- 3 Useful GUI and Terminal Based Linux Disk Scanning Tools
- 1. fsck – Filesystem Consistency Check
- 2. badblock
- 3. S.M.A.R.T System Utilities
- i. Smartctl
- ii. Gnome Disk Utility( or Disks)
- If You Appreciate What We Do Here On TecMint, You Should Consider:
- How to scan new lun / disk in Linux & HPUX
- HPUX disk scan :
- Linux Disk scan:
- How to Scan/Detect New LUNs on Linux
- Check the number of attached disks
- 1) Using /sys class file
- Method to find Channel Routes
- Another Method
- 2) Scan lun with multipath/powermt
- 3) Using Script
- Conclusion
- 6 приложений для анализа жесткого диска в Linux
- Командная строка
- Baobab
- KDirStat и GdMap
- Filelight
- Philesight
- xdiskusage
3 Useful GUI and Terminal Based Linux Disk Scanning Tools
There mainly two reasons for scanning a computer hard disk: one is to examine it for filesystem inconsistencies or errors that can result from persistent system crashes, improper closure of critical system software and more significantly by destructive programs (such as malware, viruses etc).
And another is to analyze its physical condition, where we can check a hard disk for bad sectors resulting from physical damage on the disk surface or failed memory transistor.
In this article, we will review a mix of GUI and terminal based disk scanning utilities for Linux.
In case you notice any unusual behavior from a computer hard disk or a particular partition, one of the first things you can always investigate is filesystem inconsistency or errors and there is no other better utility for performing this other than fsck.
1. fsck – Filesystem Consistency Check
fsck is a system utility used to check and optionally repair a Linux filesystem. It is a front-end for several filesystem checkers.
Warning: Try out fsck commands on test Linux servers only, unless you know what you’re doing..
Always unmount a partition first before you can run fsck on it.
In the command below, the switch:
- -t – specifies the filesystem type.
- -V – enables verbose mode.
You can find detailed usage instructions in the fsck man page:
Once you have performed filesystem inconsistency tests, you proceed to carry out physical condition assessments.
2. badblock
badblocks is a utility for scanning bad blocks or bad sectors in hard disks. Assuming you detect any bad blocks on your hard disk, you can use it together with fsck or e2fsck to instruct the kernel not to use the bad blocks.
For more information on how to check bad blocks using badblock utility, read: How to Check Bad Sectors or Bad Blocks on Hard Disk in Linux.
3. S.M.A.R.T System Utilities
S.M.A.R.T (Self-Monitoring, Analysis and Reporting Technology) is a system built into nearly all modern ATA/SATA and SCSI/SAS hard disks as well as solid-state disks.
It collects in-depth information about a supported hard disk and you can get that data using the utilities below.
i. Smartctl
smartctl is one of the two utilities under the smartmontools package. It is a command line utility which controls and monitors the S.M.A.R.T system.
To install smartmontools package, run the applicable command below for your distro:
The following is an example of a smartctl command for reporting hard disk partition health where the option -H helps to show the general partition health condition after a self-test:
Look through the smartctl man page for more usage guidelines:
There is a GUI front-end for smartctl called gsmartcontrol which can be installed as follows:
![]() GSmart Control – Linux Disk Scanning Tool
GSmart Control – Linux Disk Scanning Tool
ii. Gnome Disk Utility( or Disks)
Gnome disk utility offers a GUI for doing all the partition management related tasks such as creating, deleting, mounting partitions and beyond. It comes pre-installed in majority of mainstream Linux systems such as Ubuntu, Fedora, Linux Mint and others.
To use it on Ubuntu, open the Dash and search for Disks, on Linux Mint, open Menu and search for Disks and on Fedora, click on Activities type Disks.
![]() Gnome Disk Utility for Linux Disk Scanning
Gnome Disk Utility for Linux Disk Scanning
More importantly, it can as well provide S.M.A.R.T data and effect self-tests as in the following interface.
![]() Gnome Disk Utility for Linux Disk Scanning
Gnome Disk Utility for Linux Disk Scanning
That’s it! In this article, we reviewed hard disk scanning utilities for Linux operating system. You can share with us any utilities/tools for the same purpose, that are not mentioned in the list above or ask any related questions all in the comments.
If You Appreciate What We Do Here On TecMint, You Should Consider:
TecMint is the fastest growing and most trusted community site for any kind of Linux Articles, Guides and Books on the web. Millions of people visit TecMint! to search or browse the thousands of published articles available FREELY to all.
If you like what you are reading, please consider buying us a coffee ( or 2 ) as a token of appreciation.

We are thankful for your never ending support.
Источник
How to scan new lun / disk in Linux & HPUX
Published: December 16, 2016 | Modified: June 20, 2020
Howto guide to scan new disk or LUNs on Linux or HPUX machines. This guide explains steps to scan and then identify new disk device names.
When you add a new disk to the system, you need to scan it so that kernel will be able to identify new hardware and assign a disk name to it. Adding a new disk to the system can be local or from storage. If it’s a local then its an addition of disk in free disk slots attached to server. If its a storage LUN then it’s masking and zoning at storage level to WWN of the server.
Once the disk / LUN is made available/visible to the server, the next step is to scan it. The kernel has a know hardware tree with it. This tree needs to be updated with new disk information. To let the kernel know that a new disk is made available to server disk scanning is required. If the disk is from storage array then there are chances you have storage vendor utilities/scripts available to scan storage on server example: evainfo (for EVA storage), xpinfo (for XP12K storage), powermt (for EMC storage). If these utilities are not available, you still be able to scan them from OS.
HPUX disk scan :
In HPUX, we have dedicated ioscan command to scan new hardware. You can ask command to scan on hard disks with -C option i.e. class. Before executing this command, keep the output of previous disks ( ioscan -funC disk ) handy. This output can be compared to new output (command below) to identify new disk.
Scan output shows you all detected disks on the system and their assigned disk names in CTD format. Sometimes, ioscan unable to install special device files for newly detected disks, in such a situation you can run insf (install special files) command to ensure all detected hardware has device files in place.
New disk even can be identified by comparing directory structure of /dev/disk or /dev/dsk/ before and after the scan. Any new addition during the scan to these directories is your new disk.
Once you identify this new disk, you can use it on the system via volume managers like LVM.
Linux Disk scan:
In Linux, it’s a bit tricky since there is no direct ioscan available. First, you need to get currently available disk details using fdisk command as below :
Keep this list handy to compare with the list after scan.
Scan SCSI disks
Now, if you have connected disks via SCSI then you need to scan SCSI hosts on the server. Check the current list of hosts on the server as below :
Now, you have 4 hosts on this server (in the example above). You need to scan all these 4 hosts in order to scan new disks attached to them. This can be done by writing — — — in their respective scan files. See below commands:
This completes your scan on SCSI hosts on the server. Now you can again run fdisk command we saw previously and compare the new output with the old one. You will see a new disk being added to the system and its respective device name too.
Scan FC LUNs:
If you have connected disks via FC then you need to scan FC hosts on the server. Check the current list of hosts on the server as below :
Now there are 2 FC hosts on the server. Again we need to scan them by writing 1 to their respective issue_lip file along with scan steps from above.
This will scan your FC HBA for new visible disks. Once the command completes (check syslog for completion event), you can use fdisk command to list disks. Compare the output with ‘before scan’ output and get new disk names!
Источник
How to Scan/Detect New LUNs on Linux

When you are running RedHat Enterprise Linux 5, 6, and 7 series system with DM-Multipath and the software iSCSI initiator, you can discover new LUNs by rescanning the iSCSI service on the host.
Rescanning the service will display all the newly created LUNs that have been mapped to the host. In this tutorial I will show commands to scan and detect (outputs to check) new luns attached to the Centos/RHEL server.
To scan new FC LUNS and SCSI disks in Linux, you can use the echo script command for a manual scan that doesn’t require a system reboot. But, from Redhat Linux 5.4 onwards, Redhat introduced /usr/bin/rescan-scsi-bus.sh script to scan all the LUNs and update the SCSI layer to reflect new devices.
Check the number of attached disks
You use the below commands to identify existing LUNs and how to add newly mapped LUNs to Linux.
You can use the following command to have better output of all the disks
1) Using /sys class file
You can use the echo command to scan each scsi host device as below. Now to rescan the bus, use the following command
The three dash («- — -«) of the command act as wildcards meaning rescan everything. Remember that the three values normally stand for channel, SCSI target ID, and LUN.
- h is the HBA number
- c is the channel on the HBA
- t is the SCSI target ID
- l is the LUN.
If you don’t have the host bus number, you must list all the existing host bus number on your system with the command
Then you will scan every iscsi disk found and scan after every scanning if the new disk was detected. It means
It may look like very simple as we perform this operation but the system has much work to do in the background when you execute storage scanning commands.
Method to find Channel Routes
If we know the channel, target ID and LUN address, we can scan using that. Here, we have 4 HBA emulex cards 0, 1, 2 and 3.
Through card 0 and 2,
It has the same WWNN (World Wide Node Name) for all the 4 WWPN (World Wide Port Name).
We can do a depth research by filtering the WWPN (World Wide Port Name) to have more information
This indicates there are four Fibre Channel routes to this target.
So now, you can scan for LUNs as follows and addresss «8» is given by storage team.
The output of SCSI file is illustrated for your reference:
Another Method
If you don’t have the host bus number, you must list all the existing host bus number on your system with the command
On the output, host0 is the relevant field. As we have said earlier, we need to have the host bus number to determine what to scan
Then you will scan every iscsi disk found and scan after every scanning if the new disk was detected. It means
If you have too many hosts (from host0 to host20 for example), you can use the command below
or you can try (this one for Fibre Channel)
# for host in `ls /sys/class/fc_host/`; do
echo «1» >/sys/class/fc_host/$
done
Can devices be rescanned in Linux OS without reloading the Linux driver?
There is a procedure which forces the driver to rescan the targets and to allow a new device which is to be added. This triggers the driver to initiate a LUN discovery process.
To force a rescan from the command line, type the following command:
# echo «scsi-qlascan» > /proc/scsi//
— = qla2100, qla2200, qla2300 (2.4 kernel drivers) or qla2xxx (2.6 kernel drivers)
— = the instance number of the HBA
After executing this command, force the SCSI mid layer to do its own scan and build the device table entry for the new device by typing the following command:
# echo «scsi add-single-device 0 1 2 3» >/proc/scsi/scsi
— «0 1 2 3» = your «Host Channel ID LUN»
The scanning must be done in the above-mentioned order; first the driver (qla2300/qla2200 driver, etc.) and then the Linux SCSI mid-layer (i.e. OS scan).
2) Scan lun with multipath/powermt
You can check current multipath setup using multipath or powermt command.
If EMC powerpath is installed, check the disk/multipath status as below:
Multipath daemon will automatically add attached devices if it’s configured properly. For powermt, we need to run below command manually.
3) Using Script
You can rescan using the SCSI rescan script which will detect new luns and add it to your server automatically. You can find this script in sg3_utils package.
Conclusion
For storage (Netapp,equallogic) that use iscsi target, command iscsiadm -m session —rescan could be used to rescan when new lun added to the target. I would recommend always to use vendor-specific script or tools to scan Luns.
I hope you have enjoyed reading and let us know if you found any other method to scan storage disk devices.
Источник
6 приложений для анализа жесткого диска в Linux
Командная строка
Если вы истинный линуксоид, самый легкий и быстрый способ – использовать команду «df» в командной строке. Просто напечатать:
в терминале, и он покажет вам загрузку жесткого диска в процентах

Как видно из представленного выше скриншота, способ может служить лишь в качестве быстрого просмотра доступного места на диске и определенно не является самым удобным для проведения анализа жесткого диска.
Baobab
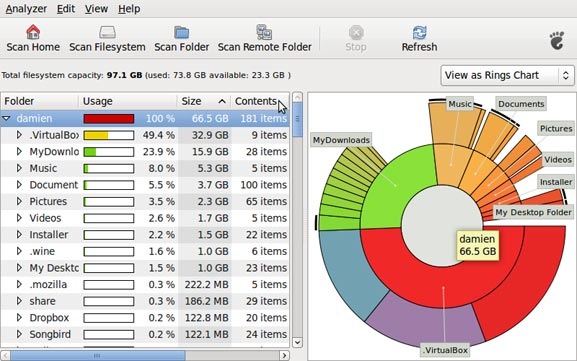
Большинство линукс-дистрибутивов с Gnome(в частности Убунту), используют Baobab в качестве дефолтного приложения для просмотра диска.Это замечательное приложение, способное до последней папки разделить и проанализировать структуру хранения данных на жестком диске. Просто укажите папки необходимые для сканирования, и в результате получите круговую диаграмму, отражающую количество занимаемого места каждым файлом.
KDirStat и GdMap
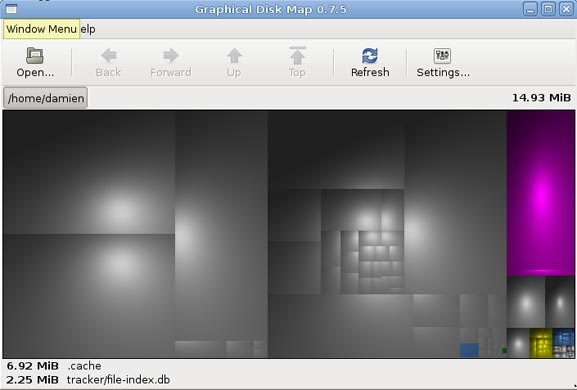
Если вы использовали WinDirStat в Windows, то согласитесь, что это очень удобное приложение, позволяющее анализировать и оптимизировать ваше дисковое пространство. Однако мало людей знают, что WinDirStat это на самом деле клон KDirStat. KDirStat обладает той же функциональностью что и WinDirStat (или может быть наоборот), за исключением того, что он предназначен для использования в Linux. Несмотря на то, что KDirStat разрабатывался для KDE, он также совместим с любым оконным менеджером X11.
KDirStat отображает ваши папки/файлы в виде прямоугольников. Чем больше размер файла, тем больше прямоугольник. Это позволяет вам быстро просмотреть файловую систему, и легко определить какая папка/файл занимают много места на жестком диске.

Gd Map это эквивалент KDirStat для Gnome, кроме того что он не отображает древовидную структуру папок, и не позволяет очищать жесткий диск.
Filelight
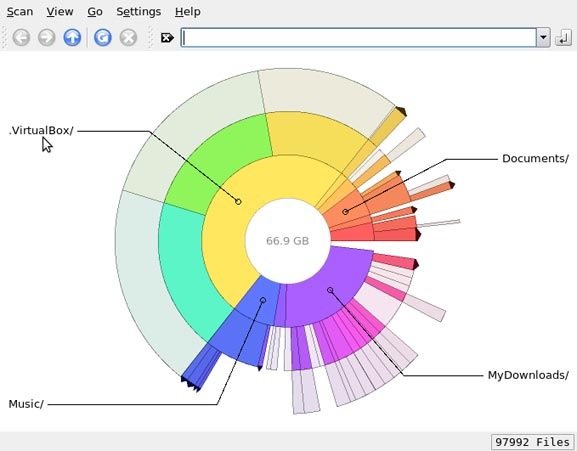
Подобно Baobab, Filelight, создает интерактивную карту концентрических, сегментированных колец, помогающих визуализировать использование диска на вашем компьютере.Вы легко можете приблизить нужные папки, путем клика на соответствующем сегменте колец.
Philesight
Philesight это реализация Filelight в качестве веб-приложения, может быть запущена на удаленном сервере, не имеющим графического интерфейса. Philesight использует командную строку для генерации PNG-файлов в браузере и включает CGI-скрипты для навигации по файловой системе. Одна из ее особенностей, красочная радуга концентрических колец, что делает ее весьма приятной на вид.

xdiskusage
xdiskusage маленькая программка, отображающая файловую систему иерархически, слева направо, прямоугольными фигурами, с размерами, соответствующими размеру файлов. Если вы сканируете домашнюю папку, слева будет находится прямоугольник, отображающий полностью папку home, а справа все файлы, находящиеся внутри нее.
Вы легко можете приближать/удалять, нужные папки, по двойному щелчку на соответствующем прямоугольнике.
Источник


