- Install and use a scanner in Windows 10
- Fix: A media driver is missing when installing Windows 10
- How can I fix A media driver your computer is missing in Windows 10?
- 1: Make sure you meet the Windows 10 requirements
- 2: Try switching the USB hub midway
- 3: Try different USB stick and use USB 2.0 port exclusively
- Run a System Scan to discover potential errors
- 4: Set USB option to Auto and disable Legacy USB if available
- 5: Try using Rufus instead of the Media Creation Tool or DVD
- Windows 10 (64bit) / versiom 1703 and missing WIA Driver (USB)
- Replies (5)
Install and use a scanner in Windows 10
When you connect a scanner to your device or add a new scanner to your home network, you can usually start scanning pictures and documents right away. If your scanner doesn’t automatically install, here’s some help to get things working.
Select one of the following sections, or select Show all. Any section you choose will open to show you more info on using your scanner.
In most cases, all you have to do to set up a scanner is to connect it to your device. Plug the USB cable from your scanner into an available USB port on your device, and turn the scanner on. If that doesn’t work, here’s a way to do it manually.
Select Start > Settings > Devices > Printers & scanners or use the following button.
Open the Printers & scanners settings
Select Add a printer or scanner. Wait for it to find nearby scanners, then choose the one you want to use and select Add device.
Note: If your scanner is included in a multifunction or All-In-One printer, you may only see the name of your printer. To see your scanner, under Printers & scanners, select your installed printer, select Manage, and then choose your scanner.
If your scanner is turned on and connected to the network, Windows should find it automatically. Available scanners can include all scanners on a network, such as Bluetooth and wireless scanners or scanners that are plugged into another device and shared on the network. Here’s a way to do it manually.
Select Start > Settings > Devices > Printers & scanners or use the following button.
Open the Printers & scanners settings
Select Add a printer or scanner. Wait for it to find nearby scanners, then choose the one you want to use, and select Add device.
If your scanner isn’t in the list, select The printer that I want isn’t listed, and then follow the instructions to add it manually.
If you use wireless access points, extenders or multiple wireless routers with separate SSIDs, you’ll need to ensure that you’re connected to the same network as the scanner for your PC to find and install it.
If you have a new wireless scanner that hasn’t been added to your home network, read the instructions that came with the scanner and check the scanner manufacturer’s website to learn more and to get up-to-date software for your scanner.
If your scanner is included in a multifunction or All-In-One printer, you may only see the name of your printer. To see your scanner, under Printers & scanners, select your installed printer, select Manage, and then choose your scanner.
You might need administrator permission to install some scanners.
If you want to see if your scanner is installed, make sure that your scanner is turned on and use the Open the Printers & scanners settings button, or follow these steps:
Under Printers & devices, look for your scanner.
Note: If your scanner is included in a multifunction or All-In-One printer, you may only see the name of your printer. To see your scanner, under Printers & scanners, select your installed printer, select Manage, and then choose your scanner.
Once your scanner is installed, use the Windows Scan app to scan a picture or document. Here’s how:
Note: Need to install the Windows Scan app? You can get the app at Microsoft Store.
Make sure your scanner is turned on.
In the search box on the taskbar, type Windows Scan, and then select Scan from the results.
Do one of the following:
Place the item you want to scan face down on the scanner’s flatbed and close the cover.
Place the item you want to scan in the scanner’s document feeder.
On the Scan page, do the following:
Under Scanner, select the scanner you want to use.
Under Source, select the location you prefer to scan from.
Under File type, select the type of file you want the scan to be saved as. For example, you can save the file in different file formats—such as JPEG, Bitmap, and PNG.
Select Show more to show the Save file to options.
Under Save file to, browse to the location where you want to save the scan.
Select Scan at the bottom of the screen to scan your document or picture.
After your scan is finished, select View to see the scanned file before you save it, or select Close to save it. You can edit the scanned document or picture in the preview that appears when you select View.
To locate a previously saved scan file, select File Explorer from the taskbar, and then select the location that you chose to save your scanned files.
If none of these instructions solved your scanner problem, there could be an issue with the scanner itself. Go to the scanner manufacturer’s website for specific troubleshooting info.
Fix: A media driver is missing when installing Windows 10

- Before we move to deal with any steps, we suggest you check the system requirements for Windows 10.
- Not every compatible USB flash stick (6 GB of storage space) will load the installation files . In case you have an alternative USB flash drive , try re-creating the setup and try installing Windows 10 again.
- For any issues regarding external USB drives, you will certainly find a solution in our dedicated category.
- The Windows 10 errors hub is full of expert articles and complete guides on how to fix Windows 10 errors. You can use it as your main information reference on this topic.
- Download DriverFix now for free (secured download)
- Launch the program and press the Scan icon
- Wait for the scan to finish and start installing the needed drivers
- DriverFix has been successfuly downloaded by 0 readers this month.
As time pass, installing Windows became a walk in the park.
Anyone remembering Windows XP and the lengthy installation process closely followed by the demoralizing driver’s lookup? Those are, luckily, the things of the past.
The USB installation media boots fine, however, the installation fails due to a missing USB hub driver.
We provided some solutions which should help you overcome this problem. Check them out below.
How can I fix A media driver your computer is missing in Windows 10?
1: Make sure you meet the Windows 10 requirements
First things first. Before we move to deal with the steps, we suggest you check the system requirements for Windows 10.
Besides applying this to a standard system configuration, we also recommend updating your BIOS (if updates are available) before you move to a clean installation of Windows 10.
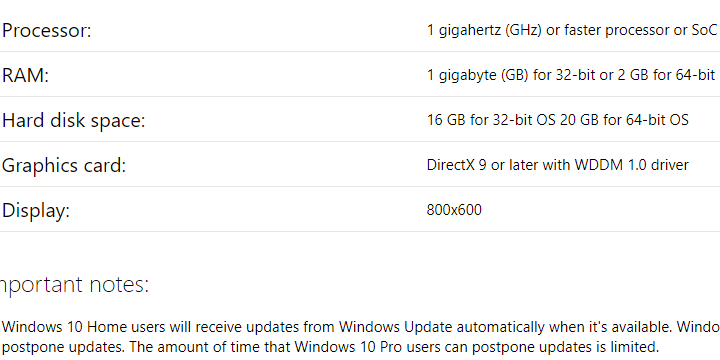
Here are the minimum system requirements you’ll need to meet in order to run Windows 10:
- CPU: 1 gigahertz (GHz) or faster processor or SoC
- RAM: 1 gigabyte (GB) for 32-bit or 2 GB for 64-bit
- HDD space: 16 GB for 32-bit OS 20 GB for 64-bit OS
- GPU: DirectX 9 or later with WDDM 1.0 driver
- Display: 800×600

Of course, in order to achieve a seamless workflow, it’s better to have at least 2 GB of RAM (3 for the 64-bit version) and much better processing power.
2: Try switching the USB hub midway
This isn’t a new problem. Not by a long stretch. A lot of users experienced the error while clean installing Windows 7 and 8, as well.
Now, it seems that the certain user provided the solution for the Windows 7 installation issue, which can, hopefully, apply to Windows 8 or, in this case, Windows 10.
Namely, he/she was able to go past the error screen with a nifty workaround. Here’s how to do it yourself:
- Create the USB installation drive with Media Creation Tool or Rufus.
- Boot from the drive and wait for the installation files to load.
- Choose your preferences and click Install now.
- When the error occurs, click Cancel, unplug the USB and plug it into a different USB port.
- Click Install now again and everything should work just fine.
This should work but we must stress that this mostly applies to users who already installed Windows 10 on a given machine before.
3: Try different USB stick and use USB 2.0 port exclusively
For some peculiar reason, not every compatible USB flash stick (6 GB of storage space) will load the installation files.
Run a System Scan to discover potential errors


In case you have an alternative USB flash drive, try re-creating the setup and try installing Windows 10 again. You can use either Media Creation Tool or any third-party application to do so.
Furthermore, if you’ve never installed Windows 10 before on the given PC, chances are that the BIOS won’t load the installation setup if you use a USB 3.0 port.
So, make sure to stick exclusively with the USB 2.0 ports while installing Windows 10. You’ll easily recognize the USB 3.0 port by the blue stripe inside.
4: Set USB option to Auto and disable Legacy USB if available
Disabling/enabling some of the options available in BIOS helped some users circumvent the error.
Firstly, if you’re installing a 64-bit version of Windows 10, we recommend disabling Legacy USB and Legacy BIOS in the BIOS (UEFI) settings.
Also, make sure to enable the AHCI prior to plugging in the flash installation drive.
Some contemporary configurations allow users to enable USB option to USB 3.0 solely. We suggest setting it to Auto. If you have the option like that in your BIOS/UEFI menu, of course.
5: Try using Rufus instead of the Media Creation Tool or DVD
Finally, if you’re unable to get through with it, starting from a scratch with the Rufus might be your way out.
Even though the Microsoft-provided Media Creation Tool usually works just fine, we suggest to try out the alternative.
Also, if you depleted options when it comes to installing Windows 10 from the USB flash, just give a DVD a try.
You can download the ISO file and burn it to DVD by using nothing else but the Windows resources. The main condition is that you have a DVD-ROM at your disposal.
Another viable solution is to upgrade to Windows 10 from Windows 7/8.1 with the Media Creation tool through the system and perform a clean reinstallation later on.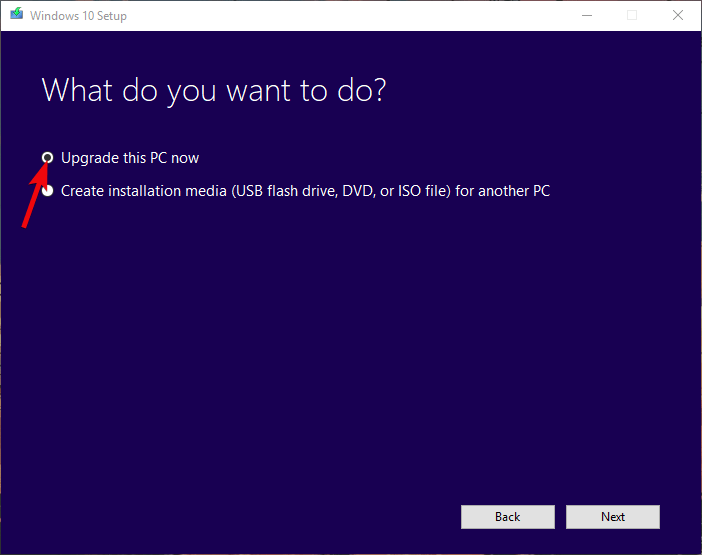
That should do it. In case you have an alternative solution or questions regarding the enlisted ones, make sure to tell us in the comments section below.
Windows 10 (64bit) / versiom 1703 and missing WIA Driver (USB)
Canon Scanner and missing Windows 10 (64 bit) WIA Driver (USB).
ref: CD 1028_DC 2028 WIA Driver (USB): Has a problem. Driver has to re-install, as Windows direct me to do.
There is no such driver available nowhere, really.
Yes, there is plenty Microsoft «partners», install me and I check your pc.
I will not do so as I do not trust them at all, as common and normal, FREE is soon pay money but basic problem will remain and if you let Microsoft «Partner»´s software do (after a payment from FREE proposal) cleaning or what ever, and Windows will not work anymore correctly and many other installed and daily use of software programs will not work anymore correctly, what is my happened feel.
So, will Microsoft assists and guide me, where to have the such WIA Driver, what Windows 10 (ver. 1703) itself demand for scanning.
You see Microsoft:
— If I let Microsoft Scanning system being installed with their free extra software from Microsoft Shop, it really will not work properly
— If (and when again) I will install proper Canon Scanner from CD (or via internet), scanning works well via its own drivers and after «try again» command, but Windows 10 (64 bit / version 1703) informs me about «Unknown device», which is the Canon Scanner.
Where to have a missing CD 1028_DC 2028 WIA Driver (USB)?¿
Windows likes to direct as well to ROOT \IMAGE \0001, mistake code 28
yes scanning works but Windows wish to o as he/she wish to?
Replies (5)
The are few reasons why this issue occur. For us to isolate the concern, we suggest that you install or update your scanner’s driver in hidden admin/built-in administrator by following these steps:
- Type CMD in the search box.
- Simultaneously press Ctrl + Shift + Enter.
- Click Yes when UAC prompt appears.
- On the command prompt, type in Net user administrator /active:yes.
- Hit Enter.
You can also check out this link about updating drivers in Windows 10. Take note to disable the hidden admin after the troubleshooting by following the same steps above and type Net user administrator /active:no.
Keep us updated with the result so we can further help.
2 people found this reply helpful
Was this reply helpful?
Sorry this didn’t help.
Great! Thanks for your feedback.
How satisfied are you with this reply?
Thanks for your feedback, it helps us improve the site.
How satisfied are you with this reply?
Thanks for your feedback.
The are few reasons why this issue occur. For us to isolate the concern, we suggest that you install or update your scanner’s driver in hidden admin/built-in administrator by following these steps:
- Type CMD in the search box.
- Simultaneously press Ctrl + Shift + Enter.
- Click Yes when UAC prompt appears.
- On the command prompt, type in Net user administrator /active:yes.
- Hit Enter.
You can also check out this link about updating drivers in Windows 10. Take note to disable the hidden admin after the troubleshooting by following the same steps above and type Net user administrator /active:no.
Keep us updated with the result so we can further help.
Thanks to response, now as follows (p.s. I do have four (4) ) table pc´s at use, in English and in Finnish):
The given line did work after no hit of space after word administration and no done both yes and after restarting
after a yes and no same «text» in Windows PowerShell prompt.
Unknown device disappeared from Device Manager, ok.
For your information;
I do have uninstalled software and I have uninstalled device; many times by days seperately, peace by peace, trying to find out what?? and why,
Also I have after removing and re-installing scanner driver each time, even Microsoft free Driver from your Store (as it does not work at all in Windows 10 normal software, even Scanning is one of it´s «point» to use it.
Secondly, point, check out «link«: Actually nothing happens, (zero results) with writing up two words: Device Manager: Nothing find out with those two words, «Name does not exists» ( = sorry).
Anyway I «went in» via other way to Device Manager and I did try to reinstall in Device Manager:
— new driver earlier for No existing devise (= i.e Scanner), even quite a many ways in «both proposed possibilities» in opened «popup window»: Results no driver etc
and now after CMD . etc done, when unknown device is not anymore existing in Device Manager:
Try to update a driver, Windows informs: Best Driver are already installed in.
but Windows Scanner itself does not work,
I do not want to reinstall «free» Windows Scanner driver via Windows Store


