- SFC и DISM: Проверка и Восстановление системных файлов в Windows
- Проверка и Восстановление системных файлов через CMD
- 1. Использование инструмента System File Checker (SFC)
- 2. Использование инструмента Deployment Image and Service Management (DISM)
- Проверка и Восстановление системных файлов через PowerShell
- 1. Использование инструмента System File Checker (SFC)
- 2. Использование инструмента Deployment Image and Service Management (DISM)
- Анализ лога CBS, какие файлы не удалось восстановить
- Learn Practical Ways To Recover Missing Files On Windows 10 [MiniTool Tips]
- Summary :
- Quick Navigation :
- Part 1 – Files Are Missing or Disappeared on Windows 10
- Part 2 – How Do You Recover Missing Files on Windows 10
- Use MiniTool Power Data Recovery to Recover Your Deleted Files
- Part 3 – Why Files and Folders Are Disappeared on Windows 10
- Reason 1: User Account Is Changed
- Reason 2: Drive Index Is Corrupted
- Reason 3: Files and Folders Are Hidden
- Reason 4: Files Have Been Moved to another Place
- Reason 5: Hard Drive Letters Get Changed
- Reason 6: Fast Startup Causes File Missing
- Reason 7: Indexing Options Needs to Be Changed
- Conclusion
- Recover Missing Files on Windows 10 FAQ
- ABOUT THE AUTHOR
SFC и DISM: Проверка и Восстановление системных файлов в Windows
Всякий раз, когда что-то идет не так с компьютером или ноутбуком, есть ряд инструментов для устранения неполадок, которые вы можете выполнить, чтобы попытаться устранить проблему. В Windows 10/8/7 есть несколько встроенных команд, которые можно использовать для проверки и восстановления поврежденных системных файлов, которые со временем вызывают проблемы при изменении.
Одним из способов устранения неполадок, связанных с Windows, является проверка системы и восстановление системных файлов. Это может помочь во всех типах проблем, таких как медленная система, синий экран смерти, внезапные сбои питания и сбои системы.
Рассмотрим, как запустить средство проверки системных файлов в Windows с помощью командной строки CMD и PowerShell, таких команд как sfc /scannow и инструмента DISM.
Проверка и Восстановление системных файлов через CMD
Средство проверки системных файлов сканирует ваш компьютер на предмет любого повреждения или изменений в системных файлах, которые в противном случае могли бы помешать нормальной работе вашего ПК. Инструменты заменяет файл правильной версией, чтобы обеспечить бесперебойную работу. С помощью командной строки можно попытаться сканировать и восстановить системные файлы поздних операционных систем, как Windows 10/8/7 /Vista. Разберем две команды sfc /scannow и DISM с помощью CMD.
1. Использование инструмента System File Checker (SFC)
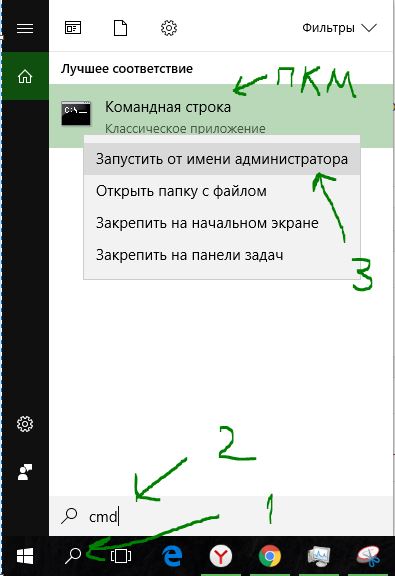
Запустите командную строку (CMD) от имени администратора. Нажмите «поиск» и напишите просто «cmd» или «командная строка», далее по ней правой кнопкой мыши и запуск от имени админа.
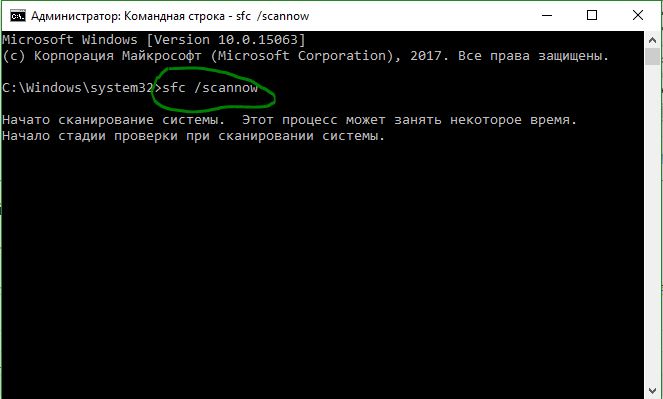
Задайте команду sfc /scannow и дождитесь окончания процесса.
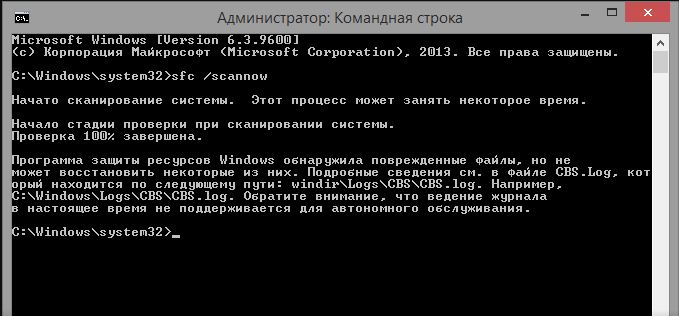
Примечание: После сканирования вашей системы будет выдан один из трех результатов:
- Ошибок системных файлов не будет.
- Будут ошибки системных файлов и Windows восстановит их автоматически.
- Windows обнаружила ошибки, но не может восстановить некоторые из них.
Если у вас показывает вариант 3, что ошибка обнаружена и система не может восстановить, то загрузитесь в безопасном режиме и проделайте заново процедуру. Советую отключить шифрование EFS и Bitlocker , если на момент проверки они имеются. Ничего не получилось? Двигаемся ниже.
2. Использование инструмента Deployment Image and Service Management (DISM)
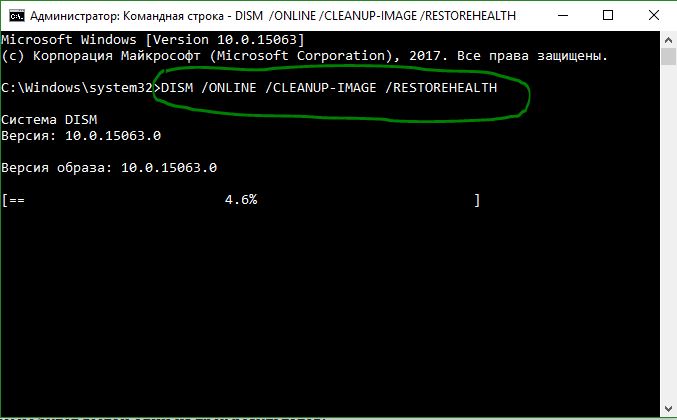
Если вышеуказанное не работает в безопасном режиме, есть один последний способ проверить повреждение в системных файлах и исправить их. Используем инструмент Deployment Image and Service Management (DISM). Команда работает с системами Windows 8/8.1/10. Откройте обратно командную строку от имени администратора и используйте следующую команду:
- DISM /ONLINE /CLEANUP-IMAGE /RESTOREHEALTH
Процесс может занять длительное время с зависанием процентной шкалы. Закончив работу, перезагрузите компьютер и запустите обратно sfc /scannow, чтобы убедиться, что ошибок нет или ошибка пропала.
Проверка и Восстановление системных файлов через PowerShell
Мы будем использовать Windows PowerShell, чтобы показать, как использовать службу обслуживания и управления DISM для сканирования и исправления поврежденных системных файлов в Windows 10. Этот способ будет более эффективный для обновления windows 10, чем командная строка.
1. Использование инструмента System File Checker (SFC)
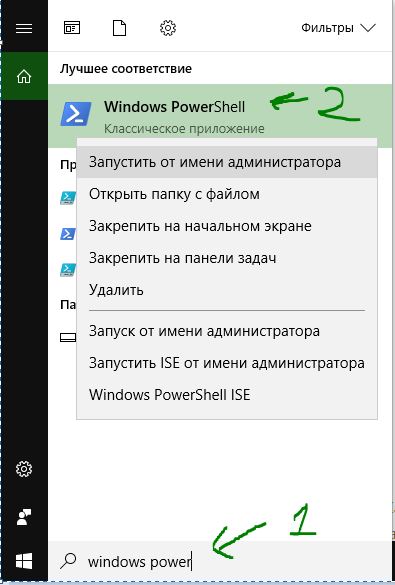
Запустите PowerShell от имени администратора. Нажмите «поиск» и наберите windows powershell, после нажмите правой кнопкой мыши и выберите от имени админа.
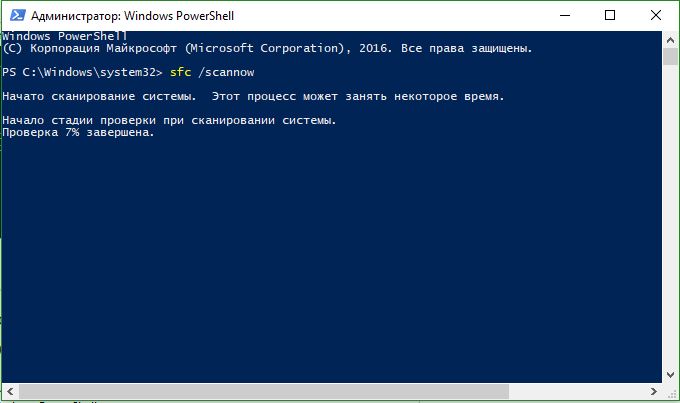
Задайте в окне PowerShell команду sfc /scannow. Если сканирование обнаружит какие-либо проблемы, Windows попытается их исправить. Если Windows не сможет их исправить, он предупредит вас, что необходимы дальнейшие исследования и действия. Двигайтесь ниже, если обнаружены ошибки.
2. Использование инструмента Deployment Image and Service Management (DISM)
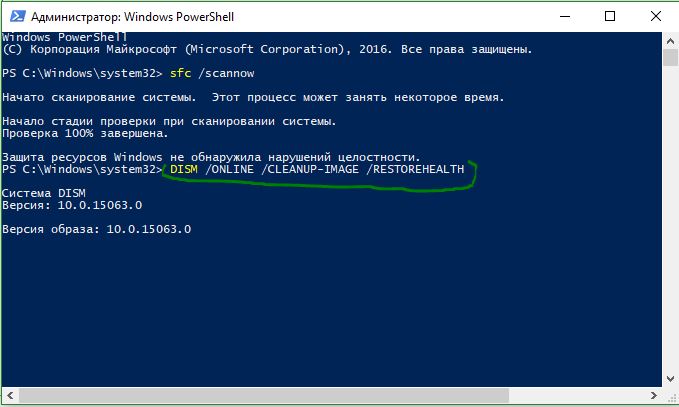
Сканирование DISM обнаруживает поврежденные системные файлы и Windows попытается исправить их, и даст вам отчет о ходе работы в конце. Если Windows не сможет найти файлы, необходимые для восстановления поврежденных системных файлов, вам также будет предоставлена информация о том, что делать дальше, со ссылкой на веб-сайт Microsoft и варианты устранения неполадок. Задайте ниже команду в окно PowerShell.
- DISM /ONLINE /CLEANUP-IMAGE /RESTOREHEALTH
Если DISM все исправил или не выявил ошибки, то перезагрузите ноутбук, компьютер и запустите для проверки обратно sfc /scannow.
Анализ лога CBS, какие файлы не удалось восстановить
Если после сканирования системных файлов, программа защиты ресурсов Windows обнаружила поврежденные файлы, но не может восстановить некоторые из них, лог файл CBS может помочь нам определить, какие именно файлы повреждены. Для этого:
- Перейдите по пути C:\Windows\Logs\CBS
- Откройте файл CBS.log в блокноте или текстовом редакторе.
- В блокноте нажмите Ctrl+F, чтобы вызвать поиск
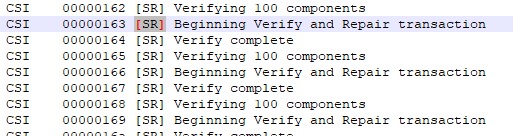
- В поиске напишите Cannot repair member file, чтобы найти файлы, которые не удается восстановить.
- Если поиск не дал результатов, то найдите записи [SR] и вы обнаружите, что все они одинаковы 100 components.
- Ищите листая вручную любые изменения, отличные от 100 components, где вы и найдете поврежденный файл или указание.
- Ориентируетесь по времени, когда вы примерно запускали сканирование SFC, так как лог может быть и за вчерашний день.

Learn Practical Ways To Recover Missing Files On Windows 10 [MiniTool Tips]
By Sarah | Follow | Last Updated January 08, 2021
Summary :
It is no doubt that files could get lost easily on a Windows 10 computer. Noticing this, I decided to tell you the exact steps to recover missing files with a professional data recovery program released by MiniTool Solution. After that, multiple reasons will be introduced to explain why files and folders are missing from Windows 10 computer.
Quick Navigation :
Part 1 – Files Are Missing or Disappeared on Windows 10
Since Windows 10 has been released, it has become very popular amongst PC users. However, have you ever experienced suddenly losing important files in Windows 10 and not knowing the exact reasons? You may have started the computer and opened a hard drive or a folder in order to access certain files, only to find they have disappeared. The following user is also troubled by such situations.
I have a couple of folders containing files I have not looked at in over a year. When I went to look at them, I cannot find them? Does Windows 10 automatically archive older unused files or folders? – asked by w1ksz on TenForums
What happened? The more important question is what can be done to fix the problem? In other words, how to recover missing files on Windows 10? Please don’t worry, I brought you good news – Windows 10 file recovery is not so difficult.
I have a piece of file recovery software that I want to share with you all — MiniTool Power Data Recovery.
- This software is totally clean (it includes no bundled spyware or virus).
- Besides, it is very user-friendly (it doesn’t require any data recovery knowledge or experience).
- More importantly, it is very powerful (it can not only help you recover your deleted files in Windows 10/8/7, but also find back files disappeared due to partition loss/damage or system crash).
In part 2, I will show you how to recover lost or deleted files from Windows 10 with this wonderful data recovery software. Then, in the third part, I plan to introduce some cases in which the disappeared files are not lost in the real sense (they may be moved to another place or hidden in somewhere of the computer).
So, are you ready to find missing files in Windows 10 and master the skills of making files appear again on Windows 10? Please roll up your sleeves and follow the tutorials given below.
Part 2 – How Do You Recover Missing Files on Windows 10
Have no background knowledge of Windows file recovery? Never had experience with missing file recovery? These are not problems you need to worry about.
- MiniTool Power Data Recovery will offer you the operational tips in almost all the software interfaces.
- Besides, I will tell you exactly what to do in this section.
This data recovery software for Windows 10 has helped many users find lost files.
Use MiniTool Power Data Recovery to Recover Your Deleted Files
The most common situation of missing files on Windows 10 is: files get deleted by users unintentionally or by some programs.
Things to do before the recovery:
First step: open your Recycle Bin to check whether the missing files are placed there. If they’re kept in this place, they’re not really deleted and no file recovery tool is needed on this occasion.

Second step:
- Click on the files and choose Restore to put them back to their original places.
- If you can’t find the files you need in Recycle Bin, please download MiniTool Power Data Recovery. Then, install it on your Windows 10 (you should remember not to choose the drive that may include missing files waiting to be recovered).
Now, please read the following paragraphs to know how to recover missing files in Windows 10. (How to recover files in a Windows Server system?)
Things to do during the recovery:
As an example, I will recover deleted files in Windows 10 in the following steps.
First step: run MiniTool Power Data Recovery and you will see the main software interface. On the left panel, you can see four recovery options: This PC, Removable Disk Drive, Hard Disk Drive, and CD/DVD Drive.
- To recover deleted files from a local drive on your Windows 10, you can select This PC.
- To recover files from a lost partition, you need to choose Hard Disk Drive Recovery.
Here, I will take This PC as an example.
On this interface, choose the partition which contains the deleted files before, and then click on the Scan button.

Second step: the software will begin to scan the partition you selected, and you will see the scan result when the scanning process is in progress. You can browse the results for the needed files.
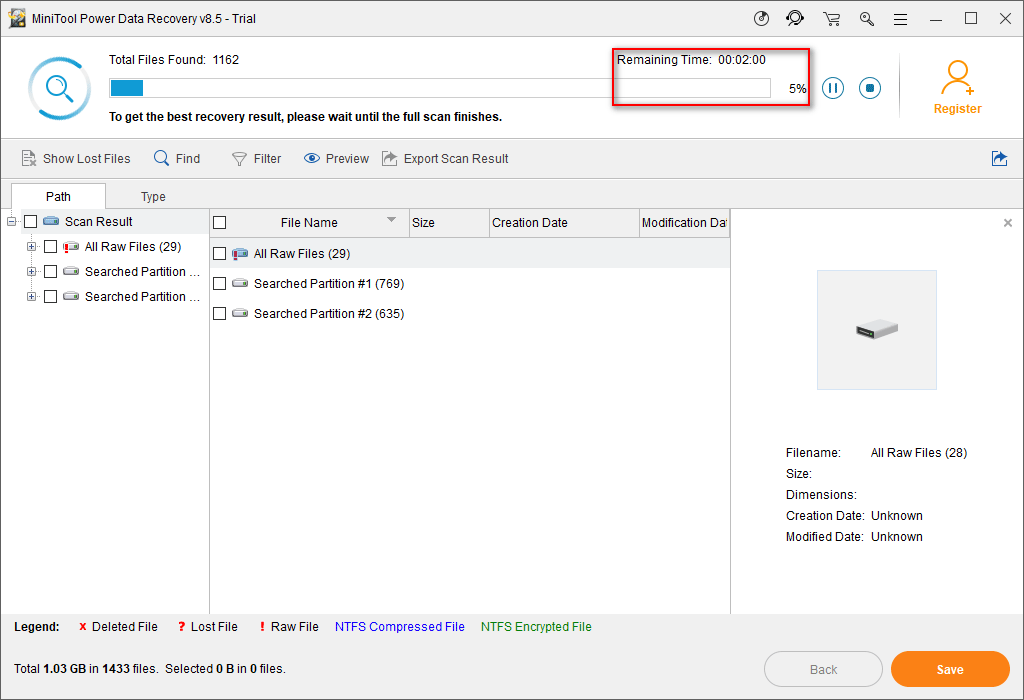
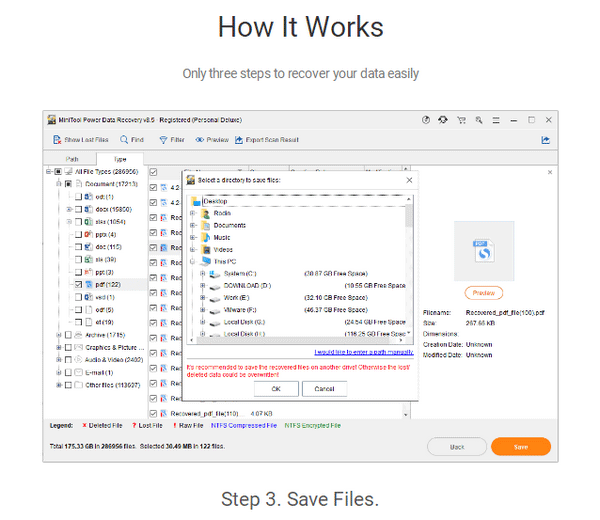
Third step: you can also wait until the full scan finishes in order to get the best recovery result. Please choose the files you want to recover and click on the Save button to trigger the interface where it tells you to Select a directory to save files. Here you can choose a location to save these selected files.
When the destination is selected, please click on the OK button. After that, your wanted files will be put back to the specified path.
Attention:
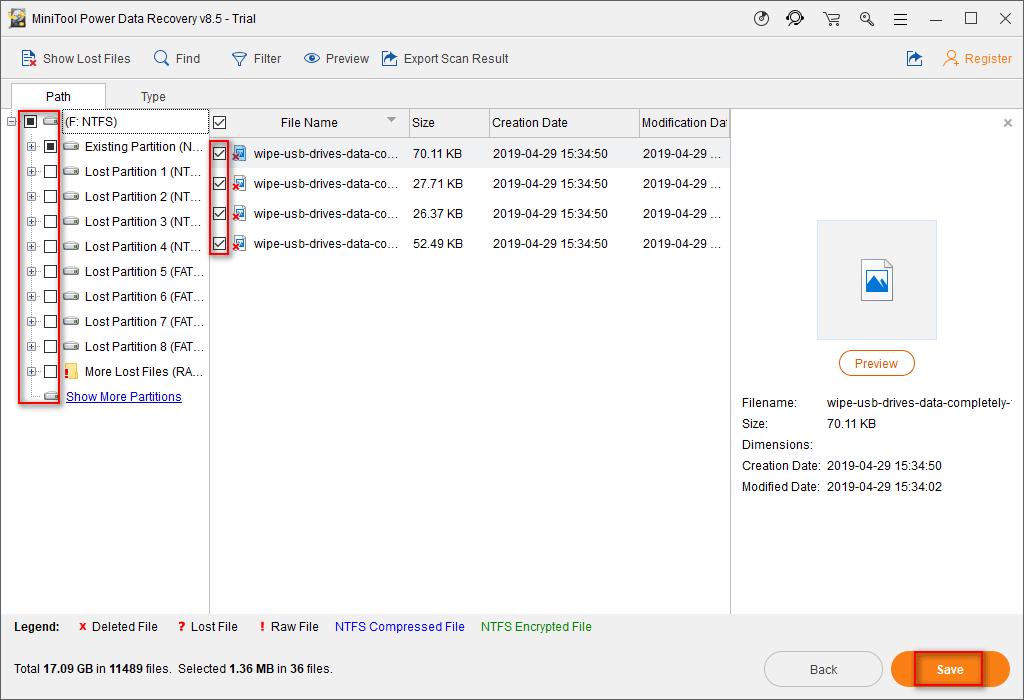
- If there are so many scanned files that make it difficult to find the files you want to recover, you can use the Find, Filter, and Preview features of this software.
- The trial edition shown in the pictures above only allows you to scan drive and preview files; if you really need to recover the found data, you should upgrade to a full version.
This is the end of Windows 10 file recovery by using MiniTool Power Data Recovery.
That’s all about the introduction to the process of how to find a disappeared file after accidental deletion.
Please read this page if you still want to know more details on how to recover deleted files on PC:
Don’t know how to retrieve deleted files on PC? The following content will show you how to get them back from devices in different situations.
This is the end of Windows 10 file recovery by using MiniTool Power Data Recovery.
Part 3 – Why Files and Folders Are Disappeared on Windows 10
- User account is changed.
- Drive index is corrupted.
- Files and folder are hidden.
- Files have been moved.
- Hard drive letters are changed.
- Files are missing due to fast startup.
- Indexing Options needs to be modified.
Sometimes, files and folders are disappearing from Windows 10, but this is not caused by mistaken deletion, formatting or other obvious wrong operations. So, today, I am going to unveil other unusual reasons why files and folders disappear on Windows 10 and the corresponding tips to fix this.
The tips will cover how to find missing files in Windows 10 when they have not, in fact, disappeared from the computer.
Reason 1: User Account Is Changed
There’s a situation in which files and folders are disappeared after you upgraded your OS to Windows 10. During the upgrading process, Win10 may create a new account for you and set it as the default one. Of course, your old account still remains, but you are not logging in with it after the upgrade.
So you need to switch to your old account to access the missing files and folders.
- Click on the Start button in the lower left corner of the screen.
- Click the user icon in the left sidebar.
- Select Sign out from the drop-down list.
- You’ll be driven to the login screen. Here, you should click to choose the different user account you want to switch to.

Watch a video to know more vivid details on how to switch between user accounts.
Reason 2: Drive Index Is Corrupted
There are also cases when files and folders are missing because the drive index has been corrupted. In this way, those files become invisible to you. In order to see them again, you should check your disk.
- Open This PC.
- Locate the correct drive here.
- Right click on the drive.
- Choose Properties from the pop-up menu.
- Navigate to the Tools tab.
- Click on Check button.
You can also run chkdsk command in Command Prompt to check the disk for errors.

Guess you may be interested in the following content:
Reason 3: Files and Folders Are Hidden
Your missing files and folders could be hidden somewhere on your computer occasionally. At this time, you ought to show hidden files and folders to make them visible again.
- Open File Explorer in Windows 10 by typing it in the search box on taskbar.
- Click on the View tab.
- Choose the Options from the submenu.
- Choose Change folders and search options from the drop-down list.
- Navigate to the View tab.
- Find Hidden files and folders under Advanced settings.
- Check Show hidden files, folders, and drives.
- Click on the Apply button.


Reason 4: Files Have Been Moved to another Place
Situation: if you find certain files are gone from the original location after you’ve finished Windows 10 upgrade. Don’t be anxious, they may not disappear from your computer; in most cases, they are only moved to another location on the hard drive.
- Click This PC icon on the desktop.
- Choose Local Disk (C:).
- Open the Users folder.
- Now, you have two choices: the first one is opening the a (user name) folder & Documents successively and the second one is opening Public to check files inside.

If your files are lost due to the update of your system, please click here to see how to recover data after Windows Update.
Also, the files may be moved to AppData\Temp folder sometimes. So you may follow this to check:
- Click on the C: drive to open.
- Choose the Users folder.
- Click on the folder named by your username.
- Open AppData folder.
- Open Local folder.
- Click on Temp folder to open.

After all of those steps, you need to do some manual searching to find the missing files and folders.
Please note that you have to enable showing hidden files and folders in order to see the AppData folder.
Click here to know how to fix when you can’t find AppData folder (it’s discovered in part 2 under How to Recover Notepad Files Unsaved).
Reason 5: Hard Drive Letters Get Changed
After you have finished upgrading your OS to Windows 10, you also probably run into this problem – the letters of drives are changed somehow. Thus, you need to check other partitions thoroughly when you can’t find some files and folders in the partition you think they should be located at. After that, you can change the drive letter to its original one as you like.
Reason 6: Fast Startup Causes File Missing
Fast Startup is said to be responsible for the disappearance of files and folders on Windows 10 sometimes. Taking this into consideration, I suggest all users turn off the Fast Startup to try to fix the issue.
- Click on the Start button.
- Choose Settings from the menu.
- Select System from the pop-up Settings window.
- Select Power & sleep from the left pane.
- Click Additional power settings from the right pane.
- Click Choose what the power button does in the left sidebar.
- Click Change settings that are currently unavailable in the System Settings window.
- Uncheck Turn on fast startup (recommended) under the Shutdown settings area.
- Click on the Save changes button.

Reason 7: Indexing Options Needs to Be Changed
When you find random files and folders missing on your Win10, you can try changing the Indexing Options to help.
- Press Start + S on the keyboard.
- Type indexing options.
- Choose Indexing Options from the result.
- Click on the Advanced button at the bottom middle.
- Find the Troubleshooting area under the Index Settings tab.
- Click on the Rebuild button.
- Click on the OK button in the Rebuild Index prompt window.

That’s all I want to share with you in terms of missing data recovery on Windows 10.
Conclusion
Maybe you are a new Windows 10 user upgrading from the previous Windows versions (such as Windows 7 and Windows 8), maybe you’re a user who has used Win10 for a period of time; either way, you may run into missing files problem.
When useful and important files & folders have disappeared from your Windows 10 computer, what should you do? Of course, you have to recover missing files on Windows 10 by adopting the methods I have introduced in part two and part three. Please remember to take measures as soon as you discover the problem. Good luck to you!
Recover Missing Files on Windows 10 FAQ
- Use Restore previous versions feature.
- Turn to backup files.
- Sync files through cloud services.
- Recover files with Command Prompt tool.
- Use powerful data recovery software.
You can recover the files easily by using Windows 10 backup feature if you have enabled it.
- Open Control Panel from start menu.
- Select System and Security.
- Choose Backup and Restore (Windows 7).
- Find the Restore section.
- Click on the Restore my files button.
- Click Browse for files and select the files you need.
- Follow the instructions to complete the recovery.
ABOUT THE AUTHOR

Position: Columnist
Sarah is working as editor at MiniTool since she was graduated from university, having rich writing experiences. Love to help other people out from computer problems, disk issues, and data loss dilemma and specialize in these things. She said it’s a wonderful thing to see people solving their problems on PC, mobile photos, and other devices; it’s a sense of accomplishment. Sarah likes to make friends in life and she’s a huge music fan.


