- Сканирование сетевых портов в Linux – команда nmap
- Зачем нужна команда nmap?
- Синтаксис команды nmap и особенности её работы
- Использование nmap
- Заключение
- How to do a Port Scan in Linux
- TCP Scanning
- UDP Scanning
- Port Scanners
- Zenmap
- Netcat
- Unicornscan
- Conclusion
- About the author
- Usama Azad
- How to Scan & Find All Open Ports with Nmap
- What Are Ports?
- How to Scan Nmap Ports
- Scan a Single Port, All Ports, or Series
- Other Types of Nmap Port Scans
- Common Ports
- Nmap Scanning Best Practices
Сканирование сетевых портов в Linux – команда nmap
Системы Linux и UNIX являются сетевыми операционными системами (ОС). Поэтому их эксплуатация неразрывно связана с администрированием и обслуживанием сетей. Независимо от сложности и масштабов сети необходимо проводить постоянный мониторинг окружения сети на предмет качества связи и соединений. А также для определения признаков или даже фактов вредительства в ней или несанкционированных атак. Одним из эффективных инструментов для выполнения подобных задач является команда nmap.
Зачем нужна команда nmap?
Основная задача команды nmap – сканирование сетевых портов указанных компьютеров для определения, какие из них используются (прослушиваются) программами-серверами. Для подавляющего числа сетевых демонов (служб) определены их стандартные порты по-умолчаню, которые они используют для своей работы. По этому признаку можно делать выводы, о том какие серверные программы запущены на том или ином компьютере в сети.
Также команда nmap – это самый доступный инструмент в руках злоумышленников для организации подготовки хакерской атаки на сеть. Ведь с помощью этой команды очень легко получить информацию, на основе которой можно судить о слабых и уязвимых местах в атакуемой системе.
Синтаксис команды nmap и особенности её работы
Команда nmap довольно проста в использовании и каким-то сложным синтаксисом не отличается:
Чего нельзя сказать о количестве, функциональности её ключей и неисчерпаемых возможностях их применения. Официальная документация, доступная на страницах man-руководства (команда man nmap), кроме того, что очень подробная (трудно встретить ещё подробнее), так ещё и имеет качественный перевод (локализации, в том числе и на русском языке) в большинстве Linux-дистрибутивов.
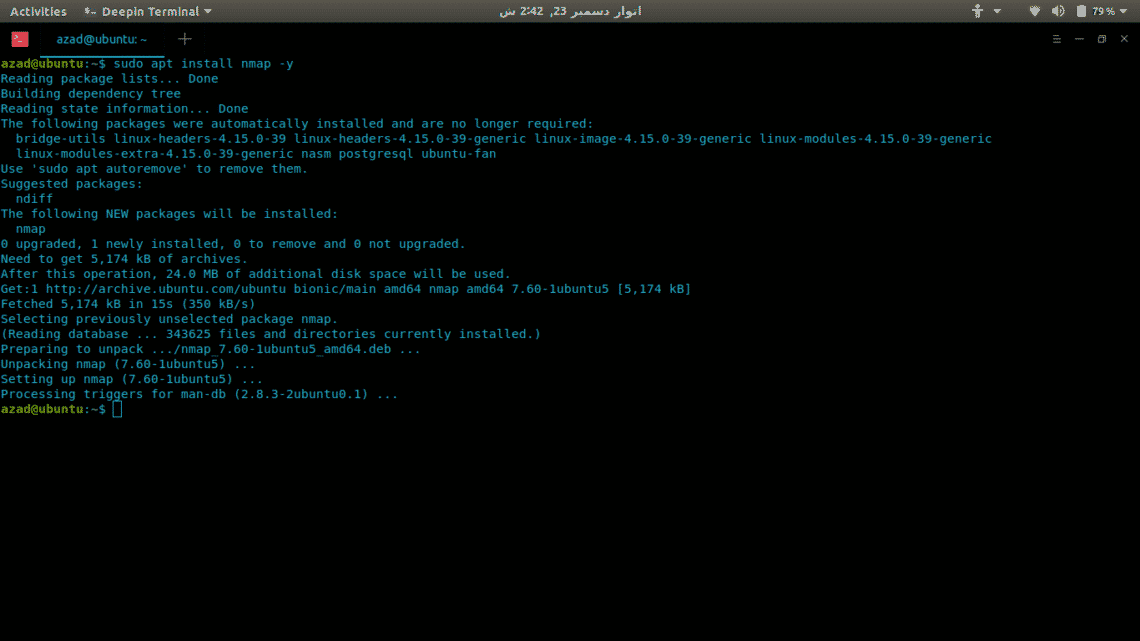
Не всегда утилита nmap предустановлена в системе, поэтому для её использования требуется установка соответствующего пакета, который обычно имеет имя nmap:
Или в Centos/Redhat
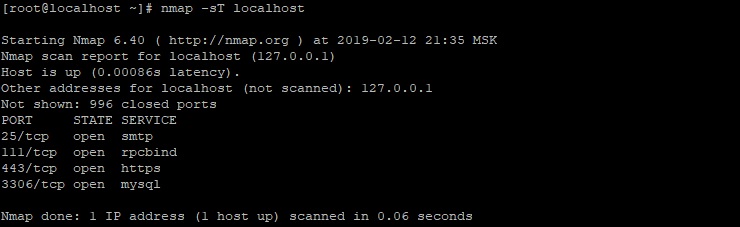
Столбец STATE показывает состояние порта: он может быть открыт (open), когда связан с использующими его службами (соединениями), закрыт (closed), когда порт не используется ни одним сервером. Также доступны состояния: unfiltered, когда nmap не смогла определить состояние порта. А также filtered – когда порт защищён (или заблокирован) брандмауэром.
Для задания хоста можно также использовать цифровую запись в виде IP-адреса. Отчёт из данного примера сформирован для самого обычного компьютера, для которого не была сконфигурирована какая-то защита. Как можно видеть, для прослушивания 80 и 443 портов для работы протоколов HTTP и HTTPS соответственно, запущен веб-сервер. Сервер баз данных (БД) MySQL также работает по стандартному порту.
Использование nmap
Если посмотреть на отчёт команды nmap для более защищённого узла, то он будет выглядеть примерно так:
Как можно видеть, на сканируемом узле (компьютере) скорее всего работает брандмауэр. Который блокирует все порты кроме тех, что отведены для работы почтового и веб- серверов. Таким образом, можно сделать вывод о том, что компьютер по указанному адресу настроен специально для работы с электронной почтой и обработкой HTTP-запросов.
Однако, одна из особенностей nmap заключается в том, что эту команду можно использовать в «хакерском» режиме. Другими словами она позволяет сканировать порты без установки реальных соединений. Это достигается путём использования неквитирующих пакетов, т. е. тех, которые похожи на имеющиеся в существующих соединениях. Но в ответ на такие пакеты можно получать пакеты диагностические. Т. е. получать информацию о соединении, при этом не быть «замеченным» брандмауэром или другим сетевым фильтром. Которые следят за «сканировщиками» портов.
Помимо всего прочего nmap умеет распознавать, какая ОС используется на проверяемом узле. Путём анализа некоторых особенностей, характерных для реализации стека TCP/IP для разных ОС. Для использования этой возможности существует ключ -O:
Как можно видеть, компьютер с IP-адресом 192.186.0.101 работает под управлением ОС Windows, предположительно Windows 7. Информация в отчёте довольно подробная, определён даже MAC-адрес сканируемого сетевого устройства.
Стоит рассмотреть некоторые примеры для команды nmap, которые могут пригодиться администраторам в их работе. Сканирование нескольких адресов:
Определение активных узлов в сети:
В этой команде используется формат записи, для обозначения подсети. В качестве параметров можно также указывать данные из файла:
Записи адресов в файле указываются также, как и в командной строке. И разделяться должны одним или несколькими пробелами или символами перевода строки. Для сканирования определённых портов:
или диапазона портов:
Сканирование всех портов:
Сканирование определённых типов портов (TCP или UDP):
Соответственно для указания UDP-портов следует указывать опцию -U. Для объединённого сканирования портов:
Для скрытого сканирования:
Сохранение результатов сканирования в файл:
Определить (с высокой степенью вероятности), работает ли на сканируемом узле брандмауэр или другой пакетный фильтр:
Определение только открытых портов:
Определение версии ОС, а также трассировки маршрутов:
Чтобы исключить из сканирования определённые адреса или подсети нужно использовать опцию —exclude:
Чтобы использовать для этой цели данные из файла, применяется опция —excludefile:
Заключение
Как можно видеть, nmap – это действительно мощный инструмент для мониторинга и анализа безопасности сетевого окружения. Следует также всегда помнить, что с помощью одной только команды nmap система или сеть могут быть досконально изучены «посторонними» или не совсем добросовестными людьми. Поэтому системные администраторы всегда должны учитывать этот фактор для обеспечения безопасности вверенных им систем.
Если вы нашли ошибку, пожалуйста, выделите фрагмент текста и нажмите Ctrl+Enter.
Источник
How to do a Port Scan in Linux
TCP Scanning
TCP is stateful protocol because it maintains the state of connections. TCP connection involves a three-way handshaking of Server socket and client-side socket. While a server-socket is listening, the client sends a SYN and then Server responds back with SYN-ACK. Client then, sends ACK to complete the handshake for the connection

To scan for a TCP open port, a scanner sends a SYN packet to the server. If SYN-ACK is sent back, then the port is open. And if server doesn’t complete the handshake and responds with an RST then the port is closed.
UDP Scanning
UDP on the other hand, is a stateless protocol and doesn’t maintain the state of connection. It also doesn’t involve three-way handshake.
To scan for a UDP port, a UDP scanner sends a UDP packet to the port. If that port is closed, an ICMP packet is generated and sent back to the origin. If this doesn’t happen, that means port is open.
UDP port scanning is often unreliable because ICMP packets are dropped by firewalls, generating false positives for port scanners.
Port Scanners
Now that we’ve looked at how port scanning works, we can move forward to different port scanners and their functionality.
Nmap is the most versatile and comprehensive port scanner available till now. It can do everything from port scanning to fingerprinting Operating systems and vulnerability scanning. Nmap has both CLI and GUI interfaces, the GUI is called Zenmap. It has a lot of varying options to do quick and effective scans. Here’s how to install Nmap in Linux.
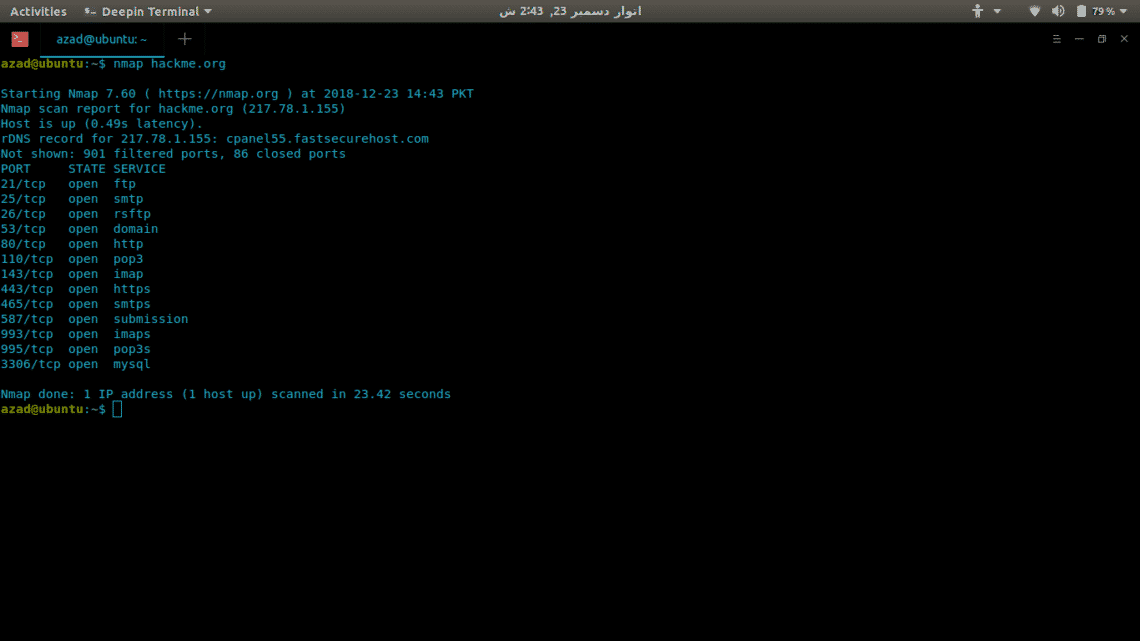
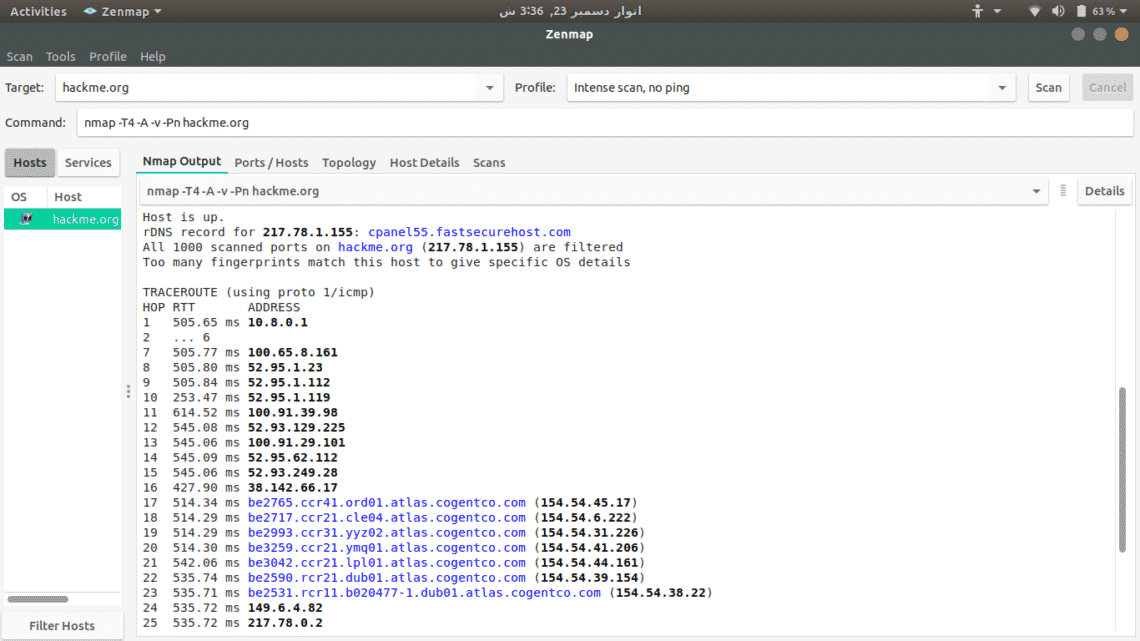
Now we’ll use Nmap to scan a server (hackme.org) for open ports and to list services available on those ports, its really easy. Just type nmap and the server address.
To scan for UDP ports, include -sU option with sudo because it requires root privileges.

There are a lot of other options available in Nmap such as:
Zenmap
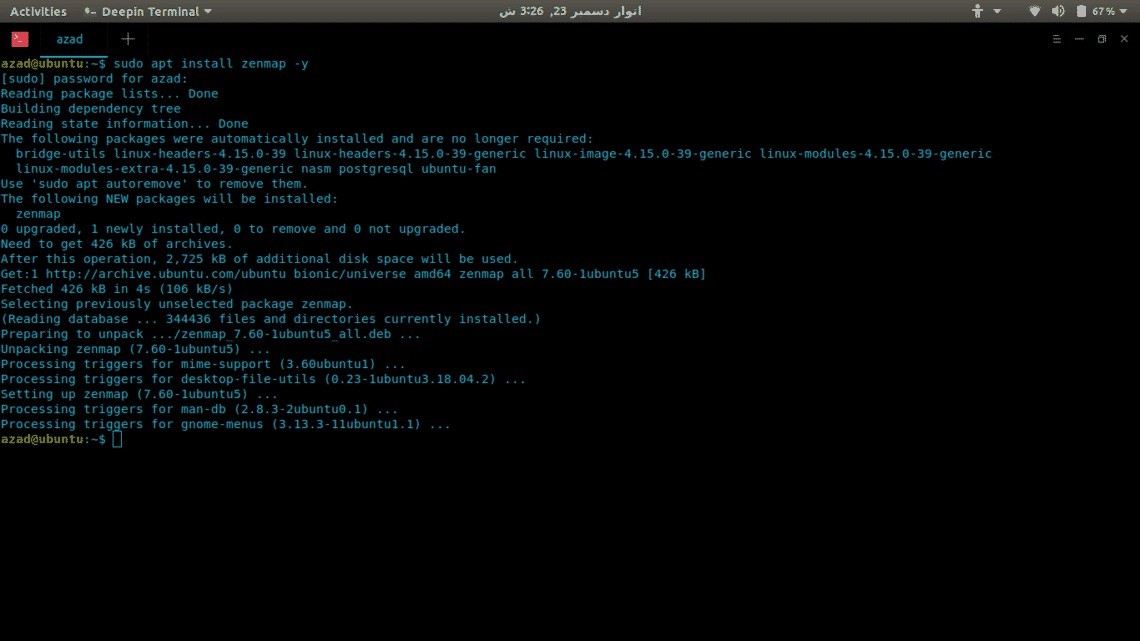
Zenmap is a GUI interface of Nmap for click-kiddies so that you won’t have to remember its commands. To install it, type
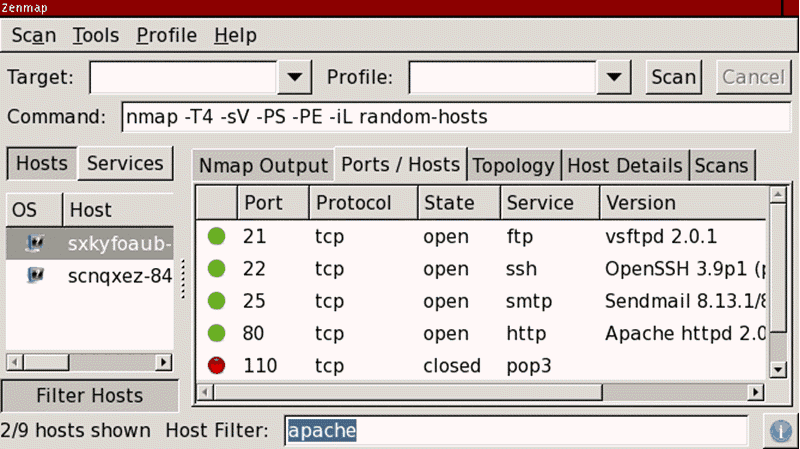
To scan a server, just type its address and select from available scan options.
Netcat
Netcat is a raw TCP and UDP port writer which can also be used as a port scanner. It uses connect scan that’s why it is not so fast like Network Mapper. To install it, type
$ sudo apt install netcat-traditional -y
To check for an open port, write
$ nc -z -v hackme.org 80
. snip.
hackme.org [ 217.78.1.155 ] 80 ( http ) open
To scan for a range of ports, type
$ nc -z -nv 127.0.0.1 20 — 80
( UNKNOWN ) [ 127.0.0.1 ] 80 ( http ) open
( UNKNOWN ) [ 127.0.0.1 ] 22 ( ssh ) open
Unicornscan
Unicornscan is a comprehensive and fast port scanner, built for vulnerability researchers. Unlike Network Mapper, it uses its own User-land Distributed TCP/IP stack. It has a lot of features that Nmap doesn’t, some of them are given,
- Asynchronous stateless TCP scanning with all variations of TCP Flags.
- Asynchronous stateless TCP banner grabbing
- Asynchronous protocol specific UDP Scanning (sending enough of a signature to elicit a response).
- Active and Passive remote OS, application, and component identification by analyzing responses.
- PCAP file logging and filtering
- Relational database output
- Custom module support
- Customized data-set views
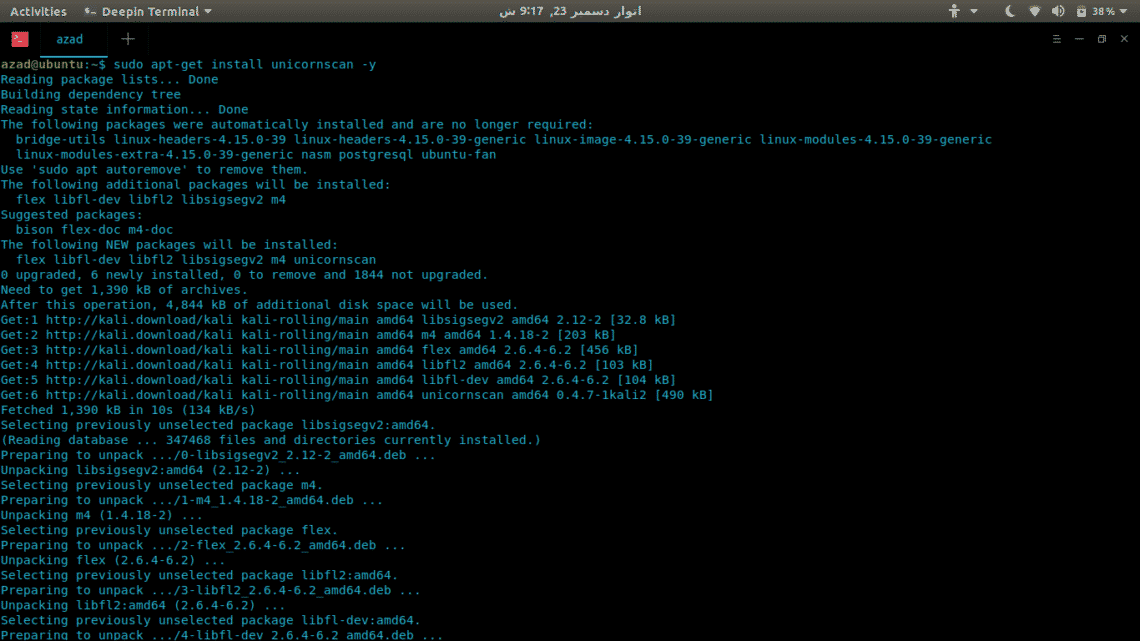
To install Unicornscan, type
$ sudo apt-get install unicornscan -y
To run a scan, write
$ sudo us 127.0.0.1
TCP open ftp [ 21 ] from 127.0.0.1 ttl 128
TCP open smtp [ 25 ] from 127.0.0.1 ttl 128
TCP open http [ 80 ] from 127.0.0.1 ttl 128
. snip.
Conclusion
Ports scanners come in handy whether you are a DevOp, Gamer or a Hacker. There is no real comparison between these scanners, none of them is perfect, each of them has its benefits and drawbacks. It completely depends upon your requirements and how you use them.
About the author

Usama Azad
A security enthusiast who loves Terminal and Open Source. My area of expertise is Python, Linux (Debian), Bash, Penetration testing, and Firewalls. I’m born and raised in Wazirabad, Pakistan and currently doing Undergraduation from National University of Science and Technology (NUST). On Twitter i go by @UsamaAzad14
Источник
How to Scan & Find All Open Ports with Nmap
Home » Networking » How to Scan & Find All Open Ports with Nmap
Nmap is the world’s leading port security network scanner. The Nmap hosted security tool can help you determine how well your firewall and security configuration is working.
This guide will show you how to use Nmap to scan all open ports on Linux systems.
- Linux operating system
- Access to a user account with sudo or root privileges
- Access to a command line/terminal window
- The apt package manager, included by default (Debian / Ubuntu)
- The yum package manager, included by default (Red Hat, CentOS)
What Are Ports?
On modern operating systems, ports are numbered addresses for network traffic. Different kinds of services use different ports by default.
For example, regular web traffic uses port 80, while the POP3 email uses port 110. One of the ways that a firewall works is by allowing or restricting traffic over a particular port.
Because the port configuration can cause a security risk, it’s critical to know which ports are open and which are blocked.
If you need assistance with installing Nmap, refer to our tutorial on How to Install Nmap on Linux systems.
How to Scan Nmap Ports
To scan Nmap ports on a remote system, enter the following in the terminal:
Replace the IP address with the IP address of the system you’re testing. This is the basic format for Nmap, and it will return information about the ports on that system.
In addition to scanning by IP address, you can also use the following commands to specify a target:
To scan a range of IP addresses (.1 – .10):
To run Nmap on a subnet:
To scan targets from a text file:
Note: The developers at nmap.org provide a test server that you can experiment on, located at scanme.nmap.org. You can use this to test your Nmap utility.
Scan a Single Port, All Ports, or Series
Nmap commands can be used to scan a single port or a series of ports:
Scan port 80 on the target system:
Scan ports 1 through 200 on the target system:
Scan (Fast) the most common ports:
To scan all ports (1 – 65535):
Other Types of Nmap Port Scans
Different types of scans can be performed:
To scan using TCP connect (it takes longer, but is more likely to connect):
To perform the default SYN scan (it tests by performing only half of the TCP handshake):
To instruct Nmap to scan UDP ports instead of TCP ports (the –p switch specifies ports 80, 130, and 255 in this example):
Run a fast scan on the target system, but bypass host discovery. (Host discovery uses ping, but many server firewalls do not respond to ping requests. This option forces the test without waiting for a reply that may not be coming):
The nmap utility can be used to detect the operating system of a particular target:
It can also be used to probe for the services that might be using different ports:
Note: The –sV option can be tuned to be more or less aggressive in its scan. Use the ––version-intensity 2 option to specify the level of testing. Replace the number 2 with a number from 0 (light testing) to 9 (run all probes). The more intense the testing, the longer the scan will take.
Common Ports
Here is a brief list of standard ports and their designations:
- 21 – FTP
- 22 – SSH
- 25 – SMTP (sending email)
- 53 – DNS (domain name service)
- 80 – HTTP (web server)
- 110 – POP3 (email inbox)
- 123 – NTP (Network Time Protocol)
- 143 – IMAP (email inbox)
- 443 – HTTPS (secure web server)
- 465 – SMTPS (send secure email)
- 631 – CUPS (print server)
- 993 – IMAPS (secure email inbox)
- 995 – POP3 (secure email inbox)
A Linux firewall can be configured to block all traffic on a particular port.
For example, a firewall can be set to block Port 80, but users won’t be able to load any website in that case. You can use firewall rules to allow some ports, but block others. Use a firewall in conjunction with other network security tools and software to scan traffic on a particular port, and to watch for suspicious traffic.
Nmap Scanning Best Practices
You should only use Nmap port scanning on servers that you own, or that you have permission to scan. Often, port-scanning is seen as an aggressive method, or a prelude to a cyber attack. It is also considered a bad practice to tie up a server’s resources by using Nmap to run repeated scans on the same target.
It is possible that during your scan, you may find unusual activity. For example, you may see a service running on an unusual port number. This means there is something strange going on, and should be investigated.
The OS and Service scanning options are helpful for scanning a particular port or service to get more information. If a service is running on a non-default port, it might be by design – or it might suggest there is a security breach.
Ports often have a default usage. Most ports under 1000 are dedicated and assigned to a specific service.
This guide provided an overview of Nmap scanning and how you can use it for testing ports in Linux. You should now understand how ports work, and why it is important to know how they are used.
Nmap adds a versatile tool to any system administrator’s arsenal for debugging and locating security flaws.
Источник


