- Пять графических утилит для сканирования в Linux
- 1. XSane
- 2. Skanlite
- 3. Gscan2pdf
- 4. Simple Scan
- 5. GIMP с Quitelnsane
- HOW-TO: Сканирование документов в PDF и DJVU
- ТОП 5: Приложения для сканирования
- Содержание
- gscan2pdf
- Gnome Scan
- Scan Tailor
- xsane
- Konrad Voelkel
- Linux, OCR and PDF: Scan to PDF/A
- Quick solution
- Long Story
- Step 1: produce high-quality input data
- Step 2 (optional): use unpaper to remove artifacts
- Step 3a: compress into a djvu
- Step 3b: compress into a pdf
- Step 3c: OCR
- Step 4 (optional): validate
- One Shell Script to Rule Them All
Пять графических утилит для сканирования в Linux
Оригинал: 5 Scanning Tools for Linux Desktop
Автор: Martins D. Okoi
Дата публикации: 6 декабря 2018 года
Перевод: А. Кривошей
Дата перевода: июнь 2019 г.
Судя по информации, которую я собрал на форумах, работать со сканерами в Linux не очень приятно. Но так быть не должно, потому что на самом деле есть эффективные опции для сканера, которые вы можете легко настроить на своем компьютере.
Именно по этой причине мы представляем вам наш список 5 утилит для сканирования в Linux. Все они бесплатные и с открытым исходным кодом.
1. XSane
XSane — это приложение, которое позволяет управлять сканерами с помощью библиотеки SANE (Scanner Access Now Easy). Это самая многофункциональная утилита для сканирования в этом списке, так что вы можете просто остановиться здесь.
Он даже может работать со сканерами, которые были разработаны для систем Mac и Windows, благодаря тому, что она сама не поддерживает сканеры, но работает с любым сканером, поддерживаемым библиотекой SANE. Вы можете использовать ее для сканирования файлов, создания фотокопий, создания факсов и в качестве плагина GIMP.
2. Skanlite
Skanlite — это легкая утилита для сканирования, которую с любовью используют в сообществе KDE.
Его функции включают в себя сохранение изображений в форматах JPG, PNG, PPM, XPM, XBM и BMP, автосохранение, предварительную настройку качества сканирования, и возможность сохранения частей отсканированных документов в виде отдельных файлов.
3. Gscan2pdf
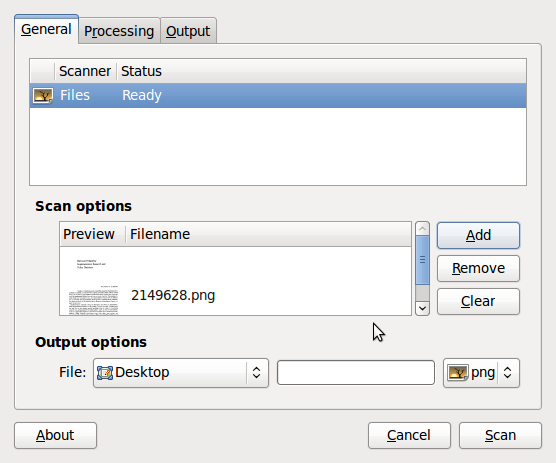
Gscan2pdf — это приложение с графическим интерфейсом, которое позволяет сканировать документы и сохранять их в файлах PDF и DjVu.
Оно совместимо практически со всеми дистрибутивами Linux и предлагает несколько функций редактирования, таких как извлеченние встроенных изображений в PDF, вращение, повышение резкости изображений, выбор страниц для сканирования, выбор стороны для сканирования, цветовой режим, разрешение и т. д.
Gscan2pdf также поддерживает OCR (оптическое распознавание символов) и множество функций, которые доступны из терминала, если вам нужна дополнительная функциональность.
4. Simple Scan
Simple Scan — это легковесная утилита для сканирования со множеством функций редактирования. Она позволяет сканировать документы одним нажатием кнопки, поворачивать и/или обрезать изображение и сохранять его в формате JPG, PNG или PDF.
По умолчанию она использует разрешение 300 точек на дюйм для фотографий и 150 точек на дюйм для текста — настройки, которые вы можете изменить в меню настроек.
Simple Scan — это приложение для сканирования по умолчанию во многих дистрибутивах Linux, включая рабочий стол GNOME, поэтому вы оно может быть уже установлено у вас.
5. GIMP с Quitelnsane
Как вы правильно поняли, GIMP способен работать с вашим сканирующим устройством, все, что вам нужно сделать, это установить Quitelnsane.
Quitelnsane — это графический интерфейс для SANE (Scanner Access Now Easy), и вы можете использовать его с GIMP для сканирования документов и их простого редактирования перед сохранением в предпочитаемом формате.
Существуют также альтернативы, такие как VueScan и TurboPrint Control, но они не являются ни бесплатными, ни открытыми. Существуют ли инструменты сканирования, достойные этого списка, которые мы пропустили? Не стесняйтесь писать свои мысли в разделе комментариев ниже.
Источник
HOW-TO: Сканирование документов в PDF и DJVU
Сберегите ваши бумажные журналы и документы, пока они не пожелтели, не распались на кусочки и не разлетелись по ветру, отсканировав их и сохранив в форматы PDF /DjVu.
Просто подключите сканер — и вы готовы к работе. Во-первых, установите gscan2pdf. Домашняя страница: http://gscan2pdf.sourceforge.net. Также его можно найти в репозиториях. Для установки через терминал введите:
Установите также pdftk. Это пакет для резки/сборки/калибровки PDF -файлов, я использую его для всех своих PDF -проектов.
Это всё, что вам потребуется. Приступим к сканированию! 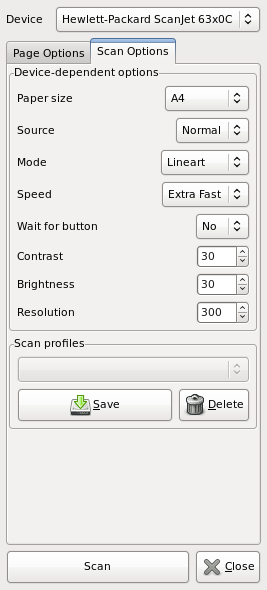 Запустите gscan2pdf и щёлкните по кнопке сканирования. Если вам повезёт, сканер обнаружится автоматически, и вы сможете изменить некоторые его настройки. Я использую сканер HP Scan-Jet 6300 с устройством автоподачи на 25 листов. Для тех, кто не знает, что такое устройство автоподачи: мой сканер немного напоминает факс. В нём можно выбирать скорость сканирования. Я всегда выбираю самую быструю. Затем нужно выбрать разрешение — я всегда выбираю 300 DPI. Теперь выберите режим сканирования.
Чёрно-белый режим отлично подходит для сканирования страниц, на которых присутствует только чёрный цвет. Не используйте его, если на странице есть фотографии, иначе они будут выглядеть ужасно. Отсканированное изображение занимает немного места.
В режиме полутонов тёмный исходный документ будет выглядеть довольно блёкло на остканированном изображении. Я никогда не использую этот режим.
Оттенки серого — используйте этот режим при сканировании чёрно-белых страниц из журналов или газет, на которых есть фотографии. В этом режиме вы получите довольно неплохую ч/б репродукцию. Файлы изображений занимают побольше места, но всё же не так много, как в полноцветном режиме.
Полноцветный режим — название говорит само за себя.
Предположим, что каждый файл содержит 20 страниц и имеет размер 20 Мб. Поэтому, когда вы соедините их все вместе, на выходе получится единый PDF -файл размером 100Мб и с уже пронумероваными страницами.  Чтобы добиться такого результата, перейдите в командную строку, затем в каталог с сохранёнными страницами и запустите pdftk. Это приложение поможет проделать все нужные операции с PDF -файлами. С его помощью мы объединим отсканированные страницы, тем самым создав одну большую книгу. Оно с лёгкостью сделает всё, что захотите, ведь pdftk имеет множество настроек, но о них я не буду рассказывать подробно. Введите в терминале:
Теперь нажмите клавишу Tab, и, как по волшебству, перед вами появится:
Как я и говорил, командная строка — это очень мощный инструмент. Ваш каталог будет просканирован и часть имени «magazine.part» подставится автоматически. Теперь нажмите 1, чтобы получилось:
Нажмите Tab ещё раз, и вы получите:
Удобно, не правда ли? Снова нажмите Tab для остальных номеров 2, 3, 4 и 5, чтобы в итоге получить следующую команду:
Затем вам нужно сказать pdftk, что вы собираетесь соединить все эти файлы вместе в один большой файл. Поэтому, добавьте следующее:
Добавьте это в конец предыдущей команды, чтобы всё вместе выглядело примерно так:
С командой verbose в конце вы будете видеть в терминале всё, что выполняет приложение. Это поможет избежать вопросов в дальнейшем. Если же вы не укажете эту команду, то не получите никакого отклика от приложения. Теперь нажимайте Enter и следите за ходом выполнения. Через несколько секунд вы снова увидите командную строку с мигающим курсором.
Теперь в каталоге вы должны увидеть ваш окончательный документ под названием my.magazine.pdf. Откройте его (с помощью программы для просмотра PDF ) и пролистайте, чтобы убедиться, что в нём действительно 100 страниц. Теперь взгляните на размер файла, он должен быть примерно 110 Мб или, возможно, чуть больше.
Теперь, чтобы переконвертировать его в формат djvu, сохранив при этом высокое качество изображений, но уменьшив размер файла, снова откройте командную строку и введите:
Источник
ТОП 5: Приложения для сканирования
Содержание
Автор — Андрей Мин (Andrew Min)
gscan2pdf

Для установки gscan2pdf, используйте пакет из репозитория universe.
Gnome Scan
Если вам не нужно ничего лишнего, посмотрите в сторону Gnome Scan (также известную как flegita). Эта программа была создана как альтернатива XSane, известной программе для сканирования на GTK+ со сложным интерфейсом. Она работает напрямую со сканером (может вставлять .png или .jpg), производить цветовую корректировку и выдавать .png. Некоторые возможности, такие как распознавание текста, еще разрабатываются (вы можете наблюдать за прогрессом на сайте http://url.fullcirclemagazine.org/9f55a4)
Gnome Scan 0.6 устанавливается пакетом gnomescan из репозитория universe.
Scan Tailor
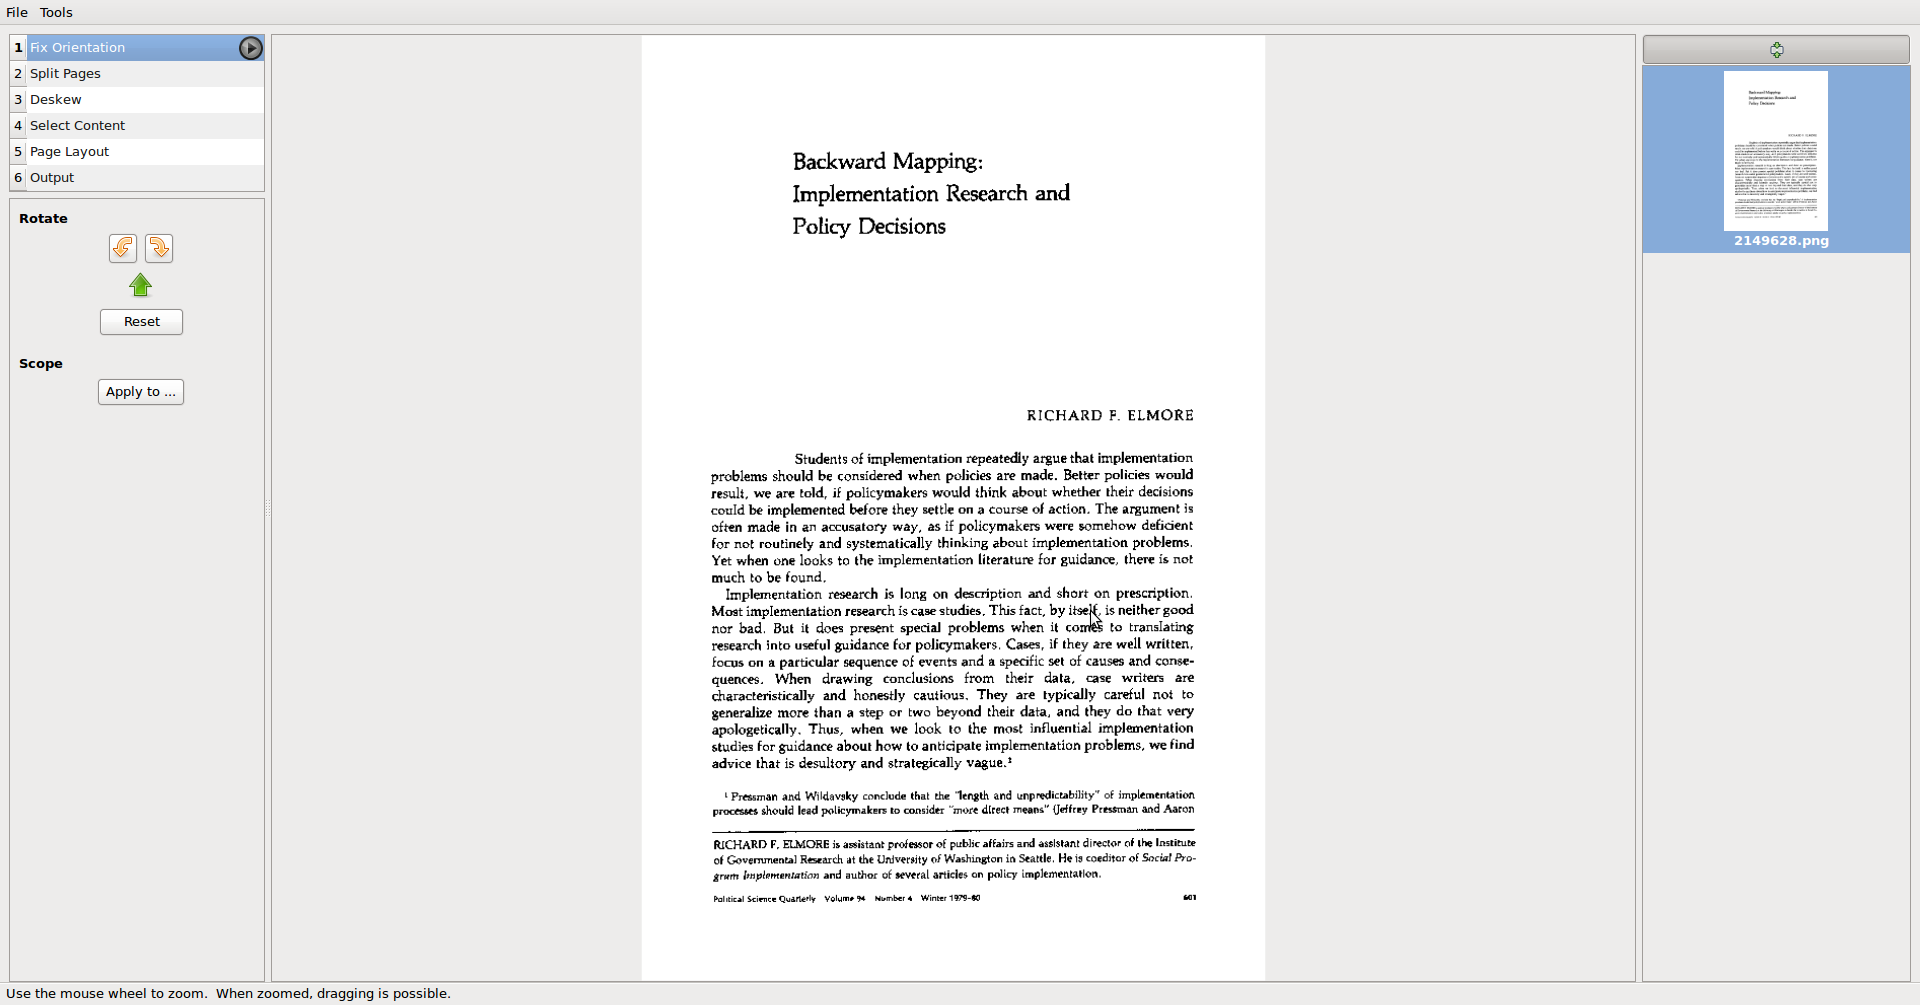
Если вы любите производить пост-обработку в отдельном приложении, то Scan Tailor — программа для вас. В его функции входит разделение страниц, наклон, вставка текста, настройка краёв, выравнивание и редактирование на выходе. В Scan Tailor вы можете изменять несколько картинок одновременно! А если вы пользуетесь KDE, вы сполна насладитесь прекрасным интерфейсом на Qt, который также хорошо выглядит и под Gnome.
Для установки Scan Tailor, используйте пакет scantailor из репозитория universe.
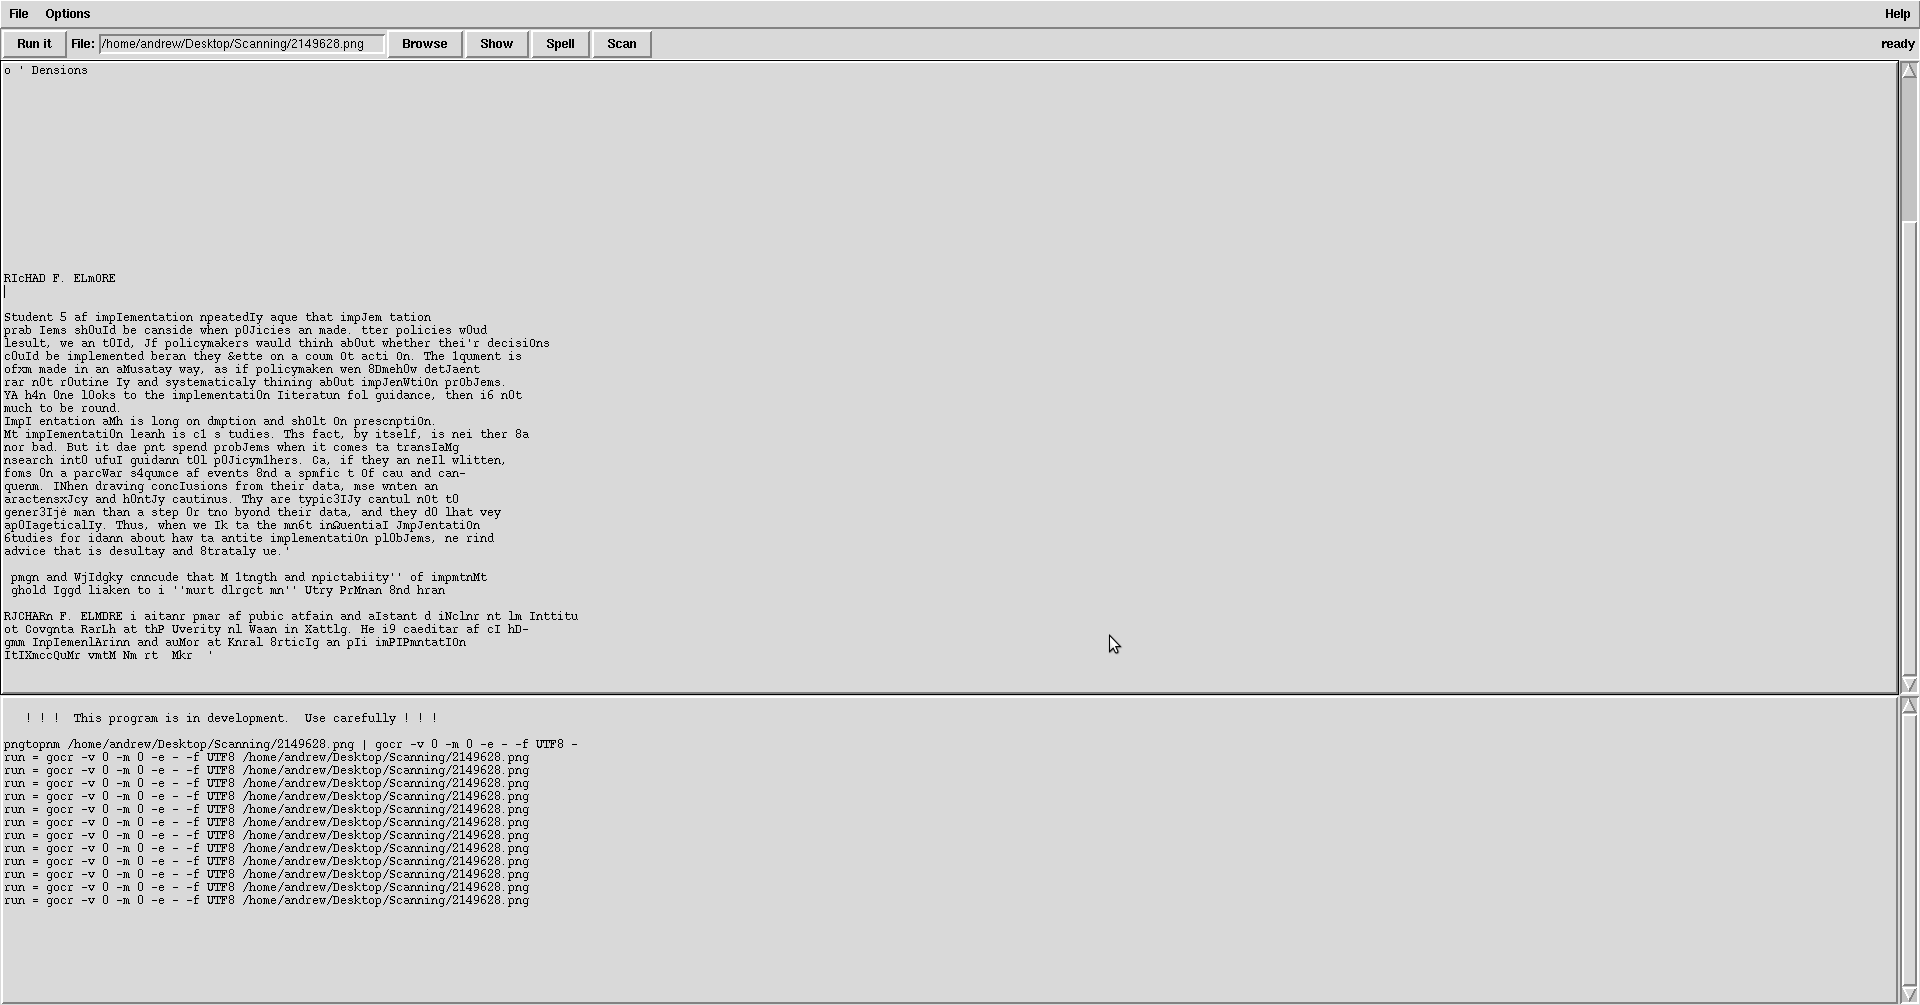
Если все, что вам нужно — распознавание текста, GOCR — хороший вариант. Это программа для распознавания текста годами была на заднем плане (gscan2pdf, например, может использовать GOCR для распознавания). Также, в GOCR имеется мощный интерфейс, написанный на Tcl.
Для установки GOCR используйте пакет gocr из репозитория universe. Графический интерфейс для программы называется gocr-tk.
xsane
В этом списке это самая старая программа, и хотя бы из-за этого её следует упомянуть. Xsane стал основой многих других программ, и ему отдают предпочтение многие опытные пользователи, хотя программа и критиковалась много раз за её интерфейс. Не смотря на свой возраст, программа обладает мощным инструментарием, в который входят развитые средства управления цветом, сохранение профилей и интеграция с большим количеством программ, включая GIMP.
Приложение можно установить при помощи пакета exsane. Начиная с Lucid похоже этот пакет нужно искать в репозитории universe.
Источник
Konrad Voelkel
Linux, OCR and PDF: Scan to PDF/A
Friday, March 29th, 2013 | Author: Konrad Voelkel
The (by far) most visited post on this blog is from 2010, about OCRing a PDF in GNU/Linux (Optical Character Recognition), and it contains a small shell script that has been improved by others several times. After having bought a new flatbed scanner, I re-investigated how to scan and OCR pdfs, how to produce DJVU files that are incredibly small and how to get metadata right. It turns out what I really ever wanted was to create PDF/A compliant documents (I just didn’t know what PDF/A was before). But let me explain the details after presenting you the quick solution. At the end, I have a shell script that scans directly to PDF/A.
A PDF/A file is a document that probably ends in .pdf, complies to the PDF 1.4 standard (not more or less), has ORCed text in the background layer to allow for full-text search, has valid metadata in XMP format (yay!), and the compression is Mixed Raster Compression (MRC) which allows quite small documents (though DJVU is still slightly smaller in my experience). Actually that was more-or-less PDF/A-1b, the basic version. Now there is also PDF/A-2, where you can use better compression (JPEG2000), transparencies and layers, since it’s based on PDF 1.7. The «A» in PDF/A stands for «archive-able».
Quick solution
In Debian or Ubuntu GNU/Linux, if you like graphical user interfaces:
sudo apt-get install scantailor
will bring you all you need. Under the hood works a command-line tool:
sudo apt-get install unpaper
and you can get ScanTailor and unpaper also from their websites.
Long Story
Step 1: produce high-quality input data
To find good hardware for scanning that is linux-compatible, just compare technical specifications and prices as usual, and once you have a list of 1—5 devices you might buy, check against the list of linux-supported devices here.
An alternative to the usual flatbed-scanner setup is to construct something yourself, like an open-source book scanner, another open-source book scanner, or a slide-scanner made from a camera.
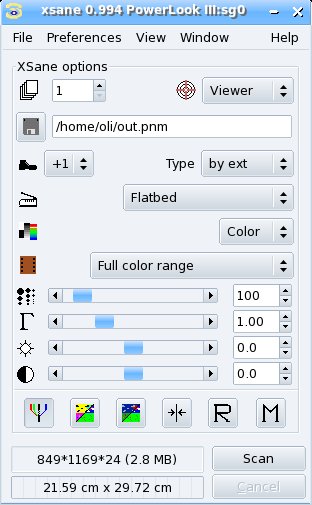
I use a recent Canon model (LiDe 210) that works without quirks in Ubuntu Linux 12.10. I use scanimage on the command-line and the GUI of XSane (though it looks a bit old-fashioned) so let me tell you about the available options on XSane. Using other scanning software on linux most probably means using another UI to the Sane library, so the options are the same.
For OCR, the best mode is «Gray» or «Color», but not lineart. The resolution should be 300 or 600 DPI, more is usually not necessary and slows down the post-processing. If you’re low on memory, high DPI values might even make the post-processing impossible. There is a green-blueish button for automatic gamma, brightness and contrast, which makes sense after acquiring a preview of your scan; I recommend the default enhancement values (1,0,0) since we can post-process later in the proper tools. Some post-processing tools have problems with 16-bit images, so I recommend to use 8-bit (in the «Bit depth»/»Standard Options» window of XSane). For most post-processing tools, it is convenient to have the scans in TIFF or PNG format. With TIFF you have to make sure that lossless compression is activated in the Sane configuration (see also these scanning tips).
Speckles and black borders on a document can make it really hard for OCR software, so you should try to get your scan as clean as possible. It may help to acquire a preview and crop manually.
To make sure the end-result contains all available relevant metadata, I recommend taking as much information as possible into your filename already, like some date attached to the scanned piece (if it is a letter or a photo) and some context. This will later make it easy to move this information into the PDF, especially if you intend to scan many pieces at once.
If you want to generate PDF/A compliant PDFs, one solution is to use LaTeX, where you just insert your scan(s) as embedded images, and the metadata where it belongs. There is a tutorial for PDF/A compliant PDFs out of LaTeX, though it doesn’t touch the issue of embedding scanned images or OCRed text.
Step 2 (optional): use unpaper to remove artifacts
UnPaper is a very useful software to remove any paper artifacts from you scans. In principle, this enables you to get printouts of your scan that look like actual re-prints, not photocopies. This is especially useful for the purpose of OCR.
The standard interface for UnPaper is the command-line, but there are also GUIs available. Some of them are still at an early stage of development, like GScan2PDF, others seem to be discontinued, like OCRFeeder, so I recommend using ScanTailor (download!).
ScanTailor has the assumption of scanning books in mind, so it is optimized to scan two pieces at once and later splitting them into two separate pages. This was useful to me when I wanted to scan large amount of photos, 4 at a time, to split them later in ScanTailor.
Warning: with high resolution come large files, so the post-processing that happens in ScanTailor can be slow. If you have a whole book to scan, I would recommend finding out the right parameters by hand and using the command-line UnPaper instead of ScanTailor.
UnPaper and ScanTailor take image files like TIFF or PNG and give back TIFF.
Step 3a: compress into a djvu
DjVu files are known for their incredible compression. However, the magic ingredient for that is «Mixed Raster Compression» (MRC), which you can also use in PDFs. Since PDF/A is the archive standard, not DJVU/A, and future tools enable MRC in PDF, DjVu will become even less important.
There is already a wonderfully detailed tutorial online on how to digitize books to DjVu, even with a section covering OCR.
As far as I know, this must be done on the command-line, since no free GUI is available.
Step 3b: compress into a pdf
To convert a bunch of TIFFs to PDF, there is tiff2pdf. You can supply some metadata on the command-line, to be included in the PDF.
Example usage:
tiff2pdf -o outputfile.pdf -z -u m -p «A4» -F inputfile.tif
The switch «-z» enables lossless compression, instead you could use «-j -q 95» for 95% quality JPEG compression. The switch «-p «A4″» specifies the paper size, which could also be «letter». The switch «-F» causes the TIFF to fit the entire PDF page, to avoid borders.
Another example:
tiff2pdf -o outputfile.pdf -z -u m -p «A4» -F -c «tiff2pdf» -a «Author Name» -t «Document Title» -s «Document Subject» -k «keyword1,keyword2,keyword3»
−e 20130324103000 inputfile.tif
This line will include the given metadata into the resulting PDF.
Step 3c: OCR
Between post-processing the scans and compressing them into a PDF, we might want to run OCR on them. I still use tesseract/hocr2pdf to do that, since the Tesseract engine tends to give me the best results, and hocr2pdf is the only solution I know of that can «hide» the scanned text in a layer behind the scanned image, to give you true full-text search without damaging the scan quality at all.
With whatever input data you have, I recommend the following:
convert -normalize -density 300 -depth 8 «inputfile.ext» «normalized-input.png»
since tesseract really works best with normalized images at density 300 and bit-depth 8, in PNG format.
Tesseract is language-sensitive. If you do
tesseract -l deu -psm 1 «normalized-input.png» «output.pdf» hocr
it will assume german text (deu=deutsch=german), but the switch «-l eng» will change that to english language. There are many other languages available (see «man tesseract»), and you can build your own.
To merge back the hocr data into the PDF, you need to convert the PNG to JPEG and run hocr2pdf:
convert «normalized-input.png» «normalized-input.jpg»
hocr2pdf -i «normalized-input.jpg» -s -o «output.pdf»
To get the metadata right, you might want to use PDFTk and its dump_data,update_info commands. Take a look at the final shell script below for this.
Step 4 (optional): validate
Standards are only good as long as you can validate them. This is possible for PDF/A with JHOVE, the JSTOR/Harvard Object Validation Environment (pronounced «jove»). Though it still has some bugs, it is the only viable free alternative to Adobe’s Windows-only Preflight mode (which is still better, I admit).
After extracting the JHOVE files to some directory «jhove», you have to edit the file «jhove/conf/jhove.conf» and change something in » something » to the actual directory (ending in «/jhove»).
After you got that right, run
java -jar jhove/bin/JhoveView.jar
to get the interactive program. You can change the configuration there as well. Once I had the strange issue that I had to change the directory from the UI tool to make the CLI tool work.
If you prefer to stay on the command-line, to automate your workflow, try
java -jar jhove/bin/JhoveApp.jar -m PDF-hul «filename.pdf»
and watch out for the lines beginning with «Status» and «ErrorMessage».
You’ll notice that most documents have some errors, but these don’t affect reading the documents. It is actually quite hard to get a PDF/A-conforming document!
I did a little survey on my own archive of PDFs, mostly from the arXiv and mathematical journals, in total about 500 PDFs. The errors (also happening in files that seem to be generated from a TeX source and files from JSTOR or Journal homepages) were:
- InfoMessage: Too many fonts to report; some fonts omitted.: Total fonts = .
- InfoMessage: Outlines contain recursive references.
- ErrorMessage: Improperly formed date
- ErrorMessage: Lexical error
- InfoMessage: File header gives version as 1.4, but catalog dictionary gives version as 1.6
- ErrorMessage: Invalid page dictionary object
- ErrorMessage: Invalid outline dictionary item
- ErrorMessage: Invalid object number in cross-reference stream
- ErrorMessage: Invalid destination object
- ErrorMessage: Invalid Resources Entry in document
- ErrorMessage: Malformed dictionary
- ErrorMessage: Malformed filter
- ErrorMessage: No PDF header
- ErrorMessage: No PDF trailer
- ErrorMessage: Unexpected error in findFonts: java.lang.ClassCastException: edu.harvard.hul.ois.jhove.module.pdf.PdfSimpleObject cannot be cast to edu.harvard.hul.ois.jhove.module.pdf.PdfDictionary
- ErrorMessage: Unexpected error in findFonts: java.lang.ClassCastException: edu.harvard.hul.ois.jhove.module.pdf.PdfStream cannot be cast to edu.harvard.hul.ois.jhove.module.pdf.PdfDictionary
The last two are obviously bugs in JHOVE. The «too many fonts to report» info message came about 100 times. About 100 files (not the same, but with some overlap) out of the total 500 were invalid PDF/A. Nevertheless, all these files are perfectly readable. It is not clear, if they would be readable on other devices, like a Kindle or Android. I also encountered printing errors with malformed PDFs in the past, so I recommend getting rid of these errors at least in the files you produce after scanning.
One Shell Script to Rule Them All
This is a script to call from the command-line, to scan and OCR directly to PDF/A.
usage:
./scan-archive.sh filename.pdf title subject keywords
example usage:
konrad@sagebird:
/Documents/scans$ ./scan-archive.sh Letter-20130324-Bankaccount-closing.pdf «Letter from the bank» finances bank,account,closing
full script (also available on pastebin):
#!/usr/bin/env bash
echo «usage: ./scan-archive.sh filename.pdf title subject keywords»
echo «scanning \»$2\» on \»$3\» about \»$4\». ($1)»
scanimage —mode Color —depth 8 —resolution 600 —format pnm > out.pnm
echo «processing. ($1)»
scantailor-cli —color-mode=black_and_white —despeckle=normal out.pnm ./
rm -rf cache out.pnm
tiff2pdf -o «$1» -z -u m -p «A4» -F -c «scanimage+unpaper+tiff2pdf+pdftk+imagemagick+tesseract+exactimage» -a «Author Name» -t «$2» -s «$3» -k «$4» out.tif
rm -f out.tif
echo «converting to PDF 1.4 ($1). »
mv «$1» «$1.bak»
pdftk «$1.bak» dump_data > data_dump.info
pdftk «$1.bak» cat output «$1.bk2» flatten
echo «OCR in lang deu. ($1)»
convert -normalize -density 300 -depth 8 «$1.bk2» «$1.png»
tesseract -l deu -psm 1 «$1.png» «$1» hocr
convert «$1.png» «$1.jpg»
hocr2pdf -i «$1.jpg» -s -o «$1.bk2»
You should obviously customize «Author Name», and you might want to skip the validation step in the end. In other environments, «A4» might be better replaced with «Letter» or «A3», depending on your scan format. Purists might want to skipt the conversion to JPEG, which I used to get smaller files. In JPEG2000, the same compression technique that powers DjVu (MRC) is possible.
Maybe one should try the suggestions here for other Tesseract UIs, but I’ll stick to the command-line for now. Any other suggestions?
Источник


