- Arch Linux User Repository
- Search Criteria
- Package Details: javafx-scenebuilder 17.0.0-1
- Package Actions
- Dependencies (1)
- Required by (0)
- Sources (1)
- Latest Comments
- moacirrf commented on 2021-01-31 14:45
- moacirrf commented on 2021-01-31 14:33
- nomisge commented on 2021-01-31 09:59
- moacirrf commented on 2020-12-18 11:18
- Redrield commented on 2017-10-10 20:31
- moacirrf commented on 2017-10-04 13:37
- spider-mario commented on 2017-10-03 19:51
- moacirrf commented on 2017-01-08 17:25
- moacirrf commented on 2016-11-21 11:43
- Release: JavaFX Scene Builder 1.1
- [+] Show/Hide Table of Contents
- We Welcome Your Comments
- Installing JavaFX Scene Builder
- System Requirements
- Installation
- Getting Started
- Running the JavaFX Scene Builder Samples
- Using NetBeans IDE
- Using Eclipse or IntelliJ IDEA
- Using the Ant Utility
- Uninstalling JavaFX Scene Builder
- 1 Installing JavaFX Scene Builder
- System Requirements
- Installation
- Getting Started
- Running the JavaFX Scene Builder Samples
- Using NetBeans IDE
- Using Eclipse or IntelliJ IDEA
- Using the Ant Utility
- Uninstalling JavaFX Scene Builder
Arch Linux User Repository
Search Criteria
Package Details: javafx-scenebuilder 17.0.0-1
Package Actions
| Git Clone URL: | https://aur.archlinux.org/javafx-scenebuilder.git (read-only, click to copy) |
|---|---|
| Package Base: | javafx-scenebuilder |
| Description: | Scene Builder is an open source tool that allows for drag and drop design of JavaFX user interfaces. |
| Upstream URL: | https://gluonhq.com/products/scene-builder/ |
| Keywords: | Gluon javafx SceneBuilder |
| Licenses: | BSD License |
| Conflicts: | gluon-scenebuilder |
| Submitter: | moacirrf |
| Maintainer: | moacirrf |
| Last Packager: | moacirrf |
| Votes: | 20 |
| Popularity: | 0.53 |
| First Submitted: | 2016-11-21 09:56 |
| Last Updated: | 2021-09-30 00:54 |
Dependencies (1)
Required by (0)
Sources (1)
Latest Comments
moacirrf commented on 2021-01-31 14:45
And i agree with you, i will drop 9,10,11,15 versions. thanks again.
moacirrf commented on 2021-01-31 14:33
Hi, nomisge Updated the version and description
nomisge commented on 2021-01-31 09:59
Since gluon only supplies two versions (https://gluonhq.com/products/scene-builder/) One for java8 and one for java11 and higher, I would only offer packages: javafx8-scenebuilder and javafx-scenebuilder (beeing the latest release). I would drop the other versions (9,10,11,15). (Also I submitted deletion requests for all out-of-date or orphaned versions not maintained by you).
I would adjust the description to the official one: «Scene Builder is an open source tool that allows for drag and drop design of JavaFX user interfaces.»
The version and release date don’t matter in the description, that’s what version and upstream URL are for.
moacirrf commented on 2020-12-18 11:18
I would like to turn this version on latest version 15, and drop the version 10 and turn this version javafx-scenebuilder-8. What you think?
Redrield commented on 2017-10-10 20:31
The top level `if` checking the value of CARCH can be replaced with source_x86_64 and source_i686, the sha1sums would be replaced with sha1sums_x86_64 and sha1sums_i686 respectively. That way, makepkg will sort out what to download and verify on its own.
moacirrf commented on 2017-10-04 13:37
I will test and update with your patch as soon as possible.
Thank you.
spider-mario commented on 2017-10-03 19:51
Wouldn’t things be easier with the PKGBUILD written like this? https://ptpb.pw/qJrD.patch
This way, a simple `updpkgsums` would update all checksums correctly on package updates.
moacirrf commented on 2017-01-08 17:25
How to install:
1- Use command:
2- Select only first package:
1 aur/javafx-scenebuilder 8.3.0-1 (4) (2,69)
Gluon Scene Builder based on debian package, this version is regognized by Netbeans.
moacirrf commented on 2016-11-21 11:43
If scene builder become slow or unresponsive etc.
Maybe is a problem with your Graphic Card driver.
You can disable Hardware Acceleration and use software pipeline instead.
1- As root, open:
/opt/SceneBuilder/app/SceneBuilder.cfg
2- Add this jvm option:
«-Dprism.order=sw» or «-Dprism.order=j2d»
j2d is deprecated, should not be used.
3- Complete example:
[Application]
app.name=SceneBuilder
app.mainjar=dist.jar
app.version=8.2.0
app.preferences.id=com/oracle/javafx/scenebuilder/app
app.mainclass=com/oracle/javafx/scenebuilder/app/SceneBuilderApp
app.classpath=
app.runtime=$APPDIR/runtime
app.identifier=com.oracle.javafx.scenebuilder.app
[JVMOptions]
-Dprism.order=sw
[JVMUserOptions]
Copyright © 2004-2021 aurweb Development Team.
AUR packages are user produced content. Any use of the provided files is at your own risk.
Источник
Release: JavaFX Scene Builder 1.1
Last Updated: October 2013
[+] Show/Hide Table of Contents
We Welcome Your Comments
If you have questions about JavaFX, please go to the forum.
Installing JavaFX Scene Builder
This guide provides information on how to download and install JavaFX Scene Builder 1.1 on a Windows, Linux, or Mac OS X system. Download information for the JavaFX Scene Builder samples is also included.
JavaFX Scene Builder is a design tool that enables you to drag and drop graphical user interface (GUI) components onto a JavaFX scene. It can help you to quickly prototype interactive applications that connect GUI components to the application logic. It automatically generates the FXML source code as you define the GUI layout for your application.
Use the following information to prepare your system for installing Scene Builder.
System Requirements
Ensure that your system meets the system requirements listed in the current JavaFX System Requirements document listed on the JavaFX 2 Release Documentation page. JavaFX Scene Builder 1.1 release supports the same platforms that are listed in JavaFX Certified System Configurations , including Linux and Mac OS X 10.8.
To successfully complete the JavaFX Scene Builder Getting Started tutorial, it is highly recommended that you also install the following software. However, there are also instructions in the JavaFX Scene Builder Getting Started tutorial that guide you to complete the sample application using only a standalone JavaFX Scene Builder tool and the ANT utility. You can also use the Using JavaFX Scene Builder with Java IDEs to get information about how to use other Java IDEs to create JavaFX projects and use Scene Builder to work on the FXML file for your application’s GUI.
Latest NetBeans IDE 7.4 software to utilize the tight integration with JavaFX Scene Builder that allows you to easily create a new FXML file, edit it using JavaFX Scene Builder, modify and compile your Java controller source files, and run the sample application used in the tutorial. Download the NetBeans IDE 7.4 software from http://netbeans.org/downloads/ . For information about configuring NetBeans IDE to run with a specific JavaFX version, see Setting Up NetBeans IDE with JavaFX at http://netbeans.org/kb/docs/java/javafx-setup.html .
Installation
The JavaFX Scene Builder is available as a Windows package (.msi) for the Windows platform, as a Debian package (.deb) or .tar.gz file for the Linux platform, and as a disk image (.dmg) for the Mac OS X platform.
Download JavaFX Scene Builder Download from the JavaFX General Availability download page at http://www.oracle.com/technetwork/java/javafx/downloads/index.html .
In the JavaFX Scene Builder 1.1 section, accept the license agreement, if you agree to its terms.
Click the link for your operating system and follow the prompts to save the installer file.
Use the following information to install in your specific platform.
( Windows platform ) Run the
javafx_scenebuilder-1_1-windows.msi installer file. Respond to the prompts as indicated in the installation wizard.
By default, the JavaFX Scene Builder software is installed at
C:\Program Files\Oracle\JavaFX Scene Builder 1.1 on a Windows platform. If you install JavaFX Scene Builder on a 64-bit Windows machine, the default installation location is C:\Program Files (x86)\Oracle\JavaFX Scene Builder 1.1.
( Linux platform ) Extract the Scene Builder 1.1 files from the javafx_scenebuilder-1_1 -linux- platform > .tar.gz to a directory on your local file system, or double-click the javafx_scenebuilder-1_1 -linux- platform > .deb file to open it with Ubuntu Software Center, where platform > is either x64 or i586.
( Mac OS X platform ) Open the
javafx_scenebuilder-1_1-macosx-universal.dmg file and drag the JavaFX Scene Builder 1.1.app application into the Applications folder.
For any of the supported platforms, the installed software contains the files similar to or a subset of what is shown in Figure 1, which shows the installation layout on a Windows platform.
Figure 1 Contents of a JavaFX Scene Builder 1.1 Installation on a Windows Platform
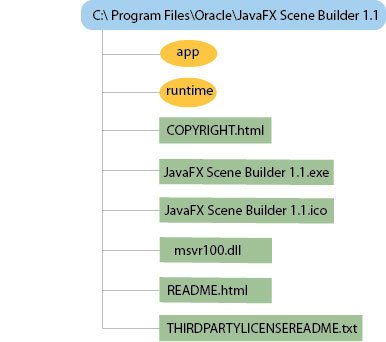
Description of «Figure 1 Contents of a JavaFX Scene Builder 1.1 Installation on a Windows Platform»
/app — Contains the JavaFX Scene Builder properties files and libraries.
/runtime — Contains a copy of the Java Runtime Environment (JRE), which includes executable files and libraries that enable JavaFX Scene Builder to run standalone.
COPYRIGHT.html — Contains the copyright information for JavaFX Scene Builder.
JavaFX Scene Builder 1.1.exe — JavaFX Scene Builder executable file.
JavaFX Scene Builder 1.1.ico — JavaFX Scene Builder icon file.
msvcr100.dll — Microsoft runtime library.
README.html — Contains a pointer to the JavaFX Scene Builder README page.
THIRDPARTYLICENSEREADME.txt — Contains the list of third-party licenses.
Getting Started
To get started with Scene Builder, read through the following documentation that can be found at http://docs.oracle.com/javafx/ .
JavaFX Scene Builder Overview — A high level overview of the JavaFX Scene Builder 1.1 tool
JavaFX Scene Builder User Guide — An introduction to the user interface and features of JavaFX Scene Builder 1.1
Getting Started with JavaFX Scene Builder — A step-by-step tutorial for creating the FXML file that defines the user interface of a simple issue tracking application
Using JavaFX Scene Builder with Java IDEs — A tutorial that gives information about how to configure the NetBeans, Eclipse, or IntelliJ IDEs to use with Scene Builder
You can also view the Getting Started with JavaFX Scene Builder 1.0 video tutorial , which shows the steps to create the same FXML file for the simple issue tracking application sample.
Running the JavaFX Scene Builder Samples
Download the JavaFX Scene Builder samples to see some applications you can build using the Scene Builder tool.
Go to the JavaFX Scene Builder Samples section of the download page at http://www.oracle.com/technetwork/java/javafx/downloads/index.html
Locate the JavaFX Scene Builder section, click the Samples link, and follow the prompts to save the javafx_scenebuilder_samples-1_1.zip file to your local file system.
Extract the sample files from the zip file to a directory on your local file system.
Each sample is a NetBeans project and also includes at least one JavaFX layout stored as an FXML file. The .fxml file can be loaded and edited using the JavaFX Scene Builder.
To run the samples, you must have the JDK 7 software with JavaFX 2.2 support or JDK 6 plus JavaFX 2.2 installed on your system. Since the samples include the corresponding NetBeans projects files, using the NetBeans IDE is the simplest way to run the sample applications. However, you can also run them using the Ant utility, Eclipse, or IntelliJ IDEA. See below for more information.
Using NetBeans IDE
Use NetBeans 7.4 or later to run the JavaFX Scene Builder samples.
Go to the javafx_scenebuilder_samples-1_1-install directory in which you extracted the sample files.
Run a sample by opening the project in the NetBeans IDE, compiling it, and then running it. For example, to run the HelloWorld application, open the HelloWorld project in NetBeans IDE, right-click the project node in the Projects window, and select Run.
Source code for each sample is in the src folder for each NetBeans project.
If you encounter an error running the sample, check that the JavaFX Platform settings in NetBeans IDE are configured correctly. For information about configuring NetBeans IDE to run with a specific JavaFX version, see Setting Up NetBeans IDE With JavaFX at http://netbeans.org/kb/docs/java/javafx-setup.html .
Using Eclipse or IntelliJ IDEA
See Using JavaFX Scene Builder with Java IDEs for information on how to run the samples in either the Eclipse or IntelliJ IDEA environment.
Using the Ant Utility
If you choose not to run the samples in NetBeans or any other IDE, you can use the Apache Ant utility (version 1.8 or later) to build and run the sample application on the command line. Enter a command similar to that in Example 1. Note that the examples shown use JDK 7.
Example 1 Ant Command to Run the Sample Application
The main values for TARGET > are clean, jar, and run. You can set TARGET > with the value of -projecthelp to get a list of available targets. For example, to run the HelloWorld application on the Windows platform, type something similar to that in Example 2.
Example 2 Using Ant to Run the HelloWorld Sample on a Windows Platform
To run the HelloWorld application on a Mac OS X platform with Java SE 7 update 40 software installed, type the command shown in Example 3.
Example 3 Using Ant to Run the HelloWorld Sample on a Mac OS Platform
Uninstalling JavaFX Scene Builder
To uninstall JavaFX Scene Builder, use the standard uninstall process for your operating system.
Источник
1 Installing JavaFX Scene Builder
This guide provides information on how to download and install JavaFX Scene Builder 2.0 on a Windows, Linux, or Mac OS X system. Download information for the JavaFX Scene Builder samples is also included.
JavaFX Scene Builder is a design tool that enables you to drag and drop graphical user interface (GUI) components onto a JavaFX scene. It can help you to quickly prototype interactive applications that connect GUI components to the application logic. It automatically generates the FXML source code as you define the GUI layout for your application.
System Requirements
Use the following information to help you get set up and successfully start using JavaFX Scene Builder.
Ensure that your system meets the requirements listed in the JDK Certified System Configurations section of the Java SE Downloads page. JavaFX Scene Builder 2.0 supports the same Java 8, Standard Edition (Java SE 8) platforms that support JavaFX, with the exception of Linux ARM.
Download JDK 8 from http://www.oracle.com/technetwork/java/javase/downloads/index.html and install it to successfully run the JavaFX Scene Builder 2.0 samples.
Download and install the latest NetBeans IDE 8.0 software to successfully complete the JavaFX Scene Builder Getting Started tutorial. The tight integration that NetBeans IDE has with JavaFX Scene Builder allows you to easily create a new FXML file, edit it using JavaFX Scene Builder, modify and compile your Java controller source files, and run the sample application used in the tutorial. Download the NetBeans IDE 8.0 software from http://netbeans.org/downloads/ .
However, there are also instructions in the JavaFX Scene Builder Getting Started tutorial that guide you to complete the sample application using only a standalone JavaFX Scene Builder tool and the ANT utility. You can also use Using JavaFX Scene Builder with Java IDEs to get information about how to use other Java IDEs to create JavaFX projects and use Scene Builder to work on the FXML file for your application’s GUI layout.
Installation
The JavaFX Scene Builder is available as a Windows package (.msi) for the Windows platform, as a Debian package (.deb) or .tar.gz file for the Linux platform, and as a disk image (.dmg) for the Mac OS X platform.
Download JavaFX Scene Builder from the Additional Resources section of the Java SE Downloads page at http://www.oracle.com/technetwork/java/javase/downloads/index.html .
In the JavaFX Scene Builder 2.0 section, accept the license agreement, if you agree to its terms.
Click the link for your operating system and follow the prompts to save the installer file.
Use the following information to install in your specific platform.
( Windows platform ) Run the
javafx_scenebuilder-2_0-windows.msi installer file. Respond to the prompts as indicated in the installation wizard.
By default, the JavaFX Scene Builder software is installed at
C:\Program Files\Oracle\JavaFX Scene Builder 2.0 on a Windows platform. If you install JavaFX Scene Builder on a 64-bit Windows machine, the default installation location is C:\Program Files (x86)\Oracle\JavaFX Scene Builder 2.0.
( Linux platform ) Extract the Scene Builder 2.0 files from the javafx_scenebuilder-2_0 -linux- platform > .tar.gz to a directory on your local file system, or double-click the javafx_scenebuilder-2_0 -linux- platform > .deb file to open it with Ubuntu Software Center, where platform > is either x64 or i586. By default, the Scene Builder application is installed at /opt/JavaFXSceneBuilder2.0/ .
( Mac OS X platform ) Open the
javafx_scenebuilder-2_0-macosx-universal.dmg file and drag the JavaFX Scene Builder 2.0.app application into the Applications folder.
For any of the supported platforms, the installed software contains the files similar to or a subset of what is shown in Figure 1-1, which shows the installation layout on a Windows platform.
Figure 1-1 Contents of a JavaFX Scene Builder 2.0 Installation on a Windows Platform

Description of «Figure 1-1 Contents of a JavaFX Scene Builder 2.0 Installation on a Windows Platform»
/app — Contains the JavaFX Scene Builder properties files and libraries.
/runtime — Contains a copy of the Java Runtime Environment (JRE), which includes executable files and libraries that enable JavaFX Scene Builder to run standalone.
COPYRIGHT.html — Contains the copyright information for JavaFX Scene Builder.
JavaFX Scene Builder 2.0.exe — JavaFX Scene Builder executable file.
JavaFX Scene Builder 2.0.ico — JavaFX Scene Builder icon file.
msvcr100.dll — Microsoft runtime library.
README.html — Contains a pointer to the JavaFX Scene Builder README page.
THIRDPARTYLICENSEREADME.txt — Contains the list of third-party licenses.
Getting Started
To get started with Scene Builder, read through the following documentation:
JavaFX Scene Builder Overview — A high level overview of the JavaFX Scene Builder 2.0 tool
JavaFX Scene Builder User Guide — An introduction to the user interface and features of JavaFX Scene Builder 2.0
Getting Started with JavaFX Scene Builder — A step-by-step tutorial for creating the FXML file that defines the user interface of a simple issue tracking application
Using JavaFX Scene Builder with Java IDEs — A tutorial that gives information about how to configure the NetBeans, Eclipse, or IntelliJ IDEs to use with Scene Builder.
Running the JavaFX Scene Builder Samples
Download the JavaFX Scene Builder samples to see some applications you can build using the Scene Builder tool.
Locate the JavaFX Scene Builder section, click the Samples link, and follow the prompts to save the javafx_scenebuilder_samples-2_0.zip file to your local file system.
Extract the sample files from the zip file to a directory on your local file system.
Each sample is a NetBeans project and also includes at least one JavaFX layout stored as an FXML file. The .fxml file can be loaded and edited using the JavaFX Scene Builder.
To run the samples, you must have the JDK 8 software. Since the samples include the corresponding NetBeans projects files, using the NetBeans IDE is the simplest way to run the sample applications. However, you can also run them using the Ant utility, Eclipse, or IntelliJ IDEA. See below for more information.
Using NetBeans IDE
Use NetBeans 8 or later to run the JavaFX Scene Builder 8.0 samples.
Go to the javafx_scenebuilder_samples-2_0-install directory in which you extracted the sample files.
Run a sample by opening the project in the NetBeans IDE, compiling it, and then running it. For example, to run the Login application, open the Login project in NetBeans IDE, right-click the project node in the Projects window, and select Run.
Source code for each sample is in the src folder for each NetBeans project.
Using Eclipse or IntelliJ IDEA
See Using JavaFX Scene Builder with Java IDEs for information on how to run the samples in either the Eclipse or IntelliJ IDEA environment.
Using the Ant Utility
If you choose not to run the samples in NetBeans or any other IDE, you can use the Apache Ant utility (version 1.8 or later) to build and run the sample application on the command line. Enter a command similar to that in Example 1-1. Note that the examples shown use JDK 8.
Example 1-1 Ant Command to Run the Sample Application
The main values for TARGET > are clean, jar, and run. You can set TARGET > with the value of -projecthelp to get a list of available targets. For example, to run the Login application on the Windows or Mac OS platform, type something similar to that in Example 1-2.
Example 1-2 Using Ant to Run the Login Sample
Uninstalling JavaFX Scene Builder
To uninstall JavaFX Scene Builder, use the standard uninstall process for your operating system.
Источник


