- Operating System — Process Scheduling
- Definition
- Process Scheduling Queues
- Two-State Process Model
- Schedulers
- Long Term Scheduler
- Short Term Scheduler
- Medium Term Scheduler
- Comparison among Scheduler
- Context Switch
- Processor Scheduling in Windows 10 for better performance
- Processor Scheduling in Windows 10
- Everything about how to schedule tasks in Windows 10
- What do you need to know about Task Scheduler?
- 1. Types of triggers
- Triggers for a schedule
- Triggers for log on
- Triggers for idle state
- Triggers for an event
- Triggers on workstation lock
- Advanced settings of triggers
- 2. Types of actions
- Action that activates a program
- Action that sends an e-mail
- Action that displays a message
- 3. Types of Task Conditions
- Idle conditions
- Power conditions
- Network conditions
- 4. Task settings
- Allow tasks to run on demand
- Run a task as soon as possible after a scheduled start is missed
- If task fails, restart every time period
- Stop a task if it runs longer than time period
- If the task is not scheduled to run again, delete if after time period
- If a task is already running you must know a few things
- 5. Task security context
- 6. How to use the Task Scheduler
- Start Task Scheduler
- Create a task
- How to change an already created task
- How to delete a task
- How to create a Task Folder
- How to delete a Task Folder
- How to import a task
- How to export a task
- How to run a task on demand
- How to stop a running task
- How to enable a task to run
- How to disable a task for running
- How to view task properties and history
Operating System — Process Scheduling
Definition
The process scheduling is the activity of the process manager that handles the removal of the running process from the CPU and the selection of another process on the basis of a particular strategy.
Process scheduling is an essential part of a Multiprogramming operating systems. Such operating systems allow more than one process to be loaded into the executable memory at a time and the loaded process shares the CPU using time multiplexing.
Process Scheduling Queues
The OS maintains all PCBs in Process Scheduling Queues. The OS maintains a separate queue for each of the process states and PCBs of all processes in the same execution state are placed in the same queue. When the state of a process is changed, its PCB is unlinked from its current queue and moved to its new state queue.
The Operating System maintains the following important process scheduling queues −
Job queue − This queue keeps all the processes in the system.
Ready queue − This queue keeps a set of all processes residing in main memory, ready and waiting to execute. A new process is always put in this queue.
Device queues − The processes which are blocked due to unavailability of an I/O device constitute this queue.
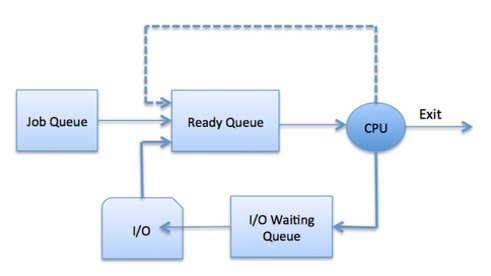
The OS can use different policies to manage each queue (FIFO, Round Robin, Priority, etc.). The OS scheduler determines how to move processes between the ready and run queues which can only have one entry per processor core on the system; in the above diagram, it has been merged with the CPU.
Two-State Process Model
Two-state process model refers to running and non-running states which are described below −
| S.N. | State & Description | |||||||||||||||||||||||
|---|---|---|---|---|---|---|---|---|---|---|---|---|---|---|---|---|---|---|---|---|---|---|---|---|
| 1 |
| S.N. | Long-Term Scheduler | Short-Term Scheduler | Medium-Term Scheduler |
|---|---|---|---|
| 1 | It is a job scheduler | It is a CPU scheduler | It is a process swapping scheduler. |
| 2 | Speed is lesser than short term scheduler | Speed is fastest among other two | Speed is in between both short and long term scheduler. |
| 3 | It controls the degree of multiprogramming | It provides lesser control over degree of multiprogramming | It reduces the degree of multiprogramming. |
| 4 | It is almost absent or minimal in time sharing system | It is also minimal in time sharing system | It is a part of Time sharing systems. |
| 5 | It selects processes from pool and loads them into memory for execution | It selects those processes which are ready to execute | It can re-introduce the process into memory and execution can be continued. |
Context Switch
A context switch is the mechanism to store and restore the state or context of a CPU in Process Control block so that a process execution can be resumed from the same point at a later time. Using this technique, a context switcher enables multiple processes to share a single CPU. Context switching is an essential part of a multitasking operating system features.
When the scheduler switches the CPU from executing one process to execute another, the state from the current running process is stored into the process control block. After this, the state for the process to run next is loaded from its own PCB and used to set the PC, registers, etc. At that point, the second process can start executing.
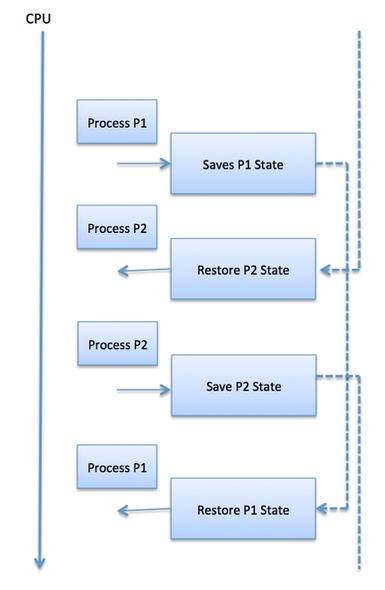
Context switches are computationally intensive since register and memory state must be saved and restored. To avoid the amount of context switching time, some hardware systems employ two or more sets of processor registers. When the process is switched, the following information is stored for later use.
- Program Counter
- Scheduling information
- Base and limit register value
- Currently used register
- Changed State
- I/O State information
- Accounting information
Processor Scheduling in Windows 10 for better performance
Depending on the usage of your Windows 10/8/7 computer, you can configure processor scheduling, so that it gives you the best performance while using Programs or for Background Processes. You can make this adjustment easily via the Control Panel.
Processor Scheduling in Windows 10
To begin the process, type sysdm.cpl in Run box and hit Enter to open the System Properties. Select the Advanced tab and under Performance, click on Settings. In the Performance Options box, select the Advanced tab again. You will see a section Processor Scheduling.

There are 2 settings you can choose:
- Adjust for best performance of Programs
- Adjust for best performance of Background Services.
This setting changes the DWORD value of Win32PrioritySeparation under the following registry hive:
Just in case you wish to know, the PriorityControl key defines the foreground vs. background priority differential. The possible default values for Win32PrioritySeparation REG_DWORD 0, 1, or 2, with the default being 0x2.
This default value specifies the priority to give to the application running in the foreground. This application receives more processor time relative to other applications running in the background, explains TechNet.. The values here correlate to the following options in the Tasking dialog box: Value Meaning
- 0 Foreground and background applications equally responsive
- 1 Foreground application more responsive than background
- 2 Best foreground application response time.
Coming back, if you have NOT changed this setting at all, and you were to open the Windows Registry, you would see Win32PrioritySeparation have a value 2. These screenshots are from my Windows 8 Pro.
Now, if via the Control Panel, as shown above, you select Adjust for best performance of Background Services and click Apply, you will find that its sets Win32PrioritySeparation to 18 (decimal 24) for Background Services.
If you now select Adjust for best performance of Programs, you will find that it sets Win32PrioritySeparation to 26 (decimal 38) for Programs.
Using this feature, you can set up Windows, so that it is optimized to run programs or foreground services OR Background Services, like printing or backing up, while you work in another program, simply by adjusting Processor Scheduling. This way, Windows then knows how to distribute or allocate the available resources, to best perform these tasks.
If you are using a desktop, you may leave the setting at its default or choose Adjust for best performance of Programs. Let us know if this results in smoother, faster response time for your programs or foreground services.
However, if you use your PC as a Server or if you constantly have background services, such as printing or disk backup that run while you work and you want them to respond faster, you can have Windows share processor resources equally between background and foreground programs by choosing the other option, ie. Adjust for best performance of Background Services.
So you see, Windows now gives you an easy way to set Processor Scheduling. If you are an advanced user and wish to set the values manually, you may use the follow the manual way in this post on how to get the best performance for programs or background services.
Everything about how to schedule tasks in Windows 10


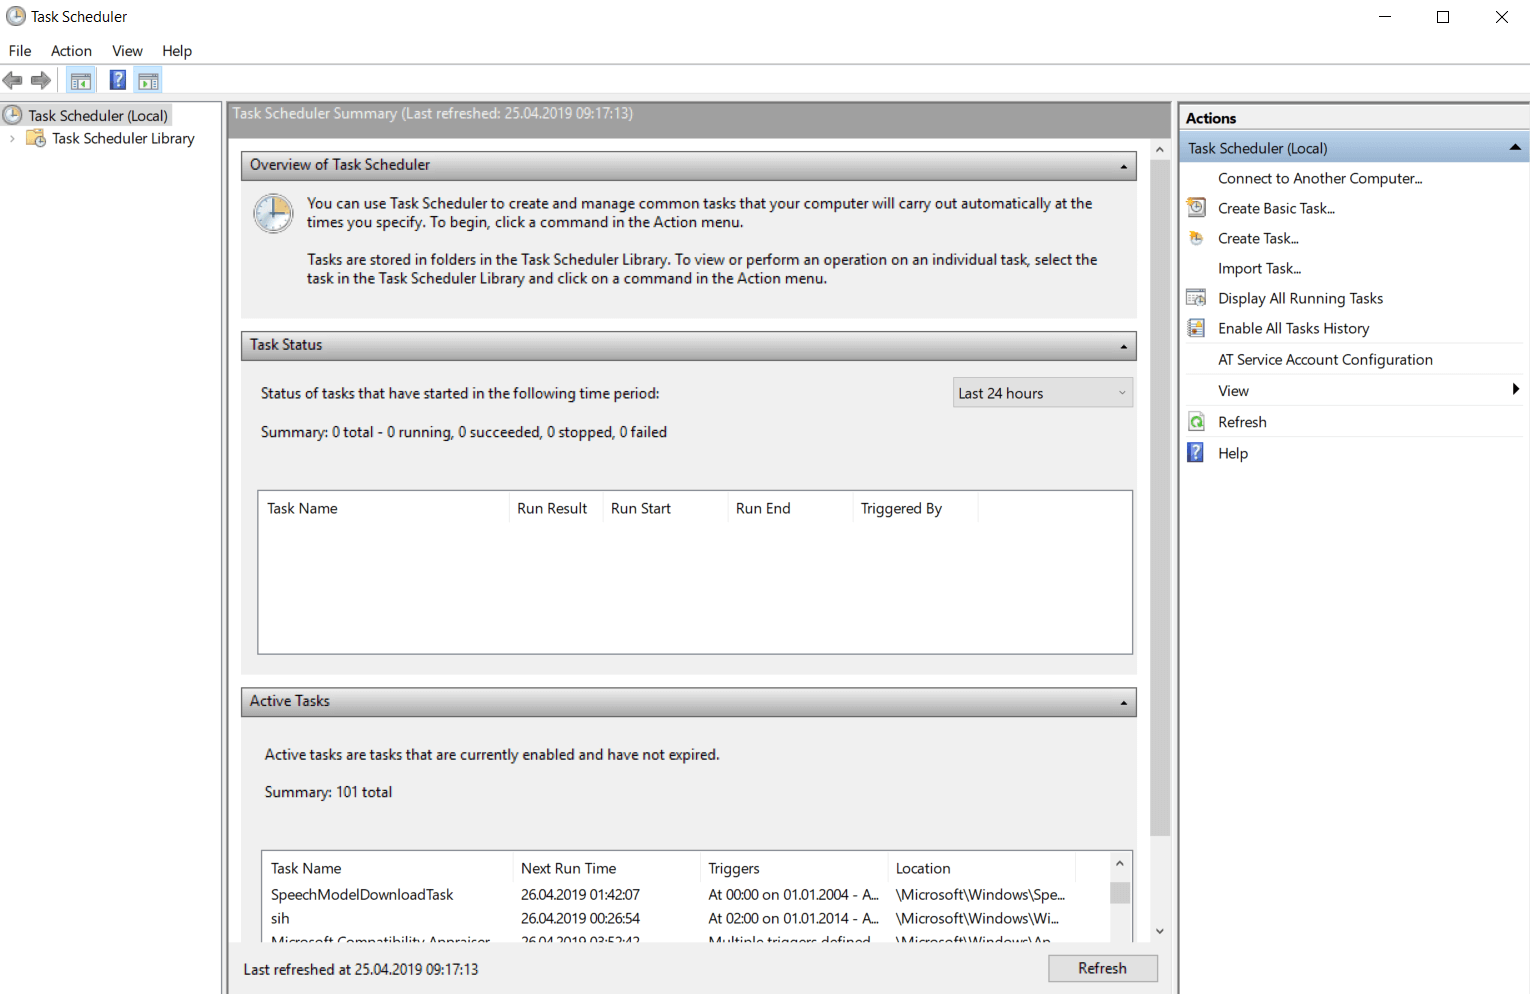
Task Scheduler is one of the most practical preset Windows applications because it can streamline your work.
The main idea of this application is to trigger the running of different scripts and programs at a specific time or a certain event.
It has a library where all the tasks loaded are indexed and it organizes them according to the time that must be done and their importance.
The basic system of this application is composed of 2 elements: triggers and actions.
What do you need to know about Task Scheduler?
1. Types of triggers
The first step of creating a task is to determine what will cause it to run, so the trigger is a set of conditions which when are fulfilled, starts the task.
The triggers can be found in the Trigger tab from the Task Properties and the Create Task menu. From the Create Task menu you can create new triggers for your needs.

There are two types of triggers: the time-based trigger and the event-based trigger.
The time-based trigger is used for tasks that starts at a certain time or tasks that starts periodically, depending on your schedule.
The event-based trigger is used for actions that starts at a specific system event.
For example, let’s suppose that in this day you want to recover a few hours work and you want to have the same productivity, even though you know you will work more than usual.
You can set a task to be triggered every time your computer is entering in the idle state.
Note: if a task has multiple triggers, it will be activated when at least one trigger is fulfilled.
Triggers for a schedule
This kind of trigger causes the task to run after a well-determined schedule configured by you. From the trigger settings you can choose if the task will be repeated once, daily, weekly or monthly.
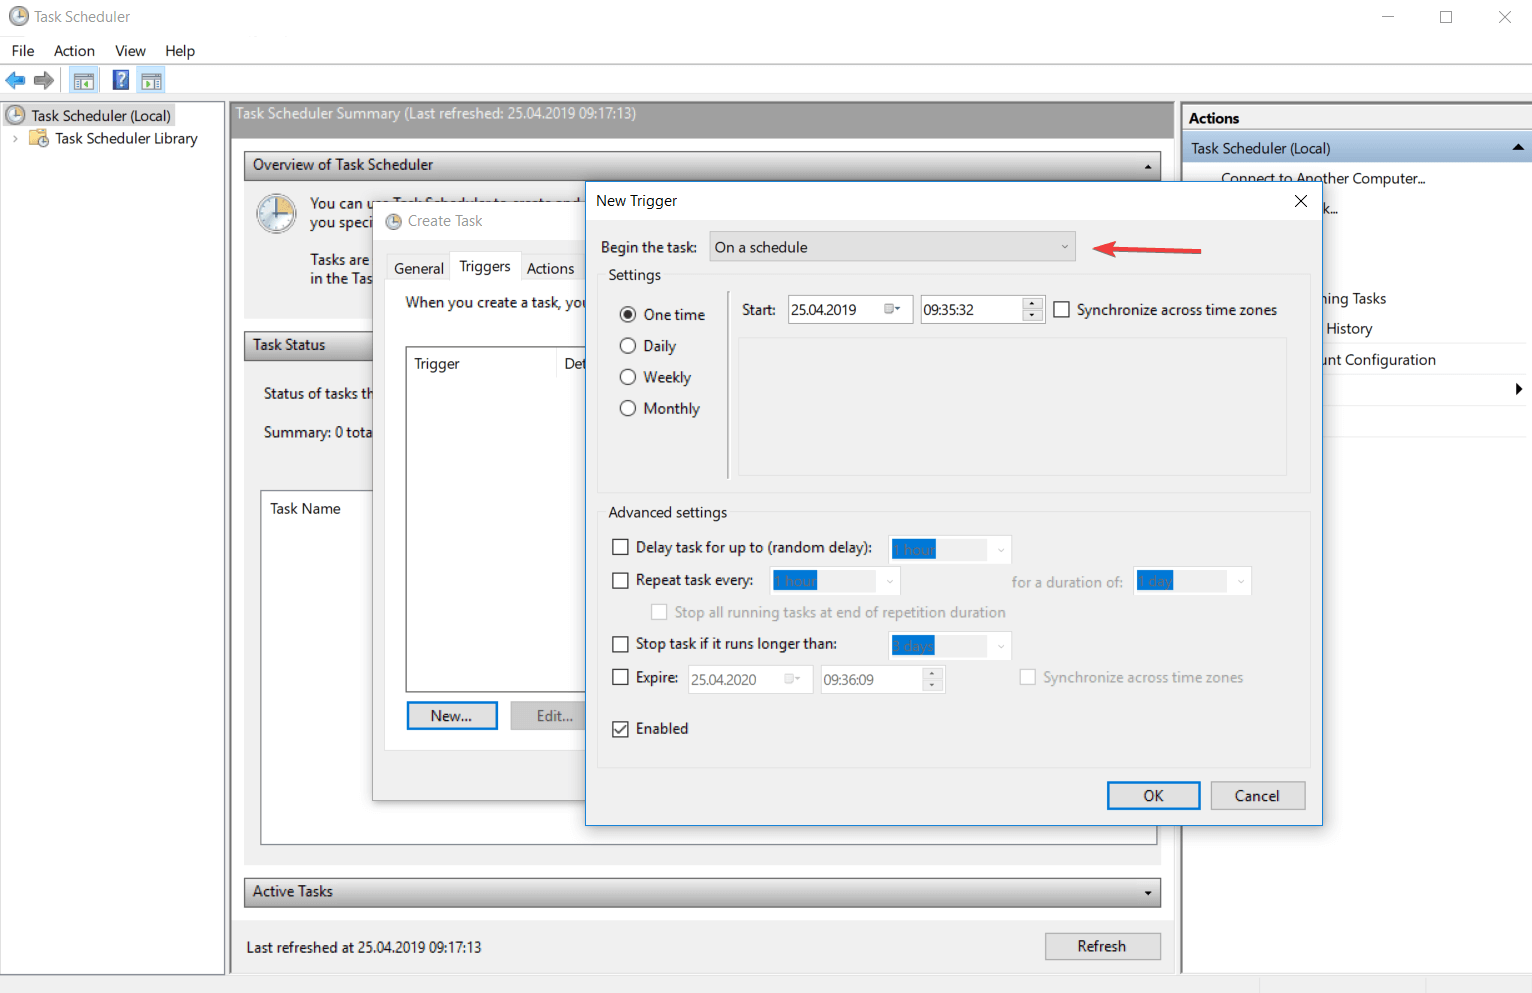
This time interval is guided by the computer date and time. You can check the Universal box for making the time interval relative and synchronize it with UTC (Coordinated Universal Time).
This feature allows you to coordinate multiple tasks to run independent in different time zones.
The One time trigger is the easiest to set up. All you have to do is enter the day and time you want the action to take place.
The Daily trigger is based on a recurrent system and the date and time you want to start using this kind of trigger.
The interval of 1 is producing a daily schedule, the interval of 2 is producing a an every other day schedule and so on.
If you opt for a Weekly trigger you must enter the date and time you want to start this schedule, the days when you want to take place and how often to repeat. Recursion of this trigger is similar to the daily one.
For the interval of 1, the task will be repeated weekly, for the interval of 2, the task will be repeated every two weeks and so on.
The Monthly trigger does not have many differences from the others, you only need to select the week and the day that you want to activate your task.
The recursion system is the same, the only difference being that the minimum interval of repetition is one month.
Triggers for log on
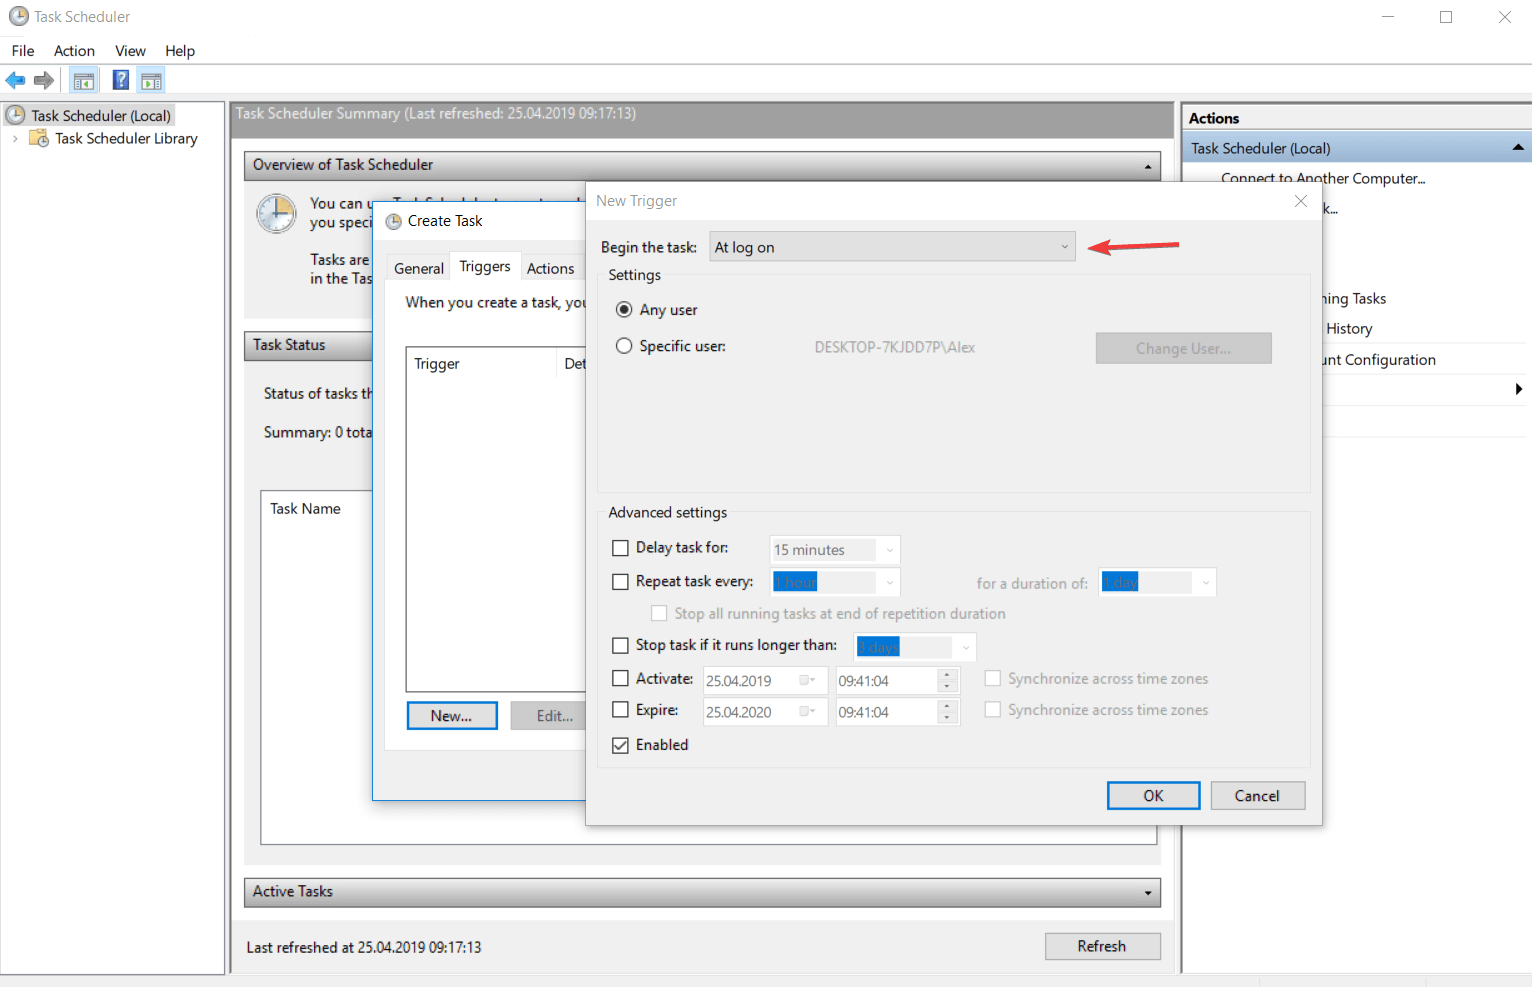
This type of trigger runs a action when a user logs onto the computer. It has a customization feature which allows you to set the action to occur for all users or only to certain users.
Triggers for idle state
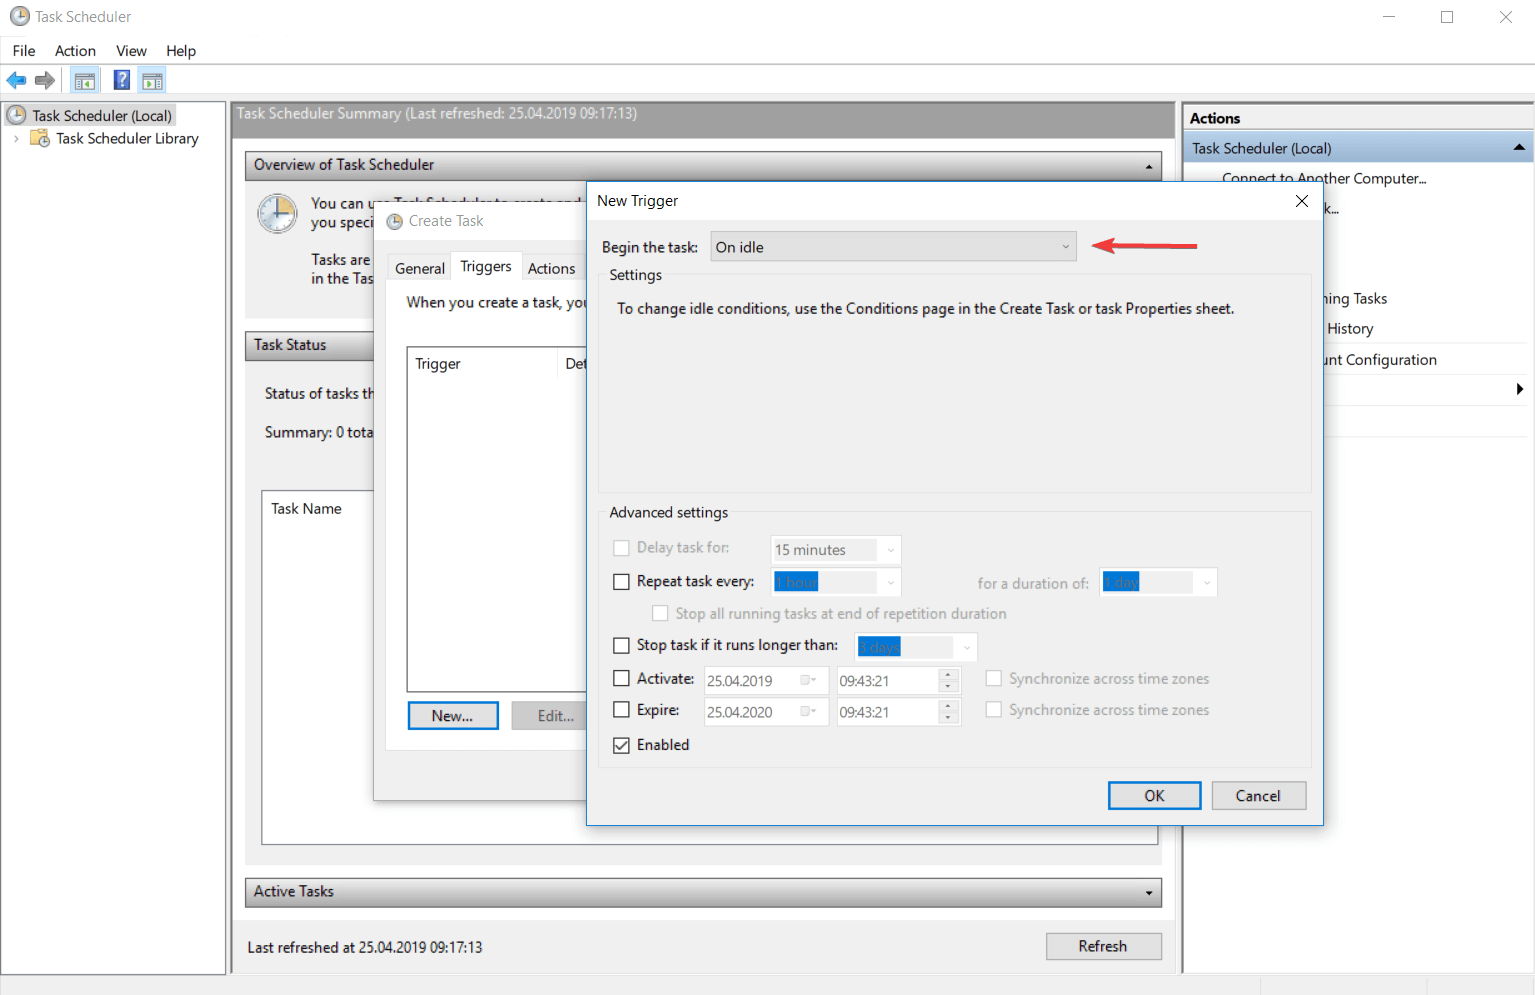
This trigger determines the action to run after the entering of the computer in the idle state. The trigger conditions can be configured from the Conditions tab of the Create Task menu or from the Task Properties window.
Triggers for an event
The event based trigger determines the action to run after an event occurs. You can choose from a predefined list of events but you can also set a specific event.
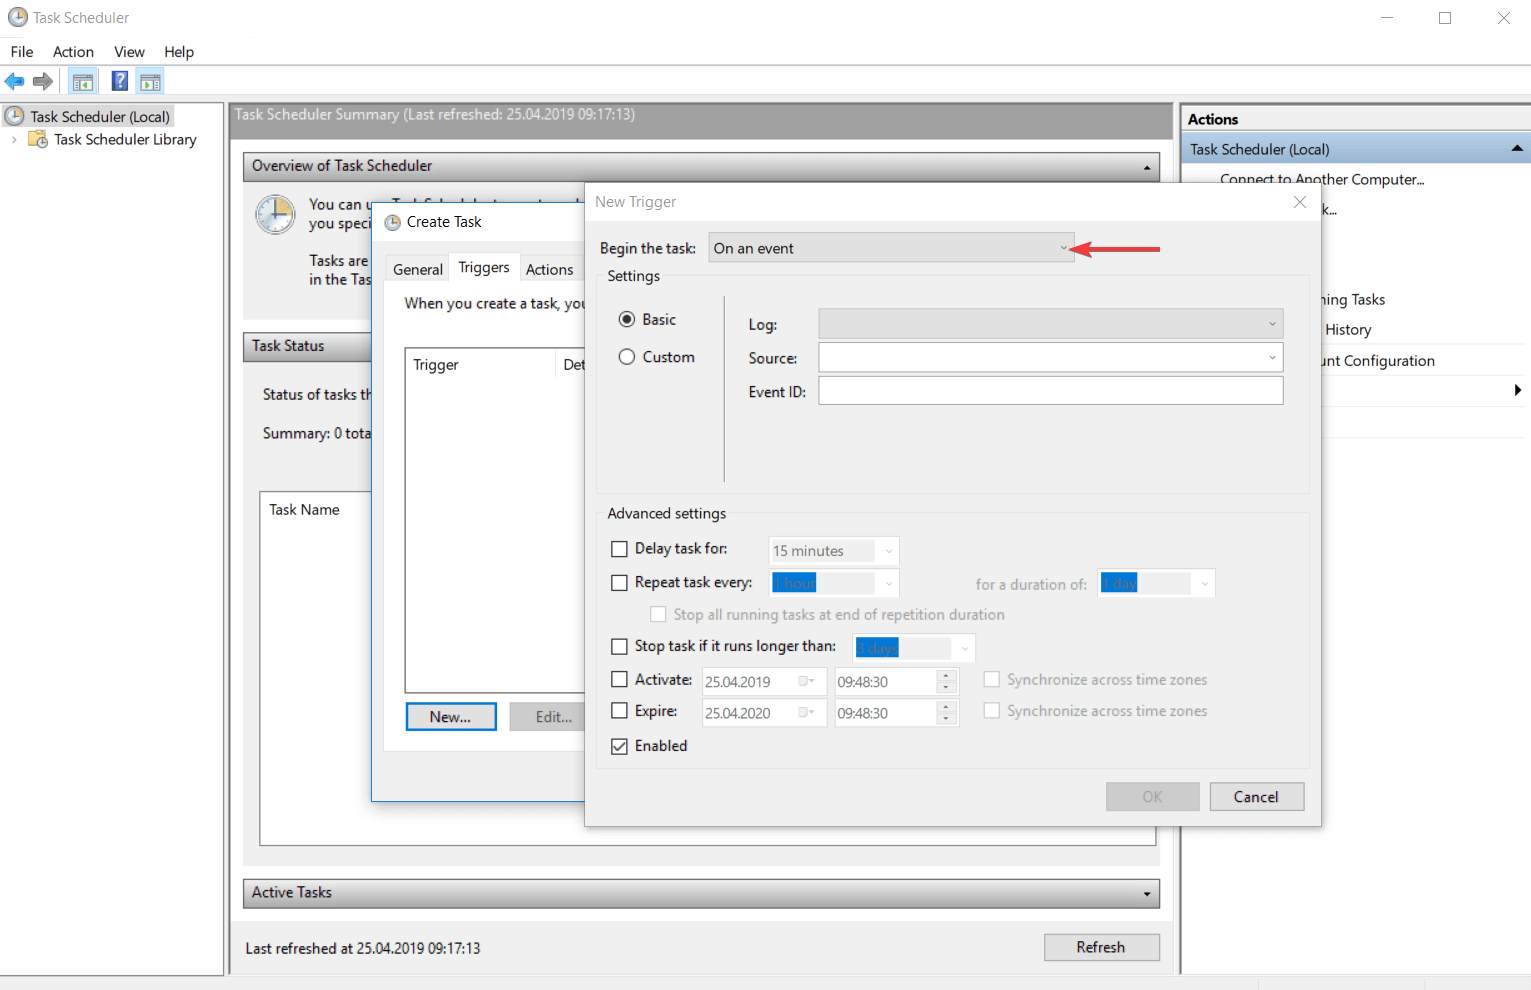
If you are choosing the Basic trigger settings, only one event from the specific event log will run the task.
If you choose the Custom trigger settings you can enter the XML event query or a custom filter for the events that can run the task.
Triggers on workstation lock
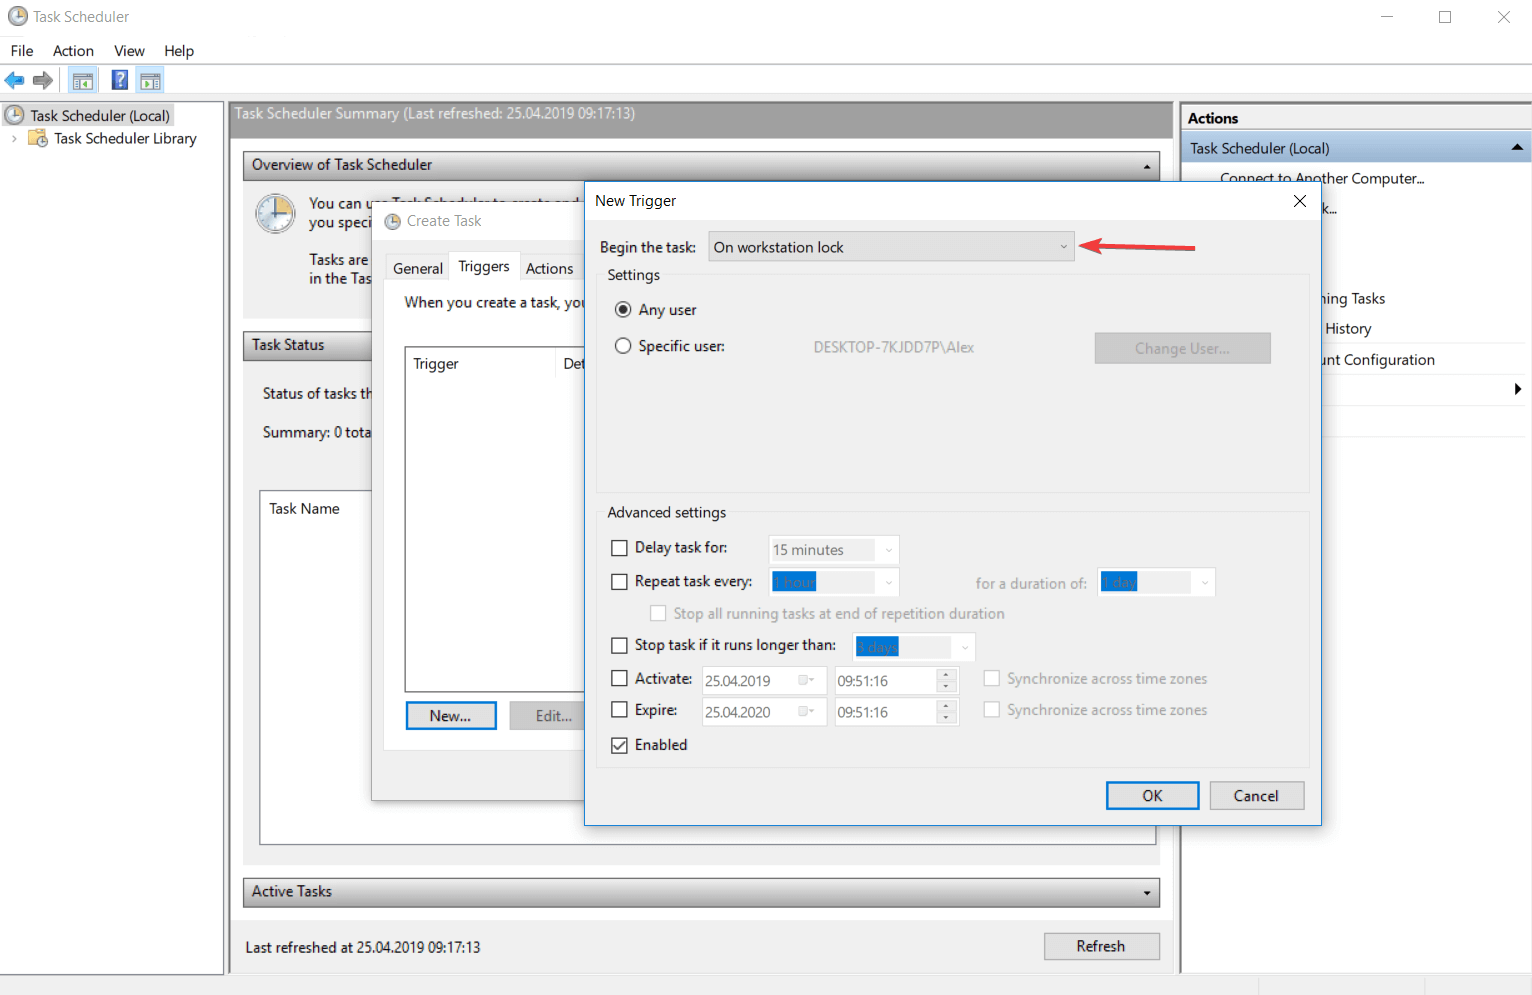
This type of trigger runs the task when the computer is locked. You can configure from the settings if this action will be available for any user or for a specific user. You can do the same thing for the unlocking station process.
Advanced settings of triggers
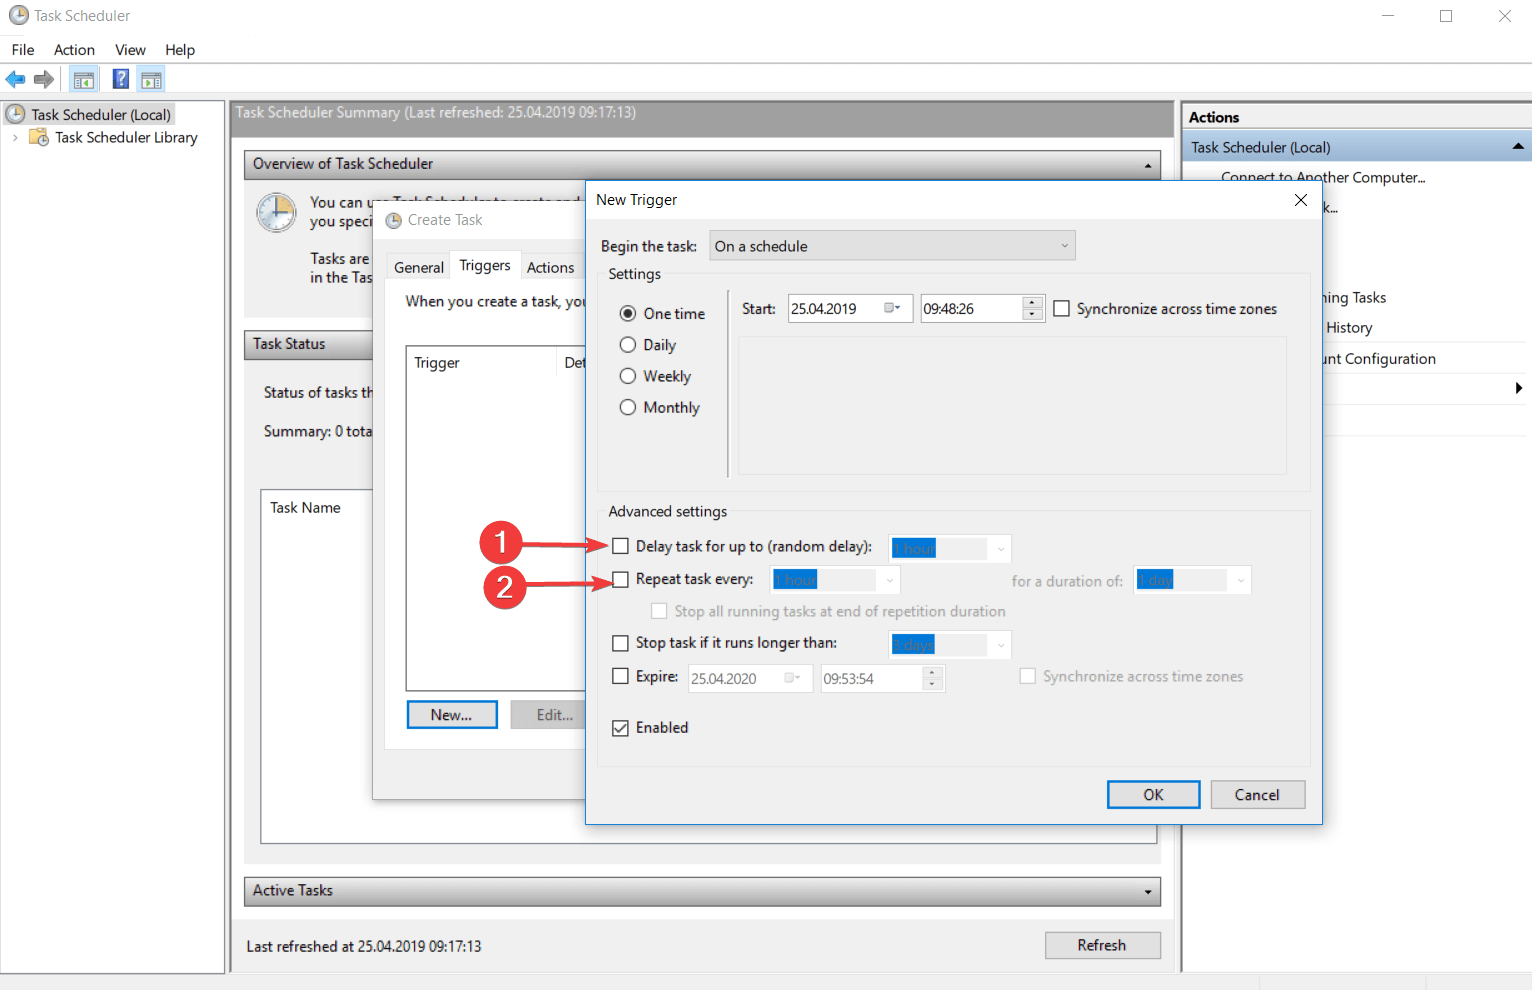
Delay task for up to (random delay)
This feature allows you to insert a delay between the moment when the task was triggered and the moment when the task will take place.
For example, if you have a time based trigger, the task is scheduled to be triggered at 3:00 PM and you set the Delay task for up to (random delay) to 30 minutes, your task will be triggered in between 3:00 PM and 3:30 PM.
Repeat task every:
Here you can set a repeating time for your task. So, after the task will be triggered, it will wait the amount of time specified and after that it will be triggered again. This entire process will continue until the period allocated is done.
2. Types of actions
The action is the process or a part of the process that is performed when the task is running. A task can have up to 32 actions. Every action has some settings that determine how the task is performed.
You can find and edit the task‘s actions from the Actions tab of the Task Properties menu or from Create Task window.
When the list contains more than one action, they will be executed consecutively starting with the action from the top of the Actions tab and ending with the action from the bottom of the list.
If you want to change the actions order all you have to do is to click on the action that you want to move and then use the arrow keys to move it above or below.
Action that activates a program
This kind of action is used for starting a program or a script.
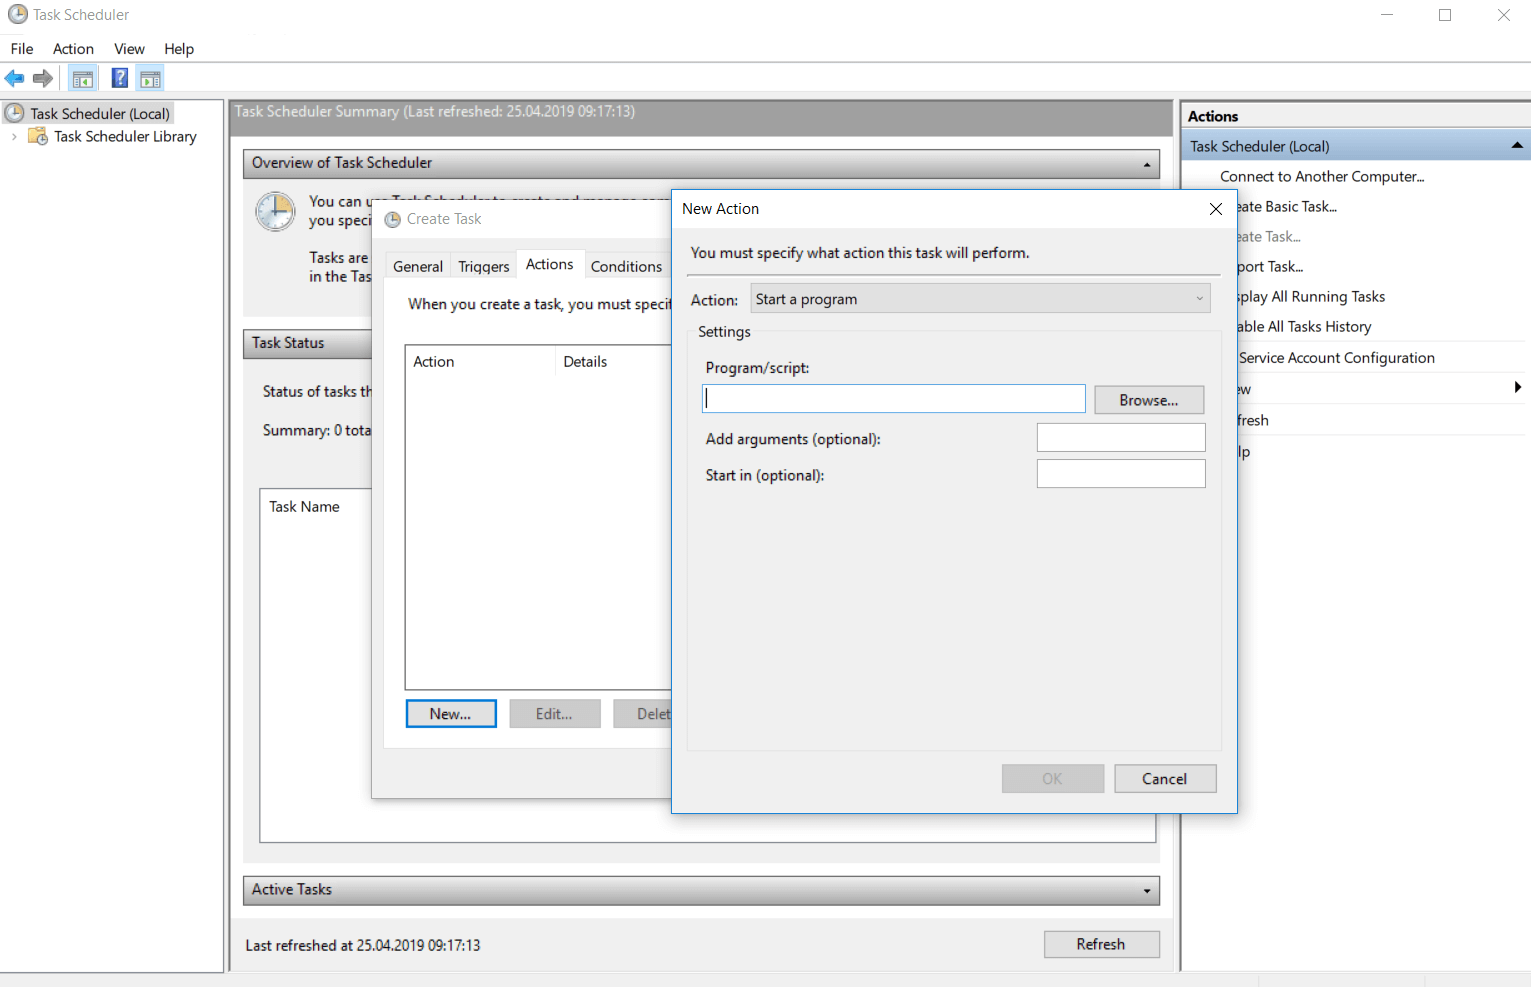
In the Settings menu of the Actions tab you enter the name of the script or the program you want to start.
If one of those sequences takes command line arguments you can add, delete and edit them in the Add arguments (optional) text box.
The Start In (optional) is the place where you can specify the directory for the command line that will execute your script or your program.
This should be either the path to the program or the script file that leads to the files that are used by the executable file.
Action that sends an e-mail
This action is particularly useful for people who communicate a lot via email.
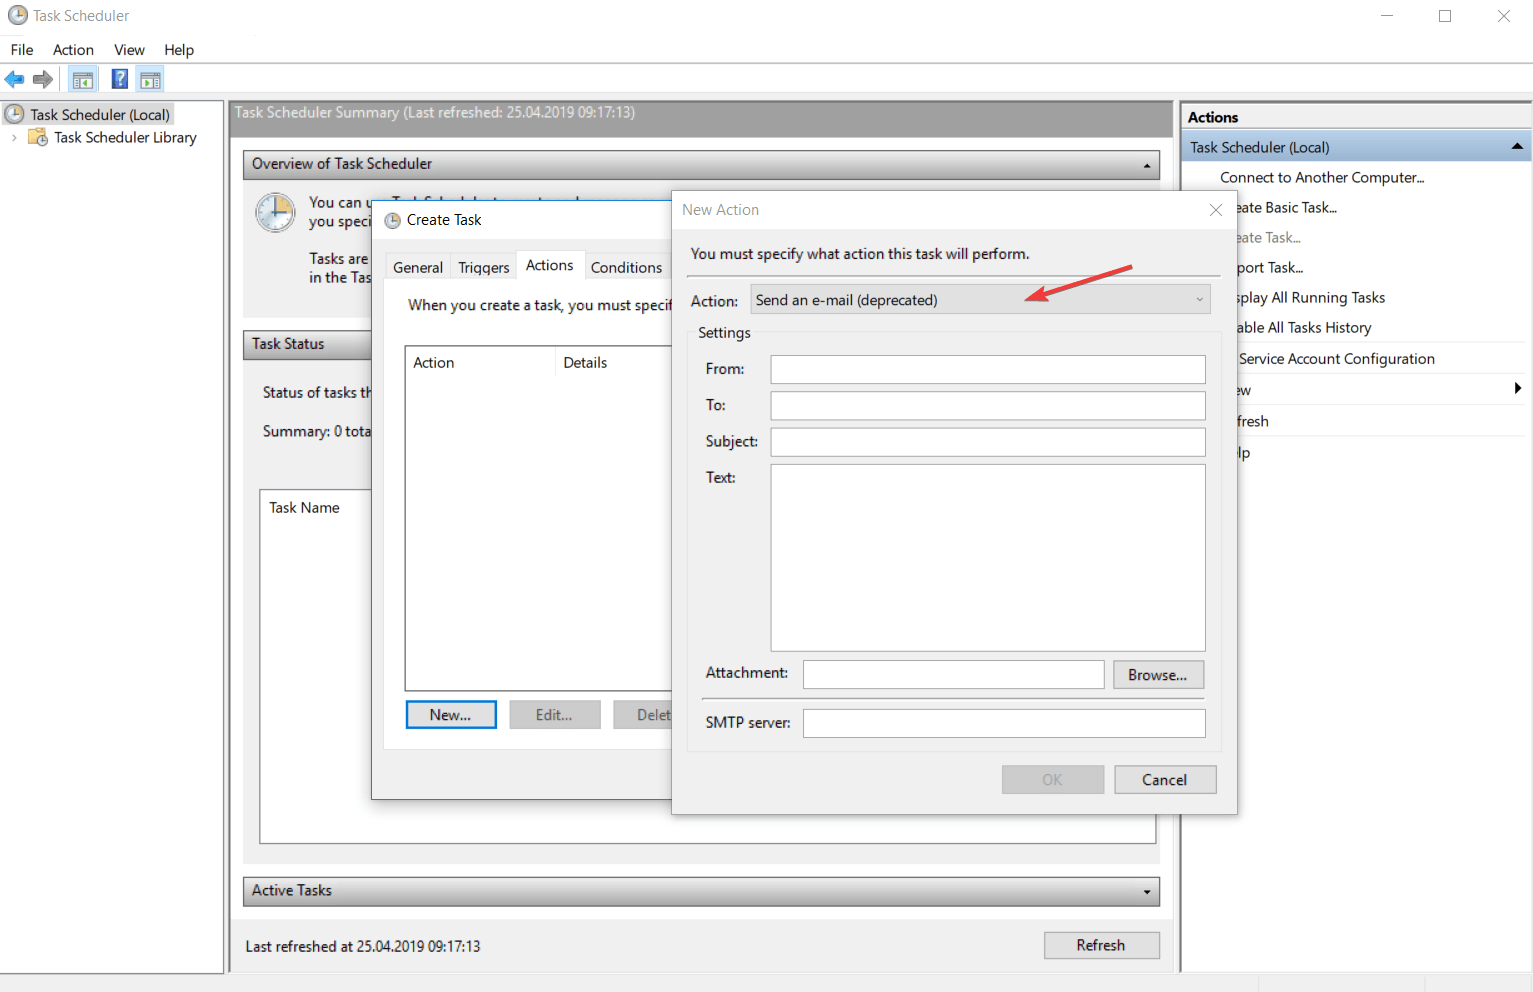
In the settings of this action you have to enter your e-mail address, the e-mail address of the person who will receive the mail, the title of the e-mail, the message you want to be sent and you have also an optional feature to attach different files to the mail.
You must also specify the SMTP server of your e-mail.
Action that displays a message
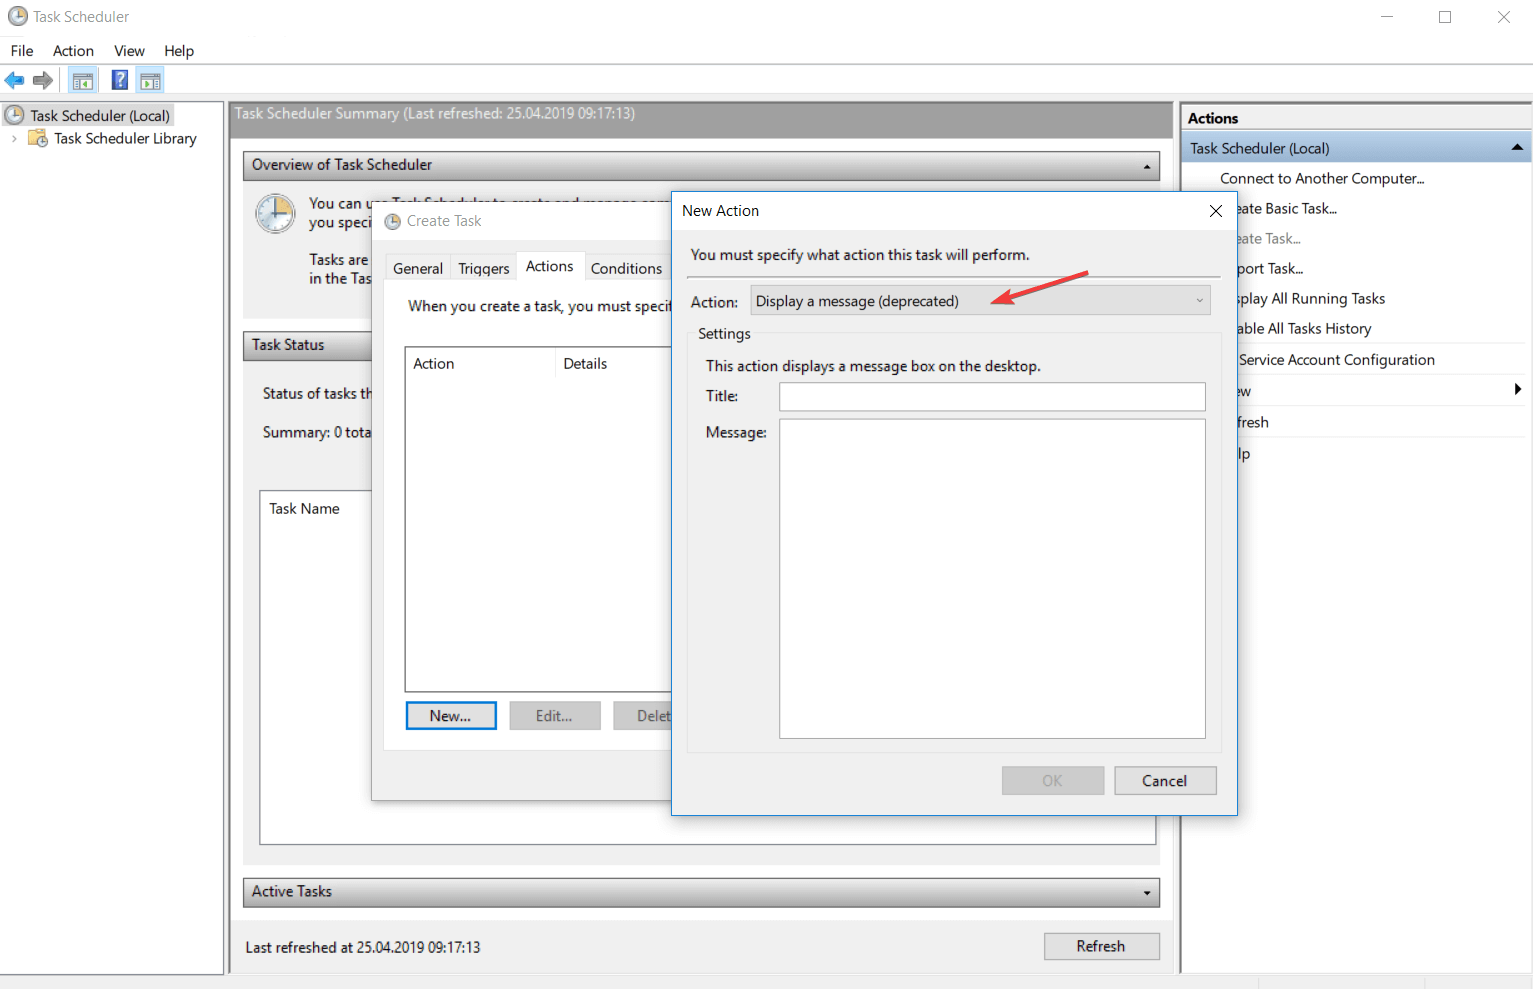
This action is used more like a reminder because it displays on your screen a text with a title. Select the Display a message category from the Actions menu and type the title and the message of the reminder.
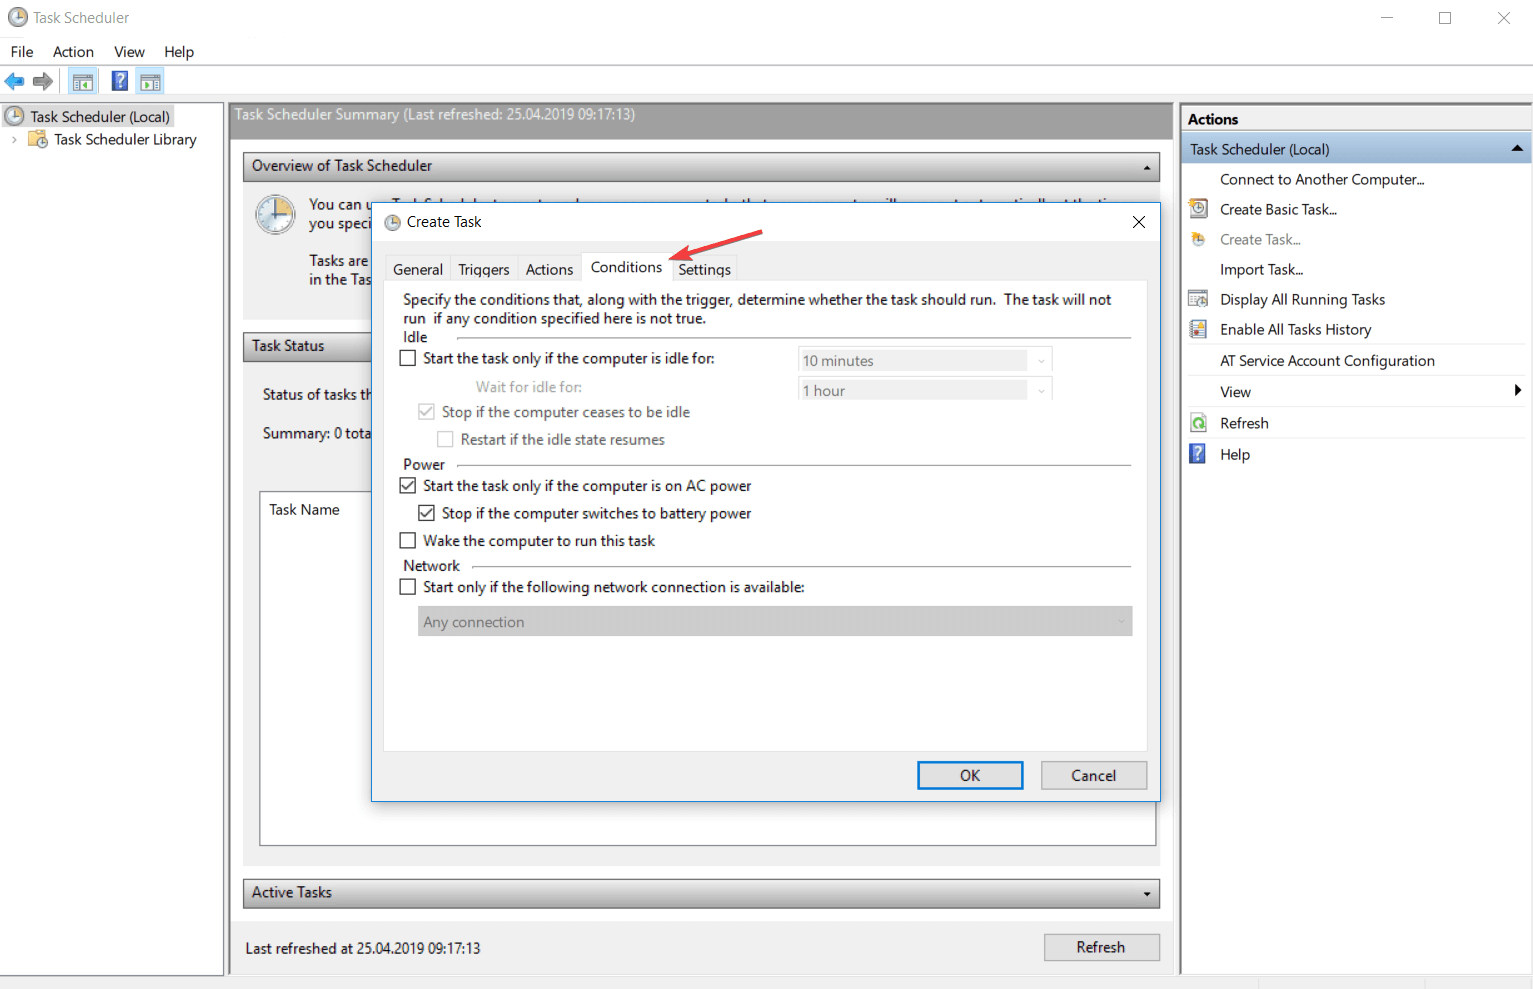
3. Types of Task Conditions
Task conditions decide if a task can run after it was triggered. Conditions are optional and their main role is to help you accomplish a more accurate task reported to the operating situation.
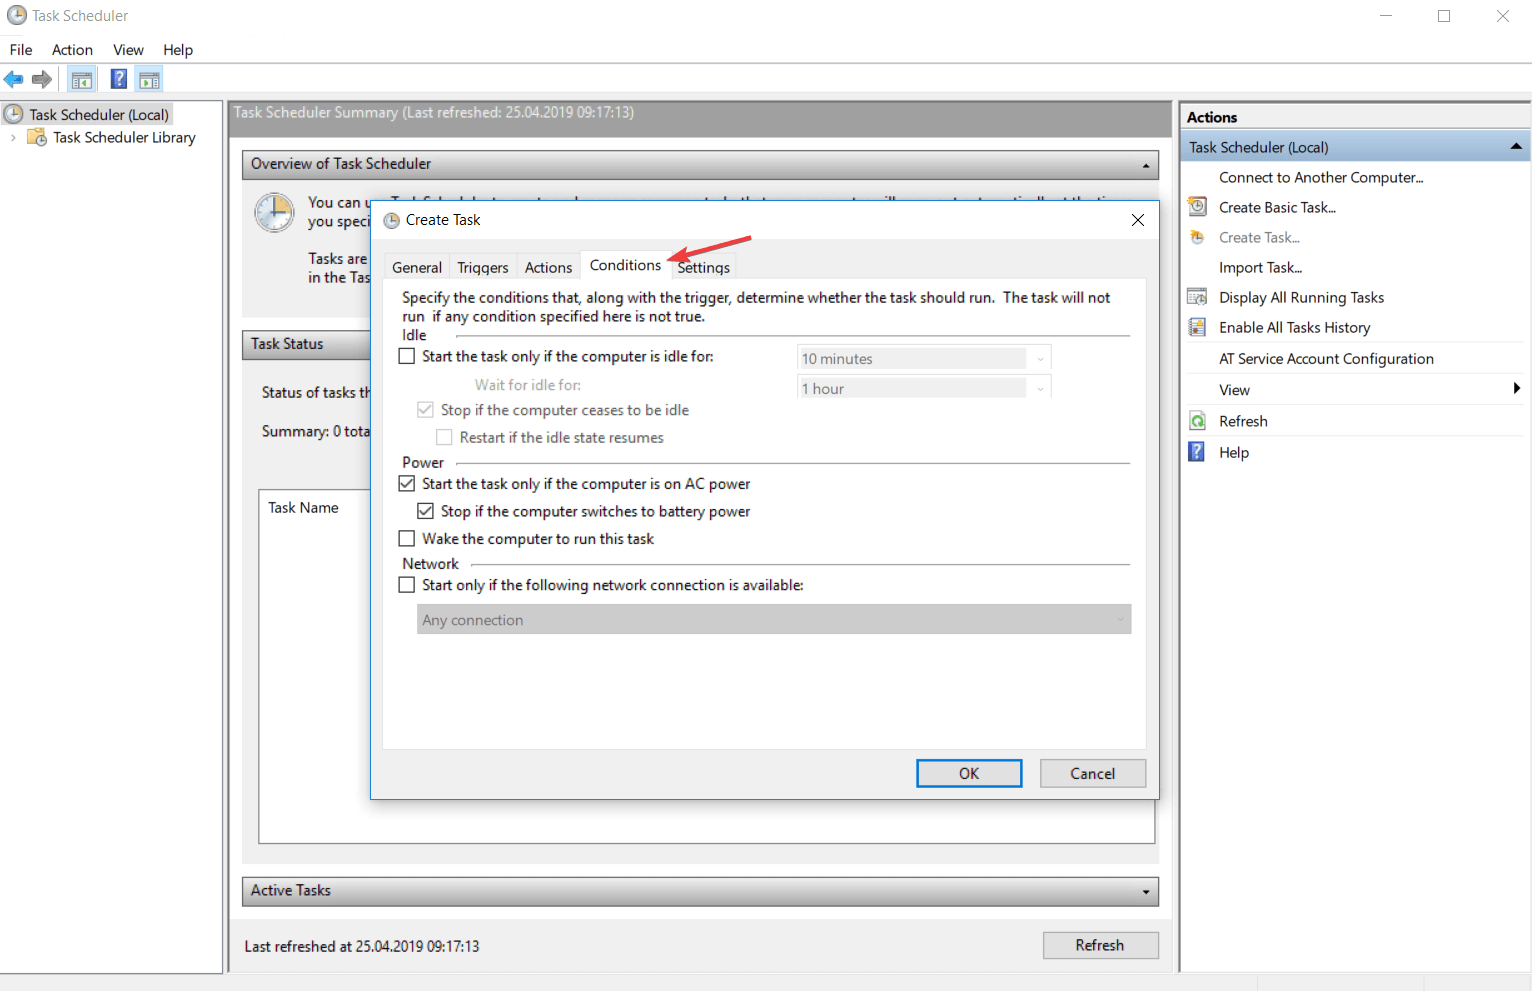
You can find them in the Conditions tab of the Task Properties or Create Task menu. Conditions are divided into 3 categories: idle conditions, network conditions and network conditions.
Idle conditions
With this condition you can tell the task to run only if your computer is in an idle for a certain amount of time. At every 15 minutes, Task Scheduler is checking your activity to find out if your PC has entered in the idle state.
It is considered that your computer is in the idle state if the screensaver is on or if the percentage of CPU and memory operation is 0%.
As soon as the Task Scheduler has detected that your computer is in idle state, it will begin the countdown of the length of time that has been set.
If you come back in this time and continue your work, the application will reset the task.
You can also set the time condition to 0 and in this case the task will run when the application will detect that your computer has entered in the idle state.
If the Stop if the computer ceases to be idle condition is on, the task will stop running after the computer gets out from the idle state. Normally, this task will run just one time.
To run every time the computer remains inactive you have to check the Restart if idle state resumes.
Power conditions
This condition is dedicated to the laptop users because it follows the power method of the device. While a computer receives current flow of energy from a source, the laptop can run on a battery when you do not have a stable source of power.
With this condition you can set a task to run when the computer is connected to a stable and continuous source of energy after the trigger was activated. You can also set a condition.
You can also configure the condition so as not to allow the task to run if the device goes on the battery power.
From this conditions you can also create a task that will tell the computer to start from the sleep mode and run the actions after it was triggered. Consider that this can happen in the hours of rest and may create troubles.
To avoid this, make sure the device is at a distance where you it cannot bother you or turn it off when you rest.
Note: When the system starts running the task, the display may remain disabled even if it is no longer in the sleep mode, but it will turn on when he that a user starts working on the device.
Network conditions
With this condition you can configure a task to run if a specific named network is available or if any connection is available when the task is triggered.
If you consider that your task will need network conditions to run, you can also set this in the conditions.
4. Task settings
Task settings are indicating how a task run, is deleted or is stopped. You can find the panel with all the available settings in the Settings tab from the Task Properties or from Create Task menu.
The following list contains a description with all the available settings.
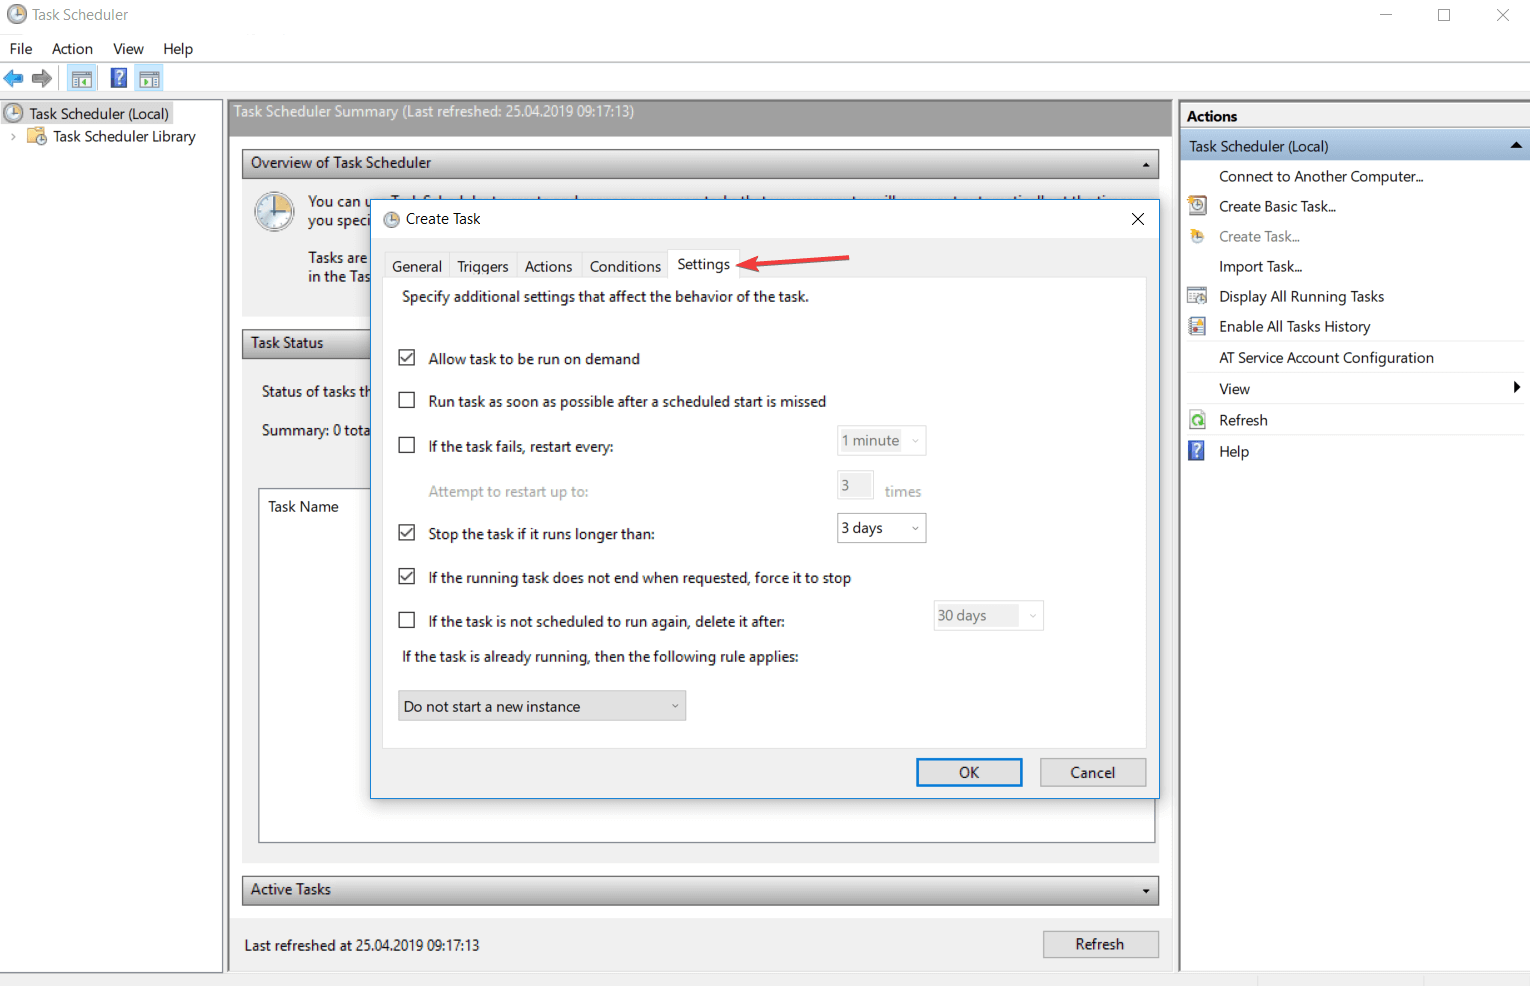
Allow tasks to run on demand
Here you can specify if the task can be run manually before or after it is scheduled by allowing it to run on demand. You can set a task to run at any time on demand.
You find more information about the demand configuration in the “How to run a task on demand” topic of this article.
Run a task as soon as possible after a scheduled start is missed
This setting will assure you that a task will start running even if it could not run when it was scheduled from different reasons (the device was turned off, Task Scheduler was busy).
In the default settings, the Task Scheduler will not start the task immediately when the service is available. It will wait 10 minutes and then immediately start the process.
If task fails, restart every time period
This setting will force the Task Scheduler to restart the task if the previous attempt was thwarted by an error.
You have to add the time interval between the running attempts and the number of attempts to achieve.
Stop a task if it runs longer than time period
With this setting you can establish a time limit in which the task can run.
This setting is used for limiting the number of tasks which need a long period of time to execute and in this way you can save resources for your computer.
If the task is not scheduled to run again, delete if after time period
This feature replaces an action that you should do it manually.
If you schedule a task to run only once means that you will not need it in the future and to not unnecessarily load the list of tasks you should delete after you have used it.
This setting will delete automatically the task after a period of time set by the user after it was activated.
Remember, your task must include at least one trigger with an expiration date in order to select this setting.
If a task is already running you must know a few things
You must configure the Task Scheduler to know how to run the task in case if another instance of the current task is already running.
Do not try to start a new instance because the application will not run the new instance and either stop the current instance from running.
You can run a new instance in parallel. Task Scheduler is able to run different instances in parallel, so if you want to run a new instance, it will run it in the same time with the instance that is already running.
You can queue a new instance. You can set an instance to start as soon as the current task ends the activity. The Task Scheduler will add your add the new instance in a queue and the service will not stop the current task from running.
Stop the current instance. After you stop the current instance, the service will try to run on the next one.
You can run a new instance in parallel. Task Scheduler is able to run different instances in parallel, so if you want to run a new instance, it will run it in the same time with the instance that is already running.
You can queue a new instance. You can set an instance to start as soon as the current task ends the activity. The Task Scheduler will add your add the new instance in a queue and the service will not stop the current task from running.
Stop the current instance. After you stop the current instance, the service will try to run on the next one.
5. Task security context
By default, the Task Scheduler runs the tasks in order with the security context of every user logged on when the task is triggered.
You can modify these settings from the Security options sections of the General tab after you have selected the task that you want to modify.
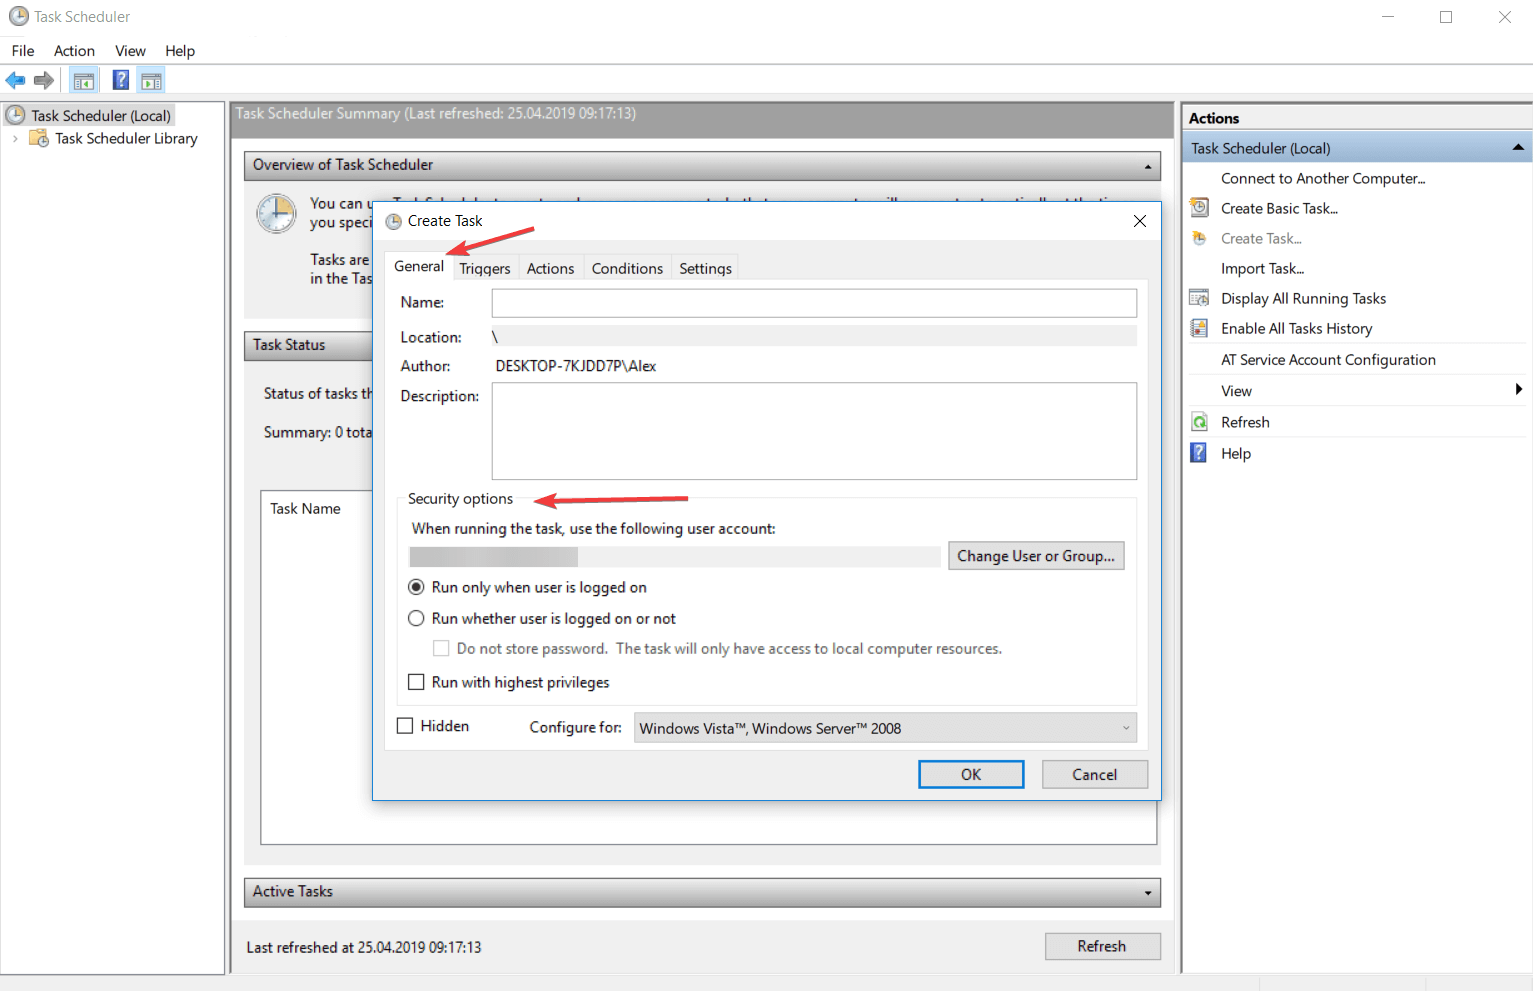
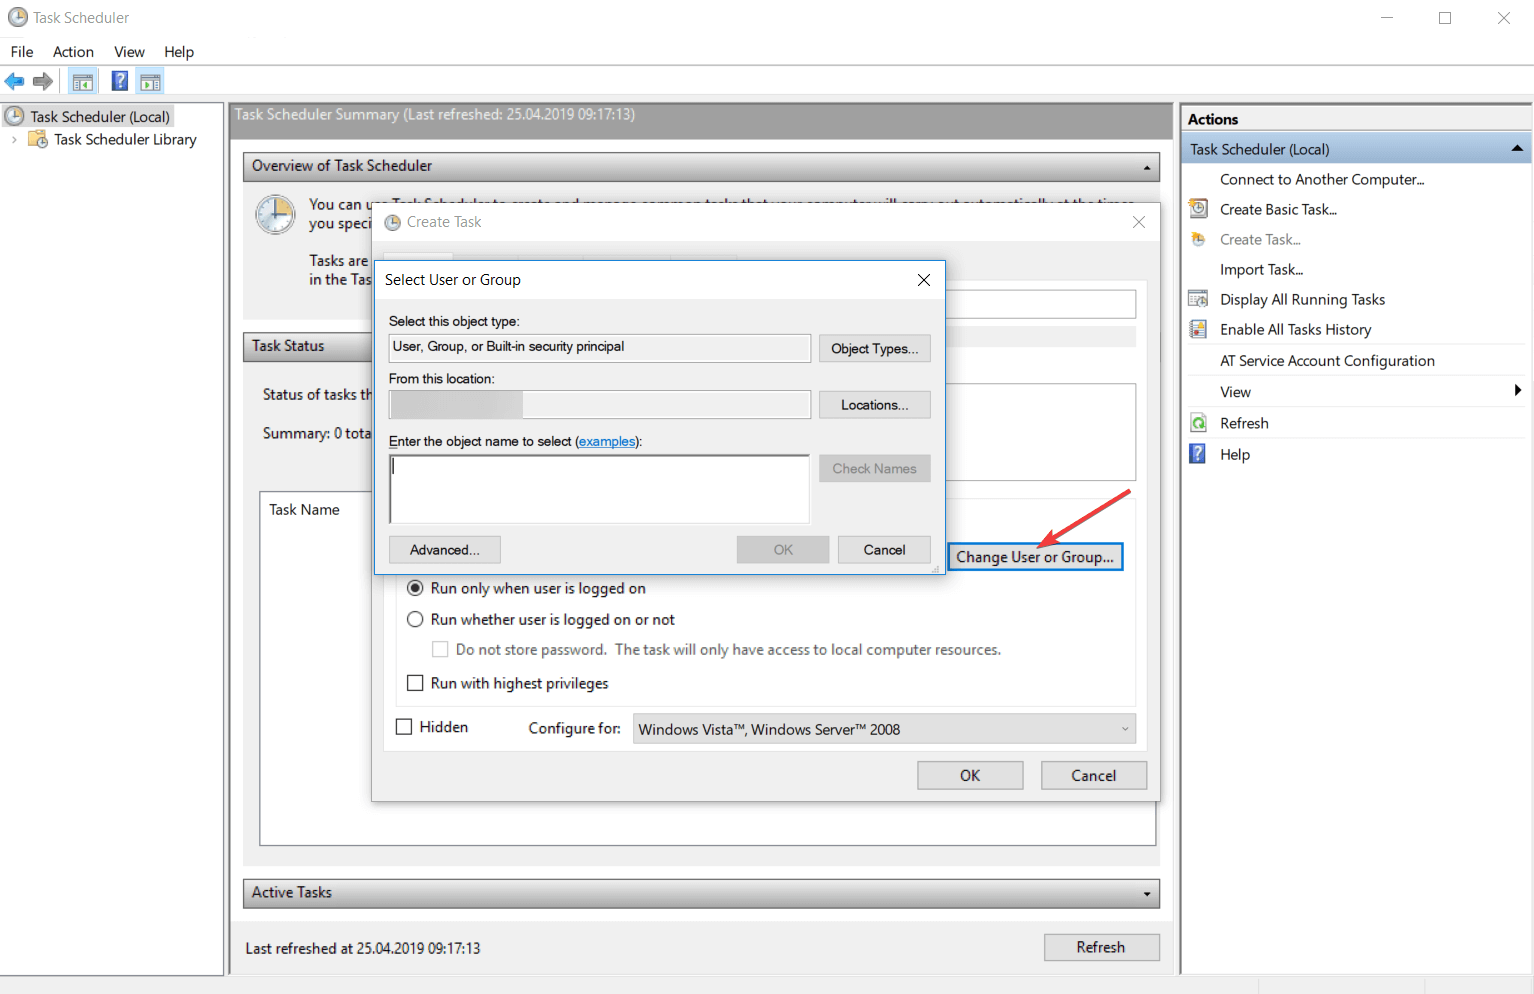
For a better organization of your tasks, you can group them on users or on groups of users by clicking on the Change User or Group category.
If your user do not have administrator rights the button will be called Change User and your account will not be able to enter in the Administrators group.
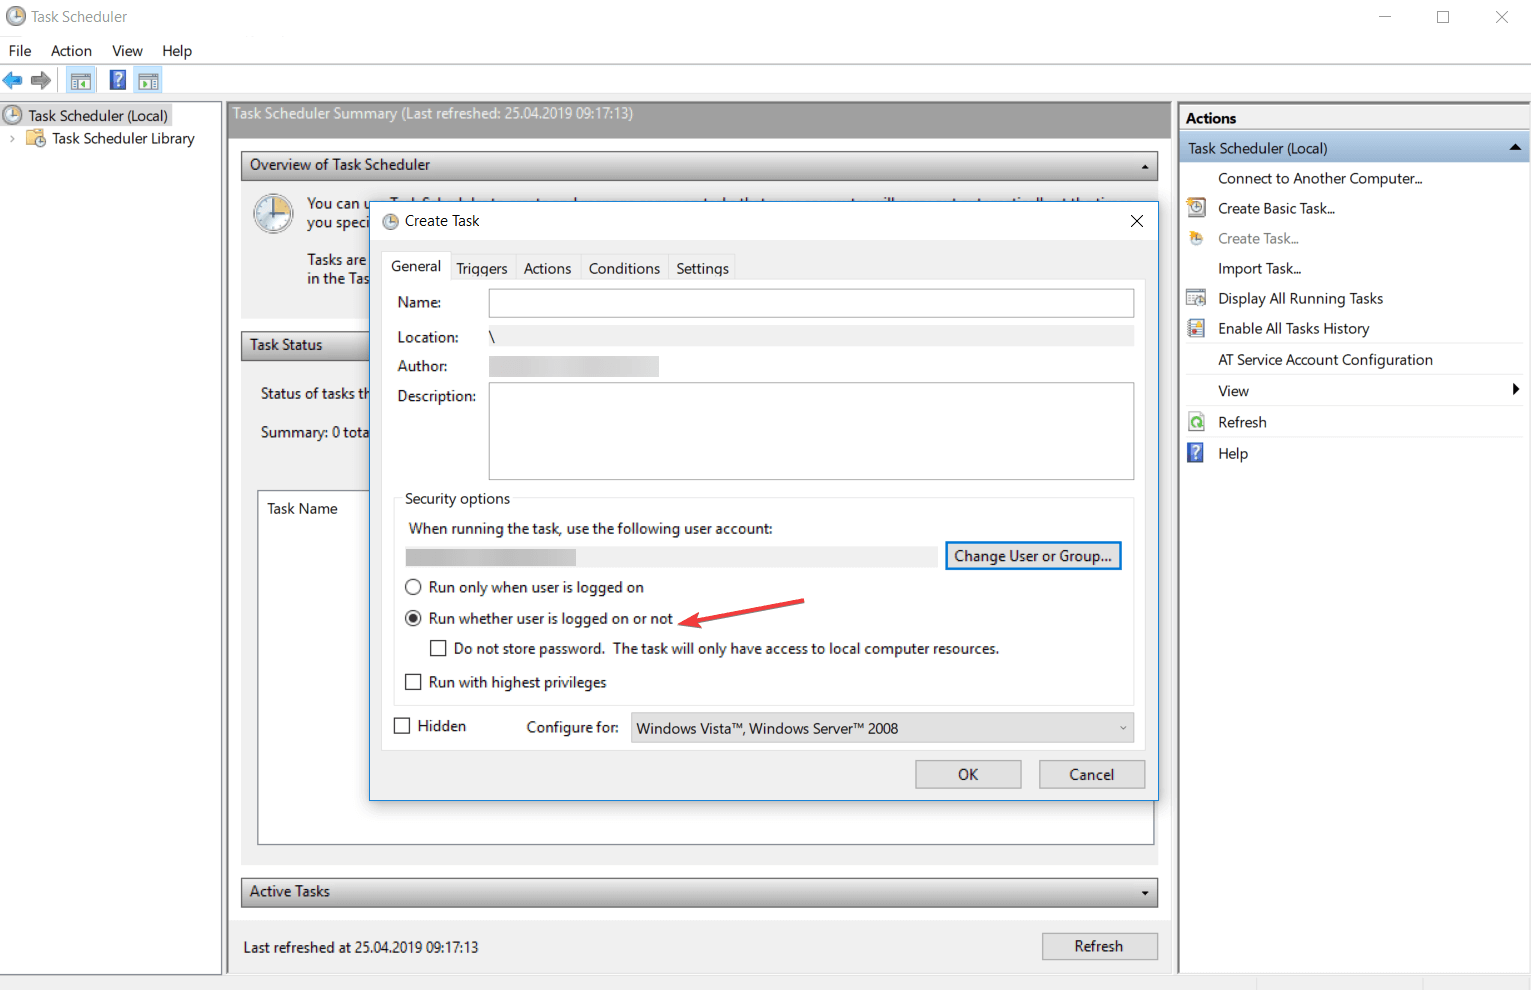
The Run whether user is logged on or not feature allows you to run tasks even if the specific user is not logged on.
The feature is used for tasks that need to be run on any user of the system. If this setting is checked, the tasks will not run interactively.
To make a task run only when a user in logged on select the Run only when user is logged on radio button.
If the Run whether user is logged on or not feature is used, you should supply the credentials of the account no matter if you check the Do not store password or not.
In the account is not logged on, the Task Scheduler will use the saved credentials in order to run the task.
When you select the Do not store password, the application will not save the credentials when you are creating a task, but will discard them after the user properly authenticates.
When the service requires to run a task, it will use the Service-for-user (S4U) extensions to the logging protocol to retrieve the user’s token. In other words, the main purpose of the Service-for-user is to secure the context of the account.
6. How to use the Task Scheduler
After we talked about how this application works is time to talk about how we use it and to troubleshoot different errors.
Start Task Scheduler
There are several ways you can get to access this application. We will present two of them that will work on any version of Windows that you have.
Method 1 – Using Windows interface
- Type Control Panel in the search bar from the bottom left corner of your screen.
- Click on the Control Panel icon.
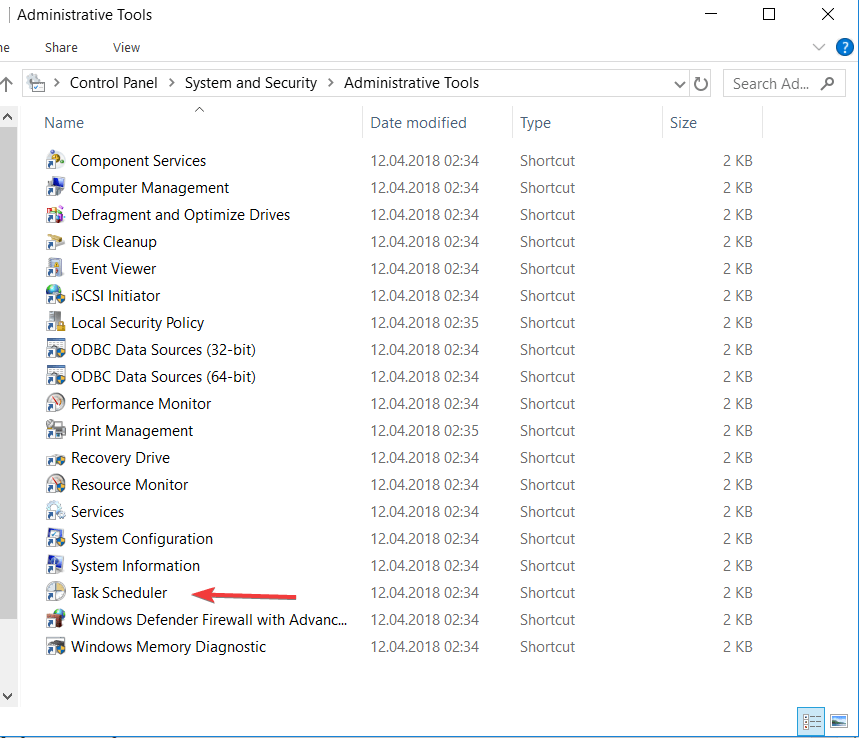
- Click on the System and Security category from the Control Panel dialog box.
- Click on the Administrative Tools.
- This will open you a list with different applications and in that list you will find Task Scheduler. Double-click on it and the application will open.
Method 2 – Using Command Prompt
- Type cmd in the search bar from the bottom left corner of your screen.
- Click on the Command Prompt.
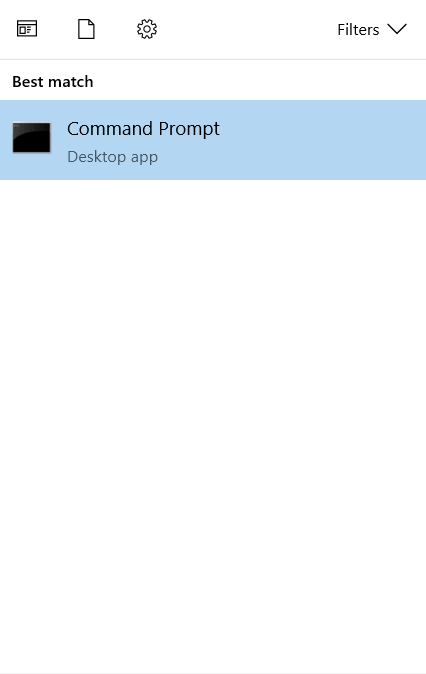
- Type msd command in the console and you will open the application.
Create a task
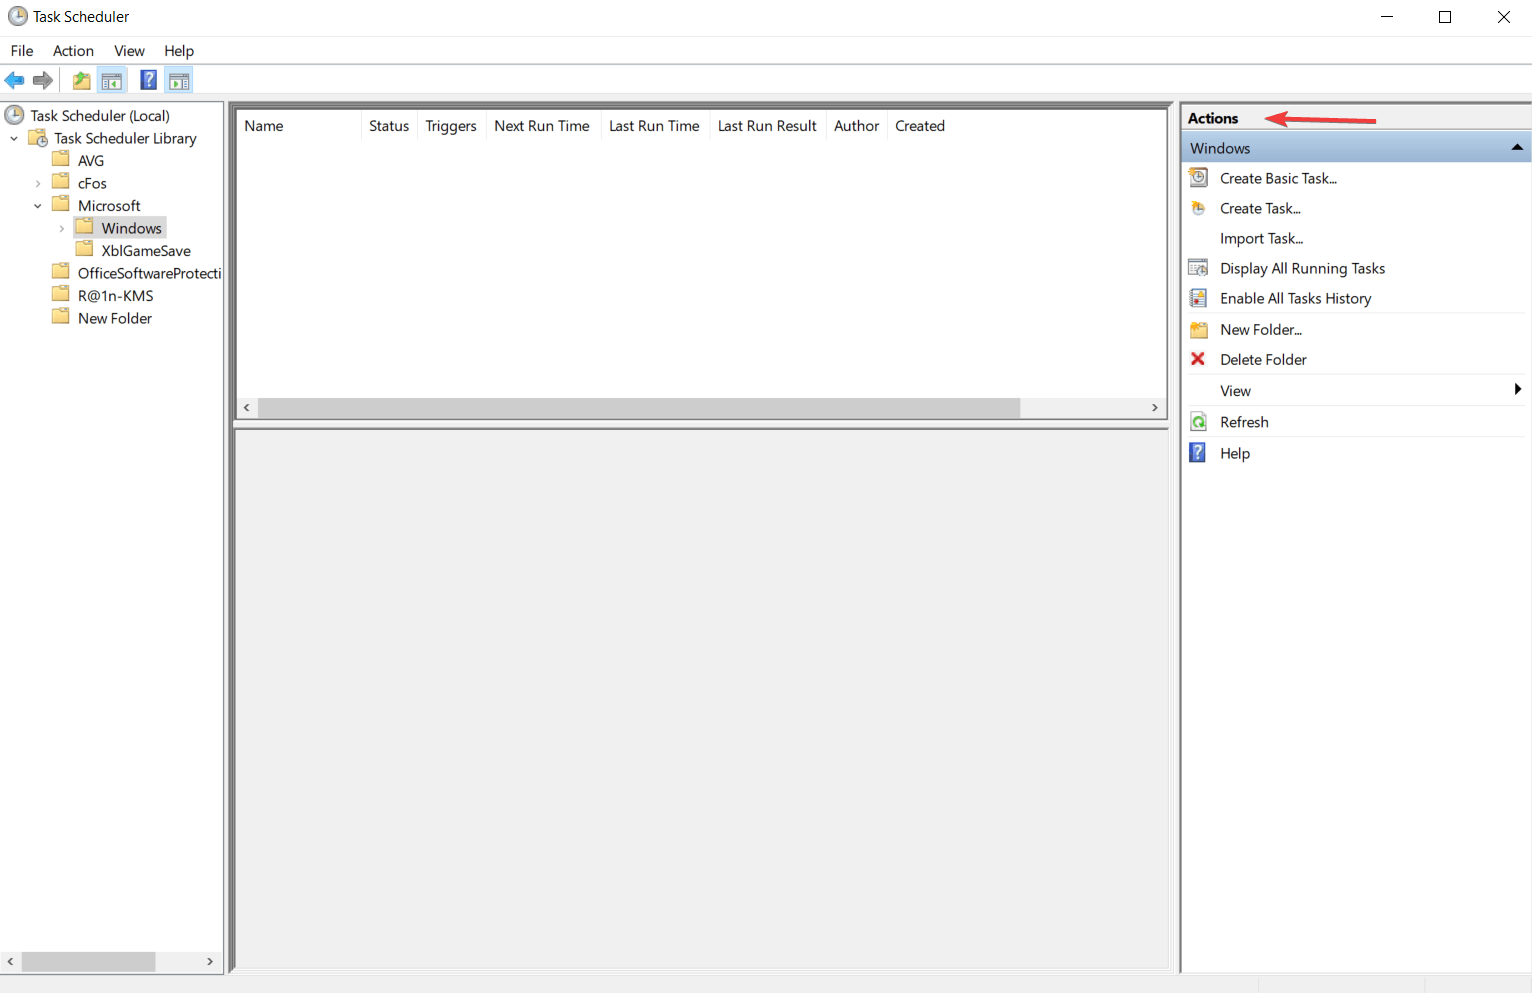
- Open Task Scheduler.
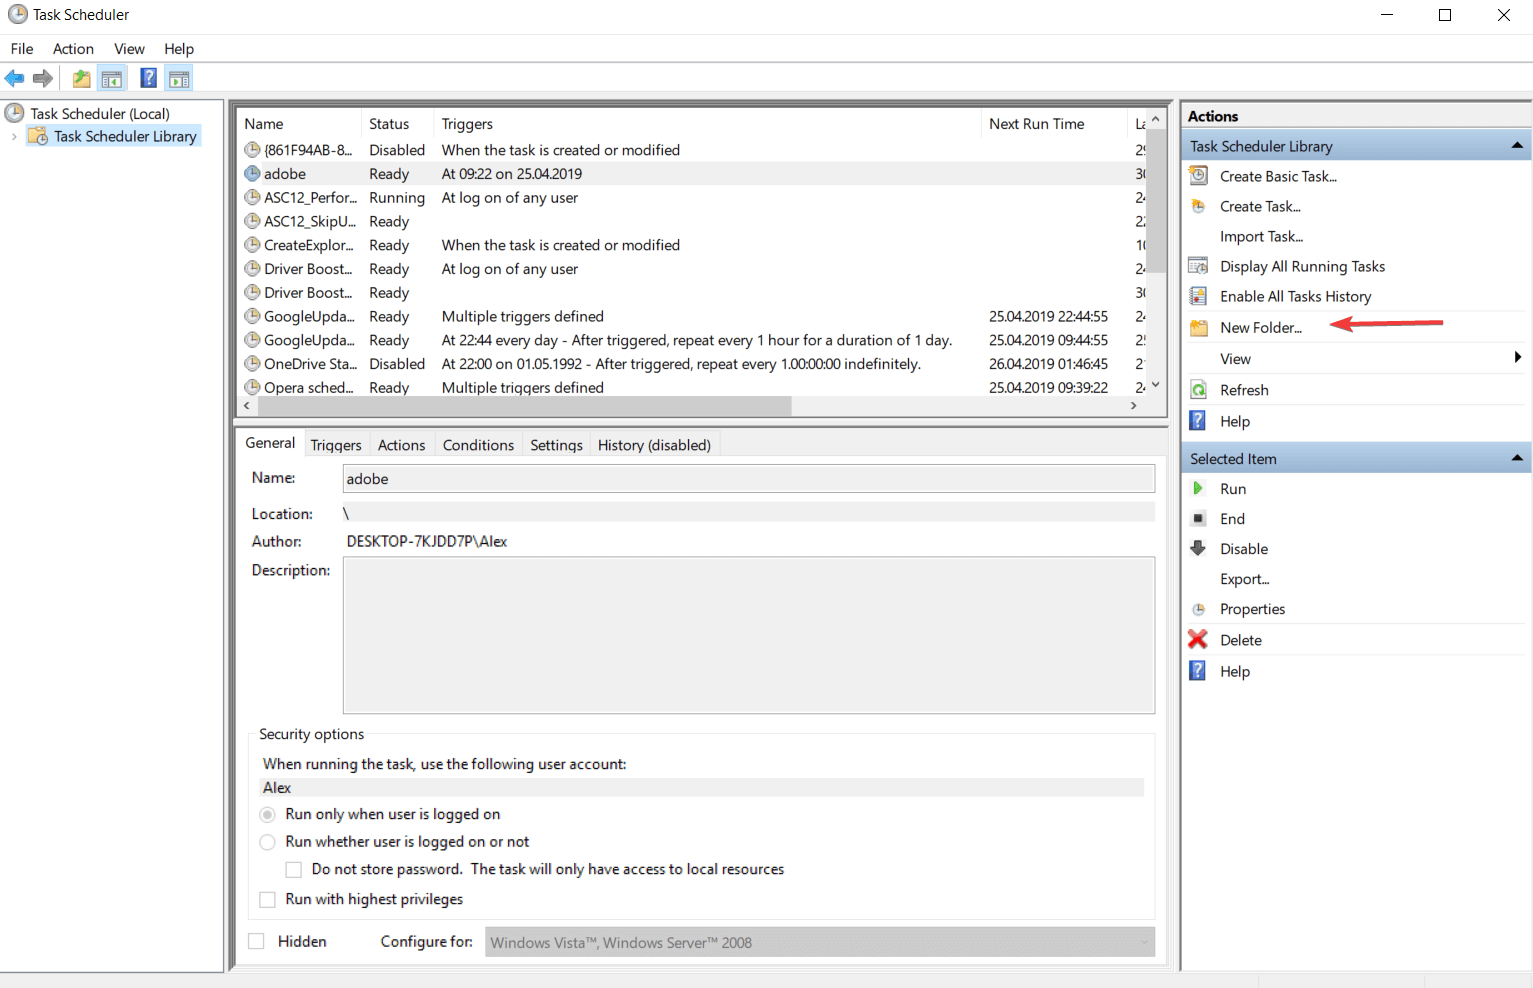
- Select the folder from the console tree (left panel) where you want to create a task. If you have not already a created folder, from the Actions tab click on the New folder… button and name your new folder.
- Click on the Create Task button from the Actions
- You must enter a name for your task in the General tab of the Create Task dialog box. Feel free to change the menu settings after your needs.
- Select what type of trigger you want to be attached to this action. To do this, open the Triggers tab and click on the .. button. For more information, check the information from the trigger section of this article.
- you must choose action or set of actions which will be found in the task. To do that, you have to enter in the Actions menu of the Create Task and click on the .. button and configure your action settings. You can check the information from the actions section of this article.
- Take a look at the Conditions and Settings tab to customize better the task for your needs.
- Click on the OK button from the Create Task dialog box to finish the task creation process.
How to change an already created task
- Open Task Scheduler. If you do not know how to do that, you can check the information from the “Start Task Scheduler” topic.
- Select from the task folder from the console that contains the task you want to change.
- Select the task that you want to change.
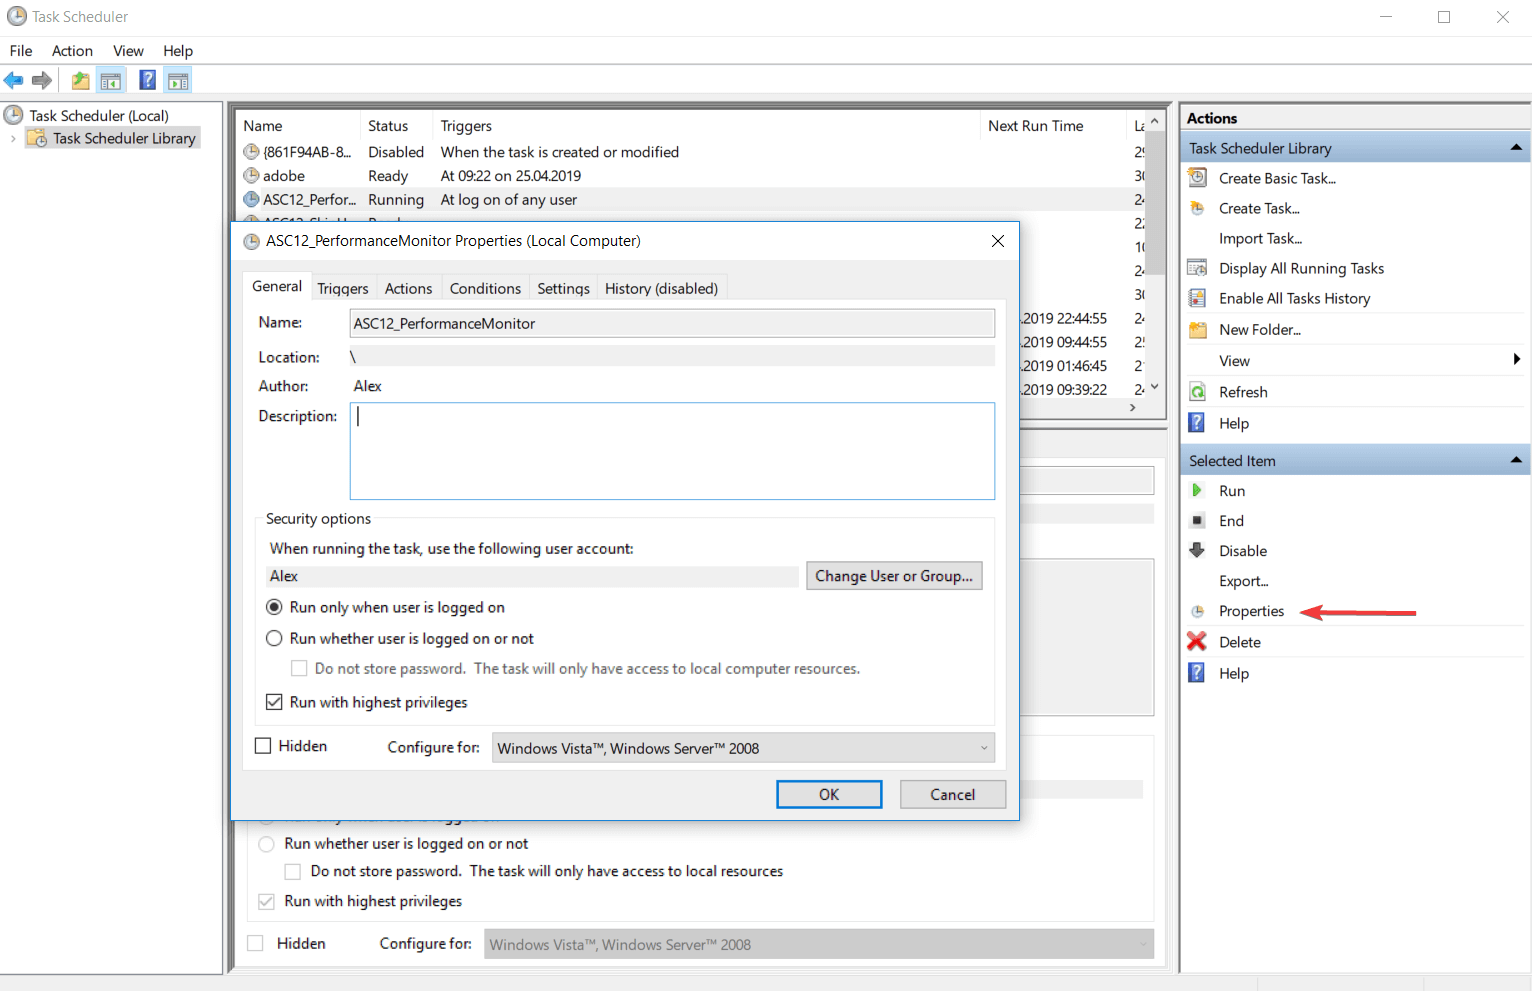
- Click on the Properties tab from the Action This will open the Task Properties dialog box.
- Click on the General tab to view the task‘s general settings that you can modify. These settings are easy to understand, so you should not have problems to modify them.
- Optional: How to change the trigger settings. From the Triggers tab you can see what triggers the action. Select the trigger that you want to change and click on the Edit If you want to add a new trigger click on the New button and follow the steps to configure it. If you want to delete the selected task all you have to do is to click on the Delete button. For more information about the trigger configuration check the “Trigger” topic of this article.
- Optional: How to change the action settings. From the Actions tab you can see what actions are executed by your task. Select the action that you want to change and click on the Edit If you want to delete the selected action click on the Delete button. If you want to add a new action click on the Add button and if you need help in setting up the action you can read the information from the “Actions” topic of the article.
- To finish the process click on the OK button of the Task Properties dialog box and the new task will be registered. If you have already created a task that activates when you register another task, it will enable.
How to delete a task
Method 1 – Using Windows interface

- Open Task Scheduler. If you do not know how to do that, you can check the information from the “Start Task Scheduler” topic.
- Click on the Task Scheduler Library folder from the left side of the application interface. This will open a list with all your scheduled tasks.
- Right click on the task that you want to remove and select the Delete.
Method 2 – Using Command Prompt
- Type Command Prompt in the search bar from the bottom left corner of your screen.
- Click on the Command Prompt icon to open the console.
- Modify this command and paste it in the console schtasks/Delete [/S [/U [/P [
/TN [/F]
- To find more information about the command from above type schtasks /Delete /? in the console.
How to create a Task Folder
To organize better your scheduled tasks we recommend you to share them in different folders depending on their role. Note: once it was created, a task cannot be renamed. To rename a task folder you must delete it and create a new task folder.
Here is how you create a task folder:
- Open Task Scheduler with one of the presented methods.
- Select the task folder from the left table of the application interface under which you want to create a new task folder.
- Click on the New Folder button from the Actions.
- Enter the name of the new folder.
- Click on the OK button to finish the process.
How to delete a Task Folder
If you want to delete a folder to better organize your tasks you must ensure that it is empty.
In other words, you must delete all the tasks and the subfolder tasks before you delete the task folder.
If you want more information about how to delete the tasks check out the ” How to delete a task” topic of the article. Note: Task Scheduler Library is the only folder that cannot be deleted.
Here is how you delete a task folder:
- Start Task Scheduler with one of the presented methods.
- Select the task folder from the left table of the application interface.
- You will notice that in the Action panel you have the Delete folder Click on that option.
- This will open a dialog box where the application will request your confirmation for deletion. Click on the Yes option to complete the process.

How to import a task
Task Scheduler have a feature that allows you to import tasks, which will be added in a folder chosen by you. All the task characteristics (properties, triggers, conditions, actions and settings) can be found in an XML file.
Method 1 – Using Windows interface
- Open Task Scheduler.
- Select the folder where you want to import the new task. To import the task in a new folder, check the “How to create a new task folder” topic of this article.
- Click on the Import Task button from the Action.
- This action will open a window where you have find and select the path to the XML file of the task.
- After you entered the path to the task, the application will open the Create Task dialog box where you can find all the information about the imported task.
- Click on the OK button of the Create Task dialog box to finish the importing process.

Method 2 – Using Command Prompt
- Open Command Prompt. To do that, type cmd in the Windows search bar.
- Click on the Command Prompt icon to open the console.
3. Edit and paste the following command in console. schtasks /Create [/S [/U [/P [
]]]] /XML /TN .4. For more information about the command from above, type the following command in the console schtasks /Create /? .
How to export a task
Task Scheduler has also an integrated feature that allows you to export your task to different users. The task will be saved in a XML format that can be shared like an usual file.
Method 1 – Export a task using Windows interface
- Open Task Scheduler.
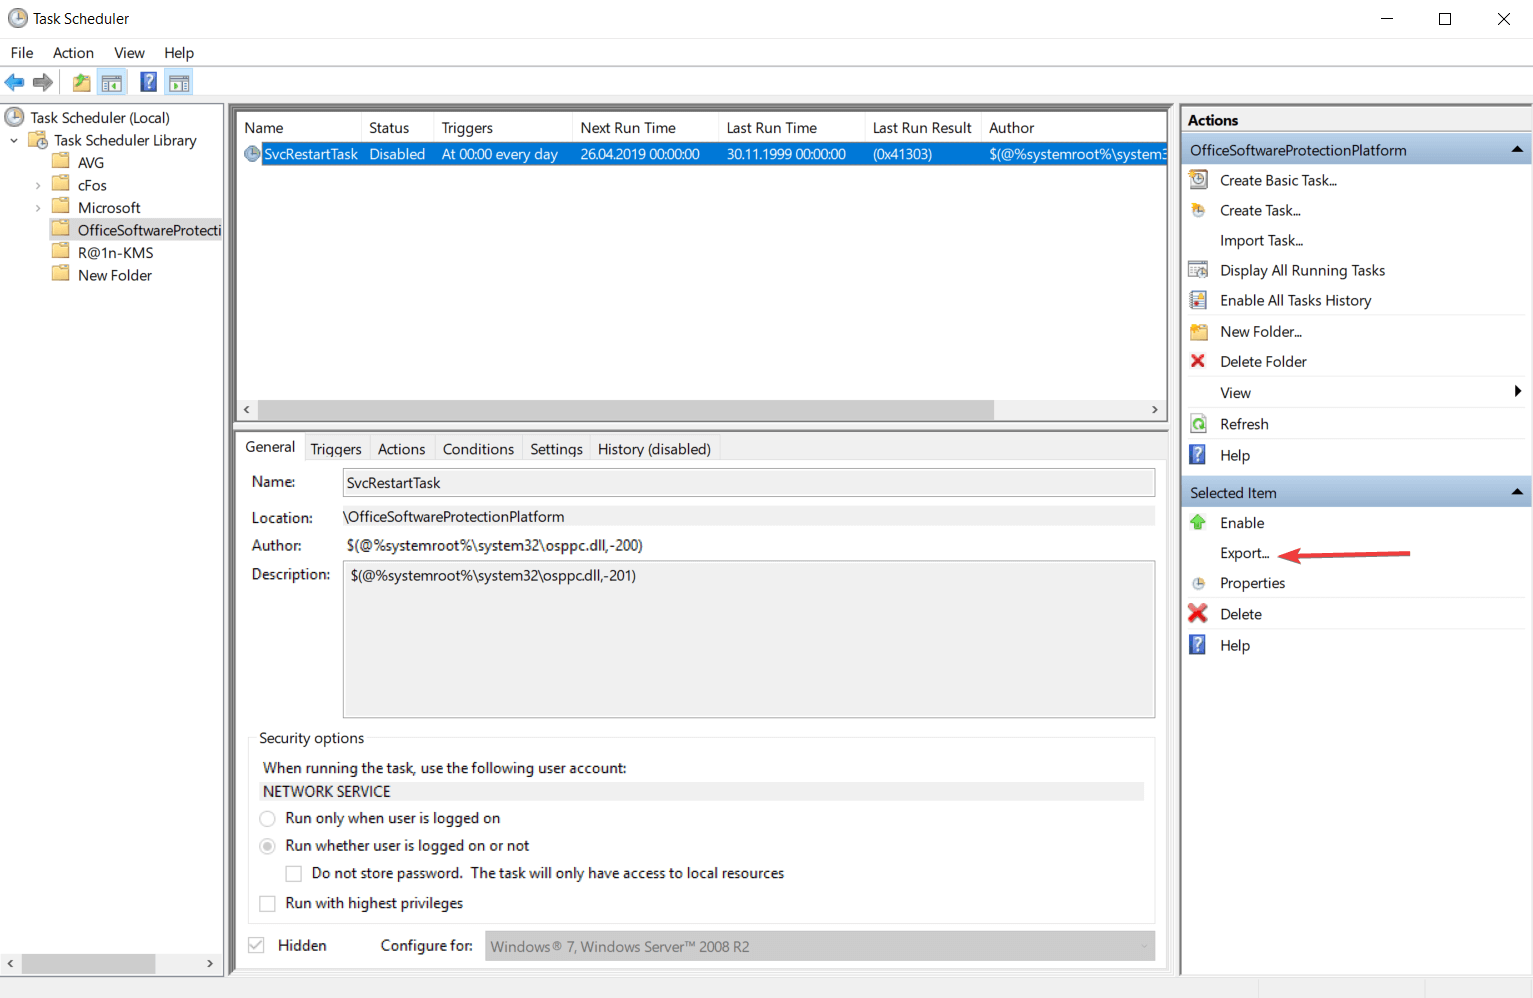
- Open the task folder which contains the task that you want to export. The list with the task folders can be found in the left side of the Task Scheduler interface.
- Right click on the task that you want to export and select the .. option. If you select the task, you can find this option in the Action panel.
- This action will open you a dialog box where you must browse the location where you want to save the task.
Method 2 – Using Command Prompt
- Find Command Prompt typing cmd in the Windows search bar.
- Click on the Command Prompt icon to open the console.
- Edit and paste the following command in the console: schtasks /Query [/S [/P
]]]] /XML /TN
How to run a task on demand
This feature helps you to run a task after or before it was scheduled to run. This is possible only if the task is not disabled and the Allow task to be run on demand setting is selected for your task. Here are 2 very easy to implement methods to do this.
Method 1 – Using Windows interface
- Open the Task Scheduler if you have not already done that.
- Open the folder that contains the task you want to run.
- Right click on your task and select the Run If you select the task you can find this option in the Action panel from the right side of the Task Scheduler interface.

Method 2 – Using Command Prompt
- Right click on the Windows icon from the bottom left corner of your screen.
- This will open a list with shortcuts to different applications. Click on the Command Prompt (Admin) section to open the console as administrator.
- Edit and type this command in the CommandPrompt dialog box. schtasks /Run [/S [/U [/P [
]]]] /TN
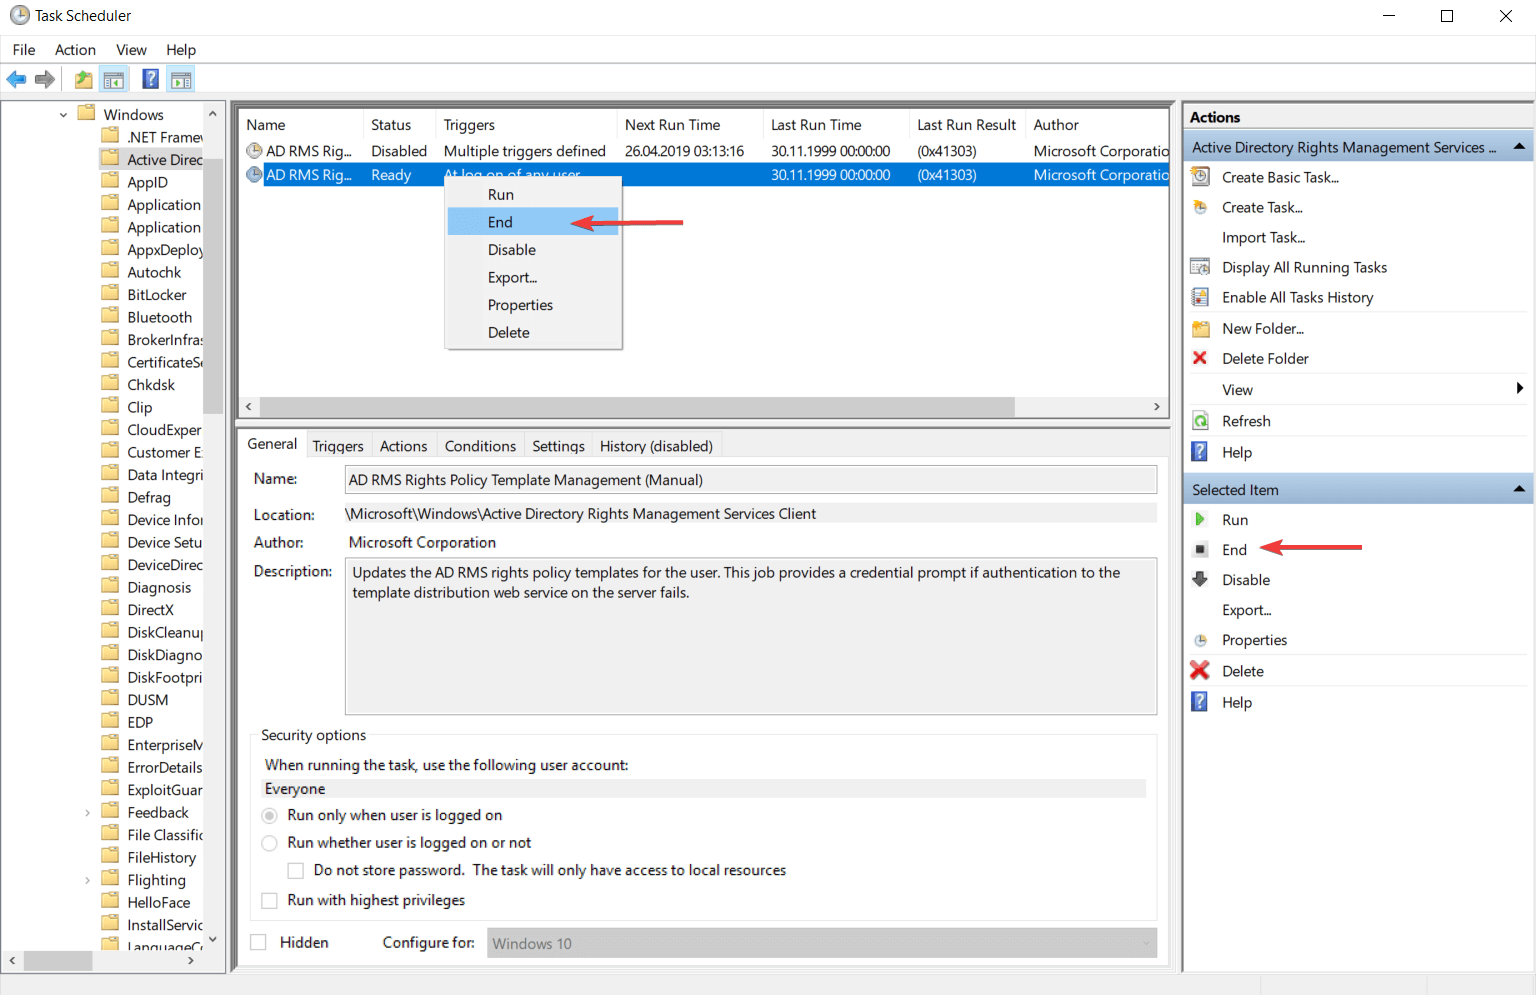
How to stop a running task
Task Scheduler is offering a feature that allows you to end the activity of a task even if it is already running.
To do that, the running task must have the If the running task does not stop when requested, force it to stop setting activated.
This feature is commonly used when a task does not finish it’s activity when you finish the ending process. Here are 2 easy methods to force stop a running task.
Method 1 – Using Windows interface
- Open Task Scheduler with one of the methods presented in the “Start Task Scheduler” topic of this article.
- Select from the left side of the application interface the folder which contains the task that you want to close.
- Right click on your task and select the End If you select the task, this option will appear in the Actions panel from the right side of the interface.
- It will be displayed a dialog box where you will be asked if you want to end all instances of this task. Click on the Yes button to end stop the task.
Method 2 – Using Command Prompt
- Use the Windows Key + R combination to open the Command Prompt.
2. Edit and type this command to end the activity of your task schtasks /End [/S [/U [/P [
- To see the role of each sequence you can enter this command in the console to get all the information you need. schtasks /End /?.
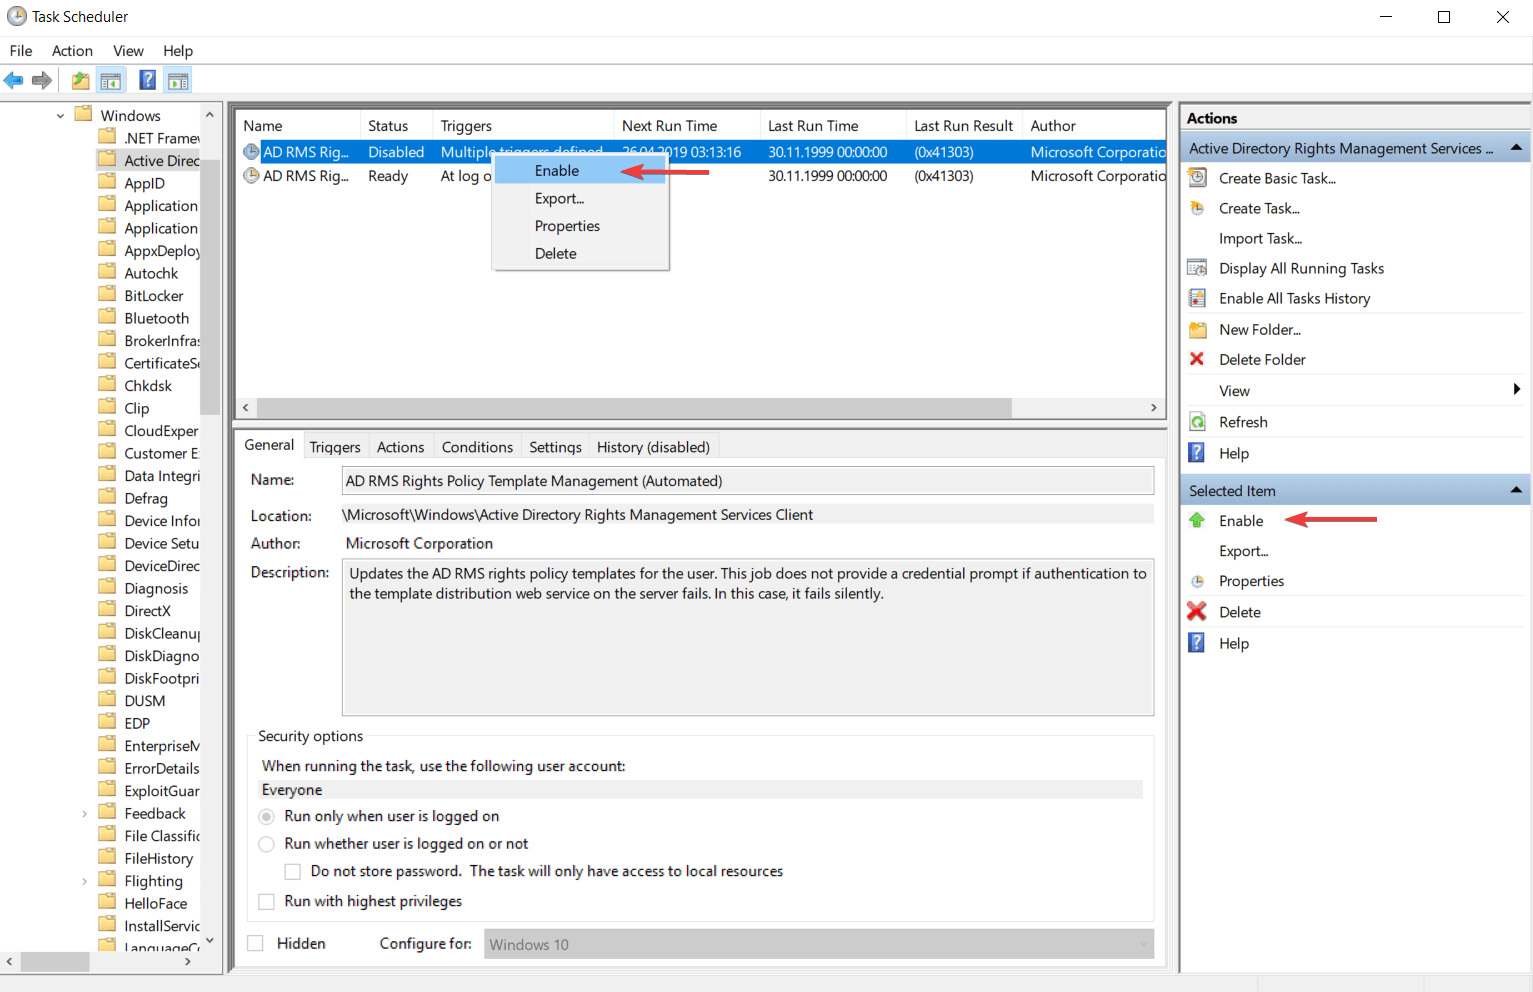
How to enable a task to run
When a task is disabled it can execute the actions. You can create a task and leave it off until the moment you want to use. Here are two ways to activate a task that any kind of user can implement.
Method 1 – Using Windows interface
- Open Task Scheduler.
- Open the task folder which contains the task you want to enable.
- Right click on your task and select the Enable You can find the list with the tasks in the console panel. You can also select your task and run it from the Actions panel.
Method 2 – Using Command Prompt
- Use the Windows Key + R key combination to open Command Prompt.
2. Edit the following command and paste it in the console dialog box: schtasks /Change [/S [/U [/P [
- Enter this command to obtain more information about the command from above: schtasks /Change /? .
How to disable a task for running
Task Scheduler has a feature that allows you to disable the activity of a task for a certain period of time. You can enable the task again any time when you will need it. For more information you can check the “Task Settings” topic of this article.
Method 1 – Using Windows interface
- Open the Task Scheduler if you have not done this. To learn how to do that see the information from the “Start Task Scheduler” topic of this article.
- Open the folder where you have the task. To do that, search the folder in the panel from the left side of the Task Scheduler interface and double click on it.
- This action will display in the console panel all tasks from that folder.
- Search the task that you want to disable and then right click on it.
- It will display a list with some actions, but in this case we are only interested in one. Click on the Disable option to stop your task activity.

Method 2 – Using Command Prompt
- To open Command Prompt right click on the Windows icon from the bottom left corner of your screen.
- This will open a list with different shortcuts and features. Click on the Command Prompt (Admin) to open the console as an administrator.
3. Edit with your information the following command and paste it in the Command Prompt dialog box: schtasks /Change [/S [/U [/P [
]]]] /TN /DISABLE .4. You can find more information about this command line by pasting schtasks /Change /? in the console. It will display you a list with every available command of the Task Scheduler along with a short description of each one.
How to view task properties and history
The task properties contains everything we must know about every task (name, description, actions, triggers, security options, conditions and settings).
The task history is a list with all the tasks created until that moment and can be viewed along with the properties. This list is based on the events tracked by Microsoft Windows Task Scheduler event log.
Every action related to a task is considered an event, so every time when a task runs, is building a line in the event log. Here are 2 methods to view the task‘s properties and history:
Method 1 – Using Windows interface
- Open Task Scheduler with one of the presented methods in the “Start Task Scheduler” topic.
- Open the folder that contains the task you want to view.
- This will open in console a list with all the task from that folder. Right click your task and select the Properties You can select the task and the Properties button will appear in the Actions panel.
- In the Task Properties dialog box you will find the General, Triggers, Actions, Conditions and Settings Click on any of these tabs to see the properties.
- Click on the History tab to view the task‘s history.
Task history option can be enable and also disabled from the Action panel. There you will find the Disable All Task History / Enable All Task History buttons and depending of your wish you can configure the tasks history.
Also you can view the description of an event from the events list by clicking on the History tab.
Method 2 – Using Command Prompt
- Right click on the Windows icon next to the Windows search bar from the bottom left corner of your screen.
- This will open a list with shortcut to different applications. Click on the Command prompt (Admin) category of that list to open the console as an administrator.
- Paste this command in the console Schtasks /Query /FO LIST /V .
- For more information about the command line from above type schtasks /Query /? in the console.


