- Processor Scheduling in Windows 10 for better performance
- Processor Scheduling in Windows 10
- The Core Technologies Blog
- Our Software // Windows Services // 24×7 Operation
- Essential Windows Services: Schedule / Task Scheduler
- What is the Schedule service?
- What happens if I stop the Schedule service?
- The “Stop” button is disabled. How can I stop the Schedule service?
- Is it safe to disable the Schedule service?
- The Schedule service isn’t starting. Help!
- Questions? Problems?
- How to schedule the start and stop of a Windows service?
- 5 Answers 5
- Создание и управление заданиями планировщика из PowerShell
- Управление заданиями Task Scheduler с помощью PowerShell
- Как создать задание планировщика с помощью PowerShell?
- Получение информации и запуск заданий планировщика из PowerShell
- Экспорт и импорт заданий планировщика в XML файл
Processor Scheduling in Windows 10 for better performance
Depending on the usage of your Windows 10/8/7 computer, you can configure processor scheduling, so that it gives you the best performance while using Programs or for Background Processes. You can make this adjustment easily via the Control Panel.
Processor Scheduling in Windows 10
To begin the process, type sysdm.cpl in Run box and hit Enter to open the System Properties. Select the Advanced tab and under Performance, click on Settings. In the Performance Options box, select the Advanced tab again. You will see a section Processor Scheduling.
There are 2 settings you can choose:
- Adjust for best performance of Programs
- Adjust for best performance of Background Services.
This setting changes the DWORD value of Win32PrioritySeparation under the following registry hive:
Just in case you wish to know, the PriorityControl key defines the foreground vs. background priority differential. The possible default values for Win32PrioritySeparation REG_DWORD 0, 1, or 2, with the default being 0x2.
This default value specifies the priority to give to the application running in the foreground. This application receives more processor time relative to other applications running in the background, explains TechNet.. The values here correlate to the following options in the Tasking dialog box: Value Meaning
- 0 Foreground and background applications equally responsive
- 1 Foreground application more responsive than background
- 2 Best foreground application response time.
Coming back, if you have NOT changed this setting at all, and you were to open the Windows Registry, you would see Win32PrioritySeparation have a value 2. These screenshots are from my Windows 8 Pro.
Now, if via the Control Panel, as shown above, you select Adjust for best performance of Background Services and click Apply, you will find that its sets Win32PrioritySeparation to 18 (decimal 24) for Background Services.
If you now select Adjust for best performance of Programs, you will find that it sets Win32PrioritySeparation to 26 (decimal 38) for Programs.
Using this feature, you can set up Windows, so that it is optimized to run programs or foreground services OR Background Services, like printing or backing up, while you work in another program, simply by adjusting Processor Scheduling. This way, Windows then knows how to distribute or allocate the available resources, to best perform these tasks.
If you are using a desktop, you may leave the setting at its default or choose Adjust for best performance of Programs. Let us know if this results in smoother, faster response time for your programs or foreground services.
However, if you use your PC as a Server or if you constantly have background services, such as printing or disk backup that run while you work and you want them to respond faster, you can have Windows share processor resources equally between background and foreground programs by choosing the other option, ie. Adjust for best performance of Background Services.
So you see, Windows now gives you an easy way to set Processor Scheduling. If you are an advanced user and wish to set the values manually, you may use the follow the manual way in this post on how to get the best performance for programs or background services.
The Core Technologies Blog
Our Software // Windows Services // 24×7 Operation
Essential Windows Services: Schedule / Task Scheduler
In this article…
What is the Schedule service?
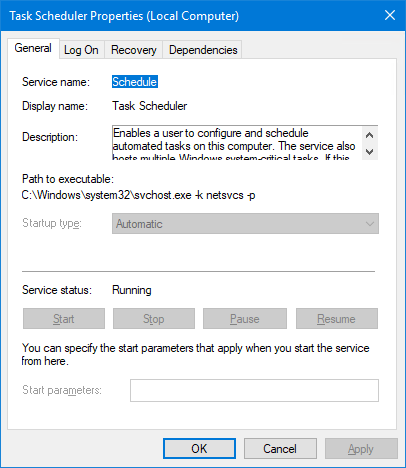
The Schedule service implements part of the Windows Task Scheduler — an important operating system component. The service’s display name is Task Scheduler and it runs inside the service host process, svchost.exe:
The Schedule service is responsible for automatically launching executables, batch files and scripts (i.e. tasks) on your PC, without human intervention. It can start each task:
- At a fixed day and time (e.g. “every night at 11 PM”)
- When someone logs on to the computer
- When the system is booted
- When the machine becomes idle
- When a specific system event occurs
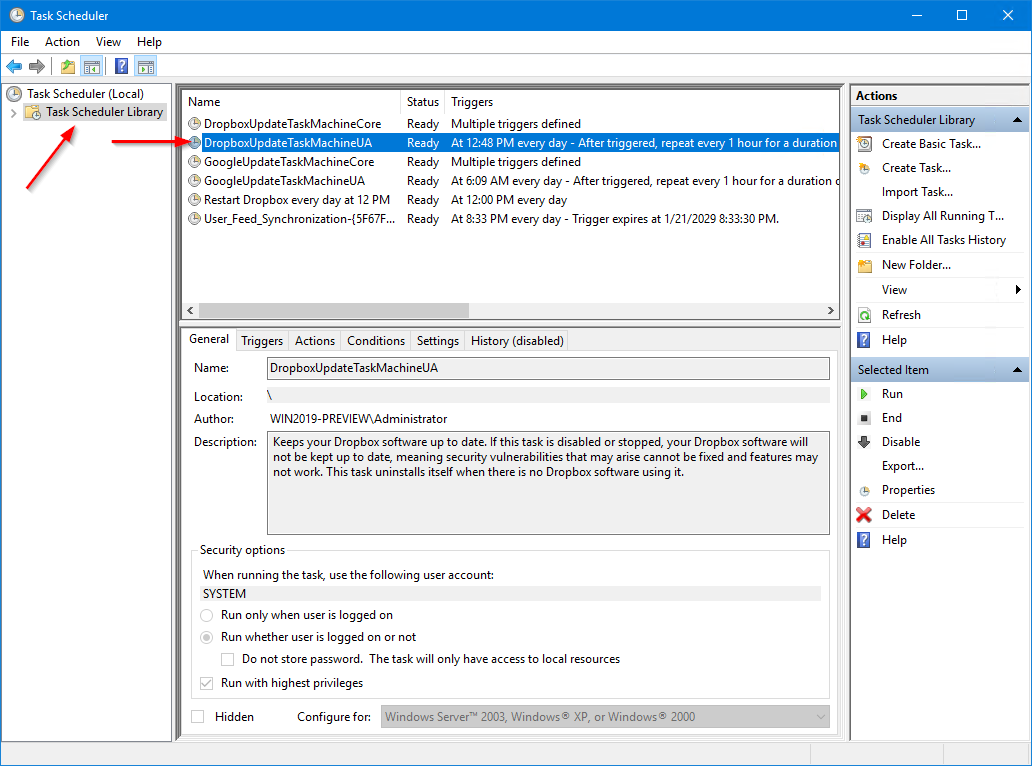
The pool of tasks to be run by the service is managed by the Task Scheduler application. Find it in the Control Panel (it may be called “Scheduled Tasks”), or launch the program directly by running taskschd.msc.
From the main window, navigate into the Task Scheduler Library to see all the tasks that the Schedule service will run. Here we see a task that updates the Dropbox cloud storage software — set to run every day at 12:48 PM:
What happens if I stop the Schedule service?
No scheduled tasks will run when the service is stopped.
This may be of little consequence on a machine with a handful of optional jobs, but it will be a catastrophe on a server that relies on scheduled tasks to perform mission-critical maintenance.
Be sure to understand which camp you are in before stopping the Schedule service!
The “Stop” button is disabled. How can I stop the Schedule service?
If you look closely at the service’s screenshot, you will notice that the Stop button is disabled — indicating that the service cannot be stopped.
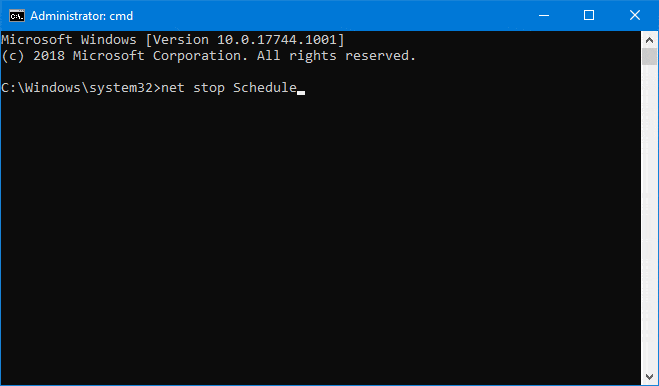
And even the versatile NET STOP command run as an administrator will fail, citing insufficient rights (“Access is denied”):
Evidently Microsoft is telling us, ever so gently, that we shouldn’t stop the service. 🙂
However — if you are hell-bent on ignoring Microsoft’s advice — there is a way forward. You can use our free Service Security Editor tool to rejigger permissions and grant yourself the ability to stop the service.
Download the free Service Security Editor utility from our website.
Start Service Security Editor.
Select Task Scheduler from the drop-down list:
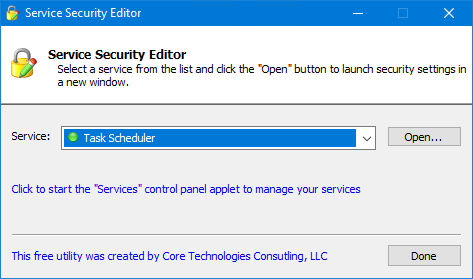
Click the Open button to bring up the service’s security settings panel.
In the top panel, highlight the user (or group) that should be able to stop the service. Check the Stop box in the lower panel.
In this screenshot, we are allowing all administrators to stop the service:
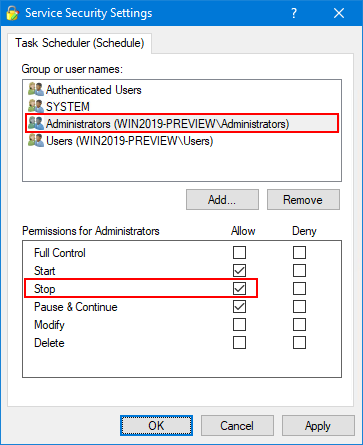
Click OK to record your settings. Close Service Security Editor.
The service’s Stop button will be enabled next time you open Services.msc:
Is it safe to disable the Schedule service?
In their guidance on disabling system services on Windows Server 2016, Microsoft does not classify the Task Scheduler service as “Do Not Disable”. Indeed, they punt on guidance altogether, commenting that “the impact of disabling the service has not been fully evaluated”. However, they do recommend that the Schedule service remains enabled.
In contrast, Windows guru Raymond Chen proclaims that disabling the Task Scheduler service is a bad idea. You should probably heed his advice.
The Schedule service isn’t starting. Help!
We suggest the following:
Reboot your computer. Hopefully you have fallen victim to a temporary glitch and sanity will be restored when the operating system next starts.
Manually run Windows Update. If you’re lucky, the Microsoft Windows engineers have already found and fixed the problem with their software.
Seek expert help. Start with a google search for a quick fix; move on to your local administrator if no resolution is forthcoming.
Reinstall Windows. You may have to start over from scratch if nothing else works… 🙁
Questions? Problems?
If you would like to know more about the Windows Schedule service, or you have a specific problem, please feel free to get in touch. We will do our best to help you!
How to schedule the start and stop of a Windows service?
I’ve a .NET windows service that should start at 7:00 and stop at 23:00 each day, running continuously in background.
While I can code the service so that it sleep between 23 and 7, I would prefer a system configuration (something like cron in unix).
How can I do this on Windows 7?
Note that, if system boot up after 7:00, the service should start immediatly.
5 Answers 5
1- Create a batch file such as starter.bat and type NET START «SERVICE NAME»
2- Create a Task in Task Scheduler for 7:00 a.m that run batch file every day and remember to check Run task as soon as possible after a scheduled start is missed in Settings tab so it will start even if system boot up after 7 a.m.
Repeat those steps for stoper.bat include NET STOP «SERVICE NAME» for 23:00 p.m

You could use Windows task scheduler for this task or a schedule task.
«The AT command schedules commands and programs to run on a computer at a specified time and date. The Schedule service must be running to use the AT command.»

Or you could write another service, let’s call it guard which runs always und starts the other service depending on a config file for example.

Seeing as you need another service to manage the scheduling of the services. Write a service, that hosts service like thingies. The host deals with starting and stopping, even restarting in the event of a crash. You can even get clever and get it to look up with «services» to load an run, and applet to see what’s going on and tweak the schedule , register and unregister services with the host.
An approach anyway.
AT command gets deprecated at some point. this works server 2012 windows 10.
schtasks /create /tn «StartWrapper» /tr «NET START ‘Name of Service'» /sc daily /st 23:05 /RL HIGHEST
You have to play with the quotes to escape the command correctly.
Создание и управление заданиями планировщика из PowerShell
Большинство пользователей и администраторов привыкли использовать графический интерфейс консоли Taskschd.msc для создания заданий планировщика Windows (Task Scheduler), запускаемых по расписанию. Однако в различных скриптах и автоматизируемых задачах для создания заданий планировщика гораздо удобнее использовать возможности PowerShell. В этой статье мы покажем, как создавать и управлять заданиями планировщика Windows из PowerShell.
Управление заданиями Task Scheduler с помощью PowerShell
В Windows 10/Windows Server 2016 для управления задачами в планировщике используется PowerShell модуль ScheduledTasks. Список командлетов в модуле можно вывести так:
Get-Command -Module ScheduledTasks
- Disable-ScheduledTask
- Enable-ScheduledTask
- Export-ScheduledTask
- Get-ClusteredScheduledTask
- Get-ScheduledTask
- Get-ScheduledTaskInfo
- New-ScheduledTask
- New-ScheduledTaskAction
- New-ScheduledTaskPrincipal
- New-ScheduledTaskSettingsSet
- New-ScheduledTaskTrigger
- Register-ClusteredScheduledTask
- Register-ScheduledTask
- Set-ClusteredScheduledTask
- Set-ScheduledTask
- Start-ScheduledTask
- Stop-ScheduledTask
- Unregister-ClusteredScheduledTask
- Unregister-ScheduledTask

Как создать задание планировщика с помощью PowerShell?
В современных версиях PowerShell (начиная с PowerShell 3.0 в Windows Server 2012/Windows 8) для создания заданию планировщика нужно использовать командлеты New-ScheduledTaskTrigger и Register-ScheduledTask.
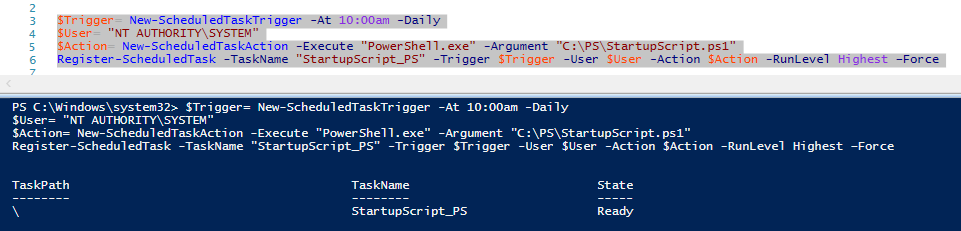
Предположим, наша задача создать задание планировщика, которое должно запускаться при загрузке компьютера (или в определенное время) и выполнять какой-то PowerShell скрипт. Создадим задание планировщика с именем StartupScript_PS. Данное задание должно каждый день в 10:00 запускать PowerShell скрипт, хранящийся в файле C:\PS\StartupScript.ps1 из-под учетной записи системы (SYSTEM). Задание будет выполняться с повышенными привилегиями (галка “Run with highest privileges”).
$Trigger= New-ScheduledTaskTrigger -At 10:00am -Daily
$User= «NT AUTHORITY\SYSTEM»
$Action= New-ScheduledTaskAction -Execute «PowerShell.exe» -Argument «C:\PS\StartupScript.ps1»
Register-ScheduledTask -TaskName «StartupScript_PS» -Trigger $Trigger -User $User -Action $Action -RunLevel Highest –Force
Если задание успешно создано, появится надпись Ready.
Теперь ваш PowerShell скрипт будет запускаться по указанному расписанию. Если на вашем компьютере настроена PowerShell Execution Policy, блокирующая запуск скриптов PS1, вы можете запустить скрипт их планировщика с параметром –Bypass.
Используйте такую строку при создании нового задания:
$Action= New-ScheduledTaskAction -Execute «PowerShell.exe» -Argument “-NoProfile -NoLogo -NonInteractive -ExecutionPolicy Bypass -File C:\PS\StartupScript.ps1″
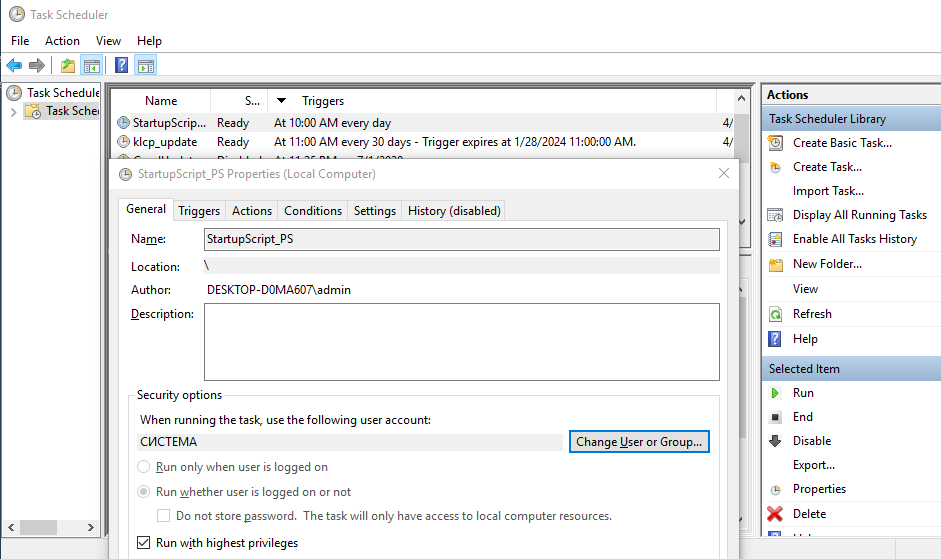
Откройте консоль Taskschd.msc и проверьте, что проверьте, что в Task Scheduler Library появилось новое задание планировщика.
$TaskName = «NewPsTask»
$TaskDescription = «Запуск скрипта PowerShell из планировщика»
$TaskCommand = «c:\windows\system32\WindowsPowerShell\v1.0\powershell.exe»
$TaskScript = «C:\PS\StartupScript.ps1»
$TaskArg = «-WindowStyle Hidden -NonInteractive -Executionpolicy unrestricted -file $TaskScript»
$TaskStartTime = [datetime]::Now.AddMinutes(1)
$service = new-object -ComObject(«Schedule.Service»)
$service.Connect()
$rootFolder = $service.GetFolder(«\»)
$TaskDefinition = $service.NewTask(0)
$TaskDefinition.RegistrationInfo.Description = «$TaskDescription»
$TaskDefinition.Settings.Enabled = $true
$TaskDefinition.Settings.AllowDemandStart = $true
$triggers = $TaskDefinition.Triggers
#http://msdn.microsoft.com/en-us/library/windows/desktop/aa383915(v=vs.85).aspx
$trigger = $triggers.Create(8)
Получение информации и запуск заданий планировщика из PowerShell
Вы можете вывести список всех активных заданий планировщика в Windows с помощью команды:
Get-ScheduledTask -TaskPath | ? state -ne Disabled
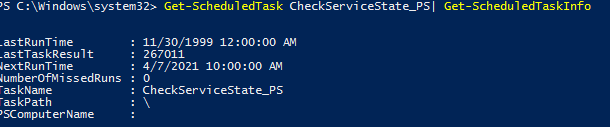
Чтобы получить информацию о конкретном задании:
Get-ScheduledTask CheckServiceState_PS| Get-ScheduledTaskInfo
Вы можете отключить это задание:
Get-ScheduledTask CheckServiceState_PS | Disable-ScheduledTask
Чтобы включить задание:
Get-ScheduledTask CheckServiceState_PS | Enable-ScheduledTask
Чтобы запустить задание немедленно (не дожидаясь расписания), выполните:

Чтобы полностью удалить задание из Task Scheduler:
Unregister-ScheduledTask -TaskName CheckServiceState_PS
Если нужно изменить имя пользователя, из-под которого запускается задание и, например, режим совместимости, используйте командлет Set-ScheduledTask:
$task_user = New-ScheduledTaskPrincipal -UserId ‘winitpro\kbuldogov’ -RunLevel Highest
$task_settings = New-ScheduledTaskSettingsSet -Compatibility ‘Win7’
Set-ScheduledTask -TaskName CheckServiceState_PS -Principal $task_user -Settings $task_settings

Экспорт и импорт заданий планировщика в XML файл
С помощью PowerShell можно экспортировать любое задания планировщика в текстовый XML файл для распространения на другие компьютеры. Вы можете экспортировать задание из графического интерфейса Task Scheduler или из консоли PowerShell.
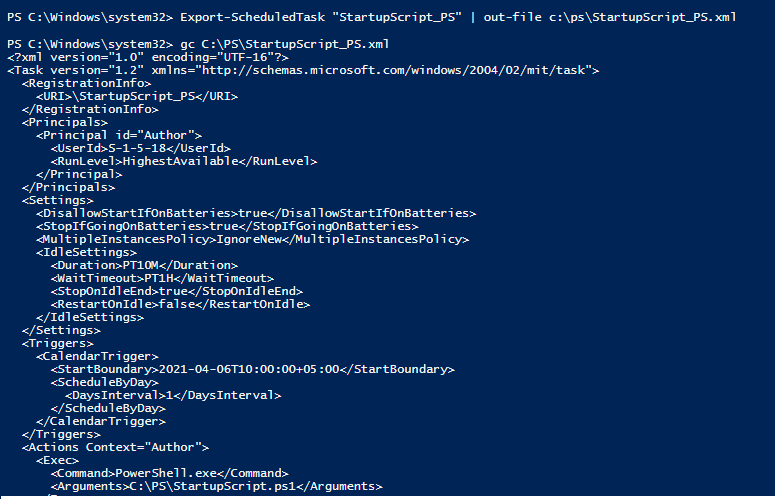
Следующая команда экспортирует задание StartupScript_PS в файл StartupScript_PS.xml:
Export-ScheduledTask «StartupScript_PS» | out-file c:\temp\StartupScript_PS.xml
schtasks /query /tn «NewPsTask» /xml >> «c:\ps\NewPsTask.xml»
После того, как настройки задания планировщика экспортированы в XML файл, его можно импортировать на любой другой компьютер с помощи графической консоли, SchTasks.exe или PowerShell.
Воспользуйте командлетом PowerShell Register-ScheduledTask чтобы параметры задания из файла и зарегистрировать его:
Register-ScheduledTask -Xml (Get-Content “\\Server1\public\NewPsTask.xml” | out-string) -TaskName «NewPsTask»
schtasks /create /tn «NewPsTask» /xml «\\Server1\public\NewPsTask.xml » /ru corp\aaivanov /rp Pa$$w0rd
schtasks /Run /TN «NewPsTask»
Обратите внимание, что в этом примере указаны данные учетной записи, из-под которой будет запускаться задание. Если имя и пароль учетной записи не указаны, то т.к. они не хранятся в задании, они будут запрошены при импорте.


