- Использование встроенного SSH клиента в Windows 10
- Установка клиента OpenSSH в Windows 10
- Как использовать SSH клиенте в Windows 10?
- SCP: копирование файлов из/в Windows через SSH
- Installing SFTP/SSH Server on Windows using OpenSSH
- Installing SFTP/SSH Server
- On Windows 10 version 1803 and newer
- On earlier versions of Windows
- Configuring SSH server
- Setting up SSH public key authentication
- Connecting to the server
- Finding Host Key
- Connecting
- Copying a local file from Windows to a remote server using scp [closed]
- 7 Answers 7
- Подключение к Windows по SSH как в Linux
Использование встроенного SSH клиента в Windows 10
В Windows 10 и Windows Server 2019 появился встроенный SSH клиент, который вы можете использовать для подключения к *Nix серверам, ESXi хостам и другим устройствам по защищенному протоколу, вместо Putty, MTPuTTY или других сторонних SSH клиентов. Встроенный SSH клиент Windows основан на порте OpenSSH и предустановлен в ОС, начиная с Windows 10 1809.
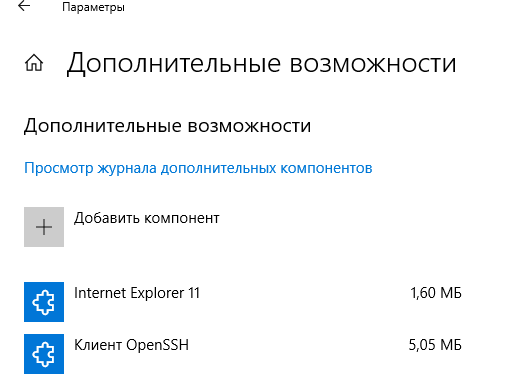
Установка клиента OpenSSH в Windows 10
Клиент OpenSSH входит в состав Features on Demand Windows 10 (как и RSAT). Клиент SSH установлен по умолчанию в Windows Server 2019 и Windows 10 1809 и более новых билдах.
Проверьте, что SSH клиент установлен:
Get-WindowsCapability -Online | ? Name -like ‘OpenSSH.Client*’

В нашем примере клиент OpenSSH установлен (статус: State: Installed).
Если SSH клиент отсутствует (State: Not Present), его можно установить:
- С помощью команды PowerShell: Add-WindowsCapability -Online -Name OpenSSH.Client*
- С помощью DISM: dism /Online /Add-Capability /CapabilityName:OpenSSH.Client
0.0.1.0
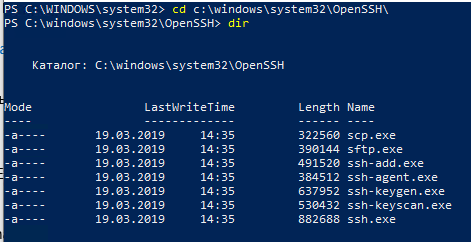
]Бинарные файлы OpenSSH находятся в каталоге c:\windows\system32\OpenSSH\.
- ssh.exe – это исполняемый файл клиента SSH;
- scp.exe – утилита для копирования файлов в SSH сессии;
- ssh-keygen.exe – утилита для генерации ключей аутентификации;
- ssh-agent.exe – используется для управления ключами;
- ssh-add.exe – добавление ключа в базу ssh-агента.
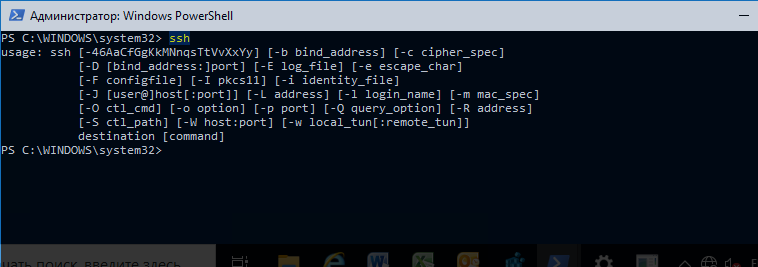
Как использовать SSH клиенте в Windows 10?
Чтобы запустить SSH клиент, запустите командную строку PowerShell или cmd.exe . Выведите доступные параметры и синтаксис утилиты ssh.exe, набрав команду:
ssh
usage: ssh [-46AaCfGgKkMNnqsTtVvXxYy] [-b bind_address] [-c cipher_spec]
[-D [bind_address:]port] [-E log_file] [-e escape_char]
[-F configfile] [-I pkcs11] [-i identity_file]
[-J [user@]host[:port]] [-L address] [-l login_name] [-m mac_spec]
[-O ctl_cmd] [-o option] [-p port] [-Q query_option] [-R address]
[-S ctl_path] [-W host:port] [-w local_tun[:remote_tun]]
destination [command]
Для подключения к удаленному серверу по SSH используется команда:
Если SSH сервер запущен на нестандартном порту, отличном от TCP/22, можно указать номер порта:
ssh username@host -p port
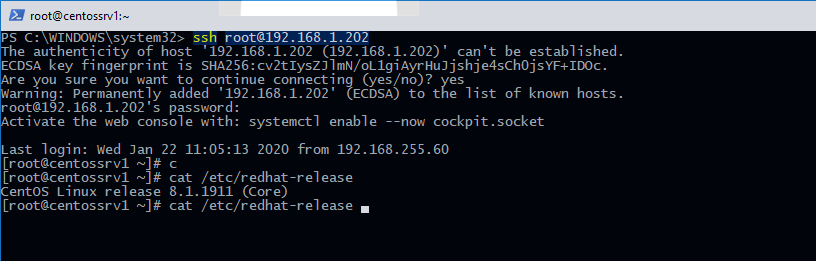
Например, чтобы подключиться к Linux хосту с IP адресом 192.168.1.202 под root, выполните:
При первом подключении появится запрос на добавление ключа хоста в доверенные, наберите yes -> Enter (при этом отпечаток ключа хоста добавляется в файл C:\Users\username\.ssh\known_hosts).
Затем появится запрос пароля указанной учетной записи, укажите пароль root, после чего должна открытся консоль удаленного Linux сервера (в моем примере на удаленном сервере установлен CentOS 8).
Если вы используете SSH аутентификацию по RSA ключам (см. пример с настройкой SSH аутентификации по ключам в Windows), вы можете указать путь к файлу с закрытым ключом в клиенте SSH так:
ssh root@192.168.1.92 -i «C:\Users\username\.ssh\id_rsa»
Также вы можете добавить ваш закрытый ключ в SSH-Agent. Сначала нужно включить службу ssh-agent и настроить ее автозапуск:
set-service ssh-agent StartupType ‘Automatic’
Start-Service ssh-agent
Добавим ваш закрытый ключ в базу ssh-agent:
Теперь вы можете подключиться к серверу по SSH без указания пути к RSA ключу, он будет использоваться автоматически. Пароль для подключения не запрашивается (если только вы не защитили ваш RSA ключ отдельным паролем):
Еще несколько полезных аргументов SSH:
- -C – сжимать трафик между клиентом и сервером (полезно на медленных и нестабильных подключениях);
- -v – вывод подробной информации обо всех действия клиента ssh;
- -R / -L – можно использовать для проброса портов через SSH туннель.
SCP: копирование файлов из/в Windows через SSH
С помощью утилиты scp.exe, которая входит в состав пакета клиента SSH, вы можете скопировать файл с вашего компьютера на SSH сервер:
scp.exe «E:\ISO\CentOS-8.1.1911-x86_64.iso» root@192.168.1.202:/home 
Можно рекурсивно скопировать все содержимое каталога:
scp -r E:\ISO\ root@192.168.1.202:/home
И наоборот, вы можете скопировать файл с удаленного сервера на ваш компьютер:
scp.exe root@192.168.1.202:/home/CentOS-8.1.1911-x86_64.iso e:\tmp
Итак, теперь вы можете прямо из Windows 10 подключаться к SSH серверам, копировать файлы с помощью scp без установки сторонних приложений и утилит.
Installing SFTP/SSH Server on Windows using OpenSSH
Recently, Microsoft has released a port of OpenSSH for Windows. You can use the package to set up an SFTP /SSH server on Windows.
Installing SFTP/SSH Server
On Windows 10 version 1803 and newer
- In Settings app, go to Apps > Apps & features > Manage optional features.
- Locate “OpenSSH server” feature, expand it, and select Install.
Binaries are installed to %WINDIR%\System32\OpenSSH . Configuration file ( sshd_config ) and host keys are installed to %ProgramData%\ssh (only after the server is started for the first time).
You may still want to use the following manual installation, if you want to install a newer version of OpenSSH than the one built into Windows 10.
On earlier versions of Windows
- Download the latest OpenSSH for Windows binaries (package OpenSSH-Win64.zip or OpenSSH-Win32.zip )
- As the Administrator, extract the package to C:\Program Files\OpenSSH
- As the Administrator, install sshd and ssh-agent services:
Configuring SSH server
- Allow incoming connections to SSH server in Windows Firewall:
- When installed as an optional feature, the firewall rule “OpenSSH SSH Server (sshd)” should have been created automatically. If not, proceed to create and enable the rule as follows.
- Either run the following PowerShell command as the Administrator:
Replace C:\System32\OpenSSH\sshd.exe with the actual path to the sshd.exe ( C:\Program Files\OpenSSH\ssh.exe , had you followed the manual installation instructions above). - or go to Control Panel > System and Security > Windows Defender Firewall1> Advanced Settings > Inbound Rules and add a new rule for port 22.
- Start the service and/or configure automatic start:
- Go to Control Panel > System and Security > Administrative Tools and open Services. Locate OpenSSH SSH Server service.
- If you want the server to start automatically when your machine is started: Go to Action > Properties. In the Properties dialog, change Startup type to Automatic and confirm.
- Start the OpenSSH SSH Server service by clicking the Start the service.
Setting up SSH public key authentication
Follow a generic guide for Setting up SSH public key authentication in *nix OpenSSH server, with the following difference:
Connecting to the server
Finding Host Key
Before the first connection, find out fingerprint of the server’s host key by using ssh-keygen.exe for each file.
In Windows command-prompt, use:
Replace %WINDIR%\System32 with %ProgramFiles% , if appropriate.
In PowerShell, use:
Replace $env:WINDIR\System32 with $env:ProgramFiles , if appropriate.
You will get an output like this:
Connecting
Start WinSCP. Login dialog will appear. On the dialog:
- Make sure New site node is selected.
- On New site node, make sure the SFTP protocol is selected.
- Enter your machine/server IP address (or a hostname) into the Host name box.
- Enter your Windows account name to the User name box. It might have to be entered in the format user@domain , if running on a domain.
- For a public key authentication:
- Press the Advanced button to open Advanced site settings dialog and go to SSH > Authentication page.
- In Private key file box select your private key file.
- Submit Advanced site settings dialog with the OK button.
- For a password authentication:
- Enter your Windows account password to the Password box.
- If you Windows account does not have a password, you cannot authenticate with the password authentication (i.e. with an empty password), you need to use the public key authentication.
- Save your site settings using the Save button.
- Login using Login button.
- Verify the host key by comparing fingerprint with those collected before (see above).
If you cannot authenticate to the server, and you are using Windows 10 Developer mode, make sure that your OpenSSH server does not conflict with an internal SSH server used by the Developer mode. You may need to turn off the SSH Server Broker and SSH Server Proxy Windows services. Or run your OpenSSH server on a different port than 22.
Copying a local file from Windows to a remote server using scp [closed]
Want to improve this question? Update the question so it’s on-topic for Stack Overflow.
Closed 1 year ago .
So, I’m attempting to simply transfer folder of files from my local computer to a server via ssh and scp. After sudoing I’m using the command as follows:
I get the error:
ssh: C: Name or service not known
I’m guessing its my syntax for c:/desktop etc. Any ideas?
BTW I’m using putty + Windows 7.

7 Answers 7
If your drive letter is C, you should be able to use
scp -r \desktop\myfolder\deployments\ user@host:/path/to/whereyouwant/thefile
without drive letter and backslashes instead of forward slashes.
You are using putty, so you can use pscp. It is better adapted to Windows.

-r ./localdir user@host:»D:\remotedir» – serigado Jun 11 ’20 at 16:16
Drive letters can be used in the target like
where c is the drive letter. It’s treated like a directory.
Maybe this works on the source, too.
On windows you can use a graphic interface of scp using winSCP. A nice free software that implements SFTP protocol.
I see this post is very old, but in my search for an answer to this very question, I was unable to unearth a solution from the vast internet super highway. I, therefore, hope I can contribute and help someone as they too find themselves stumbling for an answer. This simple, natural question does not seem to be documented anywhere.
On Windows 10 Pro connecting to Windows 10 Pro, both running OpenSSH (Windows version 7.7p1, LibreSSL 2.6.5), I was able to find a solution by trial and error. Though surprisingly simple, it took a while. I found the required syntax to be
BY EXAMPLE INSTEAD OF MORE OBSCURE AND INCOMPLETE TEMPLATES:
Transferring securely from a remote system to your local system:
or going the other way around:
I also found that if spaces are in the path, the quotations should begin following the remote host name:
Also, for your particular case, I echo what Cornel says:
On Windows, use backslash, at least at conventional command console.
Подключение к Windows по SSH как в Linux
Меня всегда удручало подключение к Windows машинам. Нет, я не противник и не сторонник Microsoft и их продуктов. Каждый продукт существует для своей цели, но речь не об этом.
Для меня всегда было мучительно больно подключаться к серверам с Windows, потому что эти подключения либо настраиваются через одно место (привет WinRM с HTTPS) либо работают не очень стабильно (здравствуй RDP к виртуалкам за океаном).
Поэтому, случайно натолкнувшись на проект Win32-OpenSSH, я решил поделиться опытом настройки. Возможно кому-нибудь эта тулза сэкономить кучу нервов.

Варианты установки:
- Вручную
- Через пакет Chocolatey
- Через Ansible, например роль jborean93.win_openssh
Далее я буду рассказывать про первый пункт, так как с остальными и так все более менее понятно.
Отмечу, что данный проект пока что находится на стадии beta, поэтому его не рекомендуют использовать в production.
Итак, скачиваем последний релиз, на текущий момент это 7.9.0.0p1-beta. Есть версии как для 32 так и для 64 битных систем.
Распаковываем в C:\Program Files\OpenSSH
Обязательный момент для корректной работы: права на запись в этой директории должны быть только у SYSTEM и у админской группы.
Устанавливаем сервисы скриптом install-sshd.ps1 находящимся в этой директории
Разрешаем входящие подключения на 22 порт:
Уточнение: апплет New-NetFirewallRule используется на Windows Server 2012 и новее. В наиболее старых системах (либо десктопных) можно воспользоваться командой:
При запуске будут автоматически сгенерированы хост-ключи (если отсутствуют) в %programdata%\ssh
Автозапуск сервиса при запуске системы мы можем включить командой:
Так же, можно сменить командную оболочку по умолчанию (после установки, по умолчанию — cmd):
Уточнение: Необходимо указывать абсолютный путь.
А дальше настраиваем sshd_config, который расположем в C:\ProgramData\ssh. Например:
И создаем в пользовательской папке директорию .ssh, а в ней файл authorized_keys. Туда записываем публичные ключи.
Важное уточнение: права на запись в этот файл, должен иметь только пользователь, в чьей директории лежит файл.
Но если у вас проблемы с этим, всегда можно выключить проверку прав в конфиге:
К слову, в C:\Program Files\OpenSSH лежат 2 скрипта (FixHostFilePermissions.ps1, FixUserFilePermissions.ps1), которые должны но не обязаны фиксить права, в том числе и с authorized_keys, но почему-то не фиксят.
Не забывайте перезапускать сервис sshd после для применения изменений.
- Стандартный подход к подключению к серверам.
Когда есть немного Windows машин, очень неудобно когда:
Так, сюда мы ходим по ssh, а тут рдп,
и вообще best-practice с бастионами, сначала ssh-туннель, а через него RDP. - Простота настройки
Считаю что это очевидно. - Скорость подключения и работы с удаленной машиной
Нет графической оболочки, экономятся как ресурсы сервера, так и количество передаваемых данных.
Минусы:
- Не заменяет RDP полностью.
Не все можно сделать из консоли, увы. Я имею ввиду ситуации, когда требуется GUI.
Материалы использованные в статье:
Ссылка на сам проект
Варианты установки бессовестно скопированы с Ansible docs.


