- Глава 5: Using PSCP to transfer files securely
- 5.1 Starting PSCP
- 5.2 PSCP Usage
- 5.2.1 The basics
- 5.2.1.1 user
- 5.2.1.2 host
- 5.2.1.3 source
- 5.2.1.4 target
- 5.2.2 Options
- 5.2.2.1 -ls list remote files
- 5.2.2.2 -p preserve file attributes
- 5.2.2.3 -q quiet, don’t show statistics
- 5.2.2.4 -r copies directories recursively
- 5.2.2.5 -batch avoid interactive prompts
- 5.2.2.6 -sftp , -scp force use of particular protocol
- 5.2.2.7 -no-sanitise-stderr : control error message sanitisation
- 5.2.3 Return value
- 5.2.4 Using public key authentication with PSCP
- Knowledge Base Article
- Quick Links and Search
- How can we help?
- Quick Login
- Transfer Files Using PuTTY
- Install PuTTY SCP (PSCP)
- Transfer files using PSCP
- Information Security Squad
- 👉 Как использовать команду PSCP в Windows👨⚕️
- Скачать Pscp
- Установка Pscp
- Помощь и Настройки
- Скачать или загрузить файл с удаленного сервера
- Скачать или загрузить несколько файлов с удаленного сервера
- Загрузить или поместить файл на удаленный сервер
- Загрузить несколько файлов на удаленный сервер
- Скачать каталоги рекурсивно с удаленного сервера
- Загрузить каталоги рекурсивно на удаленный сервер
Глава 5: Using PSCP to transfer files securely
PSCP, the PuTTY Secure Copy client, is a tool for transferring files securely between computers using an SSH connection.
If you have an SSH-2 server, you might prefer PSFTP (see chapter 6) for interactive use. PSFTP does not in general work with SSH-1 servers, however.
5.1 Starting PSCP
PSCP is a command line application. This means that you cannot just double-click on its icon to run it and instead you have to bring up a console window. With Windows 95, 98, and ME, this is called an «MS-DOS Prompt» and with Windows NT, 2000, and XP, it is called a «Command Prompt». It should be available from the Programs section of your Start Menu.
To start PSCP it will need either to be on your PATH or in your current directory. To add the directory containing PSCP to your PATH environment variable, type into the console window:
This will only work for the lifetime of that particular console window. To set your PATH more permanently on Windows NT, 2000, and XP, use the Environment tab of the System Control Panel. On Windows 95, 98, and ME, you will need to edit your AUTOEXEC.BAT to include a set command like the one above.
5.2 PSCP Usage
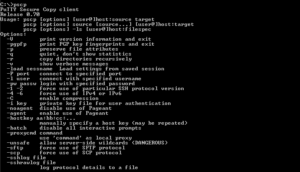
Once you’ve got a console window to type into, you can just type pscp on its own to bring up a usage message. This tells you the version of PSCP you’re using, and gives you a brief summary of how to use PSCP:
(PSCP’s interface is much like the Unix scp command, if you’re familiar with that.)
5.2.1 The basics
To receive (a) file(s) from a remote server:
So to copy the file /etc/hosts from the server example.com as user fred to the file c:\temp\example-hosts.txt , you would type:
To send (a) file(s) to a remote server:
So to copy the local file c:\documents\foo.txt to the server example.com as user fred to the file /tmp/foo you would type:
You can use wildcards to transfer multiple files in either direction, like this:
However, in the second case (using a wildcard for multiple remote files) you may see a warning saying something like «warning: remote host tried to write to a file called « terminal.c » when we requested a file called « *.c ». If this is a wildcard, consider upgrading to SSH-2 or using the « -unsafe » option. Renaming of this file has been disallowed».
This is due to a fundamental insecurity in the old-style SCP protocol: the client sends the wildcard string ( *.c ) to the server, and the server sends back a sequence of file names that match the wildcard pattern. However, there is nothing to stop the server sending back a different pattern and writing over one of your other files: if you request *.c , the server might send back the file name AUTOEXEC.BAT and install a virus for you. Since the wildcard matching rules are decided by the server, the client cannot reliably verify that the filenames sent back match the pattern.
PSCP will attempt to use the newer SFTP protocol (part of SSH-2) where possible, which does not suffer from this security flaw. If you are talking to an SSH-2 server which supports SFTP, you will never see this warning. (You can force use of the SFTP protocol, if available, with -sftp — see section 5.2.2.6.)
If you really need to use a server-side wildcard with an SSH-1 server, you can use the -unsafe command line option with PSCP:
This will suppress the warning message and the file transfer will happen. However, you should be aware that by using this option you are giving the server the ability to write to any file in the target directory, so you should only use this option if you trust the server administrator not to be malicious (and not to let the server machine be cracked by malicious people). Alternatively, do any such download in a newly created empty directory. (Even in «unsafe» mode, PSCP will still protect you against the server trying to get out of that directory using pathnames including « .. ».)
5.2.1.1 user
The login name on the remote server. If this is omitted, and host is a PuTTY saved session, PSCP will use any username specified by that saved session. Otherwise, PSCP will attempt to use the local Windows username.
5.2.1.2 host
The name of the remote server, or the name of an existing PuTTY saved session. In the latter case, the session’s settings for hostname, port number, cipher type and username will be used.
5.2.1.3 source
One or more source files. Wildcards are allowed. The syntax of wildcards depends on the system to which they apply, so if you are copying from a Windows system to a UNIX system, you should use Windows wildcard syntax (e.g. *.* ), but if you are copying from a UNIX system to a Windows system, you would use the wildcard syntax allowed by your UNIX shell (e.g. * ).
If the source is a remote server and you do not specify a full pathname (in UNIX, a pathname beginning with a / (slash) character), what you specify as a source will be interpreted relative to your home directory on the remote server.
5.2.1.4 target
The filename or directory to put the file(s). When copying from a remote server to a local host, you may wish simply to place the file(s) in the current directory. To do this, you should specify a target of . . For example:
. would copy /home/tom/.emacs on the remote server to the current directory.
As with the source parameter, if the target is on a remote server and is not a full path name, it is interpreted relative to your home directory on the remote server.
5.2.2 Options
PSCP accepts all the general command line options supported by the PuTTY tools, except the ones which make no sense in a file transfer utility. See section 3.8.3 for a description of these options. (The ones not supported by PSCP are clearly marked.)
PSCP also supports some of its own options. The following sections describe PSCP’s specific command-line options.
5.2.2.1 -ls list remote files
If the -ls option is given, no files are transferred; instead, remote files are listed. Only a hostname specification and optional remote file specification need be given. For example:
The SCP protocol does not contain within itself a means of listing files. If SCP is in use, this option therefore assumes that the server responds appropriately to the command ls -la ; this may not work with all servers.
If SFTP is in use, this option should work with all servers.
5.2.2.2 -p preserve file attributes
By default, files copied with PSCP are timestamped with the date and time they were copied. The -p option preserves the original timestamp on copied files.
5.2.2.3 -q quiet, don’t show statistics
By default, PSCP displays a meter displaying the progress of the current transfer:
The fields in this display are (from left to right), filename, size (in kilobytes) of file transferred so far, estimate of how fast the file is being transferred (in kilobytes per second), estimated time that the transfer will be complete, and percentage of the file so far transferred. The -q option to PSCP suppresses the printing of these statistics.
5.2.2.4 -r copies directories recursively
By default, PSCP will only copy files. Any directories you specify to copy will be skipped, as will their contents. The -r option tells PSCP to descend into any directories you specify, and to copy them and their contents. This allows you to use PSCP to transfer whole directory structures between machines.
5.2.2.5 -batch avoid interactive prompts
If you use the -batch option, PSCP will never give an interactive prompt while establishing the connection. If the server’s host key is invalid, for example (see section 2.2), then the connection will simply be abandoned instead of asking you what to do next.
This may help PSCP’s behaviour when it is used in automated scripts: using -batch , if something goes wrong at connection time, the batch job will fail rather than hang.
5.2.2.6 -sftp , -scp force use of particular protocol
As mentioned in section 5.2.1, there are two different file transfer protocols in use with SSH. Despite its name, PSCP (like many other ostensible scp clients) can use either of these protocols.
The older SCP protocol does not have a written specification and leaves a lot of detail to the server platform. Wildcards are expanded on the server. The simple design means that any wildcard specification supported by the server platform (such as brace expansion) can be used, but also leads to interoperability issues such as with filename quoting (for instance, where filenames contain spaces), and also the security issue described in section 5.2.1.
The newer SFTP protocol, which is usually associated with SSH-2 servers, is specified in a more platform independent way, and leaves issues such as wildcard syntax up to the client. (PuTTY’s SFTP wildcard syntax is described in section 6.2.2.) This makes it more consistent across platforms, more suitable for scripting and automation, and avoids security issues with wildcard matching.
Normally PSCP will attempt to use the SFTP protocol, and only fall back to the SCP protocol if SFTP is not available on the server.
The -scp option forces PSCP to use the SCP protocol or quit.
The -sftp option forces PSCP to use the SFTP protocol or quit. When this option is specified, PSCP looks harder for an SFTP server, which may allow use of SFTP with SSH-1 depending on server setup.
5.2.2.7 -no-sanitise-stderr : control error message sanitisation
The -no-sanitise-stderr option will cause PSCP to pass through the server’s standard-error stream literally, without stripping control characters from it first. This might be useful if the server were sending coloured error messages, but it also gives the server the ability to have unexpected effects on your terminal display. For more discussion, see section 7.2.3.5.
5.2.3 Return value
PSCP returns an ERRORLEVEL of zero (success) only if the files were correctly transferred. You can test for this in a batch file, using code such as this:
5.2.4 Using public key authentication with PSCP
Like PuTTY, PSCP can authenticate using a public key instead of a password. There are three ways you can do this.
Firstly, PSCP can use PuTTY saved sessions in place of hostnames (see section 5.2.1.2). So you would do this:
- Run PuTTY, and create a PuTTY saved session (see section 4.1.2) which specifies your private key file (see section 4.23.8). You will probably also want to specify a username to log in as (see section 4.15.1).
- In PSCP, you can now use the name of the session instead of a hostname: type pscp sessionname:file localfile , where sessionname is replaced by the name of your saved session.
Secondly, you can supply the name of a private key file on the command line, with the -i option. See section 3.8.3.18 for more information.
Thirdly, PSCP will attempt to authenticate using Pageant if Pageant is running (see chapter 9). So you would do this:
- Ensure Pageant is running, and has your private key stored in it.
- Specify a user and host name to PSCP as normal. PSCP will automatically detect Pageant and try to use the keys within it.
For more general information on public-key authentication, see chapter 8.
Knowledge Base Article
Quick Links and Search
How can we help?
Quick Login
Transfer Files Using PuTTY
How to install the PuTTy Secure Copy client and use it to transfer files
This article applies to: Managed Servers
PuTTY is the CIT-recommended application for secure file transfer using SCP between Windows clients and Windows or Unix servers. Its secure copy utility is called PuTTy Secure Copy Protocol (PSCP).
PSCP and PuTTY are available from PuTTY.org.
Install PuTTY SCP (PSCP)
PSCP is a tool for transferring files securely between computers using an SSH connection. To use this utility, you should be comfortable working in the Windows Command Prompt .
- Download the PSCP utility from PuTTy.org by clicking the file name link and saving it to your computer. (If you also want to use the PuTTY shell program, you can download and save putty.exe to your computer as well.)
- The PuTTY SCP (PSCP) client does not require installation in Windows, but runs directly from a Command Prompt window. Move the client program file to a convenient location in your Programs folders and make a note of the location.
To open a Command Prompt window, from the Start menu, click Run.
- A Command Prompt window will open. To be sure the utility launches correctly from any directory in the Command Prompt window, set up an environment path so your system knows where to look for it. You’ll use the pscp.exe location that you made note of in Step 2. For example, if you’ve saved the pscp.exe file to the folder «C:\Program Files\PuTTy\», set up a path by entering set PATH=»%PATH%;%ProgramFiles%\putty» at the prompt in the Command Prompt window.
- Entering the path in this way only lasts for the duration of the current session (that is, while you have the Command Prompt window open). To set up an environment variable path permanently, open the System control panel in Windows and click Advanced system settings, then click Environment Variables. In the Environment Variables window, select Path from the list of User variables, then click Edit. (If no Path variable is listed, click New.)
- In the Edit User Variable window, click New. Type or paste the directory path for the PSCP utility you noted in Step 2 (for example, C:/Program Files/putty ) into the empty highlighted new line item.
- Click OK to save the new entry, then click OK again to close the Environment Variables window. The PSCP program file location is set up in your system and will not need to be entered each time you open a Command Prompt window.
Transfer files using PSCP
Open the Command Prompt window, and if necessary set up your path variable as shown above in Step 4.
To copy the local file c:\documents\info.txt as user username to the server server.example.com with destination directory /tmp/foo, type at the prompt:
pscp c:\documents\info.txt userid@server.example.com:/tmp/foo/info.txt
When prompted, enter your password for the server.
Information Security Squad
stay tune stay secure
- Home
- 2019
- Март
- 12
- 👉 Как использовать команду PSCP в Windows👨⚕️
👉 Как использовать команду PSCP в Windows👨⚕️
Команда pscp – это реализация протокола SCP, в которой мы можем безопасно передавать и копировать файлы и папки по сети с помощью соединения SSH.
В этом уроке мы узнаем, как установить и использовать инструмент pscp в операционной системе Windows.
Скачать Pscp
Утилиту pscp можно скачать по следующей ссылке.
Существуют разные типы установки.
pscp может быть установлен в автономном режиме или с пакетом установки putty.
Я предпочитаю установочный пакет Putty, где настройка конфигурации Пути также выполняется автоматически.

Как видим, есть 32- и 64-битные версии.
Я буду использовать 64 бит, потому что моя ОС Windows 64 битная соответственно 🙂 .
Установка Pscp
Мы установим скачанный 64-битный MSI-пакет putty в обычном стиле Windows Далее-> Далее.
Помощь и Настройки
Если нам нужно перечислить все доступные опции и справочную информацию, мы можем просто ввести команду pscp в командную строку или MSDOS, как показано ниже.
Скачать или загрузить файл с удаленного сервера
Мы начнем с простого примера, где мы будем загружать или получать один файл с удаленного сервера или системы.
Как указывалось ранее, мы будем использовать протокол SSH для подключения и передачи.
Мы просто предоставим имя пользователя удаленной системы, IP-адрес или имя хоста и файл с его абсолютным путем.
Мы также предоставим имя файла, который мы хотим сохранить локально.

Мы видим, что сначала мы подключимся к серверу, который нам нужен, чтобы утвердить ключ удаленного сервера.
Затем мы предоставляем пароль для пользователя ismail.
После успешной аутентификации передача файла успешно завершена.
Скачать или загрузить несколько файлов с удаленного сервера
В предыдущем примере мы загрузили или получили один файл с удаленного сервера.
Мы также можем загружать и получать несколько файлов из удаленной системы в соответствии с их путем или расширением.
В этом примере мы загрузим все gzip-файлы с расширением gz, которые находятся в /home/ismail.
. означает, что мы будем сохранять в текущий рабочий каталог.

Загрузить или поместить файл на удаленный сервер
Мы также можем загрузить или поместить данный файл на удаленный SSH-сервер с помощью команды pscp.
Сначала мы предоставим имя файла, а затем предоставим имя пользователя удаленной системы, IP-адрес или имя хоста и путь, куда мы хотим положить файл.

Загрузить несколько файлов на удаленный сервер
Мы также можем поместить несколько файлов на удаленный сервер с помощью команды pscp.
Мы предоставим имена файлов перед удаленным сервером, информацию о пользователе.
В этом примере мы скопируем локальные файлы pass.txt, config.sys на удаленный сервер.

Скачать каталоги рекурсивно с удаленного сервера
Если мы хотим получить удаленные каталоги и скачать локальные, нам нужно использовать рекурсивную опцию -r.
Загрузить каталоги рекурсивно на удаленный сервер
Мы также можем отправлять или загружать локальные каталоги на удаленный сервер.
Мы снова будем использовать опцию -r.
Мы поместим каталог Downloads на удаленный сервер 192.168.142.144 и в папку /home/ismail/Downloads


