Использование встроенного SSH клиента в Windows 10
В Windows 10 и Windows Server 2019 появился встроенный SSH клиент, который вы можете использовать для подключения к *Nix серверам, ESXi хостам и другим устройствам по защищенному протоколу, вместо Putty, MTPuTTY или других сторонних SSH клиентов. Встроенный SSH клиент Windows основан на порте OpenSSH и предустановлен в ОС, начиная с Windows 10 1809.
Установка клиента OpenSSH в Windows 10
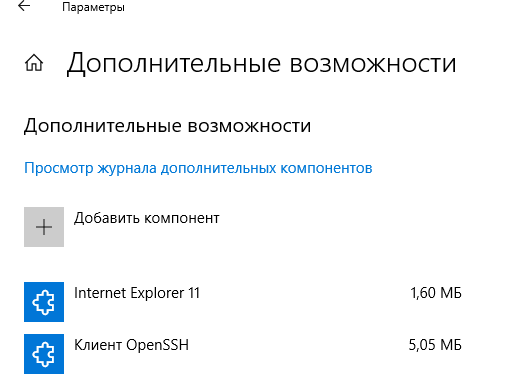
Клиент OpenSSH входит в состав Features on Demand Windows 10 (как и RSAT). Клиент SSH установлен по умолчанию в Windows Server 2019 и Windows 10 1809 и более новых билдах.
Проверьте, что SSH клиент установлен:
Get-WindowsCapability -Online | ? Name -like ‘OpenSSH.Client*’

В нашем примере клиент OpenSSH установлен (статус: State: Installed).
Если SSH клиент отсутствует (State: Not Present), его можно установить:
- С помощью команды PowerShell: Add-WindowsCapability -Online -Name OpenSSH.Client*
- С помощью DISM: dism /Online /Add-Capability /CapabilityName:OpenSSH.Client
0.0.1.0
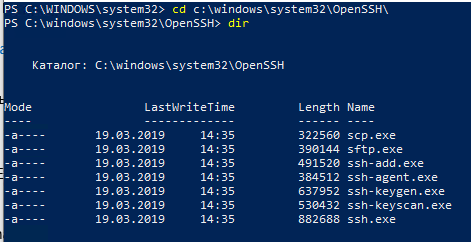
]Бинарные файлы OpenSSH находятся в каталоге c:\windows\system32\OpenSSH\.
- ssh.exe – это исполняемый файл клиента SSH;
- scp.exe – утилита для копирования файлов в SSH сессии;
- ssh-keygen.exe – утилита для генерации ключей аутентификации;
- ssh-agent.exe – используется для управления ключами;
- ssh-add.exe – добавление ключа в базу ssh-агента.
Как использовать SSH клиенте в Windows 10?
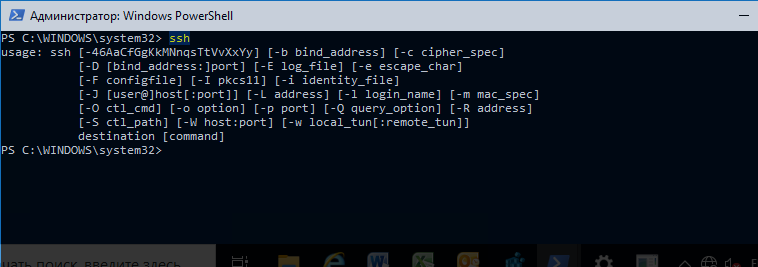
Чтобы запустить SSH клиент, запустите командную строку PowerShell или cmd.exe . Выведите доступные параметры и синтаксис утилиты ssh.exe, набрав команду:
ssh
usage: ssh [-46AaCfGgKkMNnqsTtVvXxYy] [-b bind_address] [-c cipher_spec]
[-D [bind_address:]port] [-E log_file] [-e escape_char]
[-F configfile] [-I pkcs11] [-i identity_file]
[-J [user@]host[:port]] [-L address] [-l login_name] [-m mac_spec]
[-O ctl_cmd] [-o option] [-p port] [-Q query_option] [-R address]
[-S ctl_path] [-W host:port] [-w local_tun[:remote_tun]]
destination [command]
Для подключения к удаленному серверу по SSH используется команда:
Если SSH сервер запущен на нестандартном порту, отличном от TCP/22, можно указать номер порта:
ssh username@host -p port
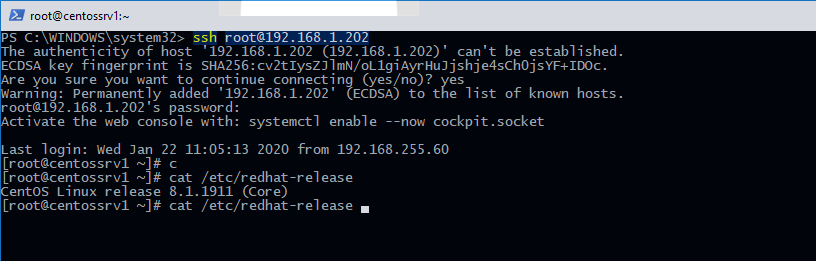
Например, чтобы подключиться к Linux хосту с IP адресом 192.168.1.202 под root, выполните:
При первом подключении появится запрос на добавление ключа хоста в доверенные, наберите yes -> Enter (при этом отпечаток ключа хоста добавляется в файл C:\Users\username\.ssh\known_hosts).
Затем появится запрос пароля указанной учетной записи, укажите пароль root, после чего должна открытся консоль удаленного Linux сервера (в моем примере на удаленном сервере установлен CentOS 8).
Если вы используете SSH аутентификацию по RSA ключам (см. пример с настройкой SSH аутентификации по ключам в Windows), вы можете указать путь к файлу с закрытым ключом в клиенте SSH так:
ssh root@192.168.1.92 -i «C:\Users\username\.ssh\id_rsa»
Также вы можете добавить ваш закрытый ключ в SSH-Agent. Сначала нужно включить службу ssh-agent и настроить ее автозапуск:
set-service ssh-agent StartupType ‘Automatic’
Start-Service ssh-agent
Добавим ваш закрытый ключ в базу ssh-agent:
Теперь вы можете подключиться к серверу по SSH без указания пути к RSA ключу, он будет использоваться автоматически. Пароль для подключения не запрашивается (если только вы не защитили ваш RSA ключ отдельным паролем):
Еще несколько полезных аргументов SSH:
- -C – сжимать трафик между клиентом и сервером (полезно на медленных и нестабильных подключениях);
- -v – вывод подробной информации обо всех действия клиента ssh;
- -R / -L – можно использовать для проброса портов через SSH туннель.
SCP: копирование файлов из/в Windows через SSH
С помощью утилиты scp.exe, которая входит в состав пакета клиента SSH, вы можете скопировать файл с вашего компьютера на SSH сервер:
scp.exe «E:\ISO\CentOS-8.1.1911-x86_64.iso» root@192.168.1.202:/home 
Можно рекурсивно скопировать все содержимое каталога:
scp -r E:\ISO\ root@192.168.1.202:/home
И наоборот, вы можете скопировать файл с удаленного сервера на ваш компьютер:
scp.exe root@192.168.1.202:/home/CentOS-8.1.1911-x86_64.iso e:\tmp
Итак, теперь вы можете прямо из Windows 10 подключаться к SSH серверам, копировать файлы с помощью scp без установки сторонних приложений и утилит.
Scp to windows example
Contents
Introduction
scp stands for secure cp (copy), which means you can copy files across ssh connection. That connection will be securely encrypted, it is a very secure way to copy files between computers.
scp uses by default the port 22, and connect via an encrypted connection or secure shell connection. (ssh for short)
You can use scp command in these scenarios:
- Securely copy files from remote computers to your computer
- Securely copy files from your computer to remote compueters
- Securely copy files from one remote computer to another remote computer
In the last case the traffic goes directly from one server to the other without passing through your system, that is a good thing if you have a slow Internet connection
You can use scp on Linux, Mac and Windows (using WinSCP). You may also want to check sftp
We will learn in this tutorial about the basic use of the command, and some useful examples and scenarios where you can use it.
Syntax
Explaining the complete syntax and every option of scp command is out of the scopy of this page, you can always enter a the command prompt
Or you can read it online here
We are going to explain the basic part of it:
scp Is the command itself and tells the operating system to copy one or more files over a secure shell connection, better known as ssh connection. [[user@]host1:]file1 The origin, where you specify the file or files to be copied, it can contain or not the information about a remote host, and it can also contain the information about the user owning the file or files in that remote host. If the user is not specified it will defaults to the current user in the machine where you are typing the command. If the host is not specified, it will look for the file locally using any given path. [[user@]host2:]file2 The destination, where you specify the path where the files are going to be copied, once again, it can contain or not the information about the remote host and/or user in that host. Same as above if the user is not specified but a hostname is given it will defaults to the current username and will try to log in the remote server using that user. And in the same way as with origin, if the host is not specified, the files will be copied locally.
Just to clarify, you can avoid specifying both username and host in origin and destination, and the scp command will work just like the cp command, copying a local file to a local destination.
Examples
Copy one single local file to a remote destination
So, if you wan to copy the file /home/user/table.csv to a remote host named host.example.com and copy there to jane’s home folder, use this command.
Copy one single file from a remote server to your current local server
Let’s say now you want to copy the same file from jane’s home folder in host.example.com to your local home folder.
Copy one single file from a remote server to another remote server
With scp you can copy files between remote servers from a third server without the need to ssh into any of them, all weight lifting will be done by scp itself.
Let’s say now you want to copy the same table file from jane’s home folder to pete’s home folder in another remote machine.
Copy files between two remote server that are not in the same network
In the example above host and host2 can route traffic between them, either because they are on the same network or because there are routers in between that route the traffic. But in the case that they are in two different networks with no routers in between you will need to route traffic through the server issuing the command. This would be the scenario.
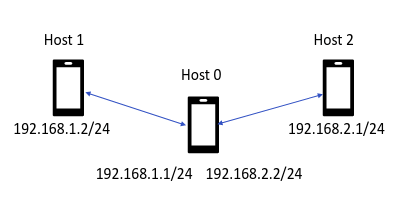
The command you will need is:
You need to issue the command in Host 0 and it has to have connection with the other two hosts
Copy one single file from a remote host to the same remote host in another location
This time, you will be copying from one host to the same host, but on different folders under the control of different users.
Copy multiple files with one command
You can copy multiple files at once without having to copy all the files in a folder, or copy multiple files from different folders putting them in a space separated list.
If the files are in different folders, just specify the complete path.
Copy all files of a specific type
This will copy all files of a given extension to the remote server. For instance, you want to copy all your text files (txt extension) to a new folder.
You can make use of wildcards in any way you want.
Copy all files in a folder to a remote server
This will copy all files inside local folder to the remote folder, let’s see an example.
All files in local folder html, will be copied to backup folder in host.example.com
Copy all files in a folder recursively to a remote server
Same as the previous example, but this time it will copy all contentes recursively
Copy a folder and all its contents to a remote server
This time the folder itself is copied with all its contents and not only the contents. One more time we’ll use an example.
This will result in having in the remote server this: /home/jane/backup/html/. The whole html folder and its contentes recursively have been copied to the remote server.
We have seen the basic uses scp, now we will see some special uses and tricks of this great command
Increase Speed
scp uses AES-128 to encrypt data, this is very secure, but also a litle bit slow. If you need more speed and still have security, you can use Blowfish or RC4.
To increase scp speed change chipher from the default AES-128 to Blowfish
Or use RC4 which seems to be the fastest
This last one is not very secure, and it may not be used if security is really an issue for you.
Increase Security
If security is what you want, you can increase it, you will lose some speed though.
Limit Bandwidth
You may limit the bandwidth used by scp command
Where limit is specified in Kbit/s. So for example, if you want to limit speed at 50 Kbps
Save Bandwidth
Yoy can save bandwidth by enabling compression, let’s see our example with compression.
Use IPv4 or IPv6
If you want to force the use of either IPv4 or IPv6 use any of these ones.
The above one is for IPv4, and below for IPv6.
Specify a port
If the remote server does not have ssh listening on default 22 port, you can make scp to use the port where the remote server is listening to:
Using the capital letter P you can make scp to use a port other than 22 which is the default for ssh. Let’s say your remote server is listening on 2222.
Use verbose output
If you want to see what is happening under the hood, use the -v parameter for a verbose output
Move instead of copy files from one server to another
This is a question that was asked on server fault, and as it clarifies in that page, the best option is rsync, but if you can’t use it here is a way to copy files with scp, and then if the copy was successful, you can delete the files from the origin.
This only works if you have configured your Linux ssh server to work with ssh-key instead of password
Copy files recursively preserving file attributes
If you want to copy a complete directory recursively and preserving file attibutes use this command:
-r copy directories recursively -p preserve file attributes
Windows
If you are working on a Windows powered computer, you can still enjoy scp in various ways, of course if you are a «*nix guy» you will prefer the command line, and you also have GUI tools available.
pscp is a shell command that works almost on Windows Shell almost the same way that scp works on Linux or Mac OS X, you first need to download it from this page, here is the direct link.
Once downloaded you can invoque it from the Windows command line, go to the start menu and click on run then write
And press ENTER, if you are on Windows 8.x hit the Windows/Super key and click on the magnifier lens, type cmd and hit ENTER.
Once in the command line, be sure to be in the directory where the pscp file was downloaded, or add that folder to your PATH, let’s suppose the folder is your Downloads folder, run this command:
You will have to set that command every time you open a new command shell, or you can add the path permanently, how to do that is out of the scope of this article.
Below are the options of the command, you will see that the options available let you do almost everything.
Copy files from Windows to Linux
You can use scp command to copy files from Linux to Windows
Copy files from Linux to Windows
You can also copy files from Windows to Linux, using pscp from the Windows computer you can «push» the files to the Linux, Max OS X or *BSD server.
Specify protocol
You can specify the protocol that scp command for Windows will use at the time of connection.
-scp This will force pscp to use scp protocol -sftp This will force pscp to use sftp protocol, which is a newer protocol than scp protocol
WinSCP
WinSCP is a GUI version of scp, mainly for Windows, its development was started on 2.000 by Martin Přikryl and it is licenced under GNU licence.
It is not only a SCP client, but also SFTP and FTP client too.
Screenshot
Below you can see a Screenshot of WinSCP

Main Features
Some of its main features are:
Full Sync This feature will keep both remote and local folders in sync, so any change you perform in any of the ends of the connection will be updated on the other end. The application should be kept on, and connected to keep this functionality running Sync Remote
This feature will keep only the remote end in sync with the local, so any change made on the local side, will be updated in the remote side. But this will not work in other way. That is any change in remote will not be updated in local.
You can decide to delete remote files or not at the time of starting the syncronization. If you turn it on, any files deleted on local, will be deleted on remote, but if not, only new added files or changes to existing ones will be updated
You can also use the drag and drop feature to copy files from remote to local or viceversa
As you can see, you can optain the same basic functionality for Windows that Linux users already enjoy, and this is maybe the best and easieste way to transfer files from Windows and Linux and viceversa.
If you have suggestions or comments, write to contact at this domain.


