- How to record the screen on your Mac
- Use the Screenshot toolbar
- Record the entire screen
- Record a selected portion of the screen
- Trim, share, and save
- Change the settings
- 15 Free Screen Capture Apps for MAC
- List of 15 Free Best Screen Capture Apps for MAC
- Screen Capture in Mac OS X
- Capturing screenshots in Mac OS X
- Change the screen capture file format
- Take a screenshot from the command line
- How to Capture Entire or Specific Screenshot On Mac
- Step for How to Capture Entire/ full Screenshot on Your Mac
- For macOS Monterey and Earlier Mac Catalina, macOS Mojave,
- Capture Entire Screen
- Capture Specific Screen/Window
- Capture Select Screen
- Shift-Command-5 Not Working on macOS?
- For Other MacOS,
- Capture Entire Screen
- Capture Specific Window
- Capture Select Portion of Screen
- How to Capture Specific Area Screenshot on MacBook Pro/ Macbook Air/ iMac
- macOS High Sierra Not working (Command Shift 4 Won’t Work)
- jaysukh patel
How to record the screen on your Mac
You can make a video recording of the entire screen or just a selected portion of it.
Use the Screenshot toolbar

To view the Screenshot toolbar, press these three keys together: Shift, Command, and 5. You will see onscreen controls for recording the entire screen, recording a selected portion of the screen, or capturing a still image of your screen:
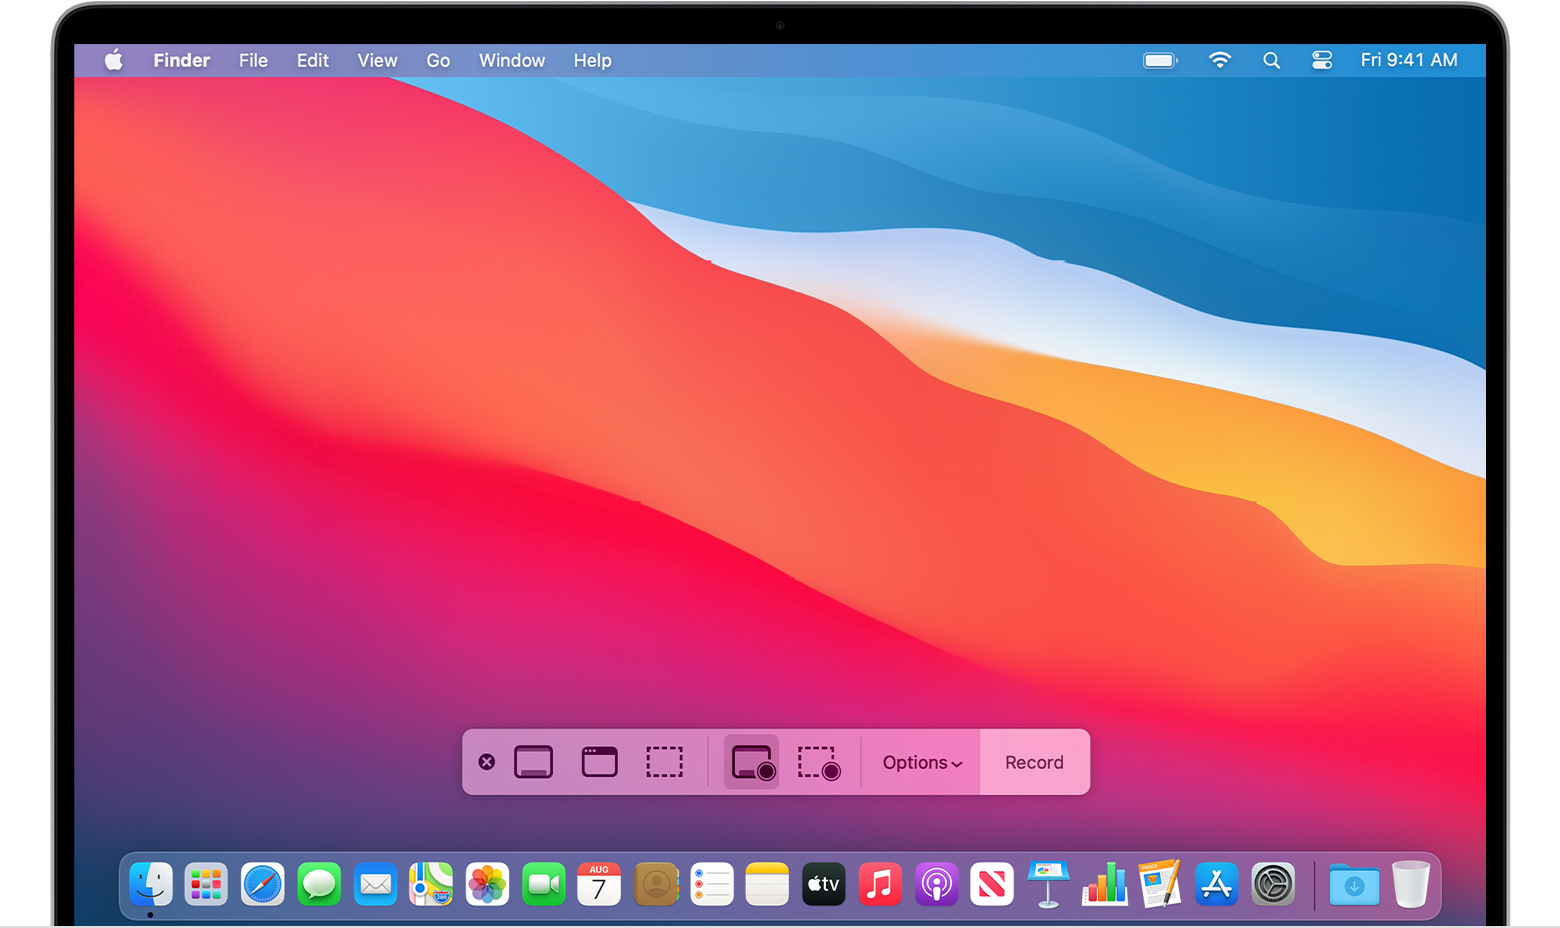
Record the entire screen
- Click in the onscreen controls. Your pointer changes to a camera .
- Click any screen to start recording that screen, or click Record in the onscreen controls.
- To stop recording, click in the menu bar. Or press Command-Control-Esc (Escape).
- Use the thumbnail to trim, share, save, or take other actions.
Record a selected portion of the screen
- Click in the onscreen controls.
- Drag to select an area of the screen to record. To move the entire selection, drag from within the selection.
- To start recording, click Record in the onscreen controls.
- To stop recording, click in the menu bar. Or press Command-Control-Esc (Escape).
- Use the thumbnail to trim, share, save, or take other actions.
Trim, share, and save
After you stop recording, a thumbnail of the video appears briefly in the lower-right corner of your screen.
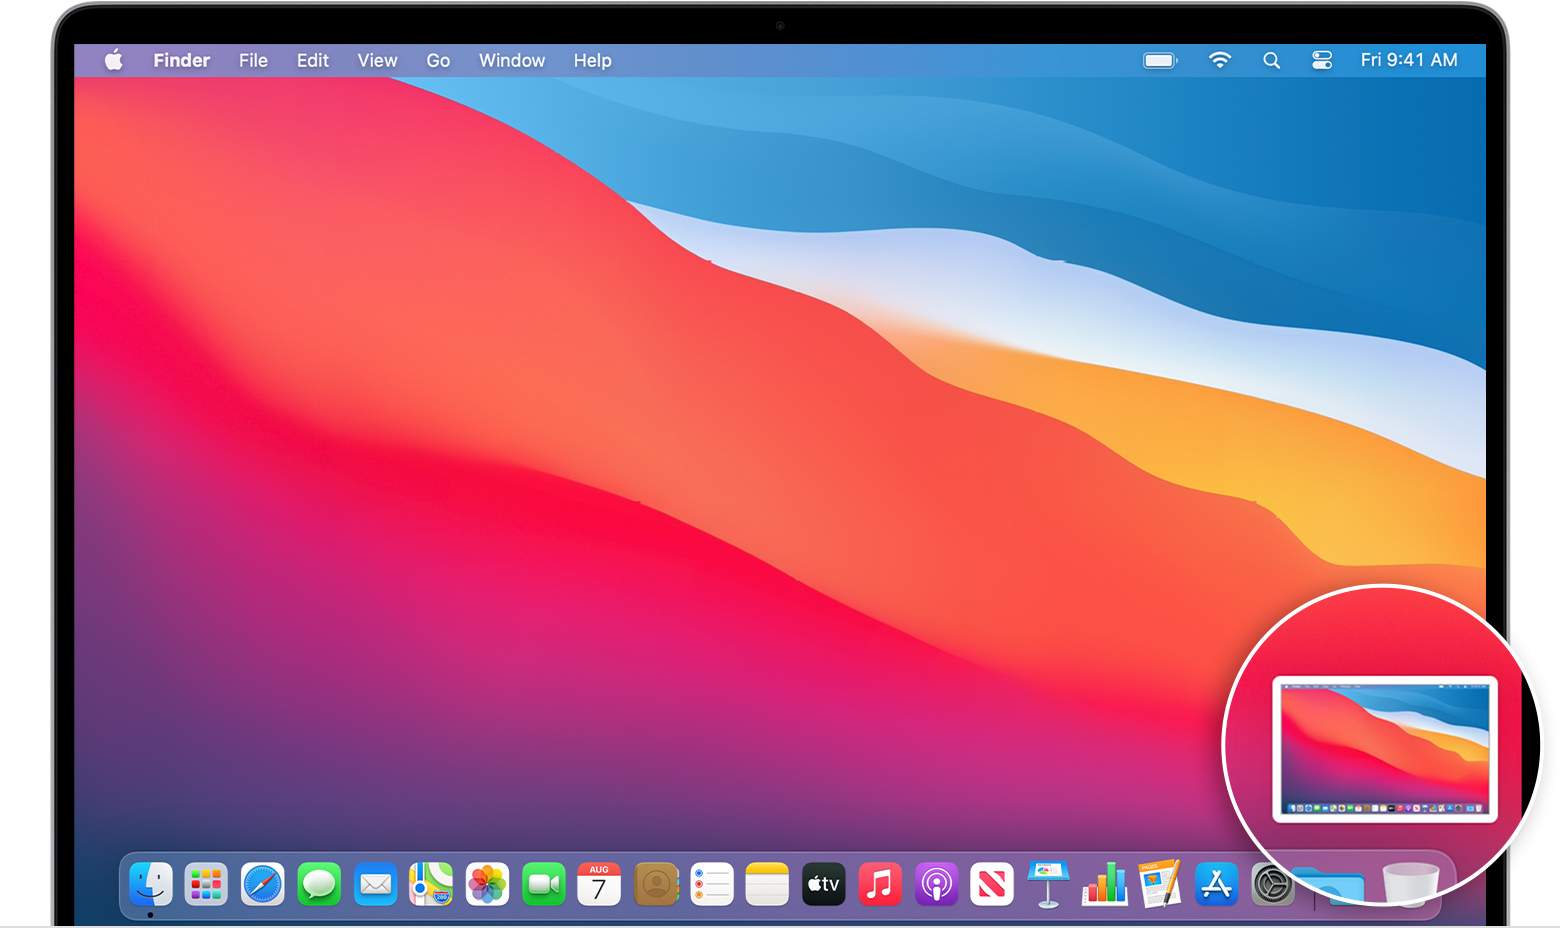
- Take no action or swipe the thumbnail to the right and the recording is automatically saved.
- Click the thumbnail to open the recording. You can then click to trim the recording, or click to share it.
- Drag the thumbnail to move the recording to another location, such as to a document, an email, a Finder window, or the Trash.
- Control-click the thumbnail for more options. For example, you can change the save location, open the recording in an app, or delete the recording without saving it.
Change the settings
Click Options in the onscreen controls to change these settings:
- Save to: Choose where your recordings are automatically saved, such as Desktop, Documents, or Clipboard.
- Timer: Choose when to begin recording: immediately, 5 seconds, or 10 seconds after you click to record.
- Microphone: To record your voice or other audio along with your recording, choose a microphone.
- Show Floating Thumbnail: Choose whether to show the thumbnail.
- Remember Last Selection: Choose whether to default to the selections you made the last time you used this tool.
- Show Mouse Clicks: Choose whether to show a black circle around your pointer when you click in the recording.
Источник
15 Free Screen Capture Apps for MAC
MAC OS has always made it easy to capture a screen shot through the key board shortcuts. And if you are the webmaster or blogger and most of the time you need to capture the screenshot for your work. Then here we present you Best free Screen Capture Apps for MAC OS X. Which helps you to capture or print screen easily. All of these app are one of most used app in MAC os to capture the screen. Check out the list of 15 free Screen Capture Apps for MAC below:-

List of 15 Free Best Screen Capture Apps for MAC

Copernicus doesn’t just take screenshots, it’s a virtual photo gallery too. Take as many pictures as you like, then save them one at a time or all at once. Also allows you to export it to several different formats
2. Capture Me

One of the best screen capture app your MAC, so easy to take the screenshot of your MAC drag and re size the floating window to cover the area you want to capture. Then click in the window to capture the screenshot. With this free app you can resize the screen copy them into clipboard and save them into various formats.
3. Jing

With Jing you can Snap a picture of your screen or video. It also provides you the option to share those screen capture immediately.
Constrictor is a screen snapshot utility for Mac OS X 10.4 and up (users on 10.3.x or earlier will want Constrictor 2.3 instead). It provides you with a moveable, resizeable frame that floats over all your other windows.
5. iShowU

iShowU allows you to capture and record anything you can see on your screen, along with audio from a compatible source (like a microphone) as well as any audio from the mac itself.
Источник
Screen Capture in Mac OS X
 I use screenshots constantly to share bits of information with people, and they can be really helpful when troubleshooting as well.
Here’s all you’ll need to know about taking screenshots in Mac OS X, from capturing the screen in Mac OS X Finder and within applications, to changing the default screenshot file type, to taking screenshots from the command line.
Capturing screenshots in Mac OS X
You can use any of these commands to take screenshots directly in Mac OS X Finder or any running applications:
- Command+Shift+3: takes a screenshot of the full screen (or screens if multiple monitors), and save it as a file to the desktop
- Command+Shift+4: brings up a selection box so you can specify an area to take a screenshot of, then save it as a file to the desktop
- Command+Shift+4, then spacebar, then click a window: takes a screenshot of a window only and saves it as a file to the desktop
- Command+Control+Shift+3: take a screenshot of the entire screen (screens if multiple monitors), and saves it to the clipboard for pasting elsewhere
- Command+Control+Shift+4, then select an area: takes a screenshot of selection and saves it to the clipboard for pasting elsewhere
- Command+Control+Shift+4, then space, then click a window: takes a screenshot of a window and saves it to the clipboard for pasting
Some of the above instructions are borrowed from our print screen on a Mac article.
Change the screen capture file format
You can change the default file type for screen captures by using a terminal command. Most major image formats are supported including PNG, PDF, GIF, TIFF, and JPG, we’ll go with JPG since that is a common type of web graphic:
defaults write com.apple.screencapture type jpg
Then you must kill the SystemUIServer for changes to take effect:
killall SystemUIServer
Take a screenshot from the command line
You can take screenshots from the command line by using the screencapture utility:
screencapture test.jpg The screen capture will then appear in the directory that the command was executed.
If you want to open the screencapture in Preview immediately after being taken, type:
screencapture -P test.jpg
You can also take screenshots silently, without the sound playing with -x:
screencapture -x silentscreenshot.jpg
If you would like to have a delay added to when the screenshot is taken use -T followed by a number of seconds:
screencapture -T 3 delayedpic.jpg
Specifying a file type is easy with the -t flag:
screencapture -t pdf pdfshot.pdf
Naturally you can combine them all together:
screencapture -xt pdf -T 4 pic.jpg
You can get a full list of screencapture flags by typing:
screencapture -h
Источник
How to Capture Entire or Specific Screenshot On Mac
Last Updated on Jun 30, 2021
Not All guys aware of capturing a full Screenshot in Mac OS X or Print Screen On Mac Command, as with new updates, Apple changes methods to take a screenshot on Mac. By the way, With a screenshot, you can get the full-screen view with text and picture data. You can save your Mac screen’s important Text or Picture, and you would like to share it with someone, you can take a snapshot of your Mac screen and quickly share it. Moreover, great photographs like your highest score of the latest game, bug send to others for solving it.
we are happy to help you, submit this Form, if your solution is not covered in this article.
Whether you are running macOS Monterey, Big Sur, Mac Cataline, this tutorial will show you how to take a screenshot on macOS.
Step for How to Capture Entire/ full Screenshot on Your Mac

For macOS Monterey and Earlier Mac Catalina, macOS Mojave,
Capture Entire Screen
- Step #1: Press the Shift+Command+5 on the keyboard.
- Step #2: The capture controls will appear on the screen. Select the one as shown in the image to capture a full-screen screenshot and click Capture.
Capture Specific Screen/Window
- Step #1: Press Shift+Command+5 and select the second option as shown in the picture.
- Step #2: Now, you have to click on a specific Window to capture a screenshot of that window and click Capture.
Capture Select Screen
- Step #1: Press Shift+Command+5 and select the third option on the screenshot control panel.
- Step #2: Drag the mouse pointer to select a particular area and then click Capture.
Shift-Command-5 Not Working on macOS?
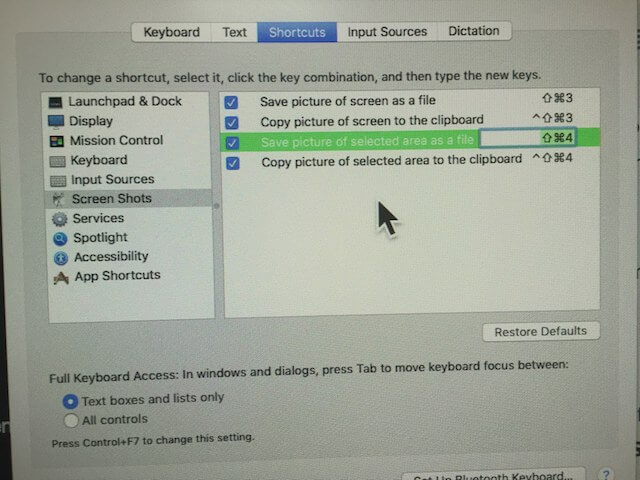
Some users have recently reported that Shift+Command+5 not working to take a screenshot on macOS Catalina or macOS Mojave. The reason behind this issue could be, someone has changed the keyboard shortcuts to capture a screenshot on your Mac. Here’s how to restore the settings to default,
- Apple logo >System Preferences >Keyboard >Shortcuts >Screenshot and lastly click on Restore Defaults.
For Other MacOS,
Capture Entire Screen
- Step #1. Open your Mac Screen, which you want to capture for share or keep safe for a long time.
- Step #2. Now on your keyboard – press command + shift + 3; after that, leave all the keys.
- Step #3. now you can see your Mac screen with notice the extra .png extension file this file contains words** screenshot.
- Step #4. in the last do Double click on the notice file I mean words**screenshot file; you can launch this file in either image previewers or within image viewer which you most like. After click snapshot, you can also see it on your Mac desktop. At the moment, you can share it or save it on your Mac.
Note: If you are using Windows Keyboard, Use Shift + Windows + 3.
Capture Specific Window
- Step #1: Press Shift+Command+4 and then press the Space bar.
- Step #2: Click on a Window to take a screenshot.
Capture Select Portion of Screen
- Step #1: Press Shift+Command+4 and drag the mouse by holding the Space bar to select and capture a screenshot of the specific portion.
Related, Very Useful:
For Change Keyboard Shortcuts,
Also, we can change keyboard shortcuts for screen capture or screenshot on Mac, Go to the System Preferences > Keyboard > Shortcuts > Screenshots (Double click on shortcut key code).
How to Capture Specific Area Screenshot on MacBook Pro/ Macbook Air/ iMac
Open on your Mac desktop, favorite apps, etc.; for particular area capture, it should not take more work as the entire capture step.
- Step: 1. Open with a screen which you would like for taking a snapshot: you can make this snap from anywhere it is your system screen or Web page anything whatever.
- Step: 2. Now look on your keyboard and press command + shift + 4 after that leave it all keys.
For Windows: Shift + Windows + 4
- Step: 3. you will show that on your screen mouse courser; using courser you can choose a specific area for taking the snapshot. As well as crosshair that you can move anywhere on the screen.
- Step: 4. now Press down your cursor and drag the mouse over the area in which you want to take a snapshot.
- Step:5. After selecting the specific area release mouse. Finally, you got (screenshot in Mac OS X: Yosemite).png extension file that is your destination I mean which you want to take the specific snapshot.
Note: – Mac OS X v10.6 and later version, the screenshot in Mac OS X are saved as automatically PNG files on your Mac desktop. As well it saved with automatically named ‘’Screenshot (date & time).png. ’’
Extra Tip
macOS High Sierra Not working (Command Shift 4 Won’t Work)
- Fix #1. Go to the System Preferences ->Keyboard ->Shortcuts
- Select “Screen Shots” in the list at left…then make sure the shortcuts are checked.
- Fix #2. First, You should Log out under the Apple in the Menu bar. then Log into Guest user mode.
Can you take a screenshot in Guest? If no…
Now you will have to Boot into Recovery Drive and run Disk Utility > First Aid on your internal Macintosh HD.
Restart in Safe boot mode. Hold down the Shift key when restarting.
Like it and share with your friends even your friends will also get a new update regarding new tips & tricks, How to, iOS update, and more.
jaysukh patel
Jaysukh Patel is the founder of howtoisolve. Also self Professional Developer, Techno lover mainly for iPhone, iPad, iPod Touch and iOS, Jaysukh is one of responsible person in his family. Contact On: [email protected] [OR] [email protected]
Источник


