- ИТ База знаний
- Полезно
- Навигация
- Серверные решения
- Телефония
- Корпоративные сети
- Курс по сетям
- 15 примеров команды PING для диагностики сети
- Руководство по команде grep в Linux
- Рекурсивно найти слово в файлах и папках Linux
- Рекурсивно найти слово в файлах и папках Linux
- Как пользоваться командой man в Linux: основы и секреты
- Управление пакетами Red Hat
- Ещё несколько полезных команд для CentOS
- Как пользоваться утилитой screen в Linux?
- Немножко теории
- Установка screen в Linux
- Установка screen в Ubuntu и Debian
- Установка screen в CentOS и Fedora
- Запуск screen в Linux
- Сессия screen с именем
- Как правильно работать с окнами в Windows
- Выход из screen сессии
- Возврат к screen сессии
- Немножко кастомизации screen под вас
- Типовой сценарий использования screen
- Выводы
- Closing the Window
- Screen Exit
ИТ База знаний
Курс по Asterisk
Полезно
— Узнать IP — адрес компьютера в интернете
— Онлайн генератор устойчивых паролей
— Онлайн калькулятор подсетей
— Калькулятор инсталляции IP — АТС Asterisk
— Руководство администратора FreePBX на русском языке
— Руководство администратора Cisco UCM/CME на русском языке
— Руководство администратора по Linux/Unix
Навигация
Серверные решения
Телефония
FreePBX и Asterisk
Настройка программных телефонов
Корпоративные сети
Протоколы и стандарты
Популярное и похожее
Курс по сетям

15 примеров команды PING для диагностики сети
Руководство по команде grep в Linux
Рекурсивно найти слово в файлах и папках Linux
Рекурсивно найти слово в файлах и папках Linux
Как пользоваться командой man в Linux: основы и секреты
Управление пакетами Red Hat
Ещё несколько полезных команд для CentOS
Еженедельный дайджест
Как пользоваться утилитой screen в Linux?
Окно в «новую жизнь»
Сейчас вы точно прочувствуете важное команды screen . Бывало ли у вас такое, что вы выполняете (очень долго) команду в консоли — CLI на удаленной машине, будучи подключенным через SSH? Команда долго выполняется и близится к завершению как вдруг пропадает подключение, рвется SSH подключение и все, что вы делали — пропало?
Обучайся в Merion Academy
Пройди курс по сетевым технологиям
Начать
Прости, что напомнили. Знаем, это болезненно. Что же, вытрем слезы. Для этих ситуаций есть команда screen о которой мы и поговорим.
Немножко теории
Так называемый screen это терминальный мультиплексор (нас тоже пугает это слово). Другими словами, оно дает нам возможность внутри действующей сессии открыть сколько угодно много виртуальных окон/терминалов. Что важно — процесс, запущенный внутри сессии через screen, будет продолжаться даже тогда, когда вы отключитесь от самой первой сессии.
Установка screen в Linux
Вообще, пакет screen предустановлен на большинстве современных Linux — дистров. Проверить можно командой:

Если случилось так, что у вас его нет — это можно быстро исправить простой установкой.
Установка screen в Ubuntu и Debian
Установка screen в CentOS и Fedora
Запуск screen в Linux
Чтобы запустить screen в консоли, просто наберите screen . Что может быть проще, не правда ли?
У вас откроется новая сессия в новом окне. Уже здесь вы можете вводить все нужные shell команды. Находясь в режиме скрина (screen) вы можете посмотреть список доступных вам команд управления этим режимом. Вот так:
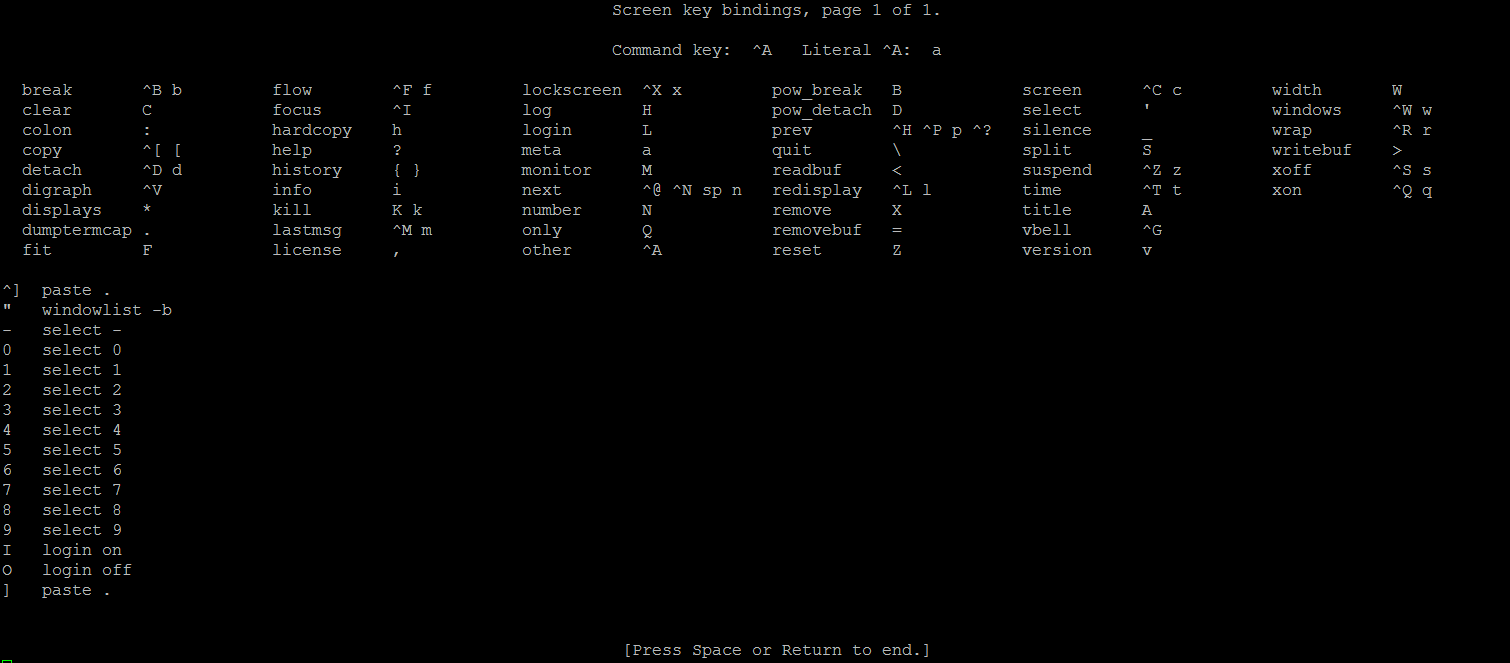
Если не получается нажать указанную выше комбинацию, можно поступить проще: нажмите отдельно Ctrl+a , отпустите, а затем в консоль наберите ? и нажмите Enter
Сессия screen с именем
Ну очень удобная фича. Если вы делаете несколько процессов параллельно, просто обзовите их так, чтобы потом понять, что и где выполняется. Синтаксис такой:
Например, вы можете запустить ping — замер хоста с 1С и назвать сессию так:
Всегда используйте скрин именно так. Будет значительно удобнее.
Как правильно работать с окнами в Windows
Как мы уже сказали, когда вы создаете новую screen — сессию, вы создадите новое окно с shell оболочкой внутри. И что интересно — внутри скрин сессии вы можете создать множество дополнительных окон. Чтобы это сделать, воспользуйтесь командой (внутри скрина) Ctrl+a и c . Новому окну будет назначен номер от 0 до 9 (первый свободный).
Ниже мы собрали все команды, которые понадобятся вам для управления скринами:
- Ctrl+a и c — создать дополнительное окно ;
- Ctrl+a и » — показать список всех имеющихся окон;
- Ctrl+a и 0 — переключиться на окно с номером 0 (номер может быть иной);
- Ctrl+a и A — переименовать текущее окно;
- Ctrl+a и S — разделить окно по горизонтали на две области;
- Ctrl+a и | — разделить окно по вертикали на две области;
- Ctrl+a и tab — переключить рабочий фокус на следующую область разделенного окна;
- Ctrl+a и Ctrl+a — переключить рабочий фокус на предыдущую область разделенного окна;
- Ctrl+a и Q — закрыть все разделенные области кроме;
- Ctrl+a и X — закрыть текущую область;
Выход из screen сессии
Вы можете легко выйти из screen — сессии набрав:
Самое важное: запущенная вами в этот момент команда не остановится и будет продолжать свое выполнение.
Возврат к screen сессии
Чтобы вернуть к screen — сессии используйте команду:
Если у вас запущено больше чем одна screen — сессия, то после ключа r нужно указать ее ID. Узнать его просто с помощью команды:
Вывод этой команды будет выглядеть вот так:
В выводе выше мы выделили ID — сессий. Например, чтобы вернуться к сессии 32328 (pings_towards_1C), дайте команду:
Немножко кастомизации screen под вас
Когда screen запускается, он считывает свои конфигурационные параметры из /etc/screenrc и
/.screenrc , если файл присутствует. Так вот — мы можем легко перенастроить предпочтения использования screen и сделать это в файле .screenrc .
Посмотрите пример с комментариями, как мы закастомили screen для себя:
Типовой сценарий использования screen
Общий случай, так сказать. Обычно он состоит из следующих шагов:
- После SSH подключения к серверу, набираем screen ;
- Запускаем интересующую нас команду в режиме screen — сессии;
- Выполняем команду Ctrl + a и d , чтобы выйти из режима работы с экран-сессией
- Через какое-то время возвращаемся к запущенному ранее экрану командой screen -r
Выводы
Мы разобрались, как создавать screen сессии, управлять ими внутри, открывая новые окна, выходить из их режима управления (без прекращения выполнения команды), делить горизонтально и вертикально экраны.
Ах да, ещё мы научились кастомизировать screen под себя. Профит!
Closing the Window
When the user closes a window, that action triggers a sequence of window messages.
The user can close an application window by clicking the Close button, or by using a keyboard shortcut such as ALT+F4. Any of these actions causes the window to receive a WM_CLOSE message. The WM_CLOSE message gives you an opportunity to prompt the user before closing the window. If you really do want to close the window, call the DestroyWindow function. Otherwise, simply return zero from the WM_CLOSE message, and the operating system will ignore the message and not destroy the window.
Here is an example of how a program might handle WM_CLOSE.
In this example, the MessageBox function shows a modal dialog that contains OK and Cancel buttons. If the user clicks OK, the program calls DestroyWindow. Otherwise, if the user clicks Cancel, the call to DestroyWindow is skipped, and the window remains open. In either case, return zero to indicate that you handled the message.
If you want to close the window without prompting the user, you could simply call DestroyWindow without the call to MessageBox. However, there is a shortcut in this case. Recall that DefWindowProc executes the default action for any window message. In the case of WM_CLOSE, DefWindowProc automatically calls DestroyWindow. That means if you ignore the WM_CLOSE message in your switch statement, the window is destroyed by default.
When a window is about to be destroyed, it receives a WM_DESTROY message. This message is sent after the window is removed from the screen, but before the destruction occurs (in particular, before any child windows are destroyed).
In your main application window, you will typically respond to WM_DESTROY by calling PostQuitMessage.
We saw in the Window Messages section that PostQuitMessage puts a WM_QUIT message on the message queue, causing the message loop to end.
Here is a flow chart showing the typical way to process WM_CLOSE and WM_DESTROY messages:
Screen Exit
Screen Exit is a type of Customer exits, which are “hooks” provided by SAP within many standard programs, screens and menus on which customers may “hang” custom functionality to meet business requirements
SAP provides standard transactions to enter data into database. But a client may want to maintain some additional information in SAP other than what is provided.
Screen exits allow you to add your own fields to specified screens in standard transactions.
To make provisions for this, additional screens have to be provided and additional fields must be added into appropriate database table.
Example Screen Exit
Scenario: In transaction CAT2 – Time Sheet Entry, HR wishes to include an interactive acknowledgement that knowingly submitting incorrect data is grounds for dismissal.

As a solution, SAP has provided the option for screen exits. Usually, SAP provides the following:
- An append structure in the database table with the new fields.
- A subscreen area into the standard screen – where the programmer can attach his subscreen of his own program with the new fields.
- A function group under which the new subscreen has to be created with the new fields.
- Function exits to synchronize the PBO and PAI of the standard SAP program with the PBO and PAI of the subscreen – so that data can flow back and forth between the standard SAP program and the program written by the developer for the subscreen. These function modules also exist in the same function group under which the subscreen will have to be developed.
- Finally, a linkage has to be done between the subscreen area of standard SAP screen with the custom subscreen constructed by the developer.
Typically, SAP provides an enhancement in which the developer can create an append structure, use the function exits to synchronize the PBO and PAI of the standard SAP program and the custom subscreen program, and make the necessary linking( as mentioned above in step 4. But, again, this is not a hard and fast rule. Linking in some case is also done by configurations.) SAP also usually provides the name of the function group under which the subscreen has to be developed.
Necessary guidance about implementing a screen exit development is usually available in the Documentation section of the enhancement (can be availed by transaction SMOD).
Locating Screen Exit: Method 1
- Execute transaction SMOD.
Specify relevant search criteria and execute search in the Repository Information System.

3. Explore search results to locate appropriate Enhancement.

Locating Screen Exit: Method 2
1. Execute transaction SE81. Select appropriate application area and click

- Click Information system button.
- Expand Repository Information system -> Enhancements -> Customer Exits tree and double-click Enhancements entry.
Proceed as with Method 1 (results will now be filtered according to application area).

Utilize the Enhancement in a Project
After you have found one, do as directed in the documentation. Generally, the steps are as follows:
- Create a project using CMOD including your enhancement.
Create the append structure with new fields.
Go to the desired function group and create a subscreen with the new fields. Write PBO and PAI for the subscreen, if required.
Use the function exits in the enhancement to link the PBO and PAI of the subscreen with that of the main SAP program supporting the SAP transaction.
Maintain necessary linkage between the subscreen area of standard SAP program with the custom subscreen developed along with the custom program name. This can be done in the project (developed by CMOD including the enhancement) or outside as a part of configuration.
Activate the project.
Add three new custom fields for Asset master and maintain information for them
Three fields in the legacy system have to be maintained in Asset master. These fields are:
- Original Asset number – 20 characters
Location 2 – 15 Characters.
Model no – 20 characters
Location 2 should start with ‘L’.
DEVELOPMENT STEPS IN DETAIL
STEP 1: Finding the Enhancement:
As described above, the enhancement is determined. It was found, that enhancement AIST0002 will serve the purpose. It contains the following components (can be viewed by transaction SMOD):
Exit Type Description EXIT_SAPL1022_001 Function Exit Check of User-Defined Fields when Using Create and Change BAPI EXIT_SAPLAIST_002 Function Exit Transfer Data for User Subscreens in PBO. EXIT_SAPLAIST_003 Function Exit Transfer of User-Defined Fields to SAP Master Data Transactions CI_ANLU Customizing Include structure to add new fields.
STEP 2: Creating a Project to include the enhancement
Go to transaction CMOD and create a project.
Enter a description for the project. Then, click on the pushbutton ‘Enhancement Assignments’ in the Application Toolbar.
Enter the name of the enhancement and Save.
Go to ‘Components’.
STEP 3: Creating Custom Include for ANLU
The screen will appear, showing all the enhancement components under the assignment AIST0002. Double-click on the name of the Include Structure to create it.
Create the include structure with three new fields, as required. Then, save and activate it.
STEP 4: Develop the subscreen and the program
Go to transaction SE80. For the function group XAIS, create a new subscreen 9000.
Create it as subscreen.
Then, go to the Layout of the screen and create three new fields from Database table ANLU.
Drag the fields in the screen body and place them.
Then, save and activate the screen and come back to screen flow editor.
Create the PAI module to add validation for field “Location 2”, as required .
Activate the whole function group and come out.
STEP 5: Write code in the Function Exits to synchronize the programs
Now, code has to be written in the function modules EXIT_SAPLAIST_002 and EXIT_SAPLAIST_003 so that data flows to and fro between the main SAP program and custom subscreen program. For that, go back to transaction CMOD and change the function exits.
Write code in the function module EXIT_SAPLAIST_002 called once at the beginning of the transaction:
Write code in EXIT_SAPLAIST_003 to pass the data from the subscreen to SAP main program.
Then, activate everything – the whole project and come out.
STEP 6: Complete the configuration to link the subscreen.
The development portion is complete. Now, linking of the subscreen has to be done with the subscreen area of the main program. In most of the cases, this linking can be done in the enhancement itself. But, here, requirement is a bit different. It is done by configuration using SPRO.
Assets are created under Asset class. And for each asset class, there is a layout assigned to it. For a layout, there are multiple tab pages assigned to it. And, for each tab page, there are multiple screen groups/field groups assigned.
Here, the requirement is to create these three custom fields in the tab page ‘General’ of asset master screen (AS01/AS02/AS03/AS91).
STEP 7: Determine the Layout
To achieve this, first of all, we need to find out which layout is assigned to asset class 1000.For that, go to transaction AOLK( information has to be obtained from functional consultant).Select the Asset Class ‘1000’ and click on folder ‘General Assignment of Layout’.
Here, for Asset class 1000, for all the user groups, tab layout SAP is assigned. Since layout ‘SAP’ cannot be changed, it has to be copied and manipulated to include our screen group. Later, the new layout has to be assigned over here.
STEP 8: Create new tab layout
Go to transaction AOLA. Copy the tab layout ‘SAP’ to create another layout, say, YSUB.
System will copy all the settings and will inform you about that.
Select your newly created layout and double-click on the folder ‘Tab page titles’.
You want to put your custom fields in the tab page “General”. So, select this tab page entry and double-click on the folder “Position of Groups”.
Here, all the field groups currently residing in the tab-page “General” are shown. Add an entry for your newly created fields.
Select the group box from the list. An entry will come with “U” padded with the custom subscreen prepared by you.
Then, save and come out.
STEP 9: Assign the new Layout to Asset Class
Now, go to tcode AOLK and assign tab layout YSUB for asset class 1000.


