- Filescrn screen list
- Syntax
- Parameters
- Remarks
- Examples
- ИТ База знаний
- Полезно
- Навигация
- Серверные решения
- Телефония
- Корпоративные сети
- Курс по сетям
- 15 примеров команды PING для диагностики сети
- Руководство по команде grep в Linux
- Рекурсивно найти слово в файлах и папках Linux
- RPM — установка и использование в Linux
- Продвинутые CLI команды для разработчиков
- Команда SCP Linux: безопасное копирование и передача файлов
- Про SSH port forwarding в Linux
- Как пользоваться утилитой screen в Linux?
- Немножко теории
- Установка screen в Linux
- Установка screen в Ubuntu и Debian
- Установка screen в CentOS и Fedora
- Запуск screen в Linux
- Сессия screen с именем
- Как правильно работать с окнами в Windows
- Выход из screen сессии
- Возврат к screen сессии
- Немножко кастомизации screen под вас
- Типовой сценарий использования screen
- Выводы
- How to Show/Hide All User Accounts from Login Screen in Windows 10?
- How to Hide User Account from Windows Logon Screen?
- How to Show All Local User Account on Login Screen in Windows 10?
- Showing Logged Domain Users on Windows 10 Login Screen
- How to Hide Specific User Account from the Sign-in Screen?
- Related Reading
- How to Run Windows File Explorer Elevated (as.
- Using Malicious Software Removal Tool (MRT.exe) on Windows
- How to Clean Up Large System Volume Information.
- How to Disable NetBIOS and LLMNR Protocols in.
- Enable Windows Lock Screen after Inactivity via GPO
- 21 comments
Filescrn screen list
Applies To: Windows Server 2008
Lists currently configured file screens. The command output displays file screen properties (including blocked file groups) on the file screen path. If used without parameters, the filescrn screen list command displays all file screens that are currently configured on the local computer.
To list file screen exceptions that are configured on the computer, use the Filescrn exception list command.
To use this command, you must be logged on as an administrator or a member of the Administrators group.
For examples of how to use this command, see Examples.
Syntax
Parameters
Lists file screens configured on path Path. You can append the following wildcard characters:
\. — a folder specified by Path
\* — all immediate subfolders of Path
\. — all recursive subfolders of Path
Includes file screens for folders in the Recycle Bin.
Includes notification details for each file screen.
Performs the operation on the remote computer ComputerName.
Remarks
The shortest sequence of characters that uniquely identifies a parameter can be used as an abbreviation. For example, the following two commands are equivalent:
To perform operations on a remote computer by the **/remote:**ComputerName parameter:
You must be logged on with a domain account that is a member of the Administrators group on both the local computer and the remote computer.
The remote computer must be running Windows ServerВ 2008, and File Server Resource Manager must be installed.
The Remote File Server Resource Manager Management exception on the remote computer must be enabled. You enable this exception by using Windows Firewall in Control Panel.
Examples
To list all file screens configured on the local computer, type:
To list file screens configured in all subfolders of D:\users, type:
ИТ База знаний
Курс по Asterisk
Полезно
— Узнать IP — адрес компьютера в интернете
— Онлайн генератор устойчивых паролей
— Онлайн калькулятор подсетей
— Калькулятор инсталляции IP — АТС Asterisk
— Руководство администратора FreePBX на русском языке
— Руководство администратора Cisco UCM/CME на русском языке
— Руководство администратора по Linux/Unix
Навигация
Серверные решения
Телефония
FreePBX и Asterisk
Настройка программных телефонов
Корпоративные сети
Протоколы и стандарты
Популярное и похожее
Курс по сетям

15 примеров команды PING для диагностики сети
Руководство по команде grep в Linux
Рекурсивно найти слово в файлах и папках Linux
RPM — установка и использование в Linux
Продвинутые CLI команды для разработчиков
Команда SCP Linux: безопасное копирование и передача файлов
Про SSH port forwarding в Linux
Еженедельный дайджест
Как пользоваться утилитой screen в Linux?
Окно в «новую жизнь»
Сейчас вы точно прочувствуете важное команды screen . Бывало ли у вас такое, что вы выполняете (очень долго) команду в консоли — CLI на удаленной машине, будучи подключенным через SSH? Команда долго выполняется и близится к завершению как вдруг пропадает подключение, рвется SSH подключение и все, что вы делали — пропало?
Обучайся в Merion Academy
Пройди курс по сетевым технологиям
Начать
Прости, что напомнили. Знаем, это болезненно. Что же, вытрем слезы. Для этих ситуаций есть команда screen о которой мы и поговорим.
Немножко теории
Так называемый screen это терминальный мультиплексор (нас тоже пугает это слово). Другими словами, оно дает нам возможность внутри действующей сессии открыть сколько угодно много виртуальных окон/терминалов. Что важно — процесс, запущенный внутри сессии через screen, будет продолжаться даже тогда, когда вы отключитесь от самой первой сессии.
Установка screen в Linux
Вообще, пакет screen предустановлен на большинстве современных Linux — дистров. Проверить можно командой:

Если случилось так, что у вас его нет — это можно быстро исправить простой установкой.
Установка screen в Ubuntu и Debian
Установка screen в CentOS и Fedora
Запуск screen в Linux
Чтобы запустить screen в консоли, просто наберите screen . Что может быть проще, не правда ли?
У вас откроется новая сессия в новом окне. Уже здесь вы можете вводить все нужные shell команды. Находясь в режиме скрина (screen) вы можете посмотреть список доступных вам команд управления этим режимом. Вот так:
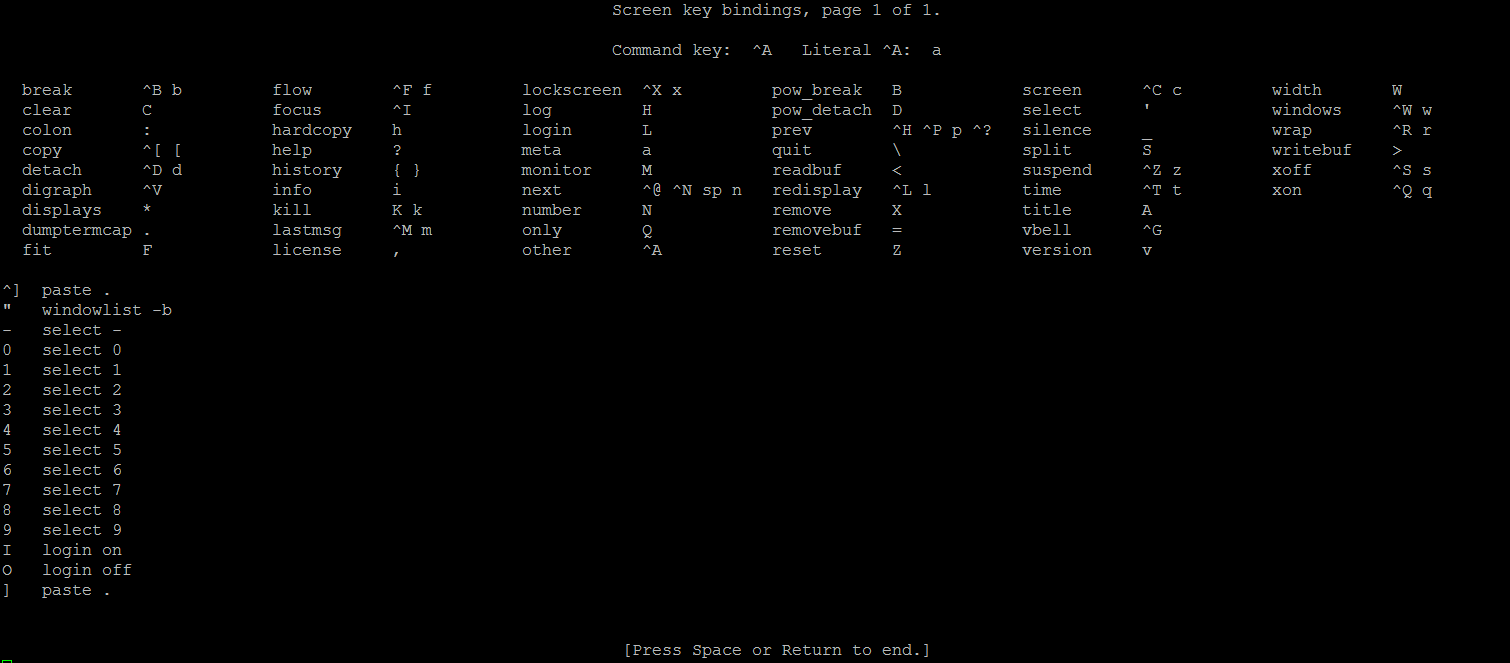
Если не получается нажать указанную выше комбинацию, можно поступить проще: нажмите отдельно Ctrl+a , отпустите, а затем в консоль наберите ? и нажмите Enter
Сессия screen с именем
Ну очень удобная фича. Если вы делаете несколько процессов параллельно, просто обзовите их так, чтобы потом понять, что и где выполняется. Синтаксис такой:
Например, вы можете запустить ping — замер хоста с 1С и назвать сессию так:
Всегда используйте скрин именно так. Будет значительно удобнее.
Как правильно работать с окнами в Windows
Как мы уже сказали, когда вы создаете новую screen — сессию, вы создадите новое окно с shell оболочкой внутри. И что интересно — внутри скрин сессии вы можете создать множество дополнительных окон. Чтобы это сделать, воспользуйтесь командой (внутри скрина) Ctrl+a и c . Новому окну будет назначен номер от 0 до 9 (первый свободный).
Ниже мы собрали все команды, которые понадобятся вам для управления скринами:
- Ctrl+a и c — создать дополнительное окно ;
- Ctrl+a и » — показать список всех имеющихся окон;
- Ctrl+a и 0 — переключиться на окно с номером 0 (номер может быть иной);
- Ctrl+a и A — переименовать текущее окно;
- Ctrl+a и S — разделить окно по горизонтали на две области;
- Ctrl+a и | — разделить окно по вертикали на две области;
- Ctrl+a и tab — переключить рабочий фокус на следующую область разделенного окна;
- Ctrl+a и Ctrl+a — переключить рабочий фокус на предыдущую область разделенного окна;
- Ctrl+a и Q — закрыть все разделенные области кроме;
- Ctrl+a и X — закрыть текущую область;
Выход из screen сессии
Вы можете легко выйти из screen — сессии набрав:
Самое важное: запущенная вами в этот момент команда не остановится и будет продолжать свое выполнение.
Возврат к screen сессии
Чтобы вернуть к screen — сессии используйте команду:
Если у вас запущено больше чем одна screen — сессия, то после ключа r нужно указать ее ID. Узнать его просто с помощью команды:
Вывод этой команды будет выглядеть вот так:
В выводе выше мы выделили ID — сессий. Например, чтобы вернуться к сессии 32328 (pings_towards_1C), дайте команду:
Немножко кастомизации screen под вас
Когда screen запускается, он считывает свои конфигурационные параметры из /etc/screenrc и
/.screenrc , если файл присутствует. Так вот — мы можем легко перенастроить предпочтения использования screen и сделать это в файле .screenrc .
Посмотрите пример с комментариями, как мы закастомили screen для себя:
Типовой сценарий использования screen
Общий случай, так сказать. Обычно он состоит из следующих шагов:
- После SSH подключения к серверу, набираем screen ;
- Запускаем интересующую нас команду в режиме screen — сессии;
- Выполняем команду Ctrl + a и d , чтобы выйти из режима работы с экран-сессией
- Через какое-то время возвращаемся к запущенному ранее экрану командой screen -r
Выводы
Мы разобрались, как создавать screen сессии, управлять ими внутри, открывая новые окна, выходить из их режима управления (без прекращения выполнения команды), делить горизонтально и вертикально экраны.
Ах да, ещё мы научились кастомизировать screen под себя. Профит!
How to Show/Hide All User Accounts from Login Screen in Windows 10?
By default, the logon screen in Windows 10/8.1 and Windows Server 2016/2012 R2 displays the account of the last user who logged in to the computer (if the user password is not set, this user will be automatically logged on, even if the autologon is not enabled). However, it is possible to display all user accounts on the welcome screen in Windows 10. You can configure different behavior of this function: you can show the last logon username, hide it, or even list all local or logged domain users.
How to Hide User Account from Windows Logon Screen?
Displaying the account name on the Windows login screen is convenient for users, but reduces the computer security. An attacker who gained local access to a computer will have to pick up only a password (for this there are various ways of social engineering, brute force attacks, or a banal sticker with a password on the monitor).
You can hide the last logged user name on a Windows welcome screen through the GPO. Open the domain (gpmc.msc) or local (gpedit.msc) Group Policy editor and go to the section Computer Configuration -> Windows Settings -> Security Settings -> Local Policies -> Security Options. Enable the policy “Interactive logon: Do not display last user name”. By default, this policy is disabled.
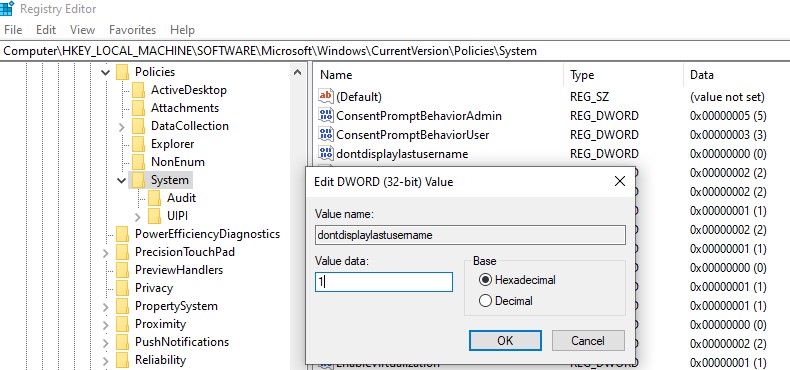
Also, you can hide the username on the login screen through the registry. To do this go to the registry key HKEY_LOCAL_MACHINE\SOFTWARE\Microsoft\Windows\CurrentVersion\Policies\System, create a new DWORD parameter named dontdisplaylastusername with the value 1.
Additionally, you can hide the username on a locked computer. To do this, in the same GPO section you need to enable the policy “Interactive logon: Display user information when the session is locked” and select the value “Do not display user information”.
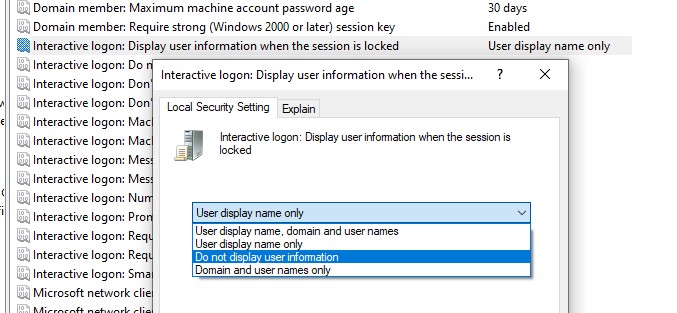
A registry parameter named DontDisplayLockedUserId in the same registry key with a value of 3 corresponds to this policy setting.
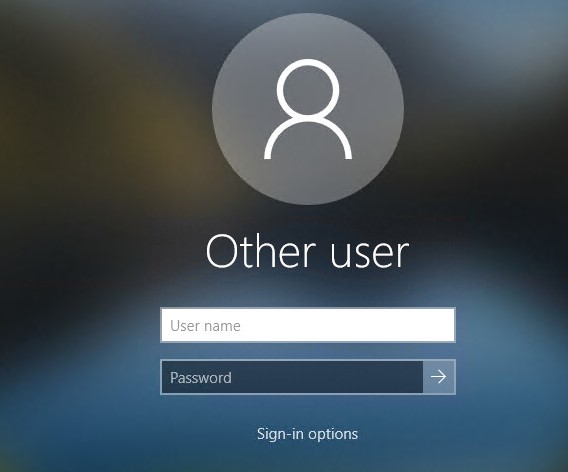
Now on the computer login screen and on the Windows lock screen, an empty fields for entering a username and password are displayed.
How to Show All Local User Account on Login Screen in Windows 10?
In Windows 10 / 8.1, you can list all local user accounts on the welcome screen. To log in to the computer, the user just needs to click on the desired account and specify its password.
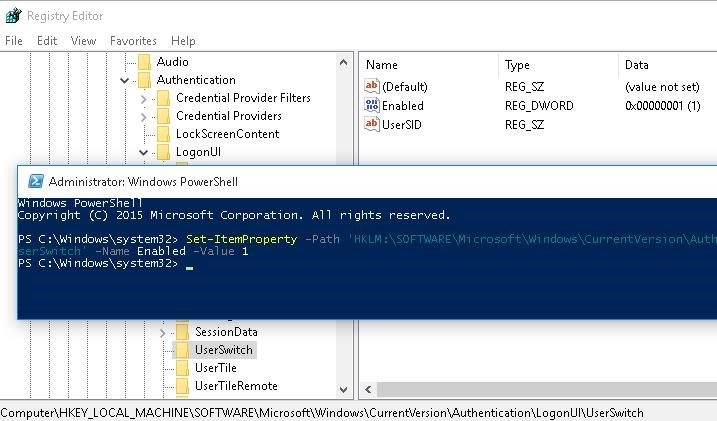
To display all local users on the Windows login screen, you need to change the value of Enabled parameter to 1 in the following registry key: HKEY_LOCAL_MACHINE\SOFTWARE\Microsoft\Windows\CurrentVersion\Authentication\LogonUI\UserSwitch. You can change this parameter through the RegEdit GUI, Reg Add cli command or Set-ItemProperty PowerShell cmdlet:
Reg Add HKLM\SOFTWARE\Microsoft\Windows\CurrentVersion\Authentication\LogonUI\UserSwitch /v Enabled /t REG_DWORD /d 1 /f
Set-ItemProperty -Path ‘HKLM:\SOFTWARE\Microsoft\Windows\CurrentVersion\Authentication\LogonUI\UserSwitch’ -Name Enabled -Value 1
However, the Windows automatically resets the value of the Enabled parameter to 0 at each user logon. In order to always change the registry value to 1, it’s easier to create a new task in the Task Scheduler that will run at user logon.
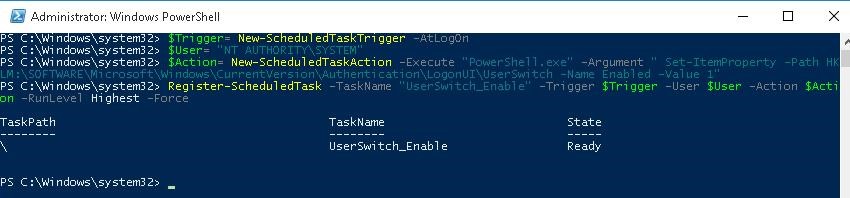
The Scheduler task must run one of the commands shown above. You can create this task manually using the taskschd.msc graphic console. But it seems to me that it is much easier to create a Scheduler task using PowerShell. In our case, the commands to create a new task may look as follows:
$Trigger= New-ScheduledTaskTrigger -AtLogOn
$User= «NT AUTHORITY\SYSTEM»
$Action= New-ScheduledTaskAction -Execute «PowerShell.exe» -Argument «Set-ItemProperty -Path HKLM:\SOFTWARE\Microsoft\Windows\CurrentVersion\Authentication\LogonUI\UserSwitch -Name Enabled -Value 1»
Register-ScheduledTask -TaskName «UserSwitch_Enable» -Trigger $Trigger -User $User -Action $Action -RunLevel Highest –Force
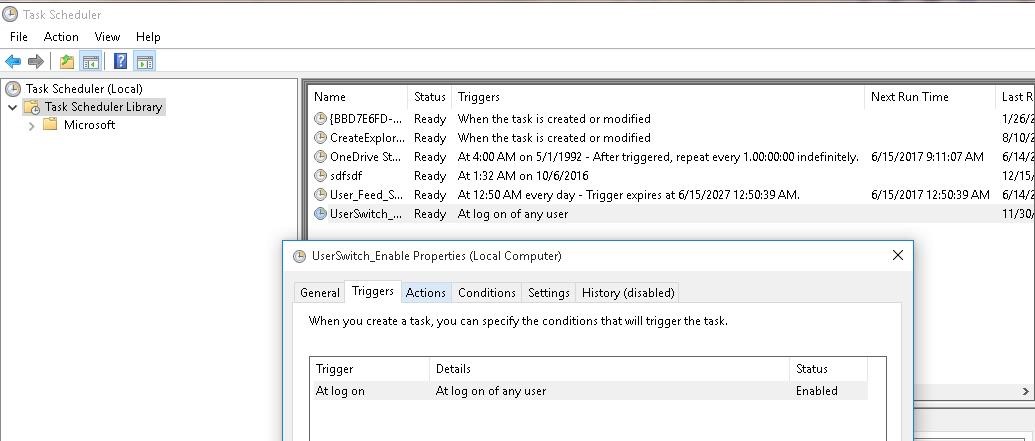
Make sure that the task appeared in Windows Task Scheduler (taskschd.msc).
Log off and then log on again. The task must start automatically and change the value of Enabled registry parameter to 1. Check the current value of the parameter. As you can see, it is 1:
get-ItemProperty -Path ‘HKLM:\SOFTWARE\Microsoft\Windows\CurrentVersion\Authentication\LogonUI\UserSwitch’ -Name Enabled
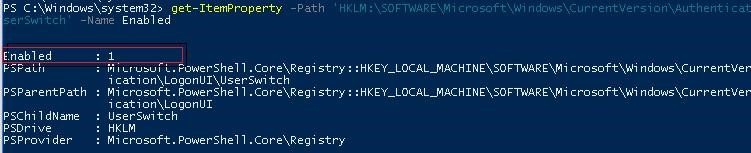
After the next reboot, all local user accounts will be displayed on Windows 10/8.1 logon screen instead of the last one.
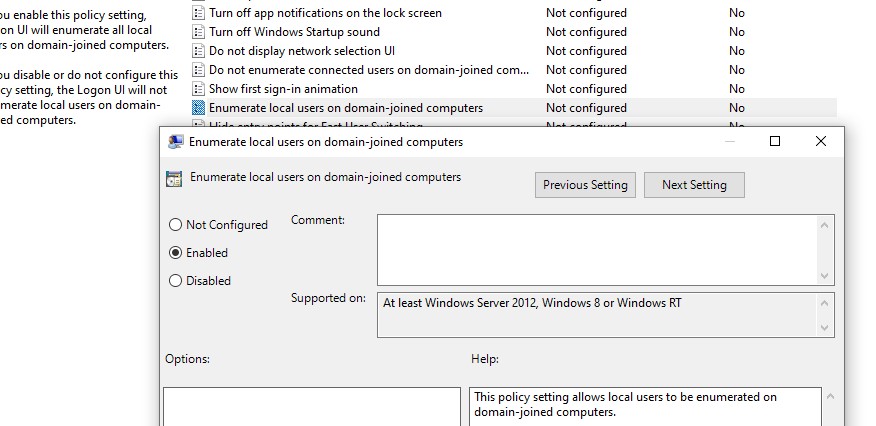
There is a separate group policy setting that makes it much easier to list local users account on the Welcome screen of the domain-joined computers. Open the GPO editor, go to the section Computer Configuration -> Administrative Templates -> System -> Logon and enable the policy “Enumerate local users on domain-joined computers”.
Showing Logged Domain Users on Windows 10 Login Screen
If several domain users use one computer, on the welcome screen you can display a list of users who have local active/disconnected session (users will only be displayed if they are logged in, for example, when using public computers, kiosks, an RDS server or its Windows 10 analogue).
To do this, check that in the Computer Configuration -> Windows Settings -> Security Settings -> Local Policies -> Security Options the following policies are disabled:
- Interactive logon: Don’t display last signed-in: Disabled
- Interactive logon: Don’t display username at sign-in: Disabled
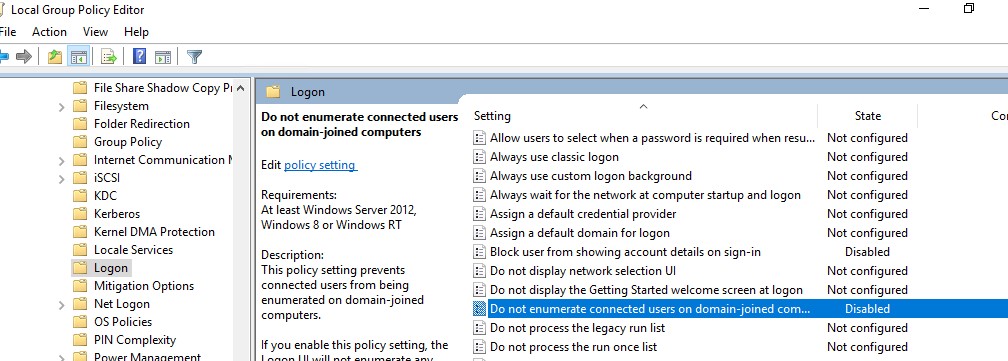
Then disable the policies in the section Computer Configuration -> Administrative Templates -> System -> Logon:
- Block user from showing account details on sign-in: Disabled
- Do not enumerate connected users on domain-joined computer: Disabled
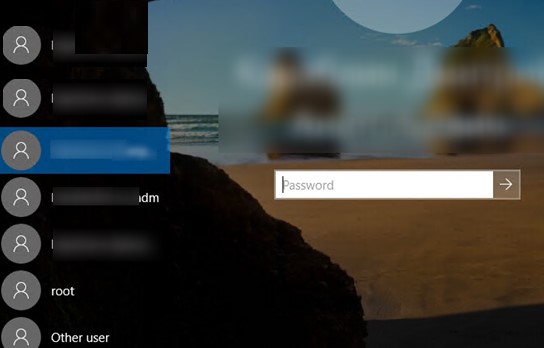
After that, the welcome screen will display a list of accounts with active sessions that have logged in but have been disconnected. It is enough for the user to log in once, and after that just select an account from the list and enter the password.
How to Hide Specific User Account from the Sign-in Screen?
The Windows Welcome screen displays users who are members of one of the following local groups: Administrators, Users, Power Users, Guests.
You can hide any user from the list on the Windows 10 sign-in screen by running the command:
reg add «HKLM\SOFTWARE\Microsoft\Windows NT\CurrentVersion\Winlogon\SpecialAccounts\UserList» /t REG_DWORD /f /d 0 /v UserName
Managing Exchange Mailbox Inbox Rules with PowerShell
How to Delegate Control and Administrator Privileges in Active Directory?
Related Reading
How to Run Windows File Explorer Elevated (as.
Using Malicious Software Removal Tool (MRT.exe) on Windows
How to Clean Up Large System Volume Information.
How to Disable NetBIOS and LLMNR Protocols in.
Enable Windows Lock Screen after Inactivity via GPO
21 comments
Mine displays all of the accounts by default. How come?
This is absurd. If this is actually the setting- which has taken an hour of googling to find- to show all the local users on the login screen, the fact that it has to be set and then a timed script created to keep it set is… nucking futs. What a hate joke of an OS.
I agree completely. It’s as if none of the developers considered the basics only the settings one would need to perform a hostile takeover of IBM. I’ve been chasing a way for days to login as any other user in Windows 10. There’s no way to switch users and no solution anywhere. Ask Microsoft? Their response is “There’s no way to switch users in Windows 10? Have you tried logging out?” (Almost took a hostage.)
Arf! This is not about local account, but this tuto is about domain account. When you have severals doamain users on the same domain computer, its interresting to show all users account on the start menu.
By default, they have to choose “other user” and type both their ID and password. So with this method, they just have to click on appropriate username and type password.
For information, this doesn’t work. Scheduled task is working on all users, the reg value switch from 0 to 1 at startup for all users but on startup screen, only last user logged appear.
Not working. MS probably killed it in an update.
You have to change the permissions of the userswitch reg key : change the owner to Admin group and enable full control of the key for Admin and disable the write permission for SYSTEM. This is working since Windows 8.
@Roland – not an adminstrator but often end up having to do deskside support. How do I do what you suggested?
Try to run this powershell script as admin :
## Taken from P/Invoke.NET with minor adjustments.
$Definition = @’
using System;
using System.Runtime.InteropServices;
public class AdjPriv <
[DllImport(“advapi32.dll”, ExactSpelling = true, SetLastError = true)]
internal static extern bool AdjustTokenPrivileges(IntPtr htok, bool disall,
ref TokPriv1Luid newst, int len, IntPtr prev, IntPtr rele);
[DllImport(“advapi32.dll”, ExactSpelling = true, SetLastError = true)]
internal static extern bool OpenProcessToken(IntPtr h, int acc, ref IntPtr phtok);
[DllImport(“advapi32.dll”, SetLastError = true)]
internal static extern bool LookupPrivilegeValue(string host, string name,
ref long pluid);
[StructLayout(LayoutKind.Sequential, Pack = 1)]
internal struct TokPriv1Luid <
public int Count;
public long Luid;
public int Attr;
>
internal const int SE_PRIVILEGE_ENABLED = 0x00000002;
internal const int TOKEN_QUERY = 0x00000008;
internal const int TOKEN_ADJUST_PRIVILEGES = 0x00000020;
public static bool EnablePrivilege(long processHandle, string privilege) <
bool retVal;
TokPriv1Luid tp;
IntPtr hproc = new IntPtr(processHandle);
IntPtr htok = IntPtr.Zero;
retVal = OpenProcessToken(hproc, TOKEN_ADJUST_PRIVILEGES | TOKEN_QUERY,
ref htok);
tp.Count = 1;
tp.Luid = 0;
tp.Attr = SE_PRIVILEGE_ENABLED;
retVal = LookupPrivilegeValue(null, privilege, ref tp.Luid);
retVal = AdjustTokenPrivileges(htok, false, ref tp, 0, IntPtr.Zero,
IntPtr.Zero);
return retVal;
>
>
‘@
# Take ownership privilege
$ProcessHandle = (Get-Process -id $pid).Handle
$type = Add-Type $definition -PassThru
for ($i=1; $i -le 10;$i++) <
$status=$type[0]::EnablePrivilege($processHandle, “SeTakeOwnershipPrivilege”)
if ($status)
if ($i -eq 10)
start-sleep 1|out-null
>
#
$keypath=”SOFTWARE\Microsoft\Windows\CurrentVersion\Authentication\LogonUI\UserSwitch”
#
# Get localized admin group name
$admin=(get-wmiobject win32_group| Where-Object <$_.sid -eq “s-1-5-32-544”>).name
# Change Owner to the local Administrators group
$regKey = [Microsoft.Win32.Registry]::LocalMachine.OpenSubKey(“$keypath”, “ReadWriteSubTree”, “TakeOwnership”)
$regACL = $regKey.GetAccessControl()
$regACL.SetOwner([System.Security.Principal.NTAccount]”$admin”)
$regKey.SetAccessControl($regACL)
# Change Permissions for the local Administrators group
$regKey = [Microsoft.Win32.Registry]::LocalMachine.OpenSubKey(“$keypath”, “ReadWriteSubTree”, “ChangePermissions”)
$regACL = $regKey.GetAccessControl()
$regRule = New-Object System.Security.AccessControl.RegistryAccessRule (“$admin”,”FullControl”,”ContainerInherit”,”None”,”Allow”)
$regACL.SetAccessRule($regRule)
# Change Permissions for System
$regRule = New-Object System.Security.AccessControl.RegistryAccessRule (“SYSTEM”,”SetValue”,”ContainerInherit”,”None”,”Deny”)
$regACL.SetAccessRule($regRule)
$regKey.SetAccessControl($regACL)
New-ItemProperty -Path “HKLM:\$keyPath” -Name “Enabled” -Value 1 -PropertyType DWORD -Force |out-null
You need to run this as admin since admin privilege is required to get ownership of the userswitch key owned by the system account.


