- Create a screen recording from your desktop
- Get started
- Record the screen
- Review the recording
- Upload screen recording
- Supported browsers and limitations
- We’d love to hear from you
- How To Record Screen In Windows 10 in 2021 (Without Any Software)
- Steps To Record Screen In Windows 10 in 2021
- Using VLC Media Player
- How to Record the Screen on Your Windows PC or Mac
- Record Your Screen with the Windows Game Bar
- Record Your Screen in macOS
- OBS Studio
- Free Cam
Create a screen recording from your desktop
Screenshots work great, but sometimes a quick how-to video can create a more powerful message. Using Microsoft Stream, you can create short screen recordings of up to 15 minutes, including your camera and microphone, without any additional software.
Get started
To record your screen, you must use the latest Microsoft Edge or Google Chrome on Windows 10 or macOS. Learn about supported browsers and limitations.
Select Create > Record screen in Microsoft Stream. 
When prompted by your browser, select Allow Microsoft Stream to use your camera and microphone.
If you select Block, your camera and microphone will be disabled. To enable them, click Lock icon in your browser’s address bar and select Allow next to the appropriate device. 
Select or to set up your camera and microphone. If you’re using a USB camera or microphone, make sure it’s plugged in and select it from the menu. You can also turn off your camera and microphone if you don’t wish to include them in your recording.
You’re now ready to start recording!
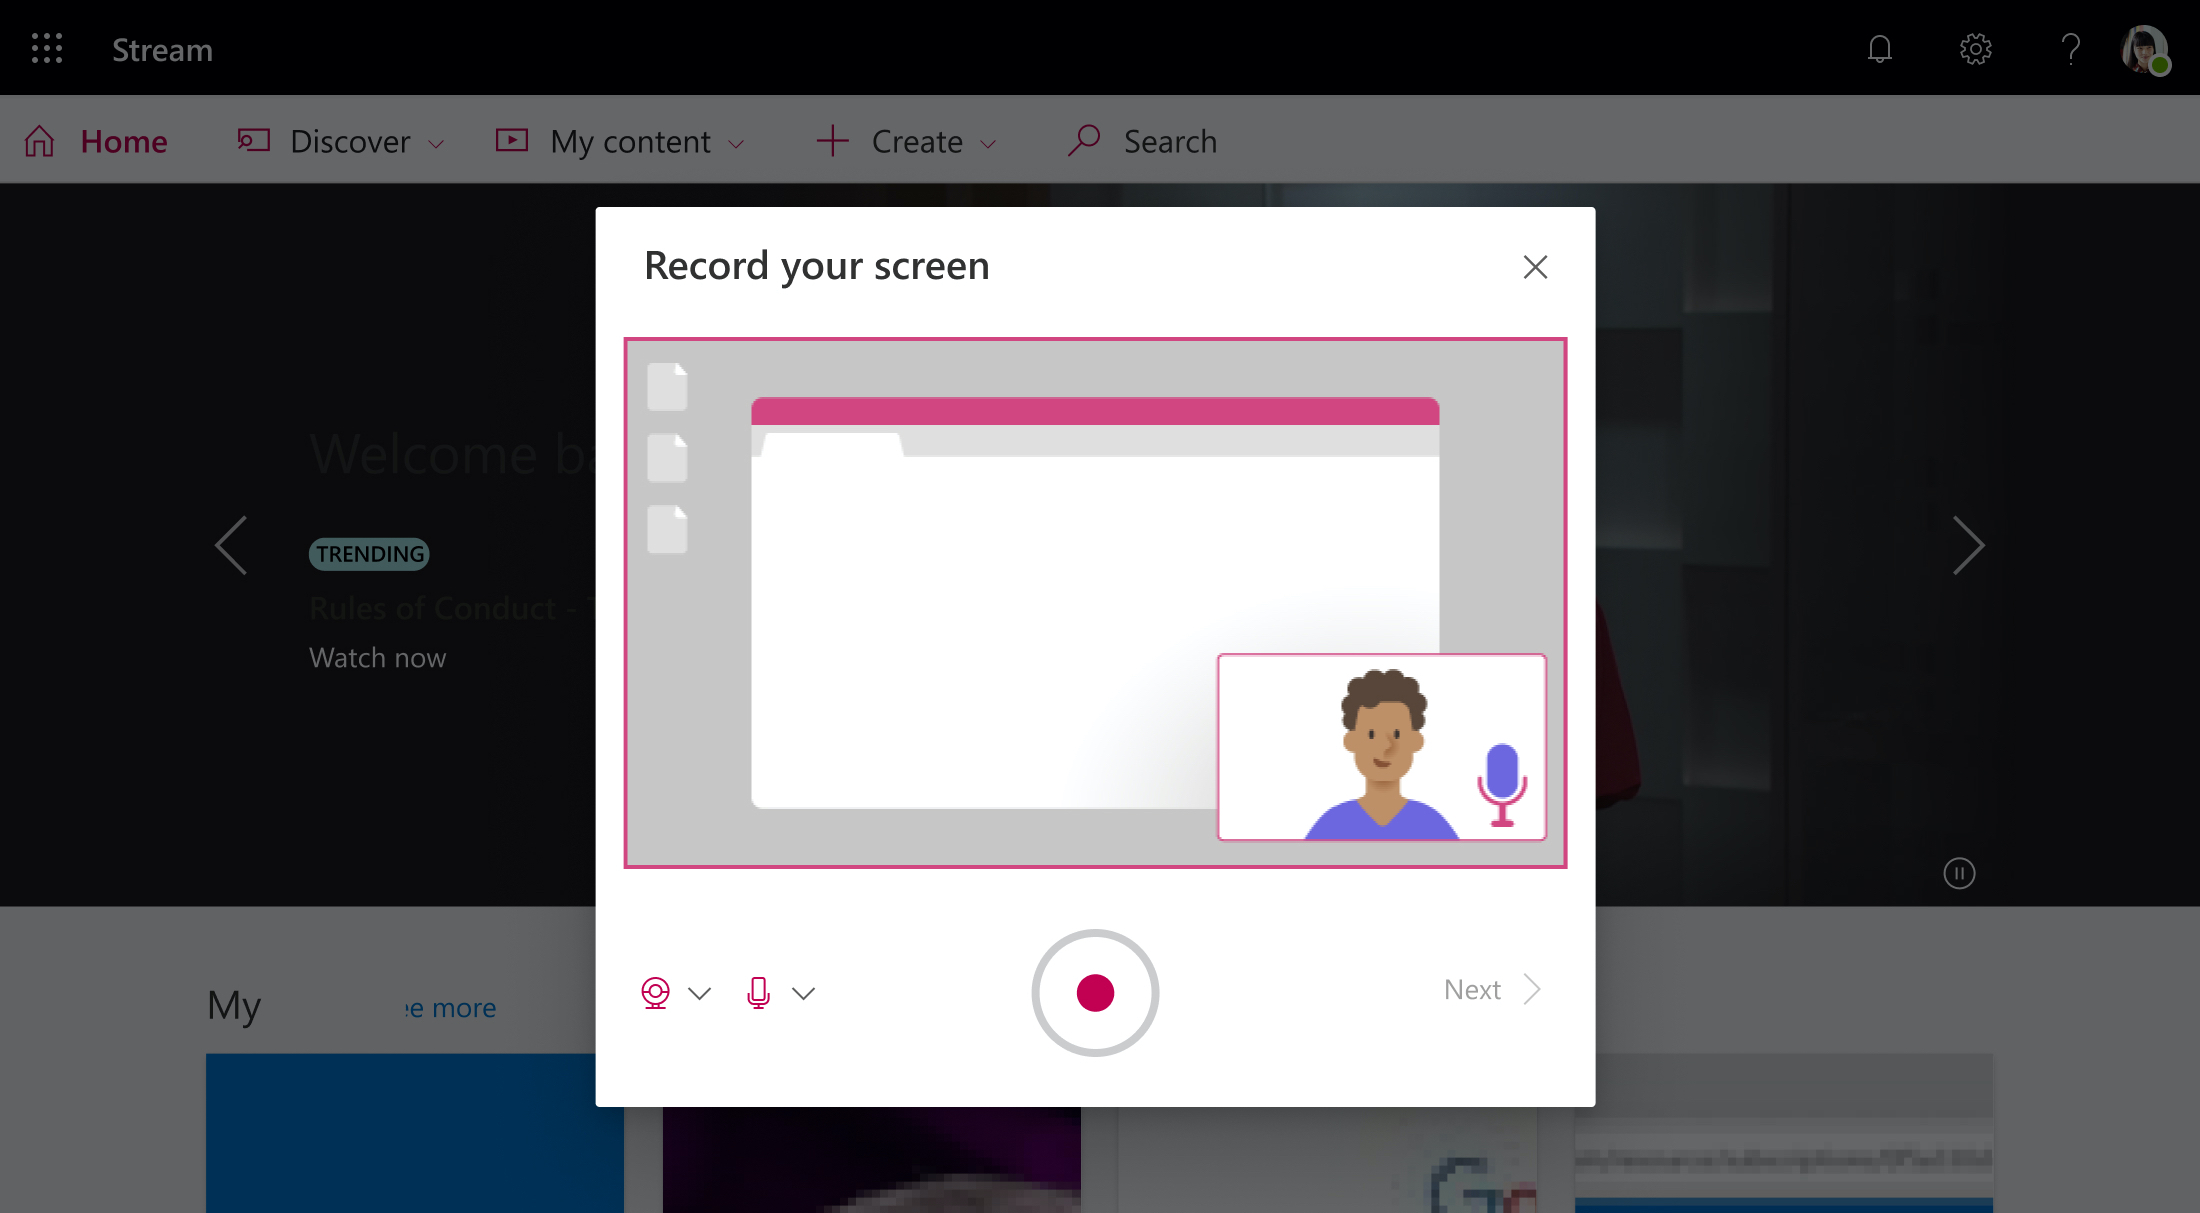
Record the screen
Select to start recording.
Select which content from your screen you wish to share—your entire screen, an application window, or browser tab—then click Share. To include audio from your computer in the recording, select the checkbox Share audio.
If you’re using macOS Catalina, you may need to set up screen recording permissions in System Preferences. Learn more about macOS Catalina permissions. 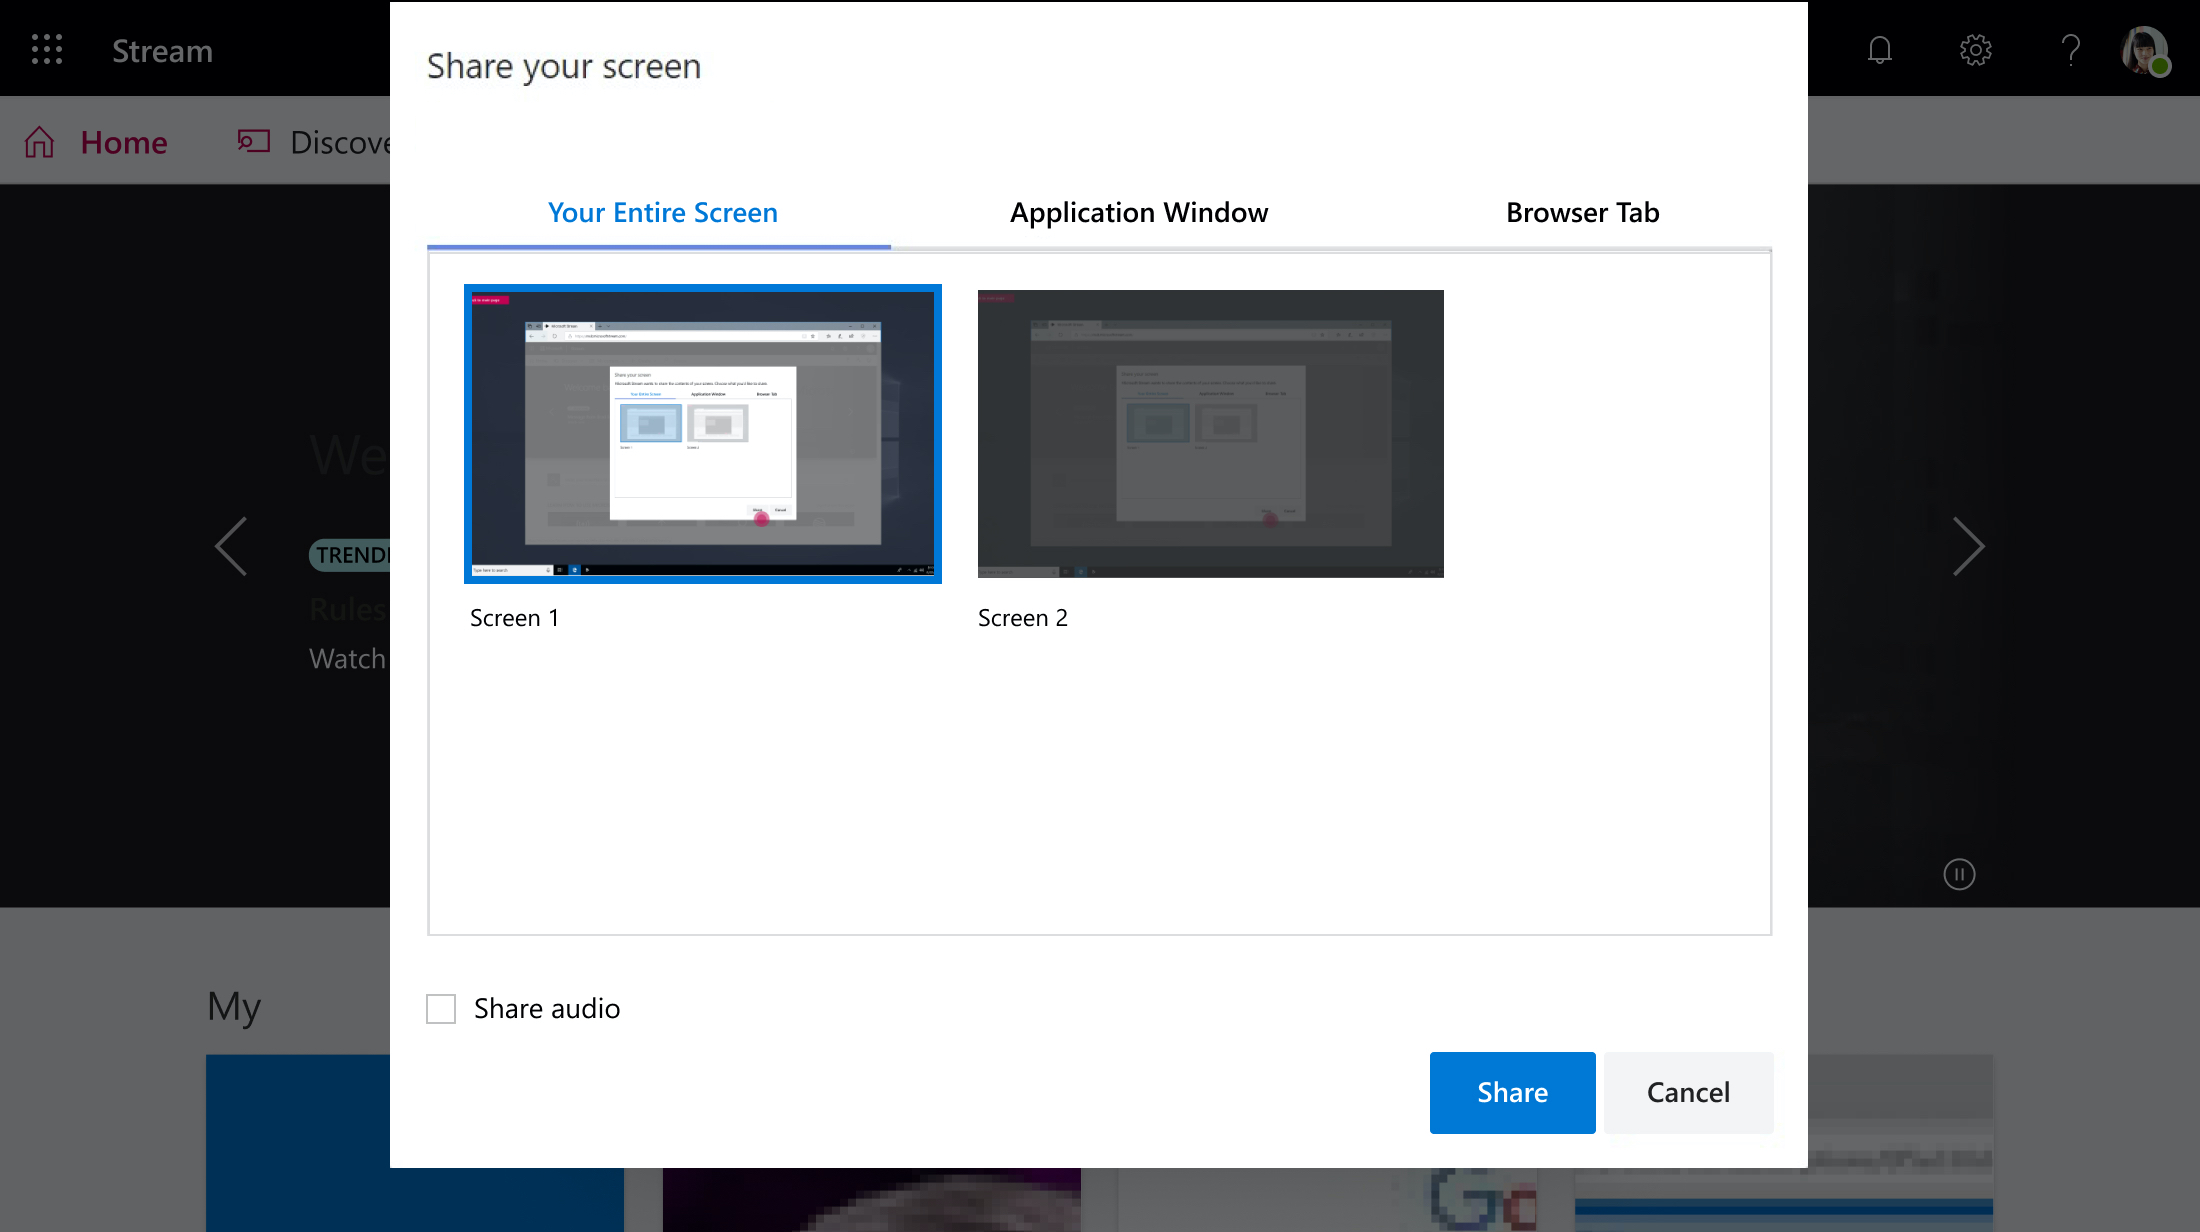
Wait until the countdown for the recording to begin. Once you begin, you’ll see a timer and the time limit.
You can now switch to the application or window you wish to record.
When you’re finished recording, or if you want to take a break, switch back to the Microsoft Stream screen recorder tab in your browser. 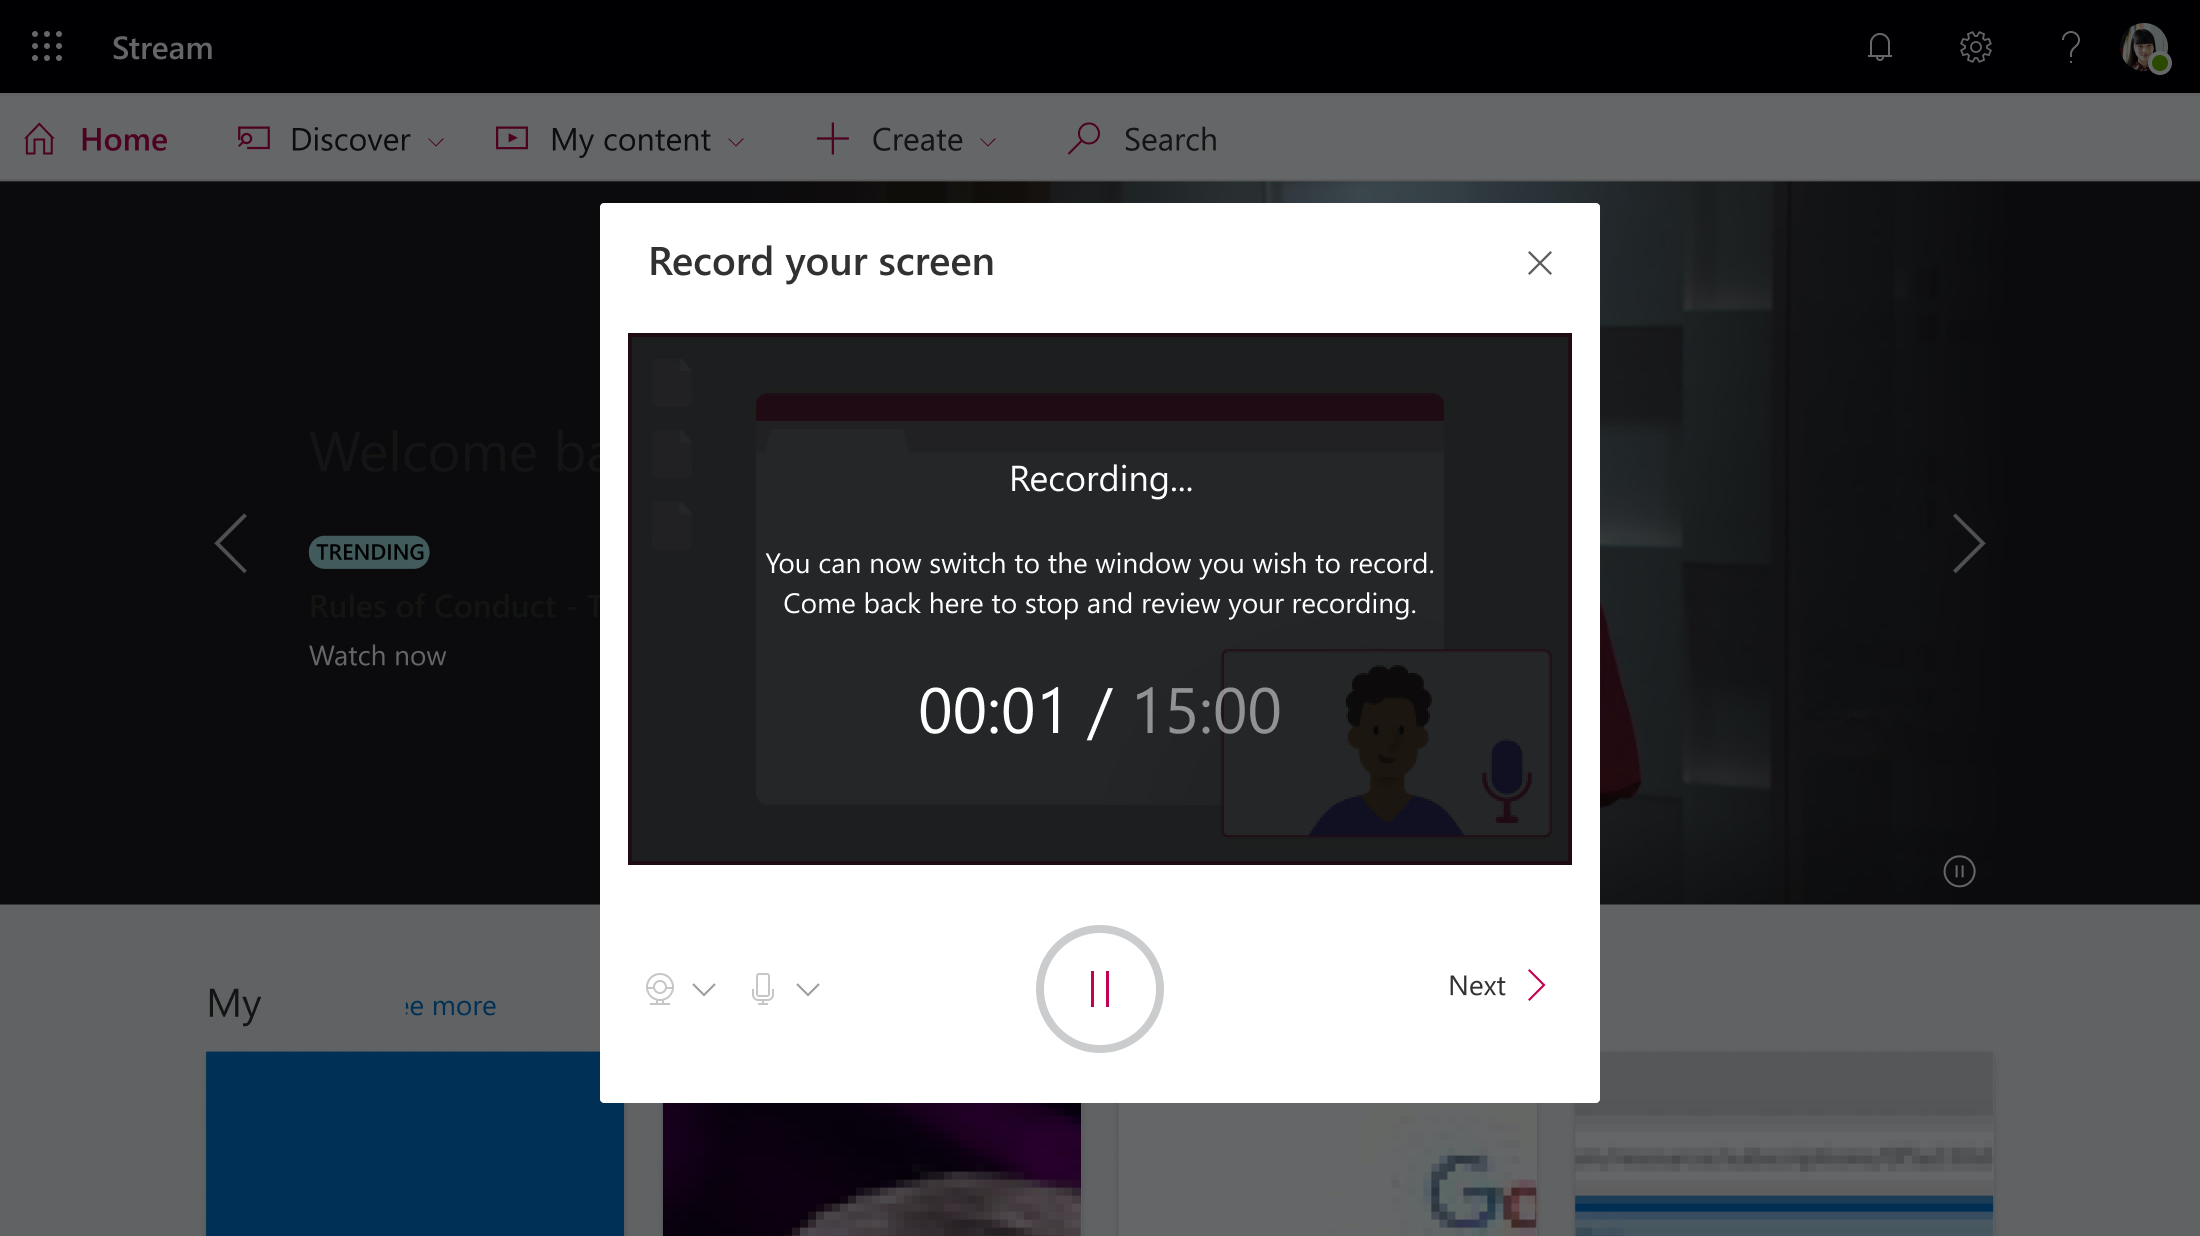
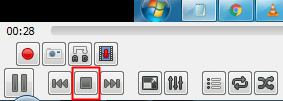
Select   to pause recording the screen, audio, and camera at any time. Select to Resume.
When you’re finished, select Next to review your recording.
Review the recording
On this page, select the Play button to review the recording. Select Record again if you’re not satisfied and want to try again.
When you’re satisfied with your recording, select Upload to Stream to continue to the next step. 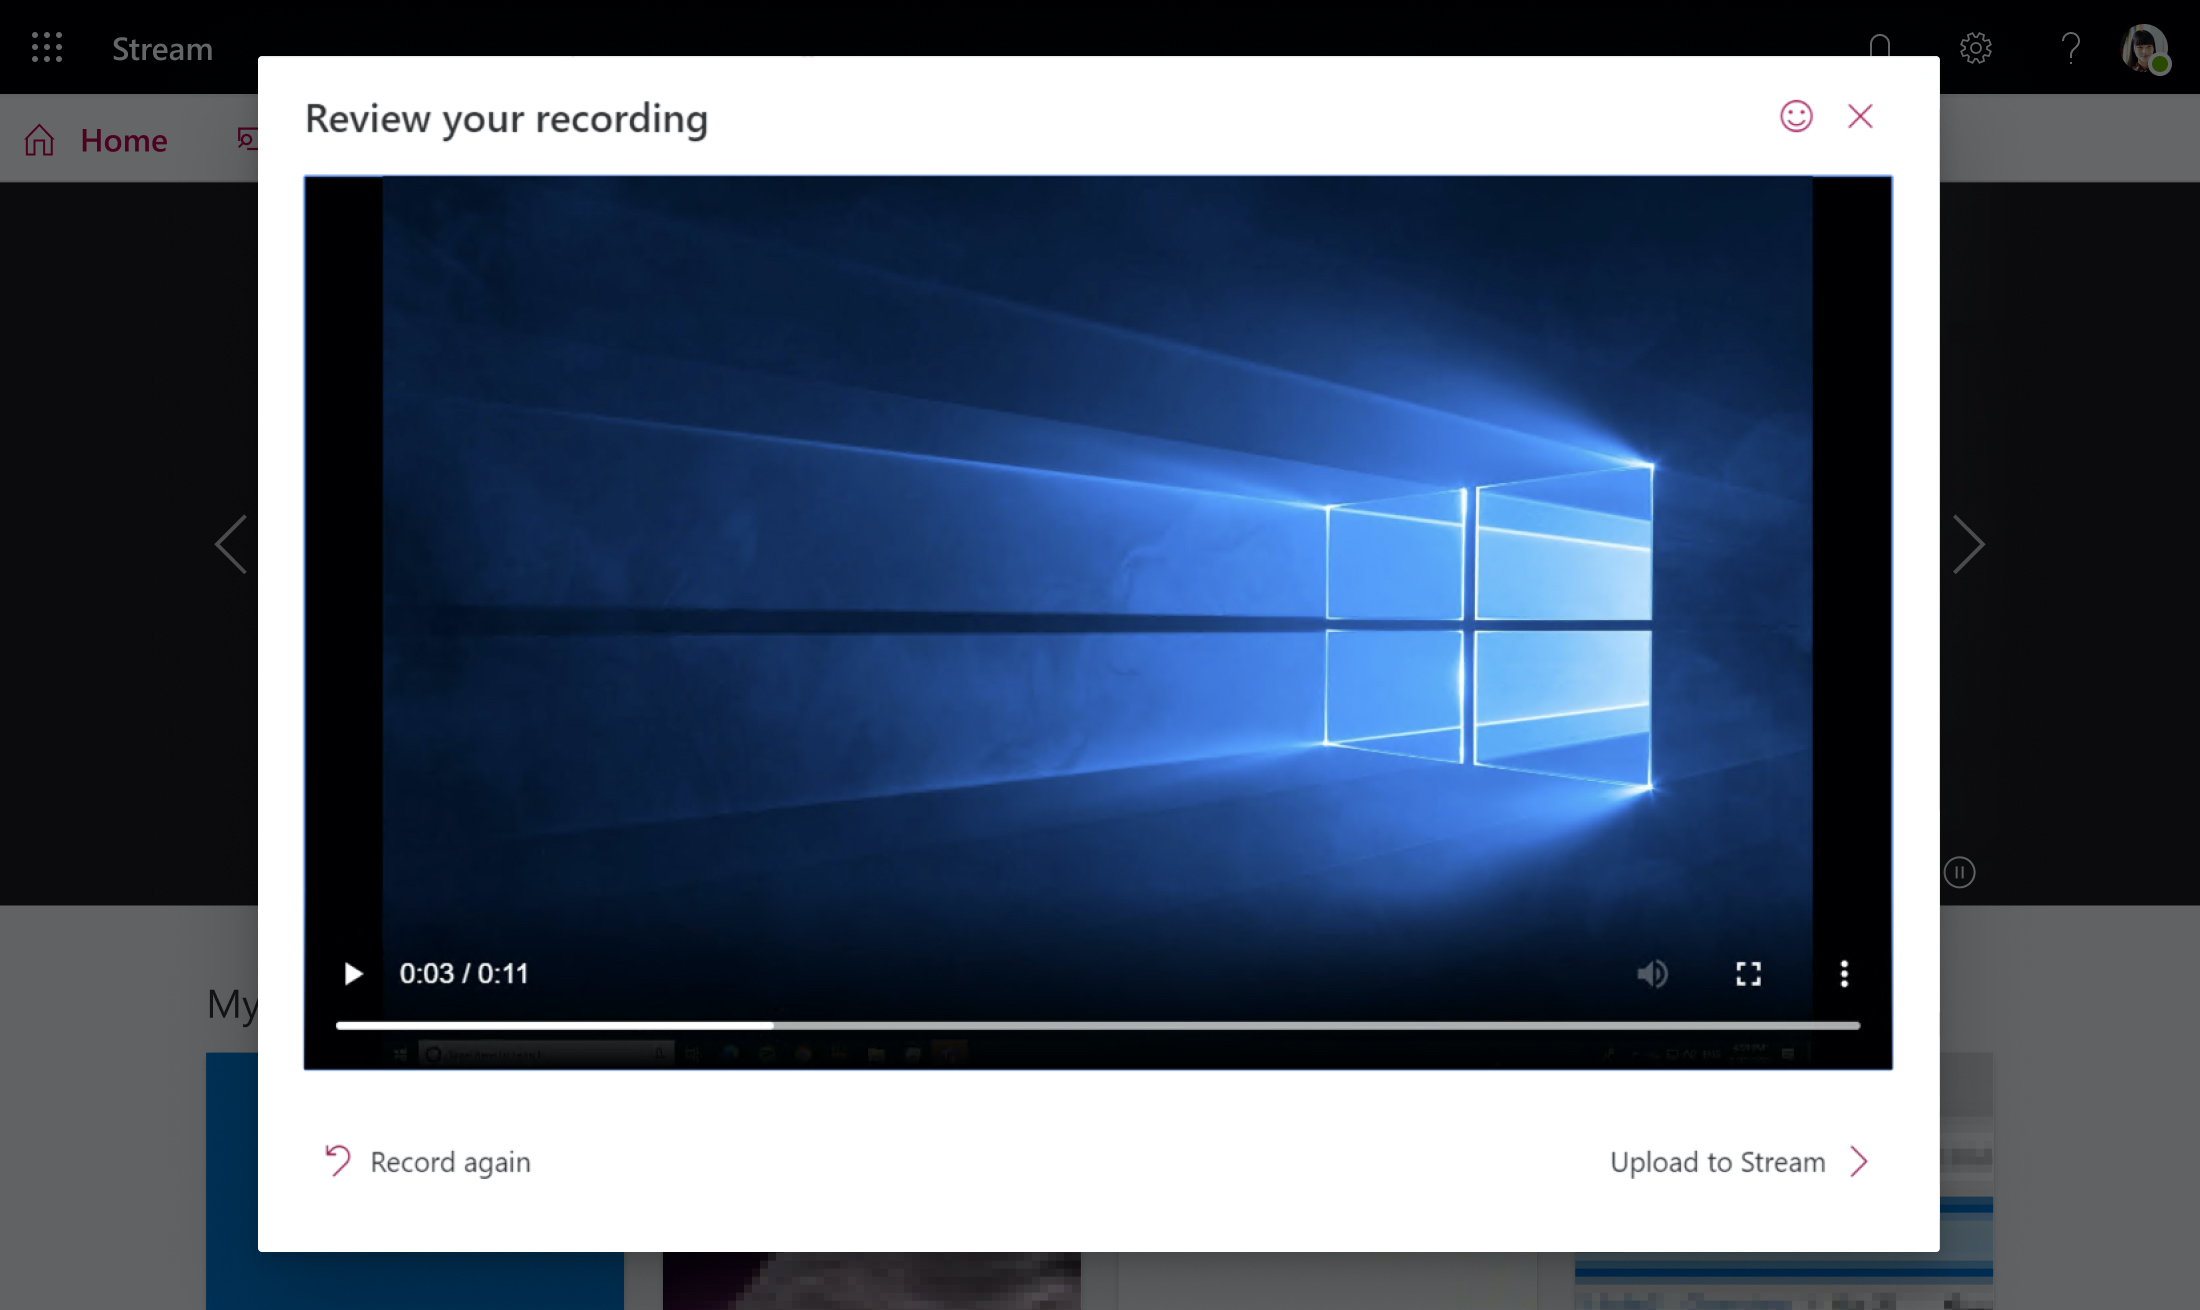
If you want to trim the video, you can do so after uploading and processing the recording.
Upload screen recording
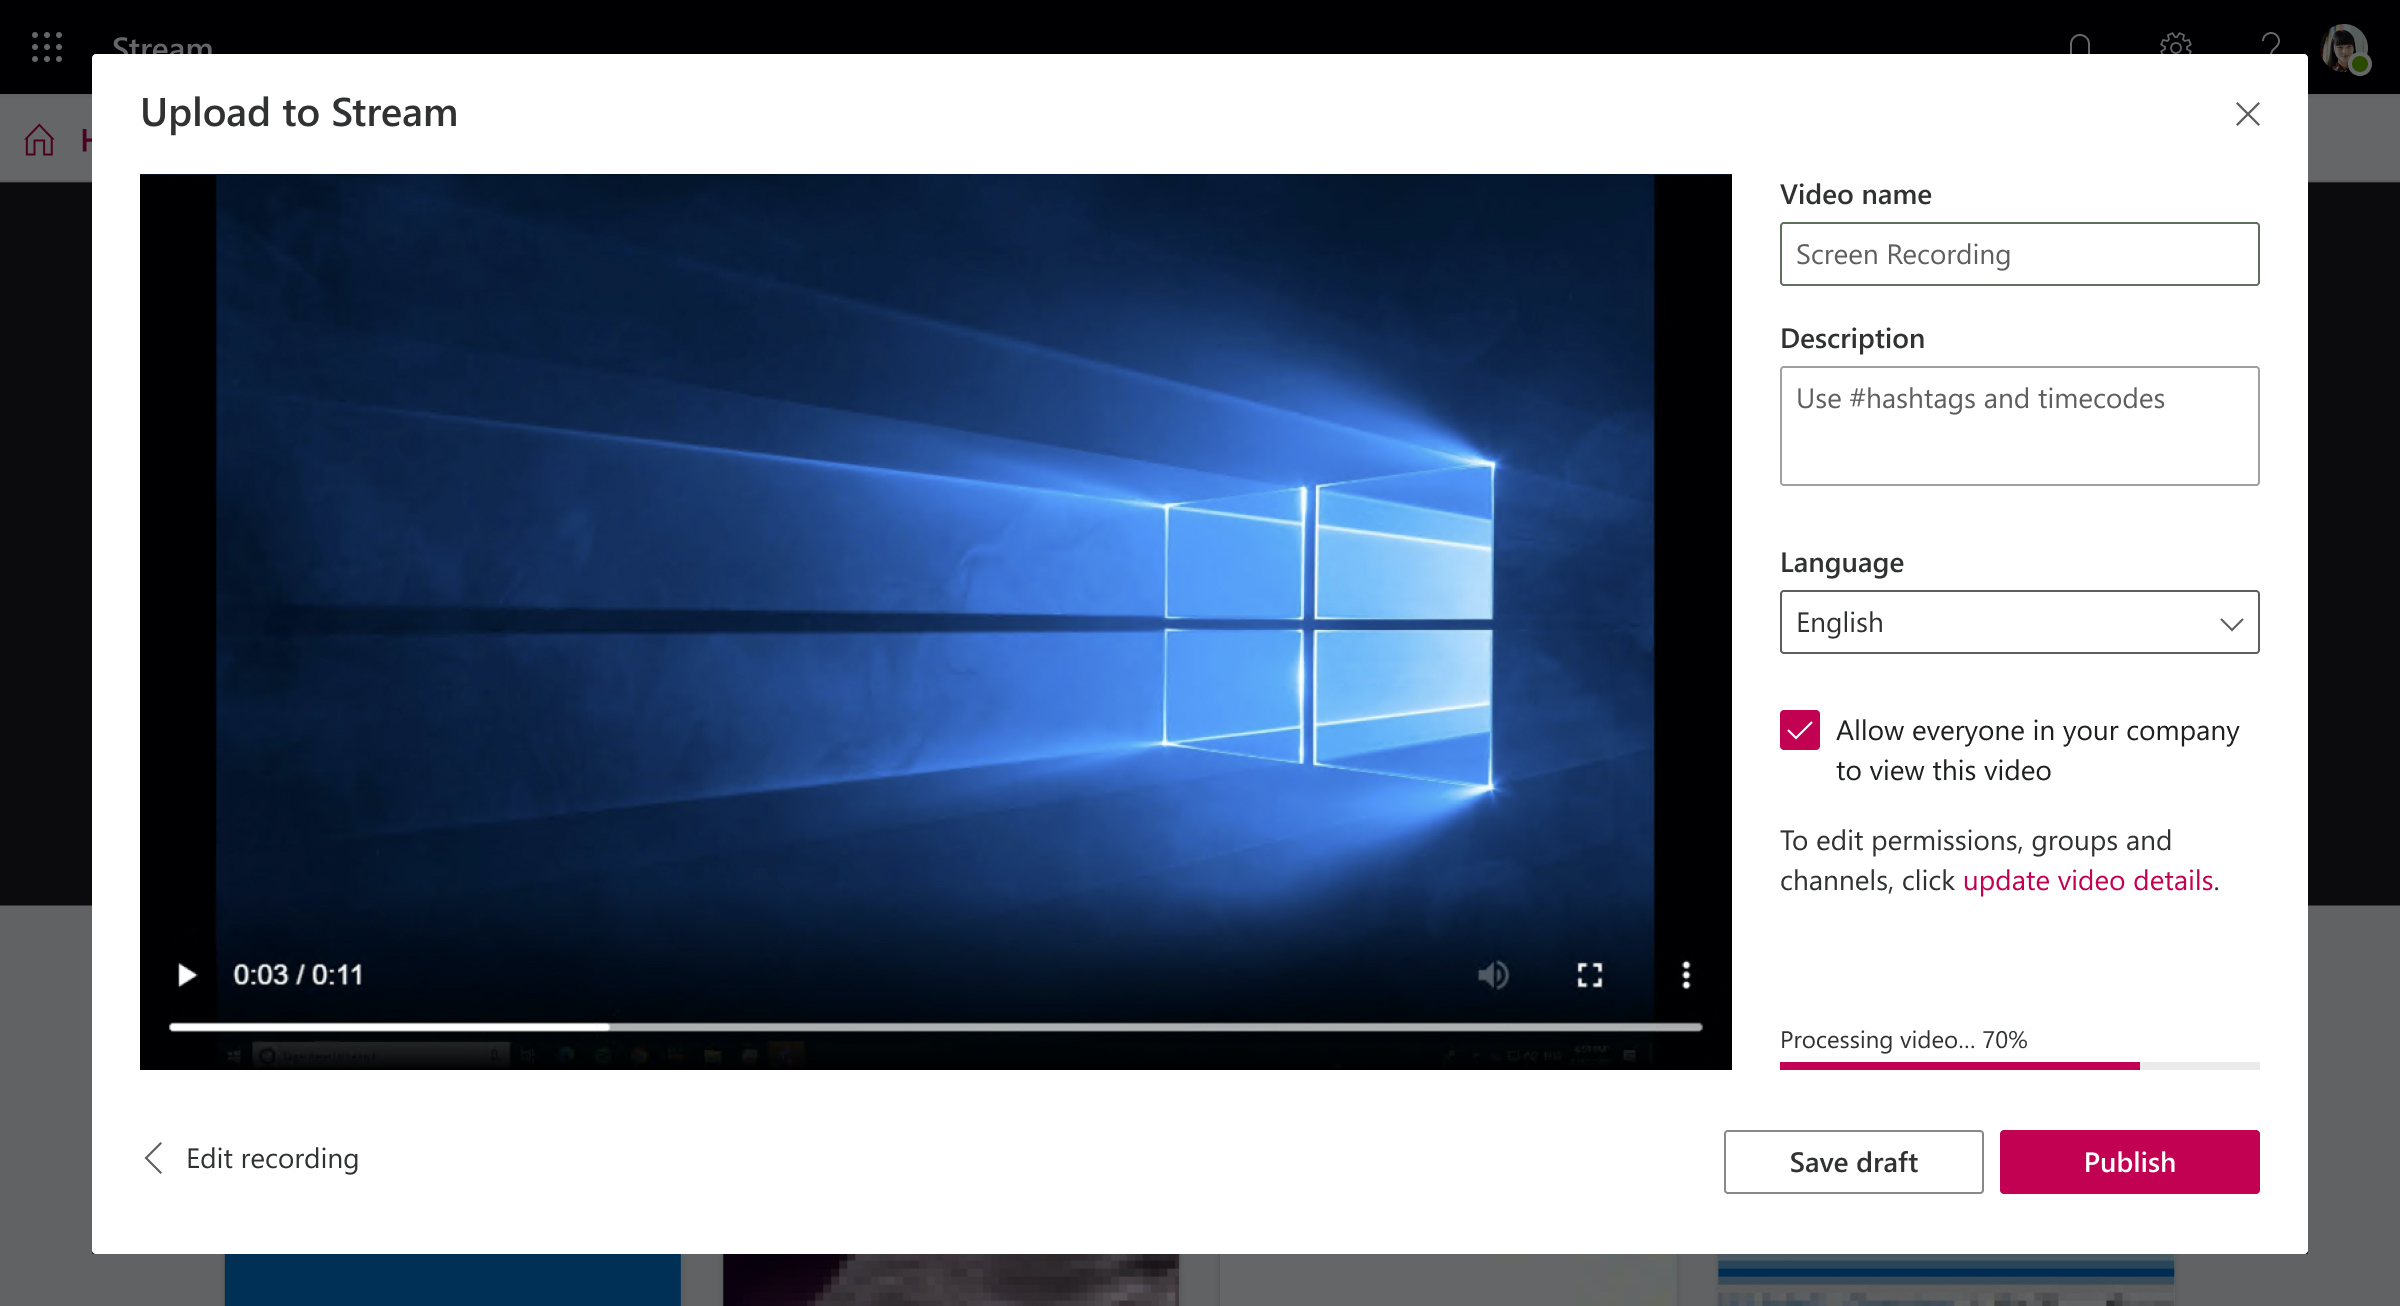
On this page, your video will start uploading to Stream. While you wait, you can:
Monitor the uploading progress
Fill in the video name, description, and language in the details section
When published, everyone in your company will have permission to view your video. To make the video visible only to yourself, deselect this checkbox: Allow everyone in your company to watch this video
To set custom permissions, groups, channels, and other options, click Update video details
After the upload is complete, you can either publish or save, as follows:
a. Click Publish. Your video is now ready! Select Go to Video to go to the video page on Stream and watch or share your video. After processing is complete, you can also trim your video by selecting the More actions menu , then click Trim video.
b. Click Save as draft if you’re not yet ready to publish your video. Your video will be saved to My Content > Videos in Stream, from where you can publish it at any time.
Supported browsers and limitations
Screen Recorder works on the following browsers:
Safari on MacOS is not supported
Microsoft Stream Mobile on iOS and Android is not supported in mobile browsers
Recording system audio is available only on Windows, not macOS
Including the camera in the recording is available only when recording the entire screen, not when recording an application window or browser tab.
Screen recordings are limited to a maximum length of 15 minutes. For longer content, break up your video into shorter segments.
We’d love to hear from you
Use the feedback tool in the top right of the website to let us know how Screen recording is working for you.
How To Record Screen In Windows 10 in 2021 (Without Any Software)
You might be using Windows 10 for a while, but that doesn’t mean that you have discovered everything it has to offer. Actually, Windows 10 offers users lots of features, but most remain undiscovered. In this article, we will talk about a hidden feature of Windows 10 that would allow you to record your screen.
To record the screen on Windows 10, users generally need to install third-party software. However, what if I tell you that you can record the Windows 10 screen without installing any additional software? Windows 10 has a hidden screen recording tool built into the Game Bar.
The screen recording tool is specially designed for gamers who want to record their gameplay videos. In this article, we will share a working method that would help you record Windows 10 screens easily. So, let’s check out how to Record a screen in Windows 10 without using any software.
Steps To Record Screen In Windows 10 in 2021
The method is straightforward, and you need to use some shortcut keys on your keyboard. Windows 10 will display the game bar you will use to record the screen. So follow the complete steps below.
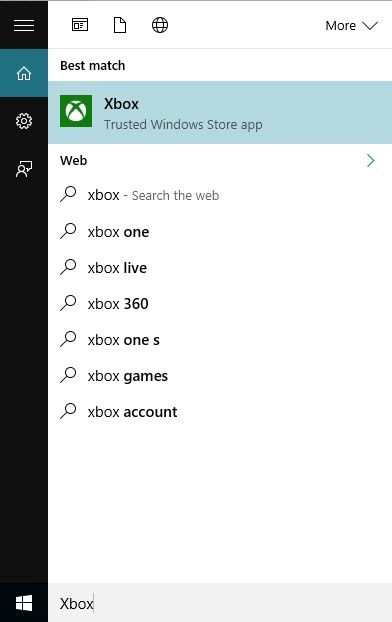
Step 1. First of all, in your Windows 10, click on start and then type “Xbox app” and then open the Xbox app.
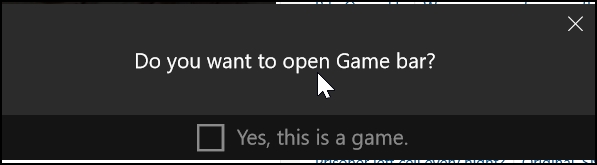
Step 2. Now in the Xbox app, you have to press a keyboard that is “win+G” this can be done on the screen you want to record. Now, as soon as you press this combination, the popup will appear, asking you that it is a game? Simple click on Yes, it is a game.
Step 3. Now you will see few options that are “Screenshot,” “Start Recording,” and “Settings.”
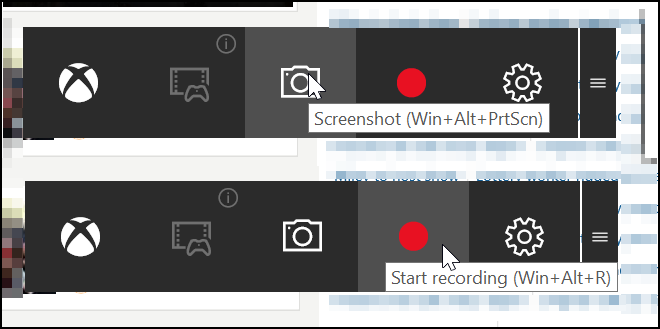
Step 4. Now select the Start recording button, and the recording will get started, and you can stop recording when you are done.
By default, all your recordings get saved to the folder
“C/Users/Videos/Captures“.
That’s it! You are done; now, you can easily record the screen with this cool trick that will not need any third-party tool. You can also choose out the screenshot feature in this game bar tool.
Using VLC Media Player
Well, VLC Media Player is software, and the reason I had mentioned VLC Media player is that almost everyone uses it. With the VLC Media player’s help, you can record the screen without any external third-party recording software. You can use this method in Windows 7,8, and 10. Let’s know how to record the screen using the VLC media player.
Step 1. First of all, download and install VLC Media Player on your Windows computer if you don’t have one.
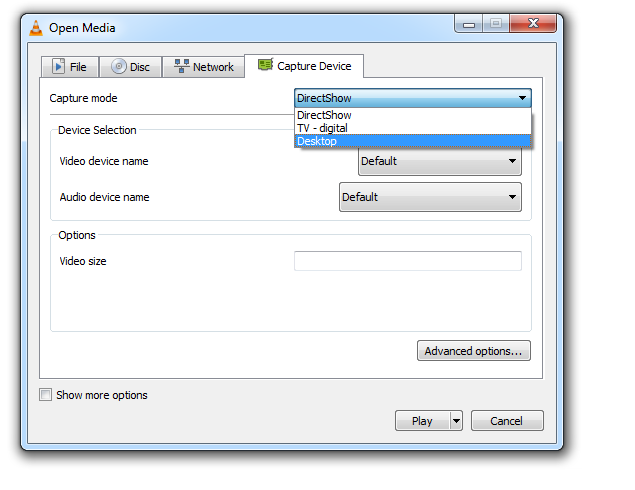
Step 2. Now launch the VLC media player, click on “Media,” and then select “Open Capture Device.”

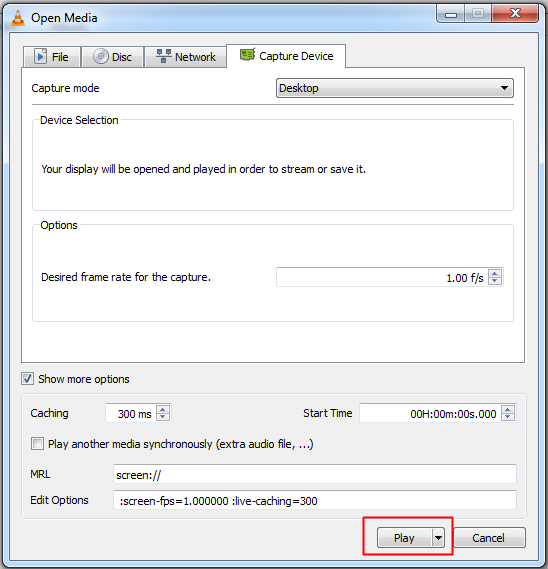
Step 3. Under Capture mode, you need to click on the drop-down and then select desktop.
Step 4. Set all other options according to your wish, and then click on the “Play” button.
Step 5. Now you need to click on the “Stop” button.
Step 6. Now you will see the screen like below. Here you need to right-click on your recording and select the option “Save,” and save it to your desired location.

That’s it! You are done. This VLC media player method works with every Windows version. You don’t need any additional software to record your desktop screen.
So, this is all about Windows 10 screen recording. We have shared the two best methods to record Windows 10 screen. If you don’t want to go through all hassle and want a straightforward way to record Windows 10 screen, you need to visit our article Best Screen Recording Software For Windows. I hope this article helped you! Please share it with others also.
How to Record the Screen on Your Windows PC or Mac
Here’s how to capture your computer screen using the built-in tools on Windows and macOS or third-party screen-capture apps.


Want to record the screen on your PC? Maybe you’re a professional who needs to capture your screen for a presentation at work, a software developer generating a how-to video, or someone who wants to upload something fun to YouTube. Windows and macOS allow you to capture your screen activity thanks to built-in tools, though there are also many third-party screen-capture apps. Here’s how to use all available tools.
Record Your Screen with the Windows Game Bar
Built into Windows 10, Game Bar was designed to record games that you play directly on your PC or those you stream from an Xbox One. However, it can just as easily capture screen activity from other applications. After you’ve recorded the chosen activity, the generated video is automatically saved as an MP4 file, which can then be uploaded anywhere you like.
To set this up, go to Settings > Gaming > Game bar and turn on the switch for Record game clips, screenshots, and broadcast using Game bar. Here, you can change any keyboard shortcuts associated with opening the Game Bar, taking a screenshot, and recording video.
If you connect an Xbox Controller to your PC, you can trigger the Game Bar by pressing the Xbox button on the controller.
You can record activity in most applications and windows, except the Windows desktop, File Explorer, and certain Windows apps, such as Weather. Navigate to the screen you wish to record and press Win+G to open Game Bar. Several Game Bar widgets appear on the screen with controls for capturing screenshots, recording video and audio, and broadcasting your screen activity.
Click the Start Recording button to capture your screen activity. Instead of going through the Game Bar pane, you can also just press Win+Alt+R to start your recording.
Now perform whatever screen actions you want to capture. After you click on the screen, the Game Bar widgets vanish, replaced by a small floating bar in the upper-right corner of the screen through which you can control the recording. To stop the recording, click the Recording button on the floating bar.
Once the recording ends, a notification will appear to tell you that the game clip was recorded. Click the notification, and File Explorer will open to the location of the recording. At this point, you can view the video file or upload wherever you want.
Record Your Screen in macOS
Your Mac comes with its own screen-recording feature on macOS Mojave and higher. Open the app or window you want to record, then press Shift+Command+5 to open the system’s screen capture tool. From the bottom toolbar, you can opt to capture the entire screen, just the selected window, or a selected portion of the screen.
Click the Options button, and you can choose where to save your recording and initiate a countdown timer to start the recording. Make sure to check the option to use your Mac’s microphone if you’re recording your own voice or external audio.
Click Record Entire Screen or Record Selected Portion to begin recording. A Recording button appears at the top of the screen on the menu bar. Click this button to stop recording, and a thumbnail of your recording will be added to your computer. Double-click the screen recording file to play it in your default video player.
You can also trigger the screen recording directly from QuickTime on a Mac. Open QuickTime Player, then click File > New Screen Recording. The first time you do this, you’ll be asked to open System Preferences to grant QuickTime Player permission to record your screen. Go into your settings and check the box to grant the proper permissions. Start the new recording through QuickTime again, and you can then use the Mac’s recording tool.
OBS Studio
Compatible with Windows 10, 8.1, and 8, as well as macOS, the free OBS Studio packs a lot of features into one program. Use the program’s floating control panel to start and stop your recording. Along the way, OBS Studio can record screen activity, your microphone, and computer audio, then saves the output as an MP4 file.
You can also stream your video live or turn to Studio Mode to add cuts, fades, and other transitions to the video. The program offers an array of settings where you can change the format and other criteria for both the video and audio portions of the recording. OBS Studio looks intimidating at first, but you should be able to catch onto it pretty quickly and learn how to use it effectively.
Free Cam
Free Cam is an extremely basic but still capable screen recorder. Designed for Windows 10, 8.1, and 7, this program captures your screen activity and audio, then saves your recording as a WMV file. Simply click the button for New Recording. Then select which area of the screen you want to capture, anywhere from a single window or application to the entire screen.
Click the Record button, perform the screen activity, and then press Esc when you’re done. Your recording appears in a preview window where you can edit it, save it as a video file, or upload it directly to YouTube.


