- 9 Best Screen Recorders For Linux
- Best Screen Recorders for Linux
- 1. Kazam
- 9 лучших устройств записи экрана для Linux
- Лучшие устройства записи экрана для Linux
- 1. Казам
- Основные характеристики
- Установка на Ubuntu
- 2. Откройте Broadcaster Software Studio
- Основные характеристики
- Установка на Ubuntu
- 3. SimpleScreenRecorder
- Основные характеристики
- Установка на Ubuntu
- 4. recordMyDesktop
- Основные характеристики
- Установка на Ubuntu
- 5. VokoScreen
- Основные характеристики
- Установка на Ubuntu
- 6. ScreenStudio
- Основные характеристики
- Установка на Ubuntu
- 7. Зеленый рекордер
- Основные характеристики
- Установка на Ubuntu
- 8. Peek
- Основные характеристики
- Установка на Ubuntu
- 9. Gifine
- Основные характеристики
- Установка на Ubuntu
- Твой выбор?
- 5 Tools To Record Your Linux Desktop (Screencast) In 2021
- 1. SimpleScreenRecorder
- 2. GNOME / Cinnamon built-in video screen recorder
- 3. OBS Studio
- 4. vokoscreenNG
- 5. RecApp
- Conclusions
9 Best Screen Recorders For Linux
Last updated May 7, 2020 By Munif Tanjim 88 Comments
Brief: In this article, we’ll list the best screen recorders for Linux. This list also includes software that lets you record your Linux desktop as a gif .
Often we need to record our desktop screen for various purposes, like broadcasting gaming sessions online, making video tutorials, etc. Today, we’re going to present some screen recording applications for Linux.
In this list, you will find options to
- Record screen as a video
- Recording screen as gif as well
All the software mentioned here is free and open-source (FOSS). You could actually call it a list of free screen recorders, in fact.

Before we see the list of the best screen recorders, I would like to mention asciinema. It’s a desktop tool that lets you record your terminal session and upload it to its website. You can grab the URL and send it to friends. The best thing is that the commands in the recorded terminal session can be copied. That will help a lot if you used a lot of commands – there’s no need to enter them manually.
So, if you just wanted to record your terminal screen, asciinema should do a fine job.
Note: The list below is in no particular order of ranking. I’ve mostly mentioned installation instructions for Ubuntu but this doesn’t make it a list of Ubuntu screen recorders – most of the applications mentioned are available in the official repositories of other distributions.
Best Screen Recorders for Linux
1. Kazam
Kazam is a minimal and nifty tool for screencasting. It includes screenshot support too. Kazam is most suitable for beginners and for getting the task done quickly without getting too caught up in different options.
Источник
9 лучших устройств записи экрана для Linux
Вкратце: в этой статье мы перечисляем вам лучшие устройства записи экрана для Linux . В этот список также входит программное обеспечение, которое позволяет записывать рабочий стол Linux в формате GIF.
Часто нам необходимо записывать экран рабочего стола для различных целей, таких как трансляция игровых сеансов в Интернете, создание видеоуроков и т. Д. Сегодня мы собираемся представить приложения для записи экрана для Linux.
Этот список разделен на две части:
- Запись экрана как видео
- Запись экрана в формате Gif
Все программы, упомянутые здесь, являются бесплатными и с открытым исходным кодом (FOSS). Вы можете назвать это списком бесплатных устройств записи экрана.

Прежде чем мы увидим список лучших устройств записи экрана, я хотел бы упомянуть asciinema. Это инструмент для рабочего стола, который позволяет вам записывать сеанс терминала и загружать его на свой веб-сайт. Вы можете получить URL и отправить его друзьям. Лучше всего то, что команды в записанном сеансе терминала могут быть скопированы. Это очень помогает, если вы использовали много команд, не нужно вводить эти команды вручную.
Для пояснения, эти приложения не перечислены в каком-либо определенном порядке, и функции, упомянутые здесь, не являются всеобъемлющими. Упомянутые функции собраны либо с их официальных веб-сайтов, либо из моего личного опыта их использования. Кроме того, я упомянул инструкции по установке Ubuntu, но это не делает его списком экранных рекордеров Ubuntu. Большинство из упомянутых приложений доступны в официальном репозитории других дистрибутивов.
Лучшие устройства записи экрана для Linux
1. Казам
Kazam — минимальный и изящный инструмент для показа экрана. Он также включает поддержку скриншотов. Kazam наиболее подходит для начинающих и для быстрого выполнения задачи, не вдаваясь в различные варианты.

Основные характеристики
- Простой и компактный пользовательский интерфейс
- Поддерживает несколько форматов вывода видео
- Запись звука с подходящего источника (микрофон или динамик)
- Поддержка записи одного окна или выбранной области экрана
- Поддержка таймера задержки
- Простой и минимальный, простой в использовании.
- Очень мало вариантов для настройки параметров конфигурации
- Отсутствие поддержки записи веб-камеры
Установка на Ubuntu
Откройте окно терминала и введите следующую команду:
NB . Последняя версия, которая добавляет в Kazam множество дополнительных функций, недоступна в официальных репозиториях PPA или Ubuntu Universal. Как вы можете установить его и использовать его довольно легко. Прочтите эту статью о том, как использовать последнюю версию Kazam.
2. Откройте Broadcaster Software Studio
OBS Studio, без сомнения, является самым многофункциональным и современным приложением для скринкастинга, доступным для Linux.

OBS Studio Интерфейс
Основные характеристики
- Несколько сцен для плавного переключения между ними с помощью пользовательских переходов
- Фильтры для видеоисточников
- Аудио микшер с фильтрами
- Мощные и простые в использовании параметры конфигурации
- Оптимизированная панель настроек для настройки конфигурации
- Поддержка потокового вещания
- Все, что вам, возможно, понадобится, находится в одном приложении
- Вам понадобится время, чтобы выяснить его терминологию (… но оно того стоит)
Установка на Ubuntu
OBS Studio доступна для Ubuntu через PPA. Вы можете ввести в терминал следующие команды для его установки:
Программное обеспечение открытого вещания
3. SimpleScreenRecorder
SimpleScreenRecorder — как следует из названия — это простое приложение для записи экрана в Linux. Его интерфейс основан на Qt.
Вы можете прочитать это руководство, чтобы узнать, как использовать SimpleScreenRecorder в Ubuntu.

Основные характеристики
- Поддерживает несколько форматов вывода видео
- Запись звука с подходящего источника
- Поддержка записи выбранной области экрана
- Предоставляет статистику во время записи
- Предварительный просмотр во время записи
- Оптимизирован для плавной работы на медленных машинах
- Поддержка горячих клавиш
- Достаточные варианты настройки для тонкой настройки выходного видео
- Пользовательский интерфейс не очень привлекателен
- Нет встроенной поддержки записи веб-камеры
Установка на Ubuntu
SimpleScreenRecorder доступен для Ubuntu. Выполните следующие команды в терминале:
4. recordMyDesktop
recordMyDesktop — это в основном инструмент командной строки для записи экрана, написанный на C. Он имеет два отдельных графических интерфейса пользователя на основе GTK и QT4.

Основные характеристики
- Легкий инструмент
- Поддержка записи одного окна
- Параметры настройки вывода видео
- Вы также можете использовать его из командной строки с командой recordmydesktop
- Интерфейс не совсем отполирован
- Нет функции записи в веб-камеру
- Нет вариантов для альтернативных форматов вывода видео
Установка на Ubuntu
recordMyDesktop доступен для установки через официальный репозиторий Ubuntu. Просто запустите следующую команду:
5. VokoScreen
VokoScreen — это простой в использовании создатель скринкастов. Эта простота, на мой взгляд, могла бы сделать его одним из лучших настольных рекордеров для Linux.

Основные характеристики
- Поддерживает несколько форматов вывода видео
- Запись звука с подходящего источника
- Поддержка записи одного окна или выбранной области экрана
- Поддержка предварительного просмотра веб-камеры
- Поддержка таймера задержки
- Поддержка горячих клавиш
- Различные настройки для настройки вывода видео
- Пользовательский интерфейс может быть лучше
Установка на Ubuntu
VokoScreen доступен через официальный репозиторий Ubuntu. Для установки введите в терминале следующую команду:
6. ScreenStudio
ScreenStudio — это кроссплатформенное приложение для записи экрана, написанное на Java.

Основные характеристики
- Поддерживает несколько форматов вывода видео
- Запись звука с подходящего источника
- Потоковая поддержка различных сервисов, таких как Hitbox, Twitch.tv и т. Д.
- Различные дополнительные параметры конфигурации
- Поддержка записи веб-камеры
- Поддержка оверлейного слоя во время записи (слои изображения и текста)
- Будучи кроссплатформенным приложением, вы можете использовать его везде
- Размер зависимости довольно большой — Требуется JRE 8.0
Установка на Ubuntu
ScreenStudio может быть на Ubuntu из PPA. Введите следующие команды в терминал для установки:
7. Зеленый рекордер

Green Recorder имеет простой интерфейс и прост в использовании. Это был один из самых ранних инструментов записи экрана в Linux, обеспечивающий поддержку Wayland. Он построен с использованием GTK3 и, как и большинство других устройств записи экрана, использует FFmpeg в фоновом режиме. При использовании Wayland это, пожалуй, лучший выбор для рекордера экрана Ubuntu.
Основные характеристики
- Поддерживает несколько видео форматов, таких как AVI, MKV, MP4, WebM и т. Д.
- Можно также записать экран в формате GIF
- Настройки по умолчанию могут быть сохранены
- Поддерживает Xorg и Wayland
- Простой интерфейс с необходимыми функциями
- Поддержка Gif
- Поддержка Wayland
- Нет поддержки записи веб-камеры
Установка на Ubuntu
Вы можете установить Green Recorder на Ubuntu, используя его официальный PPA. Просто используйте команды ниже:
8. Peek
Peek — это простой инструмент для записи анимированных GIF-изображений с экрана вашего рабочего стола.

Основные характеристики
- Настройка частоты кадров
- Поддержка таймера задержки
- Современный и удобный интерфейс
- В настоящее время поддерживается только Linux с X11 (который в настоящее время используется большинством из нас)
Установка на Ubuntu
Для установки пакеты DEB доступны на странице релиза проекта GitHub. Вы также можете установить его через официальный PPA с помощью следующих команд:
9. Gifine
Gifine — это инструмент для записи и склейки коротких гифок или видео.

Основные характеристики
- Поддерживает как GIF, так и MP4 видео выход.
- Поддерживает редактирование и обрезку вывода перед сохранением
- Предоставляет дополнительные функции, чем Peek
- Интерфейс не так хорош, как Peek
Установка на Ubuntu
Установка Gifine — это довольно длительный процесс. Откройте окно терминала и внимательно введите следующие команды для установки Gifine в Ubuntu:
И вы сделали. Для запуска Gifine введите следующую команду:
Твой выбор?
Я пропустил ваше любимое приложение для записи экрана с экрана Linux ? Какой настольный рекордер вы используете в Linux? Делитесь своими взглядами. И, пожалуйста, найдите время, чтобы поделиться этой статьей. Это помогает нам 🙂
Источник
5 Tools To Record Your Linux Desktop (Screencast) In 2021
This article presents 5 tools for recording your Linux desktop. All work under X11, and there are also a few solutions for recording your Linux screen under Wayland.
I skipped applications that are no longer maintained, like Kazam, ScreenStudio or Green Recorder. Even though they might still work, they have many bugs that will probably never be fixed.
The article initially only included 4 screencast tools, but I later added one more (RecApp).
1. SimpleScreenRecorder
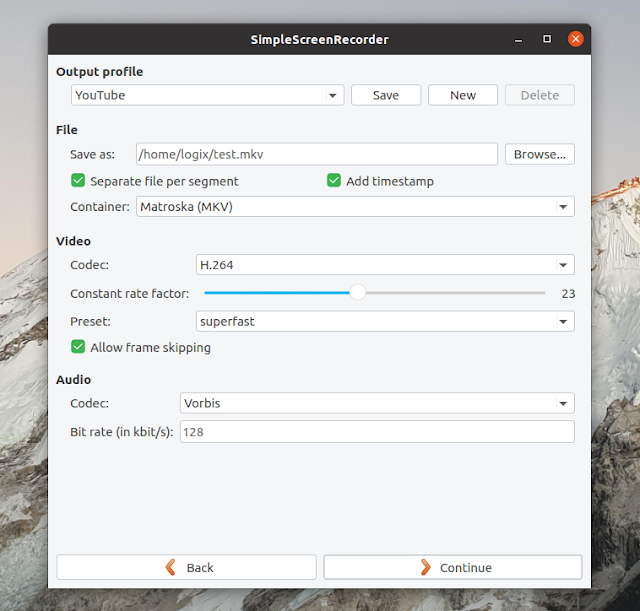
SimpleScreenRecorder is a Qt5 screen recorder for X11 that supports OpenGL. Despite its name, this is a feature-rich screen recorder; what its name actually means is that it’s easy to use this application to record your screen thanks to its sane default settings that don’t require tweaking to get started.
It should also be noted that the tool doesn’t try to do anything else other than recording your screen.
While it has quite a few screen recording related features, which you’ll see below, SimpleScreenRecorder doesn’t have any extras on top of that. There’s no option to record a live webcam (you can use a different application for that), can’t add any effects, text or anything like that.
This application is only for desktop recording, leaving everything else you might want to add on top to other applications, like a dedicated webcam application, or a video editor.
- Record the entire screen (including all screens or a particular screen in multi-monitor setups), a fixed rectangle, an application window, follow the cursor, or record an OpenGL program
- Configurable recording coordinates and frame rate, scale video, optionally record (or exclude) mouse cursor
- Record audio — it allows selecting the backend (ALSA, PulseAudio, JACK) and source
- It uses libavformat (part of FFmpeg) to encode the recorded material into a variety of video formats. It Supports Matroska (MKV), MP4, WebM, OGG and other containers, with H.264, VP8 and Theora video codecs, and Vorbis, MP3, AAC audio codecs, among many others. There are also options for choosing the desired bitrate (for Theora and VP8) or preset (for H.264)
- Keyboard shortcut for starting, pausing and resuming the recording
It’s simple wizard-like user interface may seem a bit confusing at first, but the tool is quite easy to use and powerful in the same time. My recomendation is to go with the defaults, so you’ll only interact with the application when you choose what to record: the entire screen, a window, a rectangle you draw on the screen, if you want to record audio, and leave the encoding settings to their default values.
Once you record your screen a few times you can experiment with different quality settings. But in most cases just sticking with the defaults should be enough to produce a good quality recording of a Linux desktop.
Click the button above to go to the SimpleScreenRecorder installation page, where you’ll find instructions for how to install it on a large number of Linux distributions like Arch Linux, Fedora, Debian, Ubuntu, Linux Mint, openSUSE, Red Hat Enterprise Linux, CentOS, Mageia, NixOS and more.
2. GNOME / Cinnamon built-in video screen recorder
Both GNOME and Cinnamon have a built-in screen recorder that uses GStreamer under the hood, this being the quick and easiest way of recording your Linux desktop if you use one of these two desktop environments. This built-in screen recorder does not record any sound though (either from microphone or sound coming from desktop applications).
Also, this records all monitors in multi-monitor setups, with no way of choosing which monitor to record. So if you want to use this but want to only record one monitor you’ll need to disable the other monitor(s) in the system settings. I only tested the GNOME screen recorder with multiple monitors though, because I don’t have Cinnamon installed on my computer.
It’s important to note that the built-in GNOME screen recorder supports both Wayland and X11.
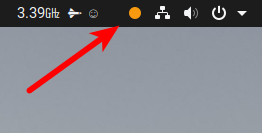
The built-in GNOME and Cinnamon screen recorder can be started and stopped using the Ctrl + Alt + Shift + R keyboard shortcut (this can be changed in System Settings for Cinnamon but not for GNOME), and the output video is recorded at 30fps in a WebM container with VP9 as the video codec on GNOME (tested on GNOME 3.34), and VP8 on Cinnamon desktop (tested with Cinnamon 4.0). When recording, a dot appear in the GNOME Shell top bar, near the system menu:
/Videos folder for GNOME (with the name Screencast from DATE TIME.webm ), and directly in the home directory for Cinnamon (having the name cinnamon-date.webm ). The video is not immediately ready, you’ll need to wait a bit for the video to be encoded.
In GNOME (this doesn’t apply to Cinnamon), the default screencast duration is 30 seconds, after that the recording automatically stops. You can change this maximum screencast length to a different value by using:
Replace 600 (600 seconds = 10 minutes) with the number of seconds you want to set for the maximum screencast length. Set it to 0 so there’s no screencast length limit.
No matter the screencast limit you set, you can stop the screencast at any time using the Ctrl + Alt + Shift + R keyboard shortcut.
There’s a GNOME Shell extensions, called EasyScreenCast, that makes use of the integrated video recording function in GNOME Shell, but provides some additional options like:
- the ability to select the audio source
- record a webcam source with the desktop
- choose the area to record (all monitors, a monitor, a window or a rectangular area)
- allows setting the video quality
- set the file container (WebM with VP9 or VP8 encoders, MKV with the x264 encoder, MP4 with x264 encoder, or OGG with the Theora encoder)
- choose the file resolution, file name and destination folder
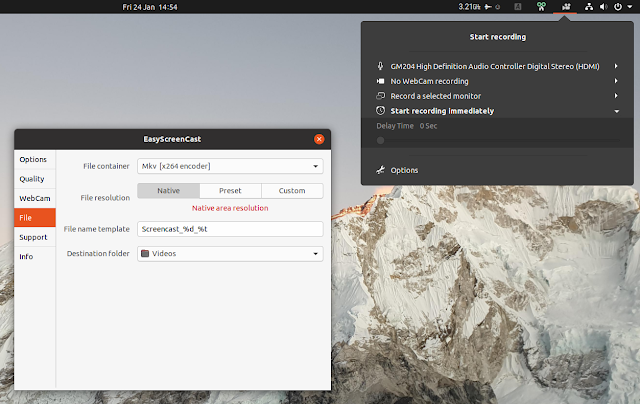
To use this EasyScreenCast extension in GNOME you’ll need to install it from source by following the instructions from its GitHub page. Don’t install it from the official GNOME Shell Extensions website because that doesn’t work with newer GNOME Shell versions.
It’s also worth noting here that Weston (Wayland compositor) has a built-in screen recording functionality too. To record a screencast (without audio) while using Weston press Ctrl + R (this both starts and stops the recording). Videos recorded like this have the .wcap extebsion, this being a losssless video format specific to Weston.
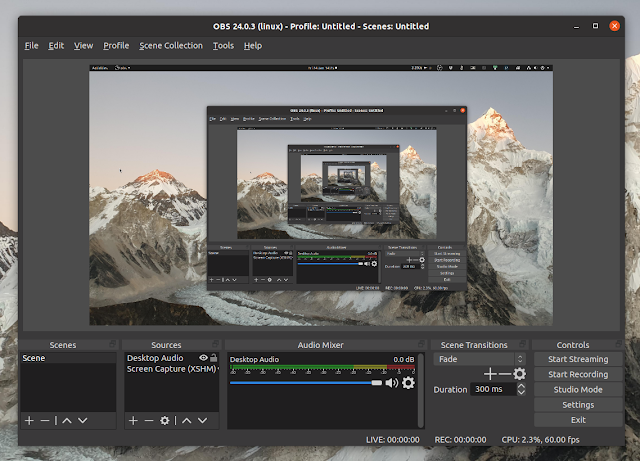
3. OBS Studio
OBS (Open Broadcaster Software) Studio is a free and open source Qt application for video recording and live streaming, which runs on Linux, macOS and Windows.
The tool can broadcast to any RTMP supporting destination, having presets for streaming on YouTube, Twitch, Instagram and Facebook. For this article though, we’re more interested in its video recording capabilities.
OBS Studio is the most advanced application for recording your Linux desktop from this list. It has numerous features like adding live or recorded video, adding text on top of the video, mixing audio, applying effects, seeing a real-time preview and more. Due to this, it may seem a bit harder to use than the other tools presented in this article, but that’s not really the case.
[[Edit]] With version 27, OBS Studio comes with native Wayland support. Now the application runs natively under Wayland, and it can capture windows and monitors on Wayland desktop environments.
OBS Studio features:
- High performance real time audio and video capturing and mixing
- Create an unlimited number of scenes and switch between them seamlessly using custom transitions (the scenes can contain multiple sources including window captures, images, text, browser windows, webcams, capture cards, etc.)
- Audio mixer with per-source filters
- Makes use of libavcodec /libavformat (part of FFmpeg) to support a wide range of containers / codecs
- Modular dock user interface that allows you to rearrange the layout to any way you like
- Keyboard shortcuts
- Supports plugins
The first time you start OBS Studio, it’s Auto-Configuration Wizard will be shown, allowing you to choose if you plan on using OBS Studio primarily for broadcasting or recording, and then perform a series of tests to automatically configure everything for your computer hardware.
Install OBS Studio
Record your X11 or Wayland Linux desktop using OBS Studio
To record your desktop using OBS Studio, you’ll need to add screen capture as a source. To do this, click the + button from the Sources section at the bottom of the OBS Studio window and add Screen Capture (XSHM) for X11 or Screen Capture (PipeWire) if you’re using Wayland. You’ll be prompted to select the screen (if you have multiple screens), and to enable or disable capturing the mouse cursor.
After adding the Screen Capture video source, you are ready to record your screen. You may want more than to simply record your desktop though — in the same way you added the Screen Capture source you may also want to add an audio device, a webcam source (Video Capture Device), add multiple scenes, transitions and anything you like.
After you’re done including everything you want to be in your screencast, click the Start Recording button to get the recording going. After stopping the recording using the same button, your screencast is saved in your home folder, having the date and time it was recorded as its filename.
As a side note, in case you want to stream your desktop instead of recording it, you’ll need to configure the stream source, e.g. Twitch or YouTube, in the OBS Studio Settings , on the Stream tab. When you have everything set up, click Start Streaming .
You can change the streaming and recording video format, quality, encoder and so on, in the OBS Studio Settings -> Output . It’s also worth noting that the default settings for the recording video output is 1280×720 on my machine, so in case you want to record a full-hd video, change that to 1920×1080 in the Settings -> Video -> Output (Scaled) Resolution section.
4. vokoscreenNG
vokoscreenNG is a free and open source screencaster for Linux and Windows. The application is a continuation of the old Vokoscreen 2.5, which has been rewritten from scratch, and is based on Qt5 and GStreamer (the old Vokoscreen was using FFmpeg).
Like SimpleScreenRecorder, vokoscreenNG is an easy to use but powerful screen recording tool. It does not yet support Wayland, so you’ll need to use an X11 session to use it right now.
vokoscreenNG can be used to record videos from the computer screen, webcams, external cameras and more, great for producing educational videos, tutorials, record videoconferences and so on, with both video and sound.

- Record full screen, a window, a rectangle area with optional video scaling and magnification
- Records audio
- Start recording video after a number of seconds
- Schedule recordings: the application supports automatically beginning a desktop recording at a given time, and stop recording after a given number of hours, minutes and/or seconds
- Configurable on-screen camera with options like flip vertical or horizontal, invert, gray, black and white, remove window frame, and frame size
- Built-in video player for playing the recorded screencasts
- Uses GStreamer and supports MKV, WebM, MP4, AVI and MOV containers with x264 / H.264 (Intel GPUs) and VP8 video codecs, and MP3, FLAC, Opus and Vorbis audio, with configurable quality and frame rate
Install vokoscreenNG
The new, rewritten vokoscreenNG was quite recently picked up by a few Linux distributions so it’s available in the repositories for Fedora (install it using sudo dnf install vokoscreenNG ; you need to use it under the X11 session and not the default Wayland session that ships with Fedora Workstation), openSUSE Leap 15.2 and Tumbleweed, Debian (buster, bullseye and sid; install it using sudo apt install vokoscreen-ng ), and Ubuntu 20.04 Focal Fossa (install it with sudo apt install vokoscreen-ng ). It’s also in AUR for Arch Linux / Manjaro users (as vokoscreen).
It’s not available in older Ubuntu versions, Flathub or the Snap Store, so in those cases you must install it from source right now.
5. RecApp
RecApp is a new simple screen recording tool written in GTK that makes use of GStreamer modules to record the screen. The application works on X11 and partially on Wayland*, and it supports recording the entire screen or an area you can draw using the mouse.
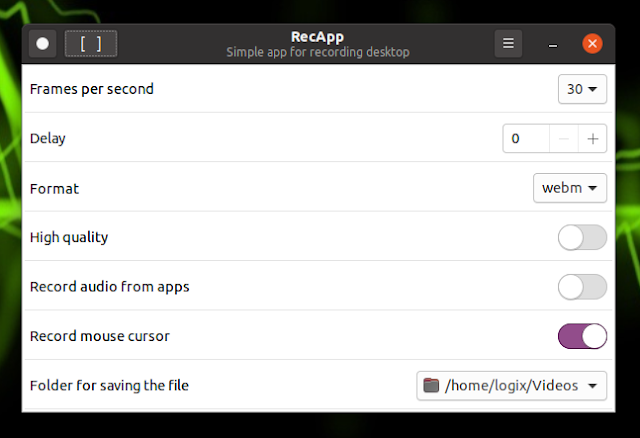
From its settings you can set the frames per second to use in the screencast, optionally you can start recording with a delay, record audio from applications, and include the mouse cursor when recording. There’s also an option to create a high quality video.
Recording sound from apps playing audio on my desktop didn’t work in my test. Edit: this eventually worked, after I switched the Output Device in System Settings from headphones to HDMI.
* On Fedora, I was able to use this application to record the desktop under Wayland (but it didn’t work on Ubuntu with Wayland), but only to record the entire screen. The option to record a screen area was not available, and that’s to be expected since it uses slop, which is X11 only. On both Fedora and Ubuntu I tested the application installed from the same source: Flathub.
RecApp is available in the Fedora repositories so if you use this Linux distribution, install it using:
Arch Linux / Manjaro users can install RecApp from AUR.
On other Linux distributions, the easiest way to install RecApp is to use the Flathub repository. Setup Flatpak and Flathub if you haven’t already, then install RecApp using:
You may also install it from source.
Conclusions
I created a short screencast with audio using each of these tools (with the GNOME built-in screencast tool and OBS I’ve recorded screencasts under both X11 and Wayland), so you can analyze them to get a very (VERY!) broad idea on the quality and performance of the resulting screencast video. I didn’t create a screencast using the built-in Cinnamon screencaster because I only have Cinnamon installed in a virtual machine, so its performance would suffer due to that.
I couldn’t use the same settings for all, since for example the built-in GNOME screencaster can only produce WEBM files and has no quality settings, SimpleScreenRecorder doesn’t allow setting the bitrate when choosing the H.264 codec, etc. Also, this will obviously depend on the hardware used, so it’s best to try these applications yourself and see how they behave on your own computer. Also, for most of these tools you can get a better quality by changing their settings.
But there are a few things I noticed during my testing:
- The built-in GNOME screencast tool seems to be a bit choppy under X11 (most noticeable when moving windows), at least on my computer (GNOME 3.34), but works flawlessly on Wayland
- OBS Studio under Wayland (with the obs-xdg-portal plugin which comes built-in when installing OBS from Flathub) seems to skip some frames at times; this does not happen when recording under X11
- vokoscreenNG and EasyScreencast created a video with only 1 audio channel, while all other tools I’ve used for recording both video and audio created an output with 2 audio channels
If you ask me, if I’d want to make a short screencast on Wayland for example, I’d go with the built-in GNOME screencast tool even if I’d then have to record my voice separately and add it on top of the video using a video editor. For a screencast with all the bells and whistles, including a live webcam, sound coming from the microphone, and more, I’d go with OBS Studio under both Wayland and X11. And for a screencast under X11 in which I only want to record the desktop (no matter the desktop enviromnent), without a cam, I’d go with SimpleScreenRecorder.
In the end, choose the screencasting tool that that you like using or that best suits what you’re recording. Give these tools a try and decide for yourself which one is best for you.
Источник


