- How to record the screen on your Mac
- Use the Screenshot toolbar
- Record the entire screen
- Record a selected portion of the screen
- Trim, share, and save
- Change the settings
- Как записать экран Mac со звуком
- Как настроить Mac для записи экрана со звуком
- Как записывать экран Mac со звуком
- Как записать скринкаст на Mac
- Screencast – Screen Recorder 4+
- High-quality screen recordings
- wegenerlabs
- Screenshots
- Description
- What’s New
- Ratings and Reviews
- Excellent Functionality at a Great Value
- So easy and efficient
- App no longer works.
- Top-10 Software for Screencasts on Mac for Free
- Best desktop software for Mac screencasting
- Movavi Screen Recorder
- QuickTime
- Icecream Screen Recorder
- ScreenRec
- Best screencast software for Mac: online options
- Screen Capture
- Panopto Express
- Best Google Chrome extensions to make a screencast on Mac
- Screencastify
- Nimbus
- Comparing screencast software for Mac
- Frequently asked questions
- How do you do a screencast on a Mac?
- What is the best screencast software on Mac?
- Can I use Screencastify on Mac?
How to record the screen on your Mac
You can make a video recording of the entire screen or just a selected portion of it.
Use the Screenshot toolbar

To view the Screenshot toolbar, press these three keys together: Shift, Command, and 5. You will see onscreen controls for recording the entire screen, recording a selected portion of the screen, or capturing a still image of your screen:
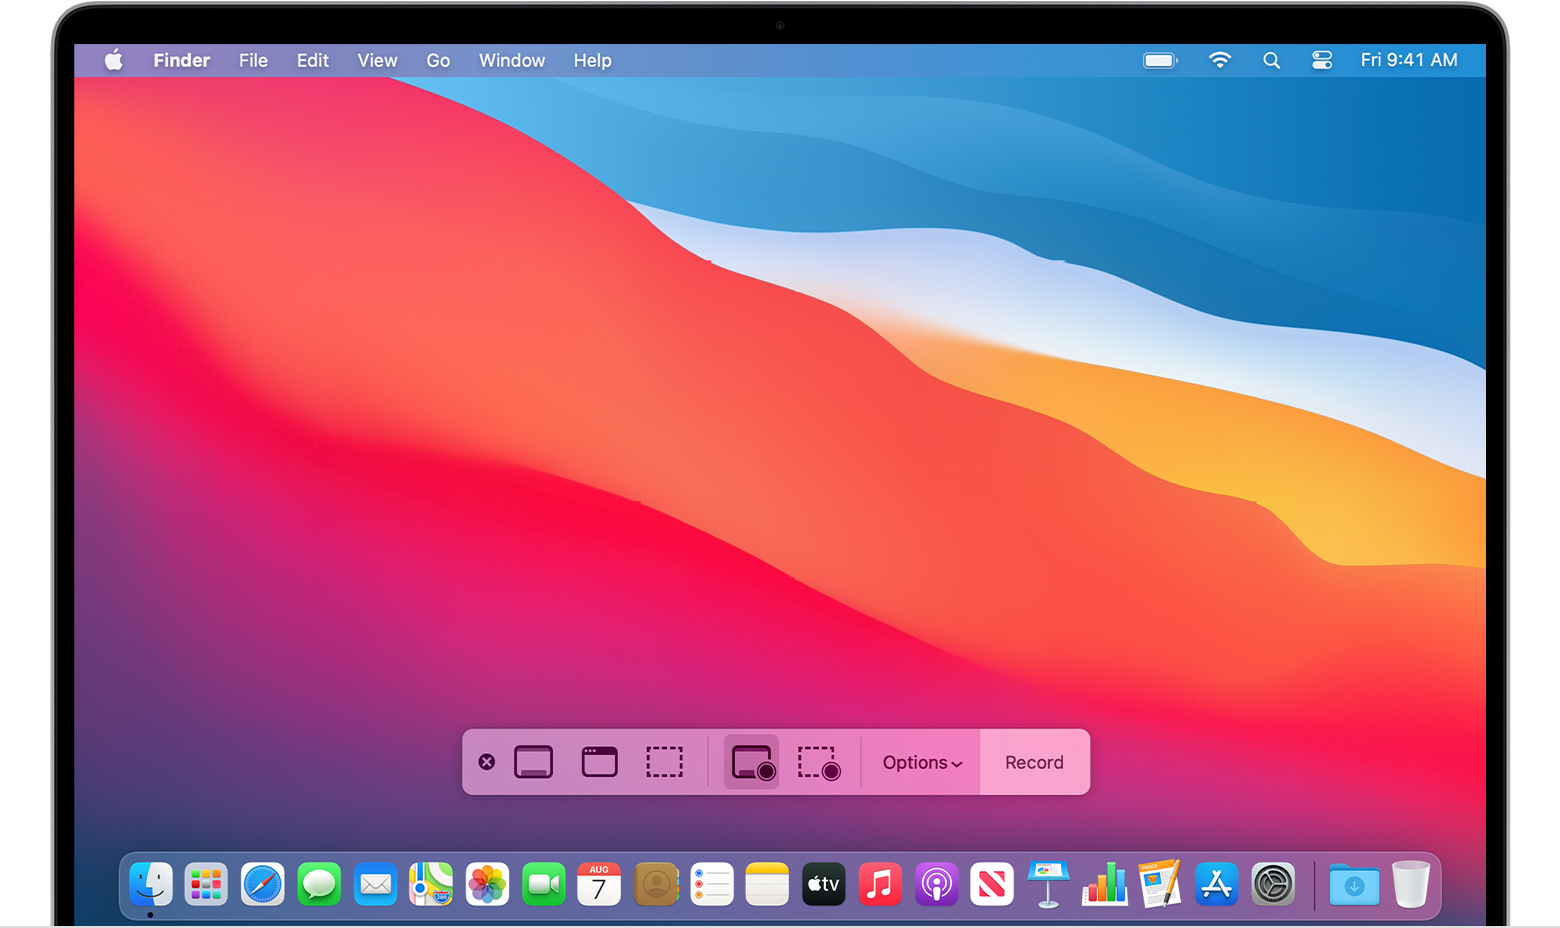
Record the entire screen
- Click in the onscreen controls. Your pointer changes to a camera .
- Click any screen to start recording that screen, or click Record in the onscreen controls.
- To stop recording, click in the menu bar. Or press Command-Control-Esc (Escape).
- Use the thumbnail to trim, share, save, or take other actions.
Record a selected portion of the screen
- Click in the onscreen controls.
- Drag to select an area of the screen to record. To move the entire selection, drag from within the selection.
- To start recording, click Record in the onscreen controls.
- To stop recording, click in the menu bar. Or press Command-Control-Esc (Escape).
- Use the thumbnail to trim, share, save, or take other actions.
Trim, share, and save
After you stop recording, a thumbnail of the video appears briefly in the lower-right corner of your screen.
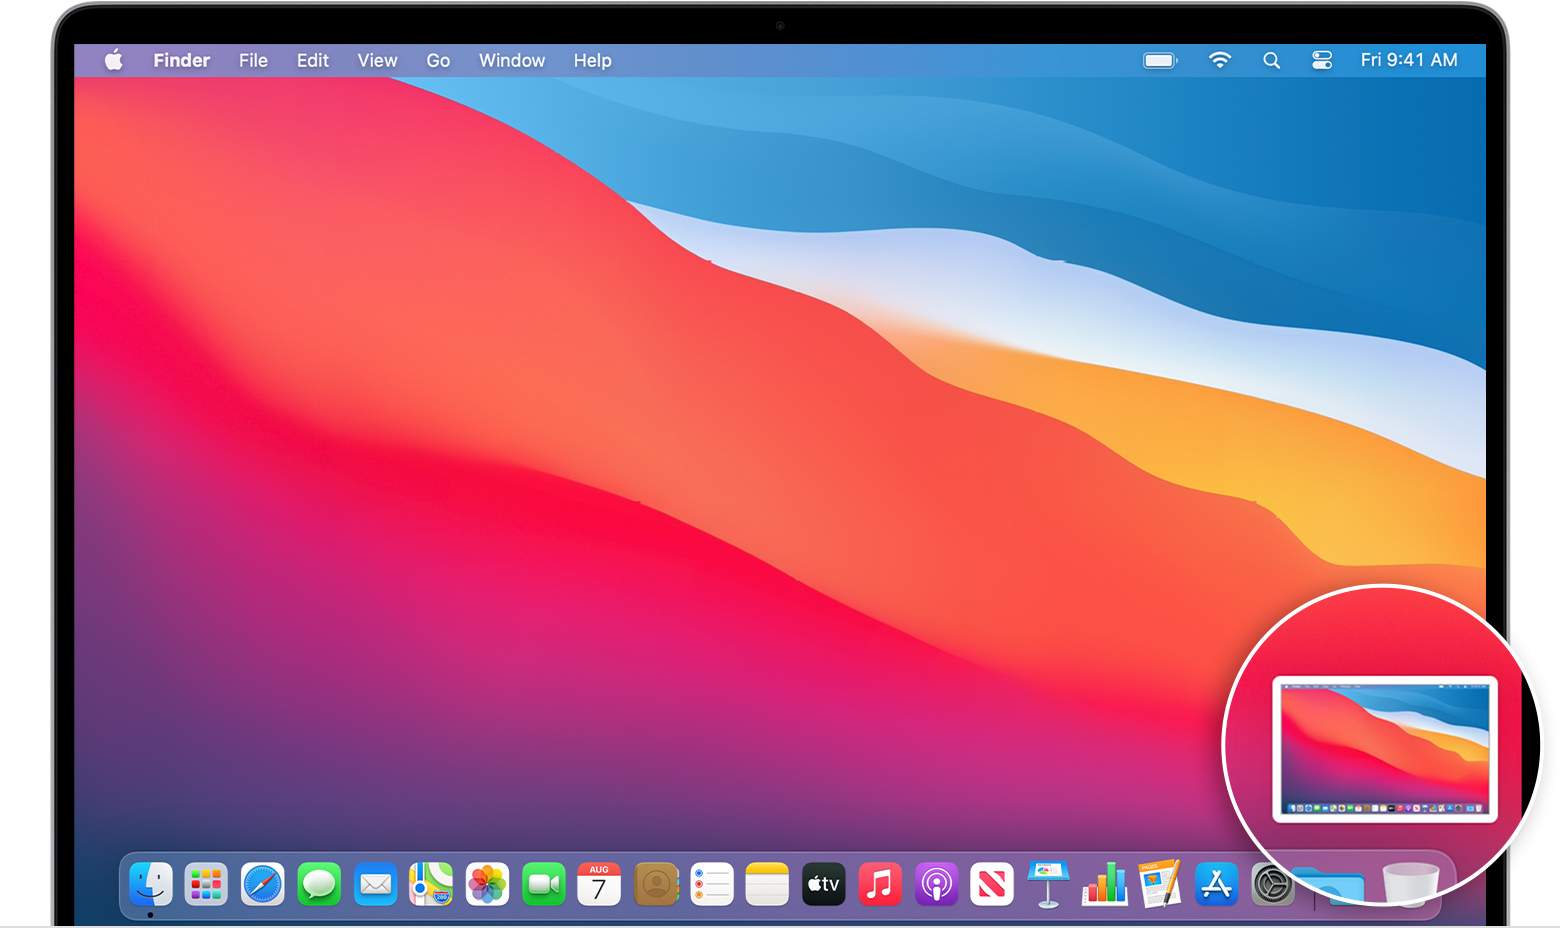
- Take no action or swipe the thumbnail to the right and the recording is automatically saved.
- Click the thumbnail to open the recording. You can then click to trim the recording, or click to share it.
- Drag the thumbnail to move the recording to another location, such as to a document, an email, a Finder window, or the Trash.
- Control-click the thumbnail for more options. For example, you can change the save location, open the recording in an app, or delete the recording without saving it.
Change the settings
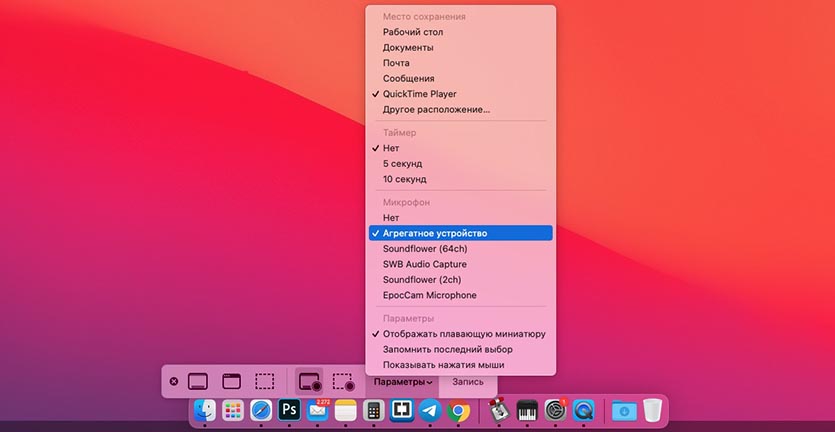
Click Options in the onscreen controls to change these settings:
- Save to: Choose where your recordings are automatically saved, such as Desktop, Documents, or Clipboard.
- Timer: Choose when to begin recording: immediately, 5 seconds, or 10 seconds after you click to record.
- Microphone: To record your voice or other audio along with your recording, choose a microphone.
- Show Floating Thumbnail: Choose whether to show the thumbnail.
- Remember Last Selection: Choose whether to default to the selections you made the last time you used this tool.
- Show Mouse Clicks: Choose whether to show a black circle around your pointer when you click in the recording.
Источник
Как записать экран Mac со звуком
Каждый пользователь компьютеров Mac рано или поздно сталкивается с необходимостью записать скринкаст со звуком. Стандартными средствами macOS можно произвести лишь запись видео, а звук захватить со встроенного микрофона. Делать это не всегда удобно, на запись попадет посторонний шум, а на Mac без микрофона вообще ничего не выйдет.
Многие платные приложения предлагают возможность записи скринкастов на Mac со звуком. Однако, есть способ настроить все необходимое при помощи специального дополнения и стандартного приложения QuickTime.
? Спасибо re:Store за полезную информацию. ?
Как настроить Mac для записи экрана со звуком
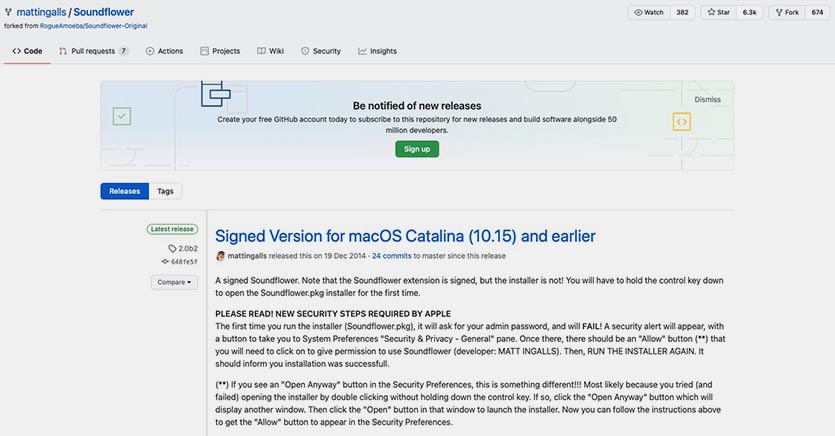
1. Скачиваем и устанавливаем специальную утилиту Soundflower с GitHub.
2. Запускаем стандартное приложение Настройка Audio-MIDI.
3. Нажимаем кнопку “+” в левом нижнем углу и выбираем Создать агрегатное устройство.
4. В правой панели выбираем Встроенный микрофон и Soundflower (2ch). На Mac без встроенного микрофона просто выбираем Soundflower (2ch).
5. Еще раз нажимаем кнопку “+” в левом нижнем углу и выбираем Создать многовыходное устройство.
6. В правой панели выбираем Внешние динамики и Soundflower (2ch). На Mac без встроенного микрофона просто выбираем Soundflower (2ch).
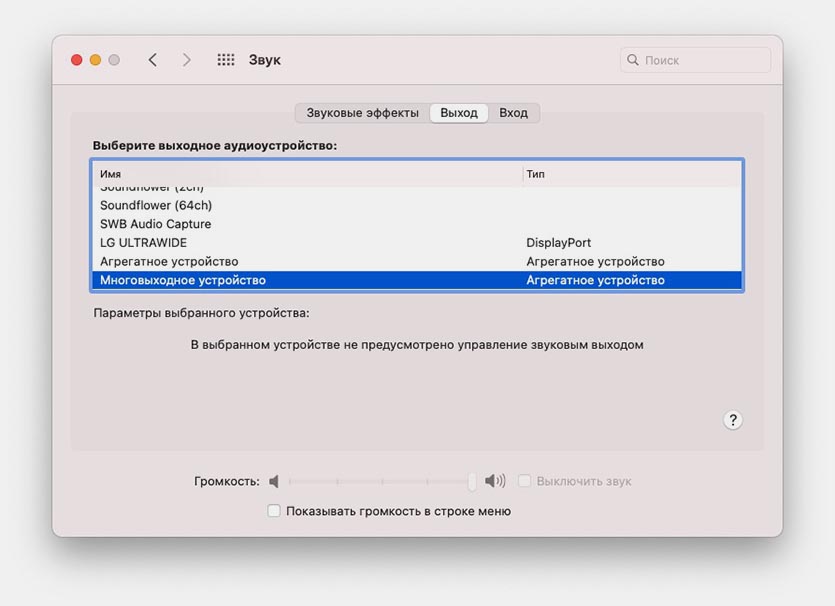
7. Переходим в Системные настройки – Звук. В качестве источника вывода звука указываем Многовыходное устройство, а в качестве входа Агрегатное устройство.
Если в дальнейшем потребуется удалить Soundflower, воспользуйтесь скриптом из установочного архива.
Как записывать экран Mac со звуком
Когда все настройки произведены, для записи экрана со звуком можно использовать стандартное приложение QuickTime.
1. Запускаем приложение QuickTime.
2. В строке меню выбираем Файл – Новая запись экрана.
3. В разделе Параметры указываем Агрегатное устройство.
4. Нажимаем кнопку Запись для начала создания скринкаста.
Так на запись будут попадать системные звуки и звуки из запущенных приложений.
Источник
Как записать скринкаст на Mac

Да, писать видео с экрана устройства — не самая нужная вещь, но весьма полезная. В первую очередь для журналистов, а во вторую для всех, кому это внезапно может понадобиться. Ведь в жизни всякое может случиться.
Обычно даже продвинутые маководы не знают самый простой и качественный способ снять скринкаст. Сразу на устройство отправляются несколько разных сторонних программ, которые обещают идеальную и простую процедуру записи, а потом выпрашивают подписку. К счастью, Apple позаботилась о своих пользователях.
На помощь приходит QuickTime! Да, плеер, о котором все забыли. Итак, короткий мануал по съемке скринкаста с экрана Mac:
1. Запусти QuickTime;
2. В верхней строке выбери пункт «Файл», а затем запись с экрана;

3. На экране появится меню, которым ты и управляешь записью (стрелочка рядом с кнопкой записи открывает меню, где можно подключить альтернативный микрофон или включить эффект клацания мышки);

4. Сохраняешь запись.
Если же нужно сделать скринкаст с iOS устройства, то процедура немного другая:
1. Все так же запускаем QuickTime;
2. В меню «Файл» выбираем «Новое видео»;

3. Любуемся изображением веб-камеры, после чего нажимаем на стрелочку рядом с кнопкой записи и выбираем нужные параметры (iPhone или iPad, какой микрофон использовать и качество видеозаписи);

4. После съемки сохраняешь запись.
Вот и все. Стоит сказать, что QuickTime снимает видео в разрешении 2K со скоростью кадров 60 fps. Приложение работает гладенько и ровненько, близко к идеальному. Пользуйтесь!
Если вы нашли ошибку, пожалуйста, выделите фрагмент текста и нажмите Ctrl+Enter.

Штатный работник UiP. Злостный любитель рубрики Связь и аналитических материалов. Души не чает в розовых пони, джазе и горячей выпечке.
Источник
Screencast – Screen Recorder 4+
High-quality screen recordings
wegenerlabs
Screenshots
![]()
![]()
![]()
![]()
Description
Thinking of recording your screen? Then you will love Screencast! Screencast is a powerful screen recorder that is very easy to use.
Features:
• Start, stop and pause recordings
• Add your camera to the screen recording
• Support for external displays
• Support for external audio sources
• Set custom compression quality, resolution and FPS
• See the current length of your recording
• 60 FPS mode for advanced users like gamers
If you make tutorials or other videos including your voice, you will love the feature to include your webcam. Your viewers will find your video much more engaging if they can see your face!
What’s New
• Recompiled for Apple Silicon
Ratings and Reviews
Excellent Functionality at a Great Value
Screen Cast-Screen Recorder is an excellent application. Without any training, I was quickly able to install and start developing a screen cast for my small engineering company. I was able to record my presentation of a powerpoint brief for use by one of my colleagues at an upcoming conference. I prepared two versions of the screencast. The first was an audio version of the brief. I recorded my voice using the display microphone as I presented each slide. As a test, I was also able to use the built-in microphone in my Apple earpods and even with record my voice using the microphone in my older plug-in ear phones. I prepared a second version of the presentation with a audio-video recording of myself. You can place the presenter’s video box anywhere on the screeen and dynamically move it as you record. In both instances, I completed the task seamlessly and was very happy with the result. The file is saved in .mov format and can be shared and stored directly from your desktop. A very nice feature is the ability to adjust the resolution of the saved presentation from 2560 x 1440 down to 1280 x 720 with the additional option of chosing frame rates of 60-15 fps. As you select the resolution, you will immediately see a display of the final file size, ensuring the file is tailored for the appropriate medium. So, in conclusion, without any accessories or instructions, you can be up and runnning in minutes. This application is a bargain.
So easy and efficient
I almost never review apps, but after trying five — six other screen recording apps, this one is far superior. As a college instructor, I need to record my screen but also have my own video while I’m explaining things and this does it so easily! It wil also show cursor and highlight clicks when I want to emphasize a point on a slide. I also love that I can reduce the size of my face so that most of the recording is of my slides/documents and just a small image of me speaking. Where have you been all my life, Screencast.
App no longer works.
UPDATED REVIEW: Well, revising my review. This app no longer works. It crashes immediately every time I launch it. This behavior persists after restarting the computer and reinstallation. It began to do this overnight. There were no OS updates or other apps installed during that time frame, Screencast just. stopped working. I have emailed the developer and not heard back. Really bummed as I did like Screencast, but obviously an app that immediately crashes is useless to me.
OLD REVIEW: 4/5, «app just works.» That’s basically it — it just works. The interface is easy to navigate, and I love that it displays a timer in the menu bar so I know how long the recording is.
My one complaint is that when I first launch the app, there is no way to open the camera view window — I have to start the recording and then I can open it. The short 5-second countdown does not give me enough time to get the camera view window adjusted. I end up having to adjust it during the beginning of the recording, then click stop, delete the recording, and start over again.
I would love to either be able to change the coundown timer, OR have the ability to open the camera view from the icon in the menu bar BEFORE making a recording after launching the app, like you can after you have finished a recording and left the app running.
Источник
Top-10 Software for Screencasts on Mac for Free
Here are the three best software to screencast on Mac:
Screencasting is a handy tool for many types of presentations. Mac screencasting is the perfect way to present a video project, business pitch, or class lecture. This form of production cuts out the need for wires and cords or a medium to store video, making the process simple and hassle-free.
Best of all, you can run a screencast from a Mac for free. This article will present the best screencast software for Mac in three categories: desktop software, online tools, and extensions.
Best desktop software for Mac screencasting
One easy option to make a screencast on a Mac is to download a video recording desktop app for OSX. The following programs are the best choices to create professional-level videos for screencasting.
Movavi Screen Recorder
Best for: easy high-quality screencasting
Rating: 4.5/5 stars, 44 reviews
Movavi Screen Recorder features a highly intuitive interface that makes recording your Mac screen easy. This app provides the option to record the entirety of the computer screen or the portion of your choice. The control panel is straightforward and small, keeping it from being a distraction. An especially useful feature allows the user to schedule recordings ahead of time to begin and end with the opening and closing of an event.
- Convenient recording
- User-friendly interface
- Option to record portion of the screen or the entire screen
- Multiple export options
- Compact panel minimizes distraction
- Easy video editing
- Schedule recording start and finish times
- Drawing on videos while recording
- Editing screenshots
- The free version does not offer all features
- The free version is watermarked
QuickTime
Best for: Apple fans
Rating: 3.6/5 stars, 169 reviews
QuickTime is Apple’s entry in the screencasting field. This program is automatically included on every Mac and offers video recording and editing. Its sleek, stylish appearance and user-friendly screen recording and streaming line up perfectly with the Apple aesthetic. QuickTime offers options to input audio from multiple sources and automatically reconnects if disconnected, both very handy features.
Some users have complained that this app can interfere with other programs and, in some cases, has a tendency to crash after an OSX update. QuickTime also does not support some common file formats.
- Offers video recording and editing
- User-friendly screen recording and streaming
- Automatically reconnects if disconnected
- Stylish appearance
- Already installed on Mac
- Options for input from multiple sound streams
- It can interfere with other programs
- It does not support some common file formats
- Sometimes crashes after OSX updates
Best for: experienced users
Rating: 4.4/5 stars, 45 reviews
OBS (Open Broadcaster Software) offers a variety of impressive features at no cost. These features include custom backgrounds, an array of plugins for added functionality, and easy export to most live-streaming video platforms like YouTube Live and Facebook Live. The user can also set the video quality and FPS as needed.
While this option for screencasting offers plenty of features for free, it is not as user-friendly as some of the other programs on this list. It also takes up a considerable amount of CPU space.
- The free version includes all features
- Easily exports to most live-streaming video platforms
- 20+ plugins to expand the functionality
- Custom backgrounds
- Easy and rapid slide duplication
- User can choose quality settings
- Not as user-friendly as other programs
- It uses a lot of memory space
Icecream Screen Recorder
Best for: short recordings
Rating: 4.1/5 stars, 21 reviews
Icecream Screen Recorder is another free tool for screencasting. This program is known for its user-friendly interface and high-quality video results. Icecream offers both video recording and editing.
Some users report that the audio distorts at times. The free version is also watermarked and limited to five minutes of recording at a time. The program also offers a limited number of video format options.
- User-friendly interface
- Offers video recording and editing
- Produces high-quality video
- Audio sometimes distorts
- Limited video format options
- The free version limits the use to 5 minutes and includes a watermark
ScreenRec
Best for: how-to videos
Rating: 4/5 stars, 50 reviews
ScreenRec offers free screencasting with no watermark or time limits. It features single-click recording, instant sharing capability, and automatic encryption for added security. ScreenRec recordings are also easily shared through private messages or posting to popular video-sharing sites.
However, ScreenRec does not offer any video editing capabilities; videos shot with ScreenRec will have to be edited using alternate software.
- The free version has no watermark or time limits
- Single-click recording
- Sources from external and internal audio
- Instant sharing capability
- Automatic encryption
- No video editing capabilities
Best screencast software for Mac: online options
Another option for screencasting on Mac is to use online software, eliminating the need to download any programs. The following are the best options for online screencasting software for Mac.
Screen Capture
Best for: beginners
Rating: 4.6/5 stars, 122 reviews
In addition to free video recording for screencasting, Screen Capture also offers an online tutorial explaining how to screencast on Mac using this software, making it ideal for first-time screencasters. The interface is very accessible for inexperienced users. However, the free version includes a watermark.
- Very user-friendly
- Tutorial for beginners
- HD videos
- Glitches may result in lost videos
- Watermark on the free version
Panopto Express
Best for: educators
Rating: 4.1/5 stars, 75 reviews
Panopto Express is another extremely user-friendly online program for screencasting. This program was designed specifically for use in schools and universities. Its interface is very accessible. This program produces HD videos up to 1080p and offers easy sharing through multiple formats. It also minimizes buffer delays for smoother video.
Several users report that the automatic closed captioning function is not very accurate. Some also identified bugs that affected the quality of the screencast.
- Very user-friendly
- HD video up to 1080p
- Easy sharing of videos
- Minimizes buffer delays
- Automatic closed captioning is underwhelming
- Some users report bugs that affect video quality
Best Google Chrome extensions to make a screencast on Mac
The third option for screencasting is to use a Chrome Extension. These extensions record and broadcast video directly from your Google Chrome browser, avoiding the need to download a desktop or navigate to an online recording website. The following are the best Google Chrome extension options for Mac screencasting.
Screencastify
Best for: Google fans
Rating: 4/5 stars, 11K reviews, 10M users
Screencastify is a video recording Google Chrome extension that can be used for screencasting. Its operation is very user-friendly, and the videos it produces are easily saved to Google Drive. It offers a handy picture-in-picture option and some editing tools in its free version.
Other editing tools are only available in the paid version of the extension, however. The free version also limits users to a five-minute recording limit. Some users have reported issues with customer service, as well.
- User-friendly operation
- Picture-in-picture option
- It offers some editing tools
- Easily saves to Google Drive
- Some users have had issues with customer service
- Five-minute recording limit on free service
- Some editing tools only included in the paid version
Best for: professional settings
Rating: 4.7/5 stars, 10K reviews, 5M users
Loom is a screencasting extension specifically designed for the workplace. This program is straightforward to use and offers easy sharing options. It also provides comprehensive tutorial videos covering every aspect of using this tool. Videos are exported as links rather than files, which many users find convenient.
Loom does not offer HD video recordings, and the audio quality is inconsistent. The quality of its recordings is subject to the internet connection speed on which it is accessed. Free users are also limited to 198 videos.
- Comprehensive tutorials
- Simple to use
- Easy sharing options
- Exports as links rather than files
- Audio quality is inconsistent
- High resolution is not available
- Free version limits users to 198 recordings
- Quality of recordings is subject to internet connection speed
Nimbus
Best for: freelancers
Rating: 4.6/5 stars, 14K reviews, 1M users
Nimbus is primarily a note-taking extension, but it can also be used for screencasting. The note-taking nature of this program makes it perfect for freelancers who may want to share videos from multiple projects in one stream. One-click recording and user-friendly sharing options make this a very easy extension to use for such tasks. Nimbus also offers keyboard shortcuts, video editing capabilities, and the use of the webcam for screencasting.
Some users have reported crashes that result in lost data. Saving the recorded files also takes an extremely long time.
- Includes use of webcam
- Provides video editing capabilities
- User-friendly sharing options
- One-click recording
- Offers keyboard shortcuts
- Some users report crashes and lost data
- Saving recorded files takes a long time
Comparing screencast software for Mac
| OBS | Experienced users | The free version includes all features | Not user-friendly |
| Icecream Screen Recorder | Short recordings | High-quality video | Distorted audio |
| ScreenRec | How-to videos | No watermark or time limits on the free version | No video-editing capability |
| Screen Capture | Beginners | Tutorials for beginners | Glitches may result in lost videos |
| Panopto Express | Educators | Minimizes buffer delays | Inaccurate closed captioning |
| Screencastify | Google fans | Offers picture-in-picture option | Issues with customer service |
| Loom | Professional settings | Exports as links rather than files | Inconsistent audio |
| Nimbus | Freelancers | Keyboard shortcuts | Crashes and lost data |
Show more Hide the table
Ben is a writer from the UK with qualifications in Media and Music Technology, he specialises in software reviews and tutorials. Ben has been blogging about media and tech subjects since he was a teenager from his base in the East of England.

Movavi Screen Recorder
The perfect way to record from your screen
Frequently asked questions
How do you do a screencast on a Mac?
Screencasting on a Mac is easy with Movavi Screen Recorder. In just a few steps, you can broadcast your Mac screen wherever you want.
- Download Movavi Screen Recorder. Download the program, then follow the installation process – your Mac will prompt you with instructions. When the installation is complete, launch the program.
- Record the screen. Get ready to record your screencast: switch to the webpage, program interface, or other screen activity that you want to demonstrate. Hit the Recording icon and fine-tune the position of the capture frame. Then, you’ll see the main recording panel with settings. To enable recording from your Mac’s speakers and/or microphone output, check the System Audio and Microphone icons – they should be green.
- Edit your screencast. If your recording contains any unwanted sections, you can quickly delete them. Select the video file on the timeline, hit Split (the scissors icon), and place the markers at the point where you want to do the cuts. Now click Delete (the trash can icon).
- Save the result in any format. Once you’re finished editing, click the Export button. Pick the appropriate video format from the list, choose the folder in which to save the file, type in the filename, and click Save.
What is the best screencast software on Mac?
Screencasts can be created using three different types of software: desktop apps, web-based programs, and Google Chrome extensions. We have rounded up the best free options in each of these categories.
The best free desktop apps for screencasting on Mac:
- Movavi Screen Recorder
- QuickTime
- OBS
- Icecream Screen Recorder
- ScreenRec
The best free online options for screencasting on Mac:
- Screen Capture
- Panapto Express
The best free Google Chrome extensions for screencasting on Mac:
Can I use Screencastify on Mac?
Yes, you can. Screencastify is specifically designed for professional workspaces and is compatible with any desktop version of Google Chrome. All desktop computers, including Windows and OSX, will support this version of Google Chrome.
In addition, some tablets support the desktop version of Google Chrome. Screencastify is compatible with those tablets, as well.
iPhones, iPads, Apple Watches, and Android phones do not support the desktop version of Google Chrome, so Screencastify cannot be used on these devices.
Источник


