- Ubuntu Screensaver
- Screensaver в Ubuntu
- Xubuntu Screensaver
- Установка xscreensaver
- Настройки экранной заставки в Linux Mint
- Что такое экранная заставка?
- Экранная заставка в Linux Mint
- Как открыть настройки экранной заставки в Linux Mint 18.3?
- Как сменить экранную заставку в Linux Mint?
- Как изменить время ожидания перед запуском заставки?
- Как отключить блокировку компьютера после запуска заставки в Linux Mint?
- XScreenSaver
- Contents
- Installation
- Configuration
- DPMS and blanking settings
- Usage
- Lock on suspend
- User switching from the lock screen
- LightDM
- Tips and tricks
- Disable during media playback
- mplayer
- Browser HTML5 video/Flash
- Animated wallpaper
- Troubleshooting
- Ubuntu Wiki
- ScreenSaver
- Summary
- Rationale
- Use cases
- Scope
- Design
- Switching accounts
- Unlocking
- Post-Breezy
- Implementation
- Data preservation and migration
- Outstanding issues
- ACPI Scripts
- Suggestions
- BoF agenda and discussion
Ubuntu Screensaver

По непонятным мне причинам ни в одном из официальных дистрибутивов Ubuntu нет нормальной, красивой экранной заставки. Из коробки вы получаете просто блокиратор экрана с черным экраном, что конечно функционально, но душа требует прекрасного! К счастью устновить в Ubuntu Screensaver дело 1 минуты!
С самых давних времен за функционал экранной заставки в Linux отвечала программа xscreensaver, которая раньше устанавливалась вместе с большинством дистрибутивов. Сейчас это не так, однако установить ее вы можете и самостоятельно. Однако предварительно, в некоторых дистрибутивах, необходимо удалить блокировщик экрана (screen locker), который установлен по умолчанию.
Screensaver в Ubuntu
Предварительно необходимо удалить gnome-screensaver. Делается это командой в терминале:
Далее переходим к установке xscreensaver
Xubuntu Screensaver
В Xubuntu необходимо предварительно удалить light-locker, поскольку он не работает вместе с xscreensaver. Используйте команду:
После этого можно устанавливать xscreensaver, рекомендую предварительно перезагрузить систему.
Установка xscreensaver
После того как вы удалили штатный хранитель экрана (желательно перезагрузить компьютер после этого) приступаем к установке xscreensver. Для этого в терминале выполняем следующую команду:
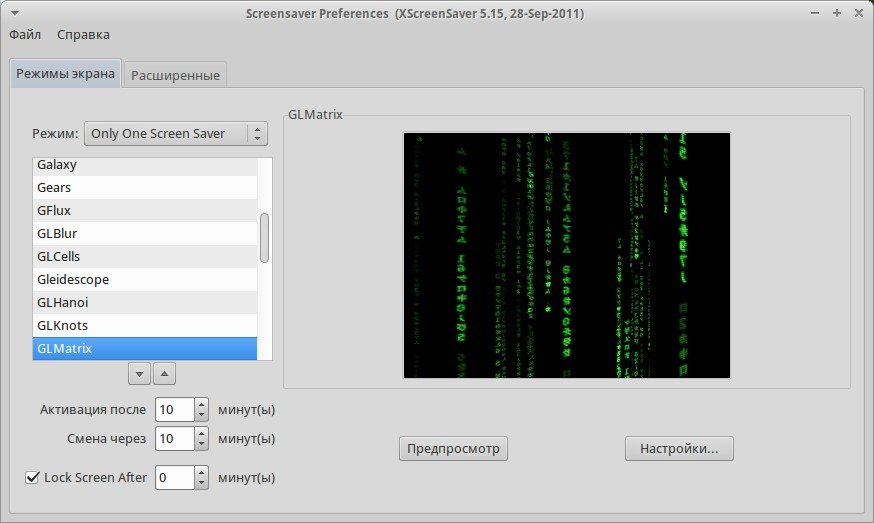
После этого в настройках у вас появится апплет для изменения параметров хранителя экрана. Выбор заставок просто огромен! Они могут быть как просто красивыми, так и частично функциональными. Например есть хранители экрана, которые выводят полезную информацию во время работы, такую как время, загрузка процессора, текстовую информацию из различных источников. Если вы не можете выбрать какую-то одну, то можно указать список заставок, которые будут выбираться случайным образом. Так же имеется опция для блокировки экрана паролем текущего пользователя, чтобы никто не смог использовать компьютер в ваше отсутствие.
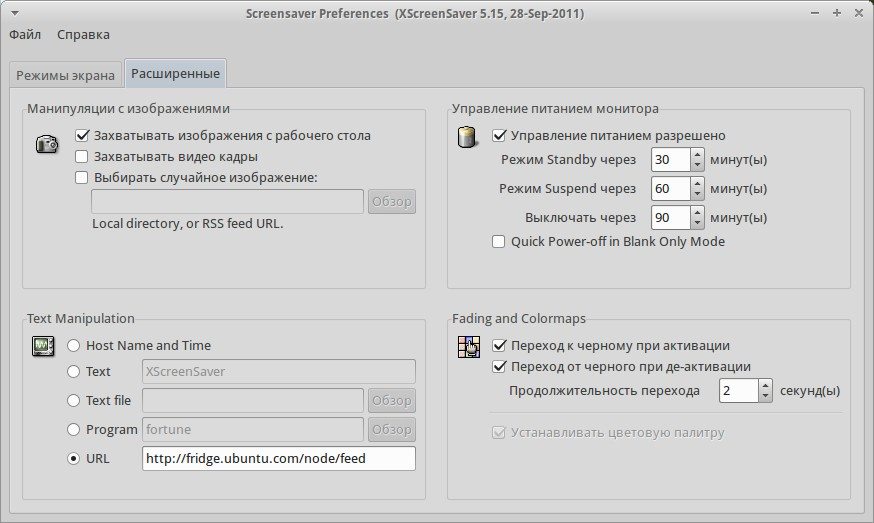
На вкладке «Расширенные» имеются параметры управления питанием монитора, а так же общие настройки для заставок использующих картинки или снимок рабочего стола.
Таким образом вы можете сделать в Ubuntu Screensaver не только энергосберегающей функцией, но и красивой информативной заставкой экрана.
Один мальчик подписался на наш канал в телеграме и получил +100 hp
Источник
Настройки экранной заставки в Linux Mint
Привет, сегодня в статье мы рассмотрим основные параметры экранной заставки в операционной системе Linux Mint, а именно я покажу, как сменить экранную заставку, как полностью ее отключить, как изменить время ожидания перед запуском заставки, а также как отключить блокировку компьютера после запуска заставки.
Для начала давайте разберемся, что же такое «Экранная заставка»?
Что такое экранная заставка?
Экранная заставка (Screensaver) – это программа, которая запускается через определенное время бездействия компьютера и выводит на всем экране монитора статическую или анимированную картинку, тем самым заменяя изображение на экране, а также заставка позволяет отображать время или другую информацию, в случае необходимости можно вообще ничего не выводить, например, отображать только черный экран. У программ такого типа существуют и другие названия, например: хранитель экрана, скринсейвер или screensaver, но все это является одним и тем же, иными словами, назначение таких программ одинаковое.
Экранные заставки могут быть использованы и в целях безопасности, например, можно задать параметр, при котором компьютер будет блокироваться при включении заставки, для разблокировки компьютера потребуется ввести пароль пользователя. Это полезно в тех случаях, когда за компьютером работает несколько пользователей или к компьютеру могут получить физический доступ посторонние люди, т.е. например Вы отошли от компьютера на неопределенное время и забыли его заблокировать или выйти из системы, экранная заставка, после того как запустится, может заблокировать компьютер за Вас.
На заметку! Если Вы обычный пользователь домашнего компьютера и хотите познакомиться с Linux поближе, рекомендую почитать мою книгу – « Linux для обычных пользователей », в ней я подробно рассказываю про основы операционной системы Linux
Экранная заставка в Linux Mint
Сразу скажу, что рассматривать настройки экранной заставки мы будем на примере версии Linux Mint 18.3 Cinnamon.
По умолчанию в Linux Mint экранная заставка настроена следующим образом: в качестве экранной заставки используется стандартный экран блокировки, на данном экране отображается время на черном фоне, запускается заставка через 15 минут бездействия компьютера, после запуска заставки компьютер блокируется немедленно. Выглядит заставка следующим образом.

После того как Вы пошевелите мышкой или щелкните по клавишам клавиатуры, у Вас отобразится окно ввода пароля, для того чтобы разблокировать компьютер.

Как открыть настройки экранной заставки в Linux Mint 18.3?
Все настройки экранной заставки в Linux Mint расположены в параметрах системы, они так и называются «Экранная заставка». Для того чтобы запустить параметры системы нажмите «Меню->Параметры системы».

Затем в разделе «Параметры» найдите пункт «Экранная заставка».

Также можно запустить параметры экранной заставки и другим способом, например, сразу в меню найти данный пункт. Он находится также в параметрах.

В итоге у Вас отобразятся настройки экранной заставки Linux Mint.
Как сменить экранную заставку в Linux Mint?
Для того чтобы сменить экранную заставку просто в настройках на первой вкладке выбирайте подходящую заставку из представленного перечня.

Как изменить время ожидания перед запуском заставки?
Для того чтобы изменить время ожидания перед запуском, в настройках экранной заставки на вкладке «Настройки», измените параметр задержки на нужное Вам значение. В случае если Вы выберите значение «Никогда», то экранная заставка запускаться не будет, т.е. будет отключена.

Как отключить блокировку компьютера после запуска заставки в Linux Mint?
Если Вы хотите, чтобы компьютер не блокировался после запуска заставки, то в настройках экранной заставки на вкладке «Настройки», в разделе «Настройки блокировки», выключите соответствующий параметр.

На вкладке «Настроить» есть еще несколько полезных параметров, например, Вы можете отобразить на стандартном экране блокировки рядом с часами свое собственное сообщение или сделать так, чтобы часы вообще не отображались.
Источник
XScreenSaver
XScreenSaver is a screen saver and locker for the X Window System.
Contents
Installation
For an Arch Linux branded experience, install the xscreensaver-arch-logo AUR package.
Configuration
Most options are configured on a user-by-user basis by running xscreensaver-settings. xscreensaver-settings writes the chosen configuration to
/.xscreensaver , discarding any manual modifications to the file. Global options are defined in /usr/share/X11/app-defaults/XScreenSaver .
Since at least XScreenSaver 5.22, there is another way to edit XScreenSaver’s user configuration, using Xresources. This includes theming support. See [1] for the version 5.22 defaults.
DPMS and blanking settings
![]() This article or section needs language, wiki syntax or style improvements. See Help:Style for reference.
This article or section needs language, wiki syntax or style improvements. See Help:Style for reference.![]()
XScreenSaver manages screen blanking and display energy saving (DPMS) independently of X itself and overrides it. To configure the timings for blanking, standby, display poweroff and such, use xscreensaver-demo or edit the configuration file manually, e.g.
DPMS and screen blanking can be disabled by starting xscreensaver-demo and, for the Mode setting, choosing Disable Screen Saver.
Usage
In the Xfce, LXDE and LXQt environments, XScreenSaver is autostarted automatically if it is available — no further action is required. For other environments, see Autostarting.
To immediately trigger xscreensaver, if it is running, and lock the screen, execute the following command:
Lock on suspend
See Power management#xss-lock. You may want to set XScreenSaver’s fade out time to 0.
User switching from the lock screen
 This article or section is out of date.
By default, XScreenSaver’s New Login button in the lock screen will call /usr/bin/gdmflexiserver to switch users. Display managers other than GDM or KDM that support user switching (such as LightDM) require a different command.
/.Xresources whilst leaving the argument blank will make the New Login button disappear.
As modifications in
/.xscreensaver are discarded by xscreensaver-demo,
/.Xresources is used in this section.
To use LXDM’s switching mode:
LightDM
To use LightDM’s switching mode:
Tips and tricks
Disable during media playback
By default mpv turns off the screensaver at startup and turns it on again on exit. The screensaver is always re-enabled when the player is paused. The option can be controlled in mpv‘s configuration file located in
This is not supported on all video outputs or platforms. If you face some issues you might use a Lua script to manually disable the screensaver. Create a file at
/.config/mpv/scripts/xscreensaver.lua with the following contents:
The above script will call xscreensaver-command -deactivate every 30 seconds. (Formerly you could use the heartbeat-cmd configuration option, but that is no longer present in newer versions of mpv.)
mplayer
Add the following to
Kodi has no native support to disable XScreenSaver (it uses its own screensaver). Install the kodi-prevent-xscreensaver AUR package as a workaround or try Kodi extension from https://sourceforge.net/projects/osscreensavermanager/.
Browser HTML5 video/Flash
There is no native way to disable XScreenSaver for Flash or HTML5 fullscreen video, but there is a script named lightsonplus with support for Firefox’s Flash plugin, Chromium’s Flash plugin, HTML5 fullscreen video in Firefox and Chromium, MPlayer, and VLC.
Another script based solution would be firefox-dpms-git AUR which makes use of PulseAudio output detection of Firefox and thus also works in windowed mode (but not without audio playback).
Animated wallpaper
One can run xscreensaver in the background, just like a wallpaper. First, kill any process that is controlling the background (the root window).
Then, locate the desired XScreenSaver executable (typically in /usr/lib/xscreensaver/ ) and run it with the -root flag, for example:
Troubleshooting
You can configure xscreensaver to write to a log file by creating the logfile touch /var/log/xscreensaver.log as the root user and then specifying its X resource logFile:
To log verbose debugging information to the logFile as well start xscreensaver with the -verbose command line option, or add this to
Источник
Ubuntu Wiki
ScreenSaver
Packages affected:
Summary
Ubuntu currently uses the xscreensaver package as the screen saver and screen locker. While performing its job quite well, it does not integrate with the rest of the desktop as well as possible. Furthermore, its preferences dialog duplicates some of the settings covered by gnome-power-manager.
The gnome-screensaver package is an alternative to the xscreensaver daemon, which provides better integration with other desktop components, so could provide a better user experience.
Rationale
Late in the Breezy cycle, gnome-screensaver was considered as a replacement for xscreensaver, but rejected because it had too many missing features. Now it needs polishing to bring it up to the Ubuntu standard of excellence for Dapper.
Use cases
Scope
Design
Switching accounts
(This is first because it’s the most in need of improvement.)
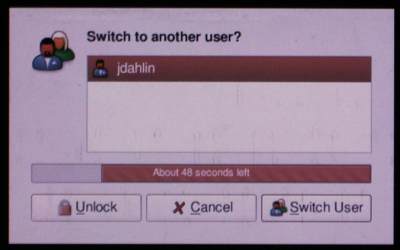
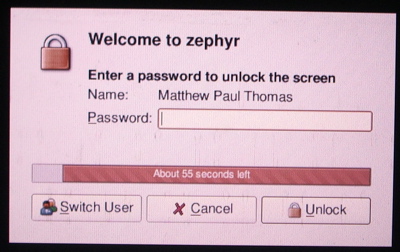
The original from gnome-screensaver:
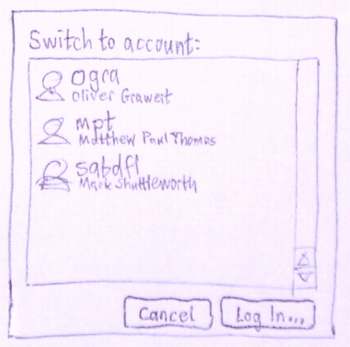
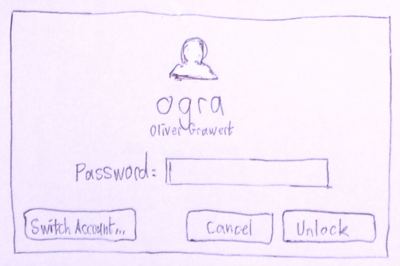
What we want:
How to get from here to there, in order of importance:
- Nuke the «Unlock» button.
- Change «Switch User» to «Log In. » (with a space, an uppercase «I», and an ellipsis).
- Change «Switch to another user?» to «Switch to account:» (with a lowercase «a» and a colon, and not bold).
- Nuke the fuel gauge.
- Nuke the large person icon. This is a dialog, not an alert.
- Make the listbox rows large enough to see the account icons properly.
- The gap between the window edge and the controls should be 12 pixels, not more.
- Add a new column to the list to show the person’s real name.
Wangle the listbox so that the real name is presented in small type under the account name (as done with program names in gnome-app-install), rather than in a separate column.
Unlocking
The unlock interface is the followup to a screensaver that may be very beautiful. And when you’re returning to the computer, you’re often thinking of something you want to do right now. Therefore simplicity and elegance is more important here, and exact consistency is less important, than in your average dialog.
The original from gnome-screensaver:
What we want:
How to get from here to there, in order of importance:
- Nuke the fuel gauge. When «That password is incorrect.» text is shown, it should be at normal size, immediately underneath the password field.
- Put the account name, centered, in extra-large type (but not bold) at the top. (Showing only the real name is a bad idea, because you may have multiple accounts with the same real name.)
- Nuke the «Name:» label. Instead, put the real name in small type underneath the account name.
Nuke the «Welcome to computer name«.
This breaks consistency with rest of the desktop. We should do them all or none. — CoreyBurger
No it doesn’t; Ubuntu’s pushbuttons are already extremely inconsistent. See for example Firefox, About Me, File Management, Tali, and the whole of Open Office.org. Given the variation and the scenario, we choose the simpler option. — MatthewPaulThomas
Post-Breezy
- Use the gdm login screen for switching accounts, and tidy it up. (A Windows-XP-like password field embedded into the account list would save one mouse click for every account selection. And an OS-X-like dialog shake would save having to print ugly «That password was incorrect» text.)
When the screensaver activates (either automatically, or with the «Lock Screen» command), the screen should first take 1000 ms to fade to black. (Imm. blanking is often very useful CoreyBurger)
The keyboard should behave like it does in xscreensaver, where the first character you type is treated as the first character of your password.
Implementation
A wrapper xscreensaver program that handles scripts expecting xscreensaver to be present. And translates single dash options into double dash options.
Data preservation and migration
When first running gnome-screensaver, get the settings by writing a «first start» wrapper that parses the xressources from
/.xscreensaver into gconf keys
Outstanding issues
ACPI Scripts
The current ACPI scripts talk to the X screensaver using the following method:
- list the current X sessions by looking for the unix domain sockets in /tmp/.X11-unix/
- for each socket, find the user that owns the display, and su to that user and run «xscreensaver-command» to send the command.
The combination of gnome-screensaver, gnome-power-manager and hal handles this automatically without explicit support from the ACPI scripts:
hald-addon-acpi listens for ACPI events (either directly from the kernel or acpid).
when an ACPI event occurs, a notification is broadcast on the dbus system bus.
gnome-power-manager listens for notifications from HAL. When a notification is received, it tells gnome-screensaver to do the appropriate action (lock, throttle, etc).
Suggestions
Having easier ways to code our own screensavers and get them working are welcome — like running swf animations as screensavers and whatever.
Recently some screensavers made on sdlBasic were registered as Launchpad projects, and seems to be very easy to code but information of how can we get them working on xscreensaver/gnomescreensaver are welcome — https://launchpad.net/sdlbasic-screensavers — http://nitrofurano.linuxkafe.com/sdlbasic
sdlBasic were not packaged in the Ubuntu repositories yet
OpenHSP (HotSoupProcessor — OnionSoft), has also a Linux port, and seems to be great for coding interpreted screensavers as well.
BoF agenda and discussion
ScreenSaver (последним исправлял пользователь localhost 2008-08-06 16:29:55)
Источник


