- Скриншот на Windows Phone
- Комбинации для фиксации изображения на экране в WP
- Скриншот в Виндовз Семь
- Скриншот в Windows Phone 8
- Screenshot в Windows Mobile 10
- Screenshot Mobile
- How to use it?
- Settings
- Supported Operating Systems
- Screens
- Windows CE
- Windows Mobile 6
- Windows Mobile 5
- Credits
- License
- How to take screenshots in Windows Phone 8.1 & Windows 10 Mobile
- Take screenshots in Windows Phone 8.1 and Windows 10 Mobile
- Where to find your screenshots?
- Conclusion
- How to Take Screenshots on Windows Mobile: Popular Screen Capture Apps
- Screenshot Apps for Windows Mobile
- How to Take a Screenshot
- Как сделать скриншот экрана в Windows 10 Mobile
- Скриншот экрана Windows 10 Mobile с помощью приложения
Скриншот на Windows Phone
Смартфоны на базе операционной системы Windows имею много достоинств и недостатков, армию поклонников и множество недовольных. Среди минусов можно отметить отсутствие элементарной опции, такой как сделать скриншот на Виндовс Фон 7. В последующих релизах офисного аппарата разработчики учли пожелания своих фанатов и снабдили-таки Windows Phones & Mobiles полезным функционалом.
Комбинации для фиксации изображения на экране в WP
Скриншот в Виндовз Семь
В «седьмых» Ви-фонах нет встроенной возможности делать моментальные снимки дисплея, но в официальном вэб-маркете от Microsoft можно найти, скачать и установить дополнительное расширение с желаемыми свойствами.
Задав ключевое слово «Screenshot», официальный магазин от Microsoft предлагает полторы сотни приложений, как платных, так абсолютно доступных для скачивания без финансовых затрат.
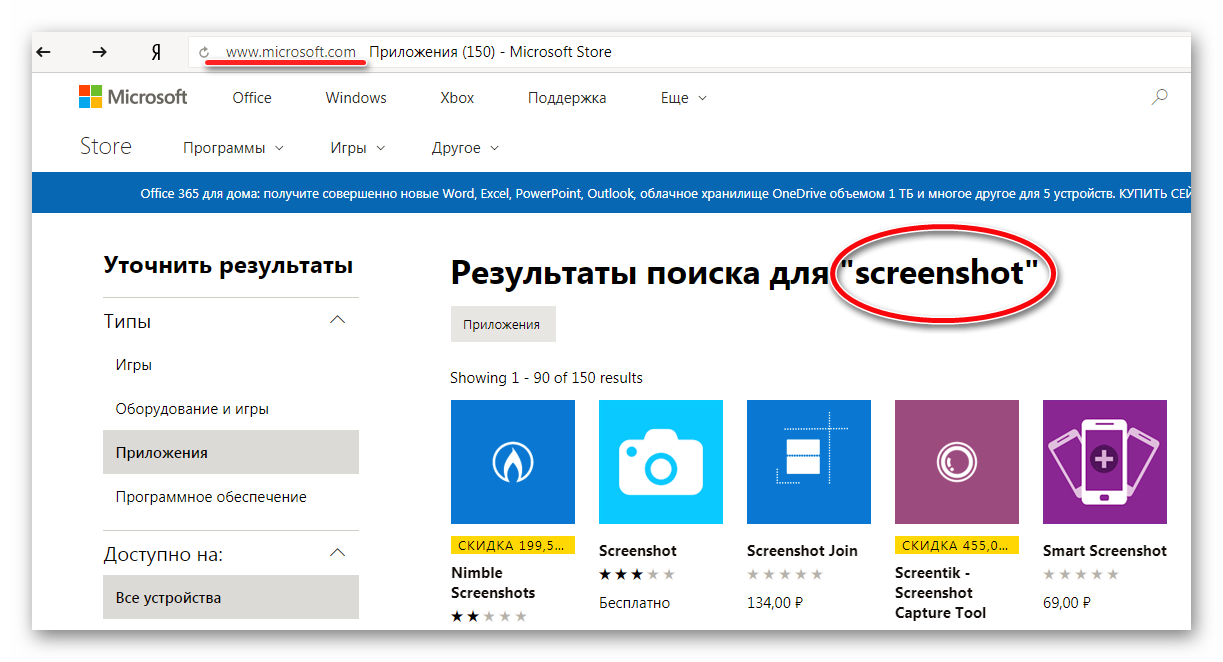
Можно попробовать изменить поиск на «Snapshot» — результат будет скромнее, но найти в предложенном списке интересный вариант всё-таки возможно.

Скриншот в Windows Phone 8
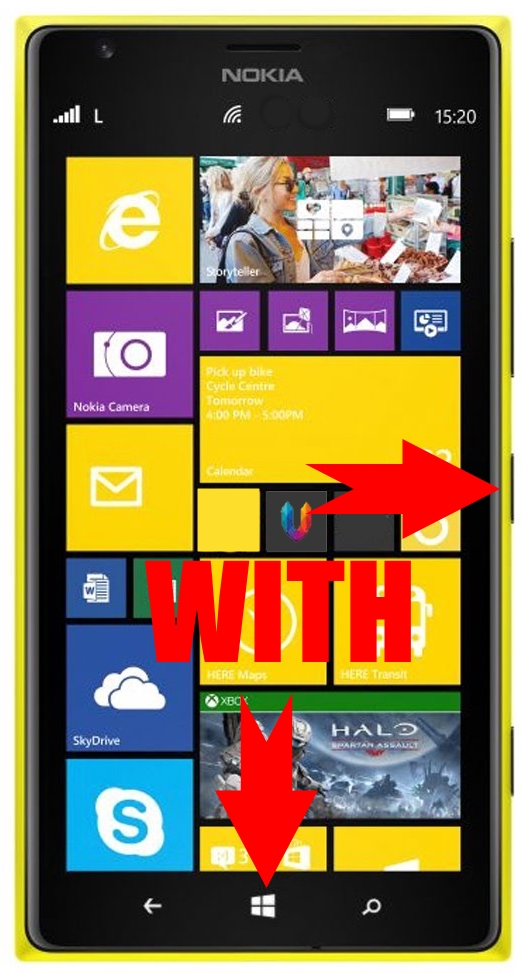
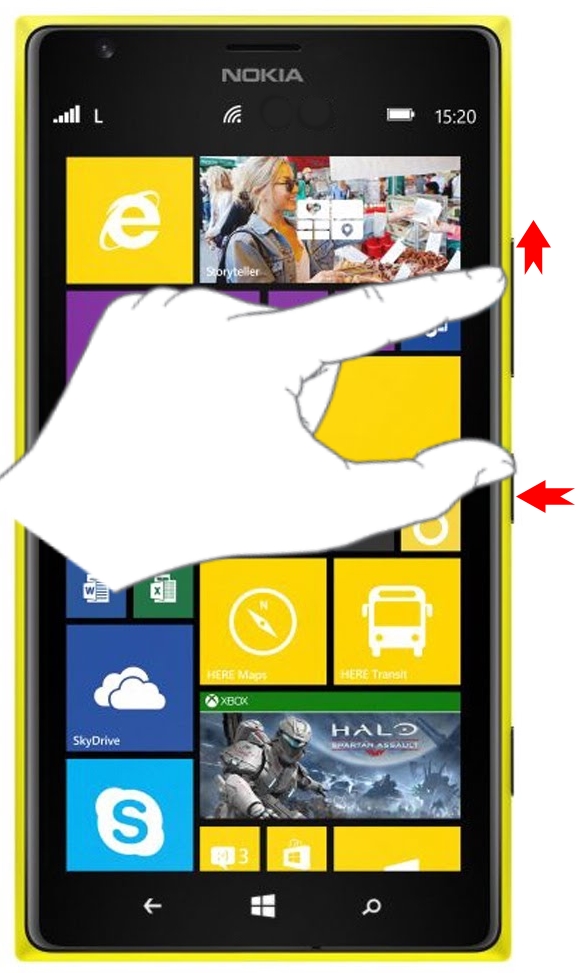
Для фиксирования изображения на дисплее мобильного устройства пользователю необходимо нажать и удерживать до характерного щелчка две клавиши – «Кнопка блокировки/Питание» и «Win» в центре.
Screenshot в Windows Mobile 10
Для фиксирования изображения на дисплее мобильного устройства пользователю необходимо нажать и удерживать до характерного щелчка две клавиши – «Кнопка блокировки/Питание» и «Sound Up».
Скриншот на Виндовс Мобайл сохраняется в одноимённой папке в галерее изображений.
Если стандартных свойств мобильного устройства недостаточно, стоит заглянуть в Windows Store и присмотреть себе приличное, практичное, многофункциональное приложение. Рекомендуется искать, скачивать, устанавливать на свой смартфон утилиту с графическим редактором.
В редакторе изображений можно не только улучшать качество фотографий, но и добавлять элементы, подписи, совмещать несколько снимков в один и многое другое.
Screenshot Mobile
Application record the image displayed on the screen to a file. Output formats are: PNG (default), JPG, BMP.
How to use it?
When you click Capture, application window disappear to a few seconds. It’s time for you to prepare screen view you wish to capture.
After this time screen will be captured and application window will appear. To save screen to a file press Save, select location, filename and press OK.
If you wish preview created screen click Preview. To close preview just click at any point of screen.
Settings
- Wait time — time before taking screen (countdown after form disappear).
- Beep — sound signal played every second before taking screen (start from parameter). Doubled beep mean «countdown finished, screen is taking now».
- Output format: BMP, JPG, PNG.
Supported Operating Systems
Windows Mobile / Windows CE
Requirement: .NET Compact Framework 2.0.
Screens
Windows CE
Windows Mobile 6
Windows Mobile 5
Credits
License
Permission is hereby granted, free of charge, to any person obtaining a copy of this software without limitation the rights to use and copy. Modification, decompilation, disassembly, merge, sublicense and/or sell this software prohibited.
THE SOFTWARE IS PROVIDED «AS IS», WITHOUT WARRANTY OF ANY KIND, EXPRESS OR IMPLIED, INCLUDING BUT NOT LIMITED TO THE WARRANTIES OF MERCHANTABILITY, FITNESS FOR A PARTICULAR PURPOSE AND NONINFRINGEMENT. IN NO EVENT SHALL THE AUTHORS OR COPYRIGHT HOLDERS BE LIABLE FOR ANY CLAIM, DAMAGES OR OTHER LIABILITY, WHETHER IN AN ACTION OF CONTRACT, TORT OR OTHERWISE, ARISING FROM, OUT OF OR IN CONNECTION WITH THE SOFTWARE OR THE USE OR OTHER DEALINGS IN THE SOFTWARE.
How to take screenshots in Windows Phone 8.1 & Windows 10 Mobile
There are times when you need a quick screenshot of what’s on the screen of your smartphone. You might have a funny conversation to capture, an error message or a screen from an app that you are using. If you have a smartphone with Windows Phone 8.1 or Windows 10 Mobile installed, here’s what you have to do in order to take a screenshot of just about anything:
NOTE: If you have a smartphone with Windows Phone 7.8, you won’t be able to take screenshots. This feature is not included in this edition of Windows Phone. This guide applies only to smartphones with Windows Phone 8.1 or Windows 10 Mobile.
Take screenshots in Windows Phone 8.1 and Windows 10 Mobile
In order to take screenshots in Windows Phone 8.1 and Windows 10 Mobile, go to the screen or app that you want to capture in the screenshot. Then, press and hold the Power and Volume Up buttons at the same time.
When the screenshot is taken, you see the text “Saving to Screenshots “ on the top side of the screen.
Where to find your screenshots?
Screenshots in Windows Phone 8.1 and Windows 10 Mobile are saved as PNG image files. They are found on your smartphone’s memory card or storage space (depending on how you have set up the operating system to store pictures).
There, go the Pictures folder and then to the Screenshots subfolder. You can open this location by using the Files app for Windows Phone 8.1 or File Explorer for Windows 10 Mobile.
Alternatively, you can use the Photos app from your smartphone and go to the Screenshots folder.
Another way to access the screenshots on your smartphone is by connecting it to a Windows PC and then navigating with File Explorer. Open your smartphone’s internal storage space or microSD card and then go to Pictures -> Screenshots.
Conclusion
As you can see, taking a screenshot of anything in Windows Phone 8.1 and Windows 10 Mobile is quite easy and it involves pressing only two buttons. If you have any question on this subject, don’t hesitate to use the comments form below.
How to Take Screenshots on Windows Mobile: Popular Screen Capture Apps

Screenshot Apps for Windows Mobile
This tutorial will show you how to take screenshots or screensnaps of your Windows Mobile phone.
There are times when you need to take shots of your Windows Mobile screen for one reason or another, you may want to share the shots with some friends or just want to log the events visually. You may also need a screenshot application when you are writing a review for an application like I am.
There are many applications which allow you to take screenshots on your Windows Mobile phone.
Some of the best ones are:
Capture Screen Utility — Fann Software — https://www.fannsoftware.com/PpcSoftMain.html
All the three applications mentioned above are freeware application. Just download them from the links mentioned above, upload the CAB installation file to your Windows Mobile phone and click on it to open it to initiate the installation. All of them have almost the same functionality, but I prefer Screen Capture by Ilium software more than the others.
How to Take a Screenshot
Just install Screen Capture and launch the application from the menu. Leave the application open and browse to whatever you wanted to take a screenshot of. When you want to take the screenshot, click the screenshot key. You can even specify the key you want to take screenshots with in the Options menu. It also lets you specify a timer duration which is the delay after which the actual screenshot will be taken. The user interface is also minimal and simple to understand.The captured screenshots will then be saved in the My Documents folder on the devices memory. You will also hear a shutter sound when the screenshot is captured. After you are done with taking the screenshots you need, just simply exit the application.
The other two applications — vSnap and Capture Screen have almost the same functionality with slight changes. Both of them also let you specify the directory to store the screenshot in and Capture Screen also has the option to exit the application when the screenshot has been captured and saved.
Как сделать скриншот экрана в Windows 10 Mobile
Notice: Undefined index: windowsstore in /home/a12496/public_html/win10m.ru/wp-content/plugins/wp-appbox/inc/createattributs.class.php on line 90
Notice: Undefined index: windowsstore in /home/a12496/public_html/win10m.ru/wp-content/plugins/wp-appbox/inc/getappinfo.class.php on line 364
В Windows 10 Mobile сделать скриншот можно двумя способами – стандартным и с помощью специального приложения. В первом случае делается скрин всего экрана и изображения сохраняется в папке с фотографиями.
Чтобы сделать скриншот нужно совершить очень просто действие: одновременно нажать на кнопку включения (блокировки) и кнопку увеличения громкости.

Скриншот экрана Windows 10 Mobile с помощью приложения
Есть также приложение в магазине Windows, которое значительно расширяет возможности при снятии скриншотов. Называется оно ScreenShot Tool. Есть как платная, так и бесплатная версия.
Чтобы сделать срин этим приложением нужно выбрать место. Это может быть память телефона или фотография, снятая на камеру из программы. Присутствует возможность изменять размер области, менять цвет, рисовать и многое другое. Вызвать приложение для скриншотов можно стандартным нажатием клавиш прибавления звука и блокировки.


