- SDK Manager
- Recommended Packages
- Adding New Sites
- Troubleshooting
- Как установить Android SDK Manager на Ubuntu 18.04
- Установите пакет инструментов Android SDK
- Использование Android SDK Manager из терминала
- Установка, обновление и удаление пакетов с помощью sdkmanager
- How to Install Android SDK Manager on Ubuntu 16.04
- Install Android SDK on Ubuntu 16.04
- Usage of Android SDK manager from command line
- List packages
- Install packages
- Update all installed packages
- Android SDK Manager
- The package contains android sdkmanager and android SDK console tools..
- Details for Android SDK Manager
- Share this snap
- Share embeddable card
- How To Install Android SDK Tools On Ubuntu 20.04
- Download SDK Tools
- Install SDK Tools
- Download and Install Platform Tools
- Configure Environment Variable
- Using the SDK Manager
- Using the Emulator and AVD Manager
- Summary
SDK Manager
The Android SDK separates tools, platforms, and other components into packages you can download using the SDK Manager. For example, when the SDK Tools are updated or a new version of the Android platform is released, you can use the SDK Manager to quickly download them to your environment.
You can launch the SDK Manager in one of the following ways:
- From Eclipse (with ADT), select Window >Android SDK Manager.
- From Android Studio, select Tools >Android >SDK Manager.
- On Windows, double-click the SDK Manager.exe file at the root of the Android SDK directory.
- On Mac or Linux, open a terminal and navigate to the tools/ directory in the location where the Android SDK is installed, then execute android sdk .
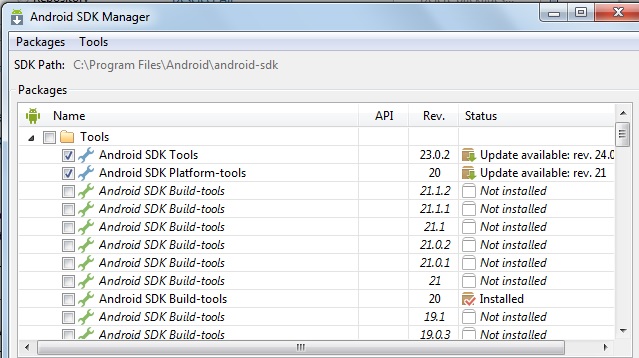
You can select which packages you want to download by toggling the checkboxes on the left, then click Install to install the selected packages.

Figure 1. The Android SDK Manager shows the SDK packages that are available, already installed, or for which an update is available.
There are several different packages available for the Android SDK. The table below describes most of the available packages and where they’re located in your SDK directory once you download them.
Recommended Packages
Here’s an outline of the packages required and those we recommend you use:
SDK Tools Required. Your new SDK installation already has the latest version. Make sure you keep this up to date. SDK Platform-tools Required. You must install this package when you install the SDK for the first time. SDK Platform Required.You must download at least one platform into your environment so you’re able to compile your application. In order to provide the best user experience on the latest devices, we recommend that you use the latest platform version as your build target. You’ll still be able to run your app on older versions, but you must build against the latest version in order to use new features when running on devices with the latest version of Android.
To get started, download the latest Android version, plus the lowest version you plan to support (we recommend Android 2.2 for your lowest version).
System Image Recommended. Although you might have one or more Android-powered devices on which to test your app, it’s unlikely you have a device for every version of Android your app supports. It’s a good practice to download system images for all versions of Android your app supports and test your app running on them with the Android emulator. Android Support Recommended. Includes a static library that allows you to use some of the latest Android APIs (such as fragments, plus others not included in the framework at all) on devices running a platform version as old as Android 1.6. All of the activity templates available when creating a new project with the ADT Plugin require this. For more information, read Support Library. SDK Samples Recommended. The samples give you source code that you can use to learn about Android, load as a project and run, or reuse in your own app. Note that multiple samples packages are available — one for each Android platform version. When you are choosing a samples package to download, select the one whose API Level matches the API Level of the Android platform that you plan to use.
Tip: For easy access to the SDK tools from a command line, add the location of the SDK’s tools/ and platform-tools to your PATH environment variable.
The above list is not comprehensive and you can add new sites to download additional packages from third-parties.
In some cases, an SDK package may require a specific minimum revision of another package or SDK tool. The development tools will notify you with warnings if there is dependency that you need to address. The Android SDK Manager also enforces dependencies by requiring that you download any packages that are needed by those you have selected.
Adding New Sites
By default, Available Packages displays packages available from the Android Repository and Third party Add-ons. You can add other sites that host their own Android SDK add-ons, then download the SDK add-ons from those sites.
For example, a mobile carrier or device manufacturer might offer additional API libraries that are supported by their own Android-powered devices. In order to develop using their libraries, you must install their Android SDK add-on, if it’s not already available under Third party Add-ons.
If a carrier or device manufacturer has hosted an SDK add-on repository file on their web site, follow these steps to add their site to the Android SDK Manager:
- Select Available Packages in the left panel.
- Click Add Add-on Site and enter the URL of the repository.xml file. Click OK.
Any SDK packages available from the site will now be listed under a new item named User Add-ons.
Troubleshooting
Problems connecting to the SDK repository
If you are using the Android SDK Manager to download packages and are encountering connection problems, try connecting over http, rather than https. To switch the protocol used by the Android SDK Manager, follow these steps:
Источник
Как установить Android SDK Manager на Ubuntu 18.04
Sdkmanager – это инструмент CLI, который позволяет пользователям просматривать, устанавливать, обновлять и удалять доступные пакеты для Android SDK.
В этой статье рассказывается, как установить Android SDK Manager на Ubuntu 18.04 с помощью терминала.
Если вы уже используете Android Studio, вам не нужно использовать sdkmanager, так как вы можете управлять пакетами SDK из среды IDE.
Инструмент sdkmanager предоставляется в пакете Android SDK Tools, поэтому мы собираемся установить последний, чтобы использовать sdkmanager.
Установите пакет инструментов Android SDK
Перед установкой предпочтительного инструмента нам необходимо обновить все пакеты и установить JAVA, так как Android SDK требует его запуска.
Для этого вы можете выполнить следующие команды в порядке, указанном ниже:
Как только JAVA установлен на машине, мы можем запустить следующую команду, чтобы проверить версию java и убедиться, что она установлена правильно:
Результат должен выглядеть так:
После успешной установки JAVA мы можем приступить к установке Android SDK. Нам нужно загрузить двоичные файлы с сайта разработчиков Android.
Если вы открываете ссылку выше в браузере, вы можете найти доступные zip-файлы в разделе «Только для командной строки».
Чтобы загрузить двоичные файлы из терминала, запустите следующую команду:
Как только он будет установлен, разархивируйте следующую команду
Будет создан новый каталог с именем tools.
Для завершения установки нам необходимо добавить следующие пути к нашей переменной среды PATH.
Для этого вы можете запустить следующую команду:
Использование Android SDK Manager из терминала
После установки Android SDK мы можем использовать инструмент sdkmanager для просмотра, установки, обновления и удаления пакетов для Android SDK с терминала.
Список установленных, доступных пакетов и обновлений
Чтобы просмотреть все установленные, доступные пакеты и те, которые имеют обновление, мы можем запустить:
Результат будет выглядеть следующим образом:
При выполнении этой команды могут возникнуть проблемы.
Например. вывод команды может быть ошибкой, подобной приведенной ниже:
Чтобы устранить эту проблему, отредактируйте скрипт sdkamanger, который находится в папке bin папки установки (в нашем случае полный путь к файлу был / home / ubuntu / tools / bin / sdkamanager) и добавить следующее в 31 строку:
После того как вы отредактировали файл и сохранили, вы можете снова запустить команду sdkmanager –list.
Отобразятся только установленные пакеты и появится другое сообщение об ошибке, которое будет выглядеть следующим образом:
Чтобы исправить ошибки, мы создаем файл repositories.cfg (так как он не был создан по умолчанию) и запускаем команду sdkmanager -list с флагом –no_https.
Выполните следующие команды в следующем порядке:
Установка, обновление и удаление пакетов с помощью sdkmanager
Чтобы установить пакет, выполните следующую команду:
Если вы хотите удалить несколько пакетов, вы можете добавить их в файл и использовать флаг –package_file. Например
Обратите внимание, что имя_пакета должно быть из списка доступных пакетов, и если вы не используете флаг no_https, он выдает ту же ошибку, когда мы запускаем команду sdkmanager -list.
Чтобы обновить все пакеты, вы можете запустить:
Обратите внимание: если вы обновите инструменты SDK, вам нужно снова отредактировать файл / home / ubuntu / tools / bin / sdkamanager и добавить в 31 строку строку -XX: + IgnoreUnrecognizedVMOptions –add-modules java.se.ee, как упомянутый выше файл будет извлечен с сервера и станет стандартным.
Чтобы удалить пакет, выполните следующую команду:
Установка самого Android SDK Manager очень проста, но во время процесса вы можете столкнуться с различными проблемами, связанными с JAVA.
Тем не менее, есть обходные пути, описанные для типов проблем, с которыми вы можете столкнуться. Поэтому, используя этот учебник, вы можете быть уверены, что установите его!
Источник
How to Install Android SDK Manager on Ubuntu 16.04
In this article, we will see how to install Android SDK manager on ubuntu 16.04 with the command line. The sdkmanager is a command line tool that allows you to view, install, update, and uninstall packages for the Android SDK. If you’re using Android Studio, then you do not need to use this tool and you can instead manage your SDK packages from the IDE. Let’s start with installation.
Install Android SDK on Ubuntu 16.04
Step 1: Before starting the installation of Android SDK, we need to install java on the machine. Android SDK requires java to run. Execute below command to install java on machine
You can check the installation status by checking the version of installed java, Execute below command to check the installed version if it gives version in output, Java is installed successfully.
If you have already java version installed on the machine, please ignore this step.
Step 2: Now, download sdkmanager binaries from the Download page of Android website. You will get link of binaries at the page under command line tools. After copying the link, execute below command to download binaries.
You need to replace the link with your copied one in above command.
Step 3: Extract the downloaded zip file on your choice of directory. I am extracting it in the home directory.
One new directory named ‘tools’ will be created. We have successfully installed Android SDK. Now, let’s configure it.
Step 4: Add SDK tools directory in PATH environment variable to make executable available globally. Add below line
/.profile file to make it permanent.
Use relative path according to your installation directory in above line.
Usage of Android SDK manager from command line
List packages
You can list installed and available packages by executing below commands. It will show installed packages, available packages and available updates on installed packages.
Install packages
sdkmanager packages [options]
Here, the ‘packages’ argument is an SDK-style path as shown with the —list command(Refer output of ‘sdkmanager —list’ command and check path column) , wrapped in double quotes (for example, «build-tools;24.0.2» or «platforms;android-25»)
$ sdkmanager «platforms;android-25» «build-tools;24.0.2» done
Alternatively, you can give package_file as argument which contains all the packages which needs to be installed.
To uninstall the existing packages, all you need to do is to insert simple —uninstall flag as shown below
Update all installed packages
We have successfully installed and configured Android SDK on ubuntu 16.04. Android studio is required for the development of Android, For building application only, sdkmanager is sufficient. If you want to use your machine as build machine only to generate android apk instead of development, Then this approach is ideal for you. Please share your thoughts in the comment section.
Источник
Android SDK Manager
Install latest/stable of Android SDK Manager
Ubuntu 16.04 or later?
View in Desktop store
Make sure snap support is enabled in your Desktop store.
Install using the command line


The package contains android sdkmanager and android SDK console tools..
This is snap version of console sdk manager for Android. For more information about sdkmanager see official google [documentation](https://developer.android.com/studio/command-line/sdkmanager) ubuntu
sdkmanager
The sdkmanager is a command line tool that allows you to view, install, update, and uninstall packages for the Android SDK.
Location of installed components:
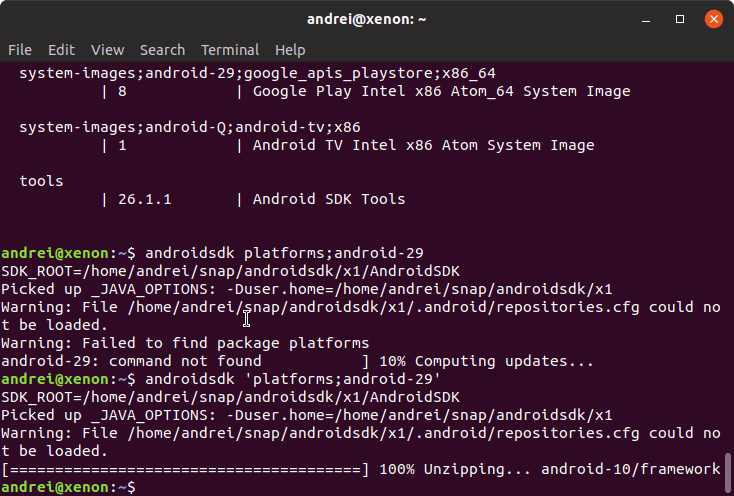
- androidsdk —list — show available packages
- androidsdk ‘platforms;android-29’ — install ‘platforms;android-29’ package
Details for Android SDK Manager
Share this snap
Generate an embeddable card to be shared on external websites.
Create embeddable card
Share embeddable card
Customise your embeddable card using the options below.
Источник
How To Install Android SDK Tools On Ubuntu 20.04
It provides all the steps required to install Android SDK Tools on Ubuntu 20.04 LTS.
In this tutorial, we will discuss all the steps required to install Android SDK Tools, SDK Manager, and AVD Manager on the popular Linux distribution i.e. Ubuntu 20.04 with Java 16. This tutorial provides the steps to install Android SDK Tools on Ubuntu 20.04 LTS, though the steps should be the same for other versions of Ubuntu and Linux systems.
This post is useful for the developers using Android SDK Tools with other IDEs without installing Android Studio for the use cases including hybrid app development using Ionic. It also assumes that a valid JAVA_HOME environment variable exists pointing to the installation directory of Java. You may follow the Java installation tutorials written by us including How To Install Java 8 On Ubuntu, How To Install Java 16 On Ubuntu 20.04 LTS, and How To Install OpenJDK 16 On Ubuntu 20.04 LTS.
In case you are interested in developing Android applications using Android Studio, you can also follow the other tutorials written by us including How To Install Android SDK Tools On Windows, How To Install Android Studio On Windows, and How To Install Android Studio On Ubuntu 20.04.
You may also be required to execute the below-mentioned command in case you have set the options previously for Java 9 or Java 10.
Notes: The Ubuntu 18.04 LTS version of this tutorial is available at — How To Install Android SDK Tools On Ubuntu 18.04. You can continue this tutorial for Ubuntu 20.04 LTS.
Download SDK Tools
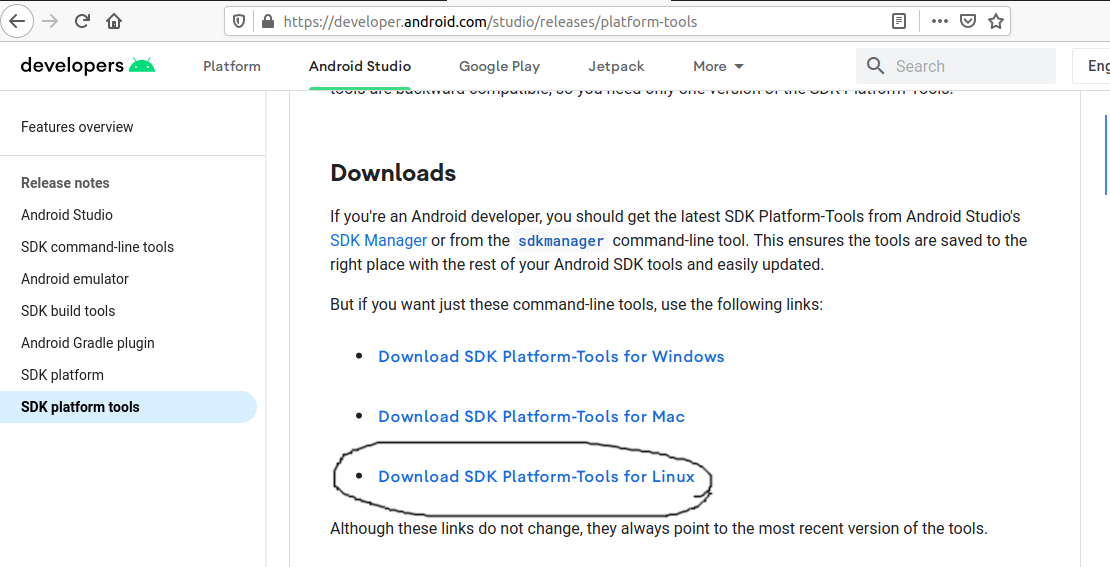
Open the download tab of Android Studio and scroll down to the Command line tools only section. This section shows various options to download the SDK tools as shown in Fig 1.
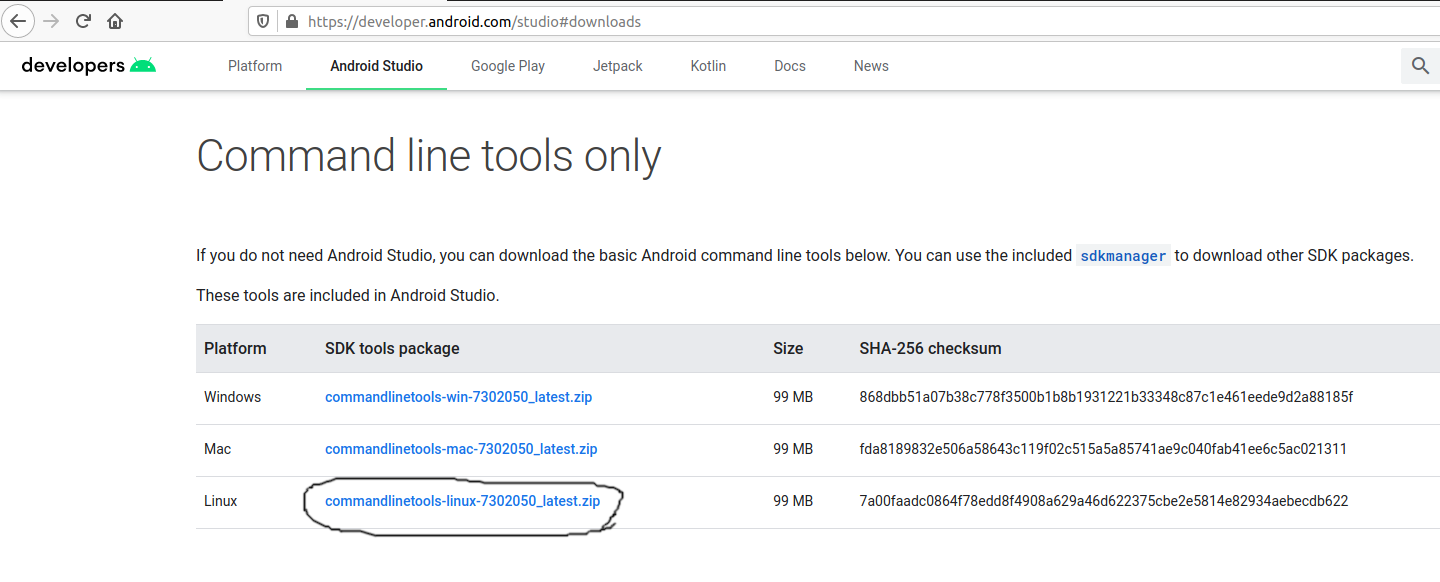
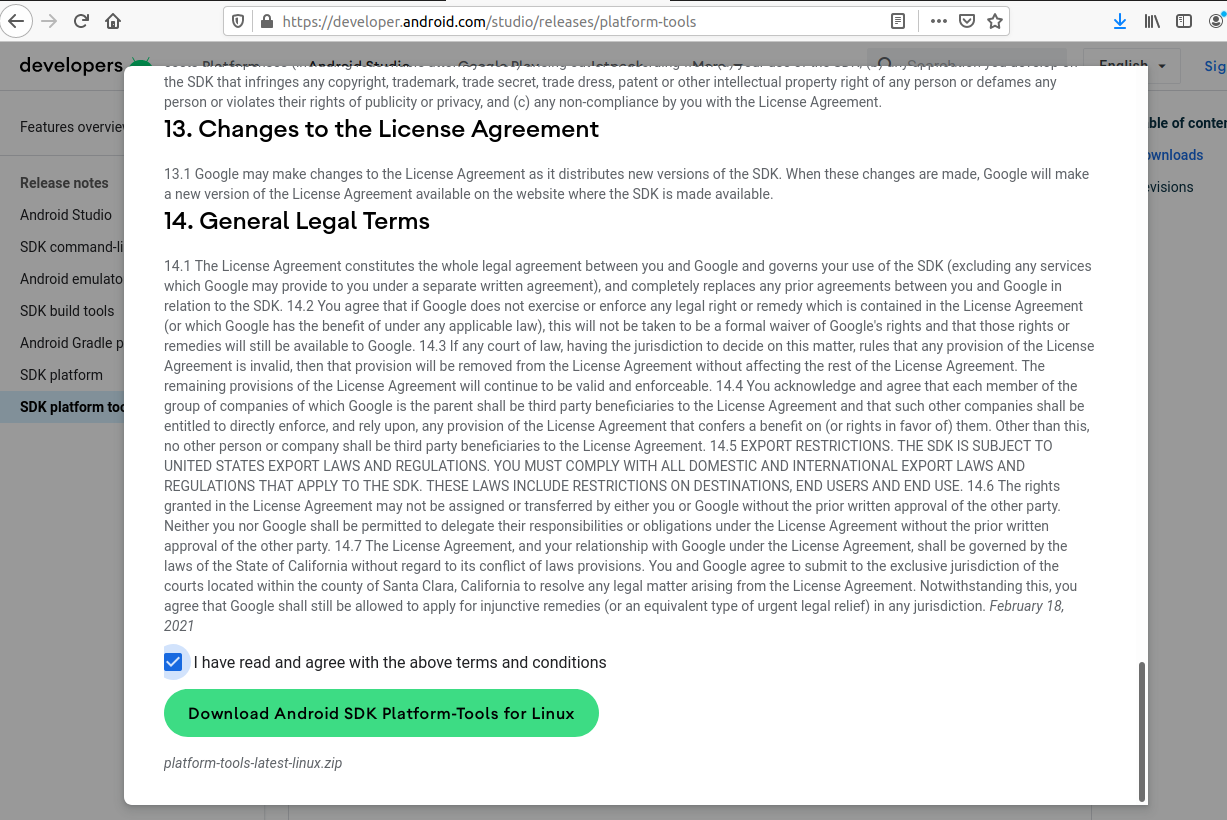
Click on the Download Link as highlighted in Fig 1. It will ask to accept the Terms and Conditions as shown in Fig 2.
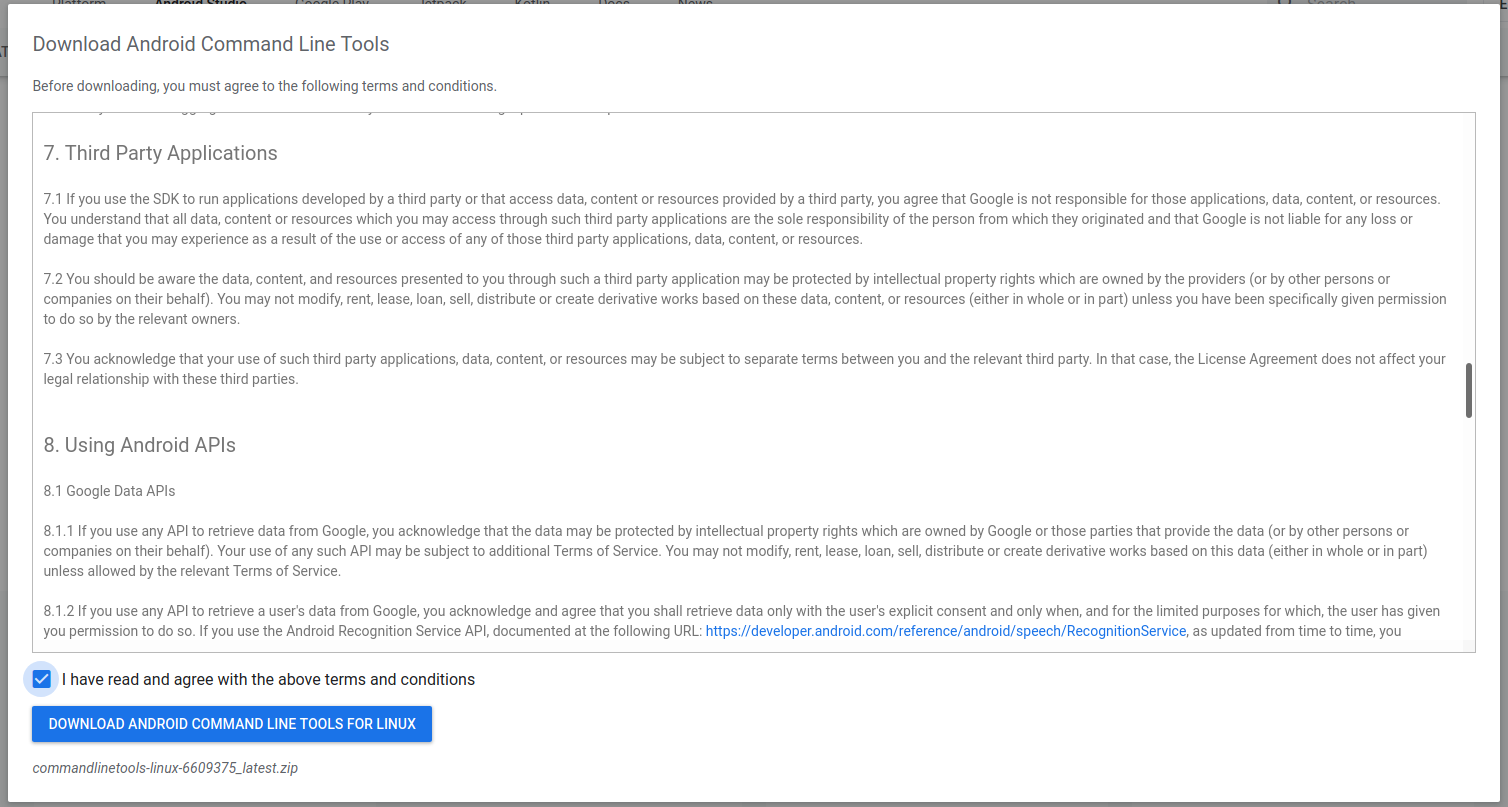
Go through the details, agree to the terms and conditions, and click the Download Button to start the download.
Install SDK Tools
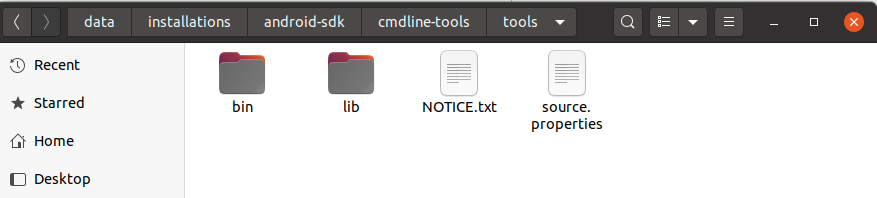
In this step, we will install the Android SDK Tools on Ubuntu. Create a directory having the name set to android-sdk and extract the content of the downloaded SDK Tools zip to this directory. Create another directory android-sdk/cmdline-tools to store the sdk-tools. Make sure that the tools directory is available directly within the android-sdk/cmdline-tools directory created by us.
Download and Install Platform Tools
In this step, we will install the Android Platform Tools on Ubuntu. Follow the same steps similar to Android SDK Tools as shown in Fig 4, Fig 5, and Fig 6 to install Android Platform Tools using the download link.
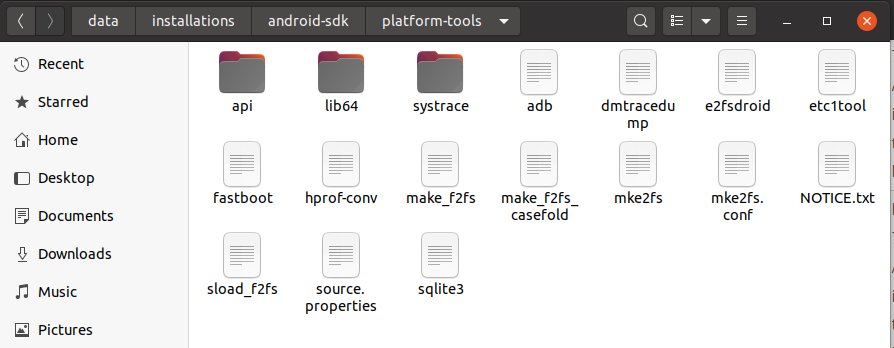
Make sure that the platform-tools content is available within the directory platform-tools. The directory structure should be similar to:
Configure Environment Variable
In this step, we will configure the environment variable to use the SDK tools installed by us. There are two ways to do it. In the first approach, we can update the .bashrc file of the user account. Another approach is to update /etc/profile file which works for all the accounts.
Approach A
Update .bashrc file of the user account.
Notes: Replace the android sdk path based on your installation directory.
Approach B
Update /etc/profile file.
Scroll down by pressing the Page Down button and add at the end of this file:
Make sure that you provide the correct path to the android-sdk directory.
Now press Ctrl + O and press Enter to write our change. Press Ctrl + X to exit the nano editor. The nano editor should look like Fig 7.
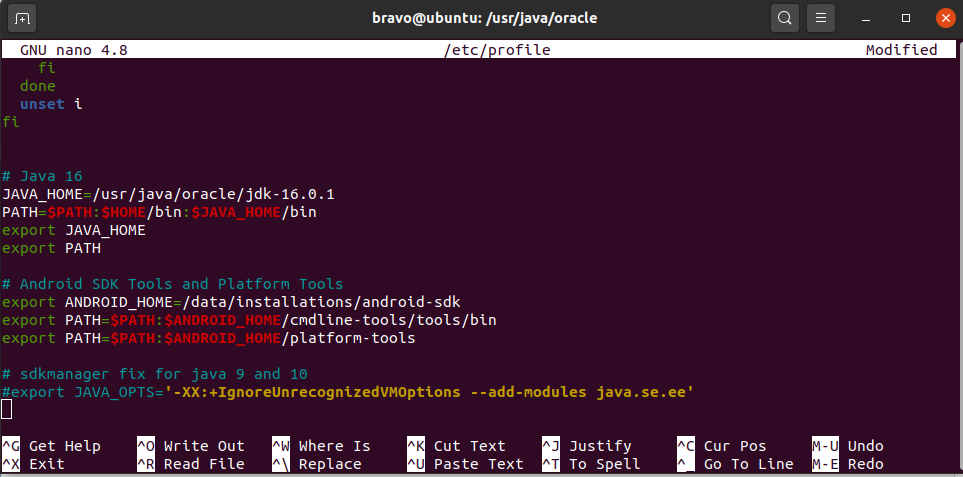
Notes: Approach B didn’t work for me.
Now test the Android SDK installed by us using the environment variables configured by us.
Using the SDK Manager
Update SDK Manager — Update the SDK manager using the below-mentioned command.
List — We can list the installed and available packages and images using the list command as shown below.
Install Platform — Use the below-mentioned command to install the Android 10 (API level 29) using the SDK manager.
It will ask to accept the terms and conditions. Enter y and hit Enter Key to accept the terms and conditions. This command creates the directories licenses and platforms within android-sdk and installs the package android-30 within the platforms directory having all the required files to run the emulator for Android 11.
If we again check the installed packages, the list command shows the installed options as shown below.
After installing the platforms, the directory structure should be:
Add System Image — We can add system image from available images shown by the list command using the SDK manager as shown below. We are adding the most recent default 64-bit system image.
Accept the License Agreement to complete the download. There are several projects which need Google Play Services. We need system images specific to Google Play Services as shown below.
Now again use the command list as shown below.
After installing the default system image, the directory structure should be:
Install Emulator — You might be required to install the emulator before creating the AVD using SDK Manager. The emulator gets installed while adding the system images in the previous steps.
Install Build Tools — Install the most recent build tool listed by the list command.
After installing the build tools, the directory structure should be:
Now again use the command list as shown below.
Using the Emulator and AVD Manager
Create AVD — Create the AVD using the system image downloaded in the previous step as shown below. Replace with actual name.
The above commands ask a bunch of questions to configure the AVD if we choose the custom hardware profile option. We have excluded the details of these options from this tutorial since these configuration details depend on the actual needs. After completing all the configurations, it creates the AVD using the name provided by us while configuring it.
List AVDs — Now go to the tools directory(only required in case you have omitted to add tools path to PATH while configuring environment variables) on the command line and check the installed platform as shown below.
It will list all the AVDs installed by us.
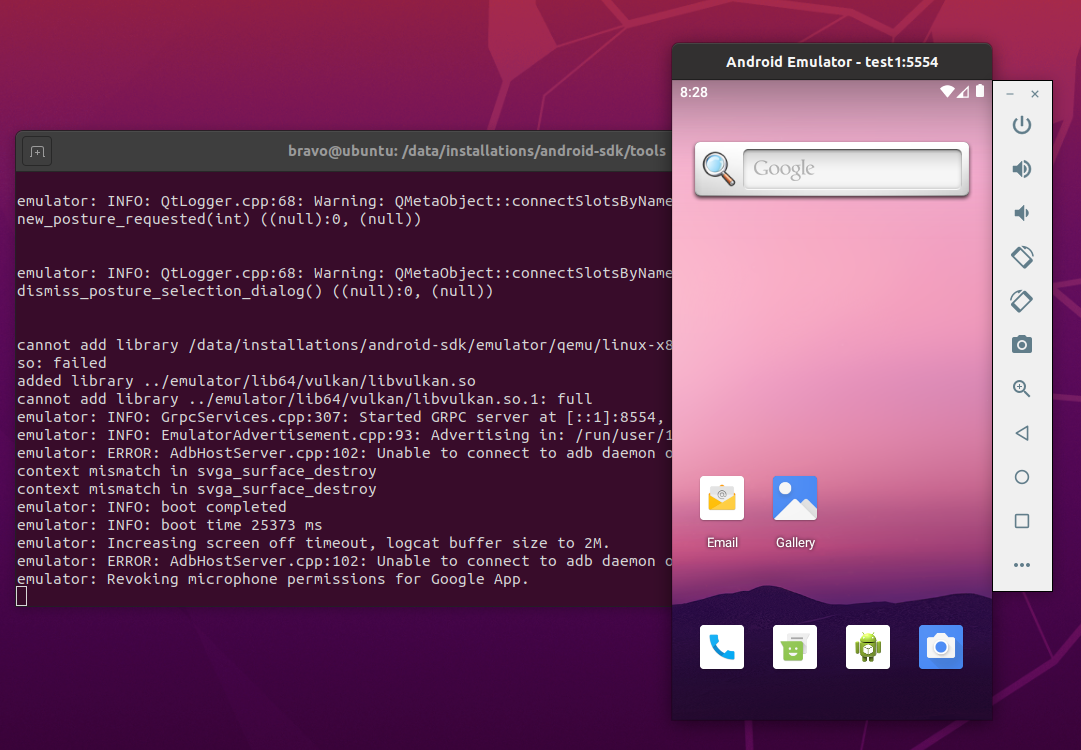
Launch AVD — We can launch the AVD using the emulator as shown below.
The emulator will take some time to completely launch the AVD. The final results should look similar to Fig 8.
Notes: I have used Ubuntu 20.04 LTS installed as VM using VMware Workstation Player, hence I have enabled the Virtualization for my Virtual Machine.
Delete Emulator — We can also delete an existing emulator as shown below.
Summary
This tutorial provided all the steps required to install Android SDK Tools and Android Platform Tools on Ubuntu 20.04 LTS. It also provided the steps required to launch the AVD using the Android Emulator.
Источник


