- journal of recreational computer science
- Running SDRSharp on Mac OS X
- Download the Mono platform and install Xamarin Studio.
- Install the portaudio and rtlsdr libraries.
- Get the SDRSharp sources.
- Build the SDRSharp binary.
- Set up symbolic links to the libraries you’ve installed above.
- Run it.
- Sdr �������� ��� mac os
journal of recreational computer science
Running SDRSharp on Mac OS X
A while back I bought one of those 15 GBP DVB-T dongles to see if they’re good for anything. Turns out, they’re pretty amazing devices, and you can’t possibly beat the price given its capabilities.
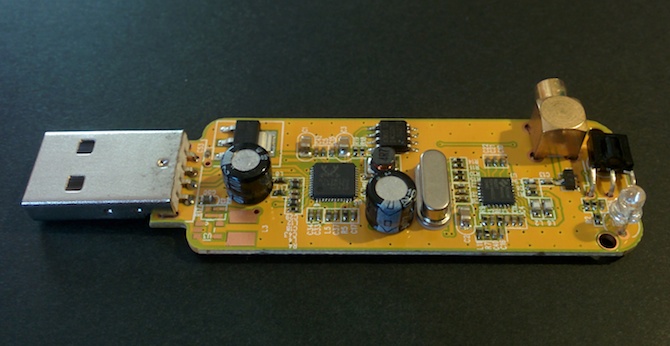
Sadly, the variety of software available for the Mac leaves much to be desired. Apart from the rtlsdr suite and Gqrx, there are very few programs available.
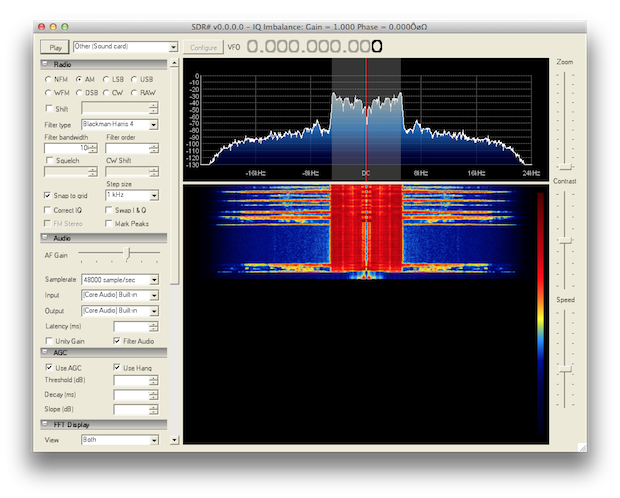
This evening, I turned my attention to SDRSharp — an SDR suite originally targeted at the Windows platform, written in C#. Immediately, I thought of Mono, and if it would be possible to run SDRSharp on a Mac, given a Mono runtime. Mind you — the last time I looked at Mono (around 2006), the folks behind it were working on reimplementing Windows.Forms, so it wasn’t exactly ready for the prime time back then.
This writeup describes how to get SDRSharp up and running on Mac OS X
Download the Mono platform and install Xamarin Studio.
First, you’ll need to download the Mono runtime (an equivalent of the .NET Framework for platforms other than Windows). Head over to the project page and select Mac OSX — there are two packages to download and install:
Install the portaudio and rtlsdr libraries.
In order to talk to your dongle, you’ll need a library (rtl-sdr) which exposes an abstraction layer and talks to the dongle using libusb . Since this is a native library (compiled for a particular platform — in our case Mac OS X), you’ll need to build it from scratch using MacPorts. SDRSharp uses P/Invoke facilities to talk to the libraries in question. All you need to do is build them for the right architecture (i386).
Assuming you have MacPorts installed, simply issue the following commands. The +universal variant is important.
Building the latter may take a while, or at least it did in my case — ImageMagick was rebuilt among others (go figure).
Get the SDRSharp sources.
In a directory of your choice, run the following:
This will pull the latest SDRSharp sources from the repository.
Build the SDRSharp binary.
| Fire up Xamarin Studio, open an existing project and select SDRSharp.sln in the sdrsharp directory you just checked out. Change the active configuration (Project | Active Configuration) to |
| Release|x86 . Then select Build | Build All and give it a minute or so to build everything. | В |
Set up symbolic links to the libraries you’ve installed above.
This will tell the mono runtime where to load the native libraries from. You will need at least portaudio – the latter is only required if you want to use the USB dongle.
Run it.
Head over to the sdrsharp/Release directory and run:
edit: Eric Brombaugh pointed out the following:
- The Mono and IDE suggestions you made are fine for those running newer versions of Mac OS X. I’m still on 10.6.8, so I had to install older versions of Mono and MonoDevelop.
- With the older versions of the .net tools, the SDR# .sln file wasn’t recognized, so I had to back off the version number in the .sln file by editing values in the header.
edit: Increasing performance
You may try your luck by precompiling the executable with mono —aot=full -O=all SDRSharp.exe . This will prevent the mono runtime from executing its JIT compiler, potentially leading to increased performance (it appears to help on my old Mac Mini, but YMMV). You’d then run the binary with mono SDRSharp.exe — the precompiled code will be executed automatically.
edit: SDRSharp goes closed source
The author of SDRSharp decided to close the source for the software – if you’re okay running an old version (from September 2013), then you can get those sources from github. Instead of running svn co above, do the following:
I’ve attempted to run the latest binaries with Mono, but did not succeed.
Источник
Sdr �������� ��� mac os
SDR++, The bloat-free SDR software
 SDR++ is a cross-platform and open source SDR software with the aim of being bloat free and simple to use.
![]()
- Multi VFO
- Wide hardware support (both through SoapySDR and dedicated modules)
- SIMD accelerated DSP
- Cross-platform (Windows, Linux, OSX and BSD)
- Full waterfall update when possible. Makes browsing signals easier and more pleasant
- Modular design (easily write your own plugins)
Download the latest release from the Releases page and extract to the directory of your choice.
To create a desktop shortcut, rightclick the exe and select Send to -> Desktop (create shortcut) , then, rename the shortcut on the desktop to whatever you want.
Debian-based (Ubuntu, Mint, etc)
Download the latest release from the Releases page and extract to the directory of your choice.
If libvolk2-dev is not available, use libvolk1-dev .
Install the latest release from the sdrpp-git AUR package
There are currently no existing packages for other distributions, for these systems you’ll have to build from source.
You might get lucky by using the installer downloadable from the Releases page.
Building it yourself
This guide requires you to have Homebrew installed. Check out https://brew.sh/ on how to do so.
Get yourself a copy of the source code. This can be done by downloading the source package from the Releases page. Eextract it to a location of your choice. Alternativley you can clone https://github.com/AlexandreRouma/SDRPlusPlus.git using git.
The above was tested on macOS Big Sur (11.5).
Check jobs.build_macos in the build_all.yaml workflow for the exact options used for building the package available in the releases
There are currently no BSD packages, refer to Building on Linux / BSD for instructions on building from source.
Building on Windows
The preferred IDE is VS Code in order to have similar development experience across platforms and to build with CMake using the command line.
- cmake
- vcpkg
- PothosSDR (This will install libraries for most SDRs)
- RtAudio (You have to build and install it in C:/Program Files (x86)/RtAudio/ )
After this, install the following dependencies using vcpkg:
You are probably going to build in 64 bit so make sure vcpkg installs the correct versions using .\vcpkg.exe install
Building using the command line
IMPORTANT: Replace with vcpkg’s install directory.
Running for development
Create a new configuration root directory
This will create the root_dev directory that will be used to save the configs of sdrpp and the modules.
You will next need to edit the root_dev/config.json file to point to the modules that were built. If the file is missing in your folder run the application once and it will create one with default value — see later on how to run the application.
Run SDR++ from the command line
From the top directory, you can simply run:
Or, if you wish to run from the build directory e.g. build/Release and adapt the relative path to the root_dev folder:
The optional -s argument is for keeping the console active in order to see the error messages.
Because all the paths are relative, for the rest of the command line instructions we are going to assume you are running from the top directory using the former command. As mentioned previously you need to edit root_dev/config.json to add the modules that were built. From the default configuration file you need to add the paths in the modules section. Add to this list all the modules you wish to use.
You also need to change the location of the resource and module directories, for development, I recommend:
Remember that these paths will be relative to the run directory.
If you choose to run SDR++ for development, you do not need this step. First, copy over the exe and DLLs from build/Release/ to root_dev .
Next you need to copy over all the modules that were compiled. To do so, copy the DLL file of the module (located in its build folder given below) to the root_dev/modules directory and other DLLs (that do not have the exact name of the module) to the root_dev directory.
The modules built will be some of the following (Repeat the instructions above for all you wish to use):
- build/radio/Release/
- build/recorder/Release/
- build/rtl_tcp_source/Release/
- build/spyserver_source/Release/
- build/soapy_source/Release/
- build/airspyhf_source/Release/
- build/plutosdr_source/Release/
- build/audio_sink/Release/
Building on Linux / BSD
Select which modules you wish to build
Depending on which module you want to build, you will need to install some additional dependencies. Here are listed every module that requires addition dependencies. If a module enabled by default and you do not wish to install a perticular dependency (or can’t, eg. the BladeRF module on Debian Buster), you can disable it using the module parameter listed in the table below
- soapy_source: SoapySDR + drivers for each SDRs (see SoapySDR docs)
- airspyhf_source: libairspyhf
- plutosdr_source: libiio, libad9361
- audio_sink: librtaudio-dev
- cmake
- fftw3
- glfw
- glew
- libvolk
Next install dependencies based on the modules you wish to build (See previous step)
Note: make sure you’re using GCC 8 or later as older versions do not have std::filesystem built-in.
replace with the number of threads you wish to use to build
Create a new root directory
Running for development
If you wish to install SDR++, skip to the next step
First run SDR++ from the build directory to generate a default config file
Then, you will need to edit the root_dev/config.json file to point to the modules that were built. Here is an example of what it should look like:
Note: You can generate this list automatically by running find . | grep ‘\.so’ | sed ‘s/^/»/’ | sed ‘s/$/»,/’ | sed ‘/sdrpp_core.so/d’ in the build directory.
You also need to change the location of the resource and module directories, for development, I recommend:
Remember that these paths will be relative to the run directory.
Of course, remember to add entries for all modules that were built and that you wish to use.
Next, from the top directory, you can simply run:
Or, if you wish to run from the build directory, you will need to correct the directories in the config.json file, and then run:
To install SDR++, run the following command in your build folder:
Not all modules are built by default. I decided to disable the build of those with large libraries, libraries that can’t be installed through the package manager (or pothos) and those that are still in beta. Modules in beta are still included in releases for the most part but not enabled in SDR++ (need to be instantiated).
| Name | Stage | Dependencies | Option | Built by default | Built in Release | Enabled in SDR++ by default |
|---|---|---|---|---|---|---|
| airspy_source | Working | libairspy | OPT_BUILD_AIRSPY_SOURCE | ✅ | ✅ | ✅ |
| airspyhf_source | Working | libairspyhf | OPT_BUILD_AIRSPYHF_SOURCE | ✅ | ✅ | ✅ |
| bladerf_source | Working | libbladeRF | OPT_BUILD_BLADERF_SOURCE | ⛔ | ⚠️ (not Debian Buster) | ✅ |
| file_source | Working | — | OPT_BUILD_FILE_SOURCE | ✅ | ✅ | ✅ |
| hackrf_source | Working | libhackrf | OPT_BUILD_HACKRF_SOURCE | ✅ | ✅ | ✅ |
| limesdr_source | Working | liblimesuite | OPT_BUILD_LIMESDR_SOURCE | ⛔ | ✅ | ✅ |
| sddc_source | Unfinished | — | OPT_BUILD_SDDC_SOURCE | ⛔ | ⛔ | ⛔ |
| rtl_sdr_source | Working | librtlsdr | OPT_BUILD_RTL_SDR_SOURCE | ✅ | ✅ | ✅ |
| rtl_tcp_source | Working | — | OPT_BUILD_RTL_TCP_SOURCE | ✅ | ✅ | ✅ |
| sdrplay_source | Working | SDRplay API | OPT_BUILD_SDRPLAY_SOURCE | ⛔ | ✅ | ✅ |
| soapy_source | Working | soapysdr | OPT_BUILD_SOAPY_SOURCE | ✅ | ✅ | ✅ |
| spyserver_source | Working | — | OPT_BUILD_SPYSERVER_SOURCE | ✅ | ✅ | ✅ |
| plutosdr_source | Working | libiio, libad9361 | OPT_BUILD_PLUTOSDR_SOURCE | ✅ | ✅ | ✅ |
| Name | Stage | Dependencies | Option | Built by default | Built in Release | Enabled in SDR++ by default |
|---|---|---|---|---|---|---|
| audio_sink | Working | rtaudio | OPT_BUILD_AUDIO_SINK | ✅ | ✅ | ✅ |
| network_sink | Working | — | OPT_BUILD_NETWORK_SINK | ✅ | ✅ | ✅ |
| new_portaudio_sink | Beta | portaudio | OPT_BUILD_NEW_PORTAUDIO_SINK | ⛔ | ✅ | ⛔ |
| Name | Stage | Dependencies | Option | Built by default | Built in Release | Enabled in SDR++ by default |
|---|---|---|---|---|---|---|
| falcon9_decoder | Unfinished | ffplay | OPT_BUILD_FALCON9_DECODER | ⛔ | ⛔ | ⛔ |
| m17_decoder | Beta | — | OPT_BUILD_M17_DECODER | ⛔ | ✅ | ⛔ |
| meteor_demodulator | Working | — | OPT_BUILD_METEOR_DEMODULATOR | ✅ | ✅ | ⛔ |
| radio | Working | — | OPT_BUILD_RADIO | ✅ | ✅ | ✅ |
| weather_sat_decoder | Unfinished | — | OPT_BUILD_WEATHER_SAT_DECODER | ⛔ | ⛔ | ⛔ |
| Name | Stage | Dependencies | Option | Built by default | Built in Release | Enabled in SDR++ by default |
|---|---|---|---|---|---|---|
| discord_integration | Working | — | OPT_BUILD_DISCORD_PRESENCE | ✅ | ✅ | ⛔ |
| frequency_manager | Working | — | OPT_BUILD_FREQUENCY_MANAGER | ✅ | ✅ | ✅ |
| recorder | Working | — | OPT_BUILD_RECORDER | ✅ | ✅ | ✅ |
| rigctl_server | Working | — | OPT_BUILD_RIGCTL_SERVER | ✅ | ✅ | ⛔ |
First, please make sure you’re running the latest automated build. If your issue is linked to a bug it is likely that is has already been fixed in later releases
SDR++ crashes then it won’t start again no matter what
This is a bug in 1.0.0 that was fixed in 1.0.1
In some cases, if a crash happened while the config was being saved, the config file woul be corrupted and SDR++ would refuse to start because of it.
This has now been fixed. If a config file is corrupted it’ll just reset it to its default state.
«hash collision» error when starting
You likely installed the soapysdr-module-all package on Ubuntu/Debian. If not it’s still a SoapySDR bug caused by multiple soapy modules coming in conflict. Uninstall anything related to SoapySDR then install soapysdr itself and only the soapy modules you actually need.
«I don’t see -insert module name here-, what’s going on?»
If the module was included in a later update, it’s not enabled in the config. The easiest way to fix this is just to delete the config.json file and let SDR++ recreate it (you will lose your setting relating to the main UI like VFO colors, zoom level and theme). The best option however is to edit the config file to add an instance of the module you wish to have enabled (see the Module List).
SDR++ crashes when stopping a RTL-SDR
This is a bug recently introduced by libusb1.4 To solve, this, simply downgrade to libusb1.3
SDR++ crashes when starting a HackRF
If you also have the SoapySDR module loaded (not necessarily enabled), this is a bug in libhackrf. It’s caused by libhackrf not checking if it’s already initialized. The solution until a fixed libhackrf version is released is to completely remove the soapy_source module from SDR++. To do this, delete modules/soapy_source.dll on windows or /usr/lib/sdrpp/plugins/soapy_source.so on linux.
Issue not listed here?
If you still have an issue, please open an issue about it or ask on the discord. I’ll try to respond as quickly as I can. Please avoid trying to contact me on every platform imaginable thinking I’ll respond faster though.
Источник


