- Fix problems in Windows Search
- Check for updates
- Run the Search and Indexing troubleshooter
- Restart Windows Search or your device
- Reset Windows Search
- Windows 10, version 1809 and earlier
- Windows 10, version 1903 and later
- Help us improve Search in Windows 10
- Search indexing in Windows 10: FAQ
- What is indexing?
- How does indexing make my searches faster?
- What information is indexed?
- Which apps use the index?
- Why does indexing automatically run on my PC at all times?
- Where is the index information stored?
- How much space is used by the index?
- What languages can be indexed?
- Which file types can be indexed?
- Can I change how much of a file’s information is indexed?
- Search Option Перечисление
- Определение
- Примеры
- Комментарии
- Windows 7/8/10 File Search Indexing Options
- Configure Indexing Options in Windows
Fix problems in Windows Search
If Windows Search is unresponsive or the search results don’t appear as expected, try any of the following solutions in this article.
If you’re running Windows 10 May 2019 Update (version 1903) or later versions and Windows can detect a problem, we’ll run the Search troubleshooter automatically. This troubleshooter will reset Windows Search back to the default experience. View your troubleshooter history under Settings > Update & Security > Troubleshoot > View History. Follow the steps below if your issue is still not resolved.
Original product version: В Windows 10 — all editions
Original KB number: В 4520146
Check for updates
Windows 10 lets you choose when and how to get the latest updates to keep your device running smoothly and securely. To manage your options and see any available updates, select the Start button, and then go to Settings > Update & Security > Windows Update > Check for updates. Install any available updates, and then restart your computer if the updates require it.
For more information, see Update Windows 10.
Run the Search and Indexing troubleshooter
Your PC automatically indexes content to deliver faster search results. Learn more about Search indexing in Windows 10.
Use the Windows Search and Indexing troubleshooter to try to fix any problems that may arise. To use the troubleshooter, follow these steps:
- Select Start, then select Settings.
- In Windows Settings, select Update & Security >Troubleshoot. Under Find and fix other problems, select Search and Indexing.
- Run the troubleshooter, and select any problems that apply. Windows will try to detect and solve them.
You can also use a command prompt to open the troubleshooter. Press Windows logo key+R, enter cmd in the Open box, and then select OK. At the command prompt, run the following command:
Restart Windows Search or your device
End the SearchUI process to restart Windows Search by following these steps:
- Press Ctrl+Alt+Delete, and select Task Manager.
- In the Task Manager window, select the Details tab.
- In the Name column, right-click SearchUI.exe, and then select End task.
- When you’re prompted to end SearchUI.exe, select End process.
The Windows Search process will automatically restart the next time that you search.
If this solution doesn’t fix your problem, try restarting your device. Restarting will also install any pending updates.
You may want to bookmark this page before you restart.
Reset Windows Search
Try resetting Windows Search by using the method that’s appropriate for your version of Windows.
To determine which version of Windows your device is running, follow these steps:
Select Start > Settings > System > About.
Under Windows specifications, check which version of Windows your device is running.
Resetting Windows Search does not affect your files. However, it may temporarily affect the relevance of search results.
Windows 10, version 1809 and earlier
If the Windows 10 October 2018 Update or an earlier update is installed, reset Cortana to reset Windows Search by following these steps:
- Select Start, right-click Cortana, select More, and then select App settings.
- In the Cortana settings, select Reset.
Windows 10, version 1903 and later
If the Windows 10 May 2019 Update or a later update is installed, use Windows PowerShell to reset Windows Search by following these steps:
You must have administrator permissions to run this script.
Download the ResetWindowsSearchBox.ps1 script from the Reset Windows Search PowerShell script, and save the file to a local folder.
Right-click the file that you saved, and select Run with PowerShell.
If you’re asked the following question, select Yes.
Do you want to allow this app to make changes to your device?
The PowerShell script resets the Windows Search feature. When the word Done appears, close the PowerShell window.
If you receive the following error message:
Cannot be loaded because running scripts is disabled on this system
enter the following command on the command line of the PowerShell window, and then press Enter:
The current policy appears in the window. For example, you might see Restricted. We recommend that you note this value because you’ll have to use it later.
Enter the following command on the command line of the PowerShell window, and then press Enter:
You’ll receive a warning message that explains the security risks of an execution policy change. Press Y, and then press Enter to accept the change.
To learn more about PowerShell execution policies, see About Execution Policies.
After the policy change is completed, close the window, and then repeat steps 2-4. However, when the Done message appears this time, DON’T close the PowerShell window. Instead, press any key to continue.
Revert to your previous PowerShell execution policy setting. Enter the following command on the command line of the PowerShell window, press the Spacebar, enter the policy value that you noted in step 5, and then press Enter:
For example, if the policy that you noted in step 5 was Restricted, the command would resemble the following one:
You’ll receive a warning message that explains the security risks of an execution policy change. Press Y, and then press Enter to accept the change and revert to your previous policy setting.
Close the PowerShell window.
If your organization has disabled the ability to run scripts, contact your administrator for help.
Help us improve Search in Windows 10
If the previous suggestions don’t fix the problem, let us know by sending feedback in the Feedback Hub. Provide details, such as a description of the problem, screenshots, log files, and any other information that might be helpful. In the Feedback Hub, select the appropriate category and subcategory. In this case, submit your feedback in the Cortana and Search category.
Search indexing in Windows 10: FAQ
Indexing the contents of your PC helps you get faster results when you’re searching it for files and other things. Learn how it works.
What is indexing?
Indexing is the process of looking at files, email messages, and other content on your PC and cataloging their information, such as the words and metadata in them. When you search your PC after indexing, it looks at an index of terms to find results faster.
When you first run indexing, it can take up to a couple hours to complete. After that, indexing will run in the background on your PC as you use it, only re-indexing updated data.
How does indexing make my searches faster?
Much like having an index in a book, having a digital index allows your PC and apps to find content faster by looking for terms or common properties such as the date a file was created. A fully built index can return answers to searches such as «Show all songs by Coldplay» in a fraction of a second, versus the minutes it could take without an index.
What information is indexed?
By default, all the properties of your files are indexed, including file names and full file paths. For files with text, their contents are indexed to allow you to search for words within the files.
Apps you install may also add their own information to the index to speed up searching. For example, Outlook 2016 adds all emails synced to your machine to the index by default and uses the index for searching within the app.
Which apps use the index?
Many of the built-in apps on your PC use the index in some way. File Explorer, Photos, and Groove all use it to access and track changes to your files. Microsoft Edge uses it to provide browser history results in the address bar. Outlook uses it to search your email. Cortana uses it to provide faster search results from across your PC.
Many apps in the Microsoft Store also depend on the index to provide up-to-date search results for your files and other content. Disabling indexing will result in these apps either running slower or not working at all, depending on how heavily they rely on it.
Why does indexing automatically run on my PC at all times?
Your Windows 10 PC is constantly tracking changes to files and updating the index with the latest information. To do this, it opens recently changed files, looks at the changes, and stores the new information in the index.
Where is the index information stored?
All data gathered from indexing is stored locally on your PC. None of it is sent to any other computer or to Microsoft. However, apps you install on your PC may be able to read the data in the index, so be careful with what you install and make sure you trust the source.
How much space is used by the index?
A rule of thumb is that the index will be less than 10 percent of the size of the indexed files. For example, if you have 100 MB of text files, the index for those files will be less than 10 MB.
The index can take up a larger percentage if you have lots of very small files ( Modify.
What languages can be indexed?
All language packs installed with Windows include the information for indexing content in that language. If you have files or other content in a language that isn’t installed on your PC, the index will try to make it searchable, but that isn’t always possible.
To install more language packs to make sure the language is searchable on your PC, go to Settings > Time & Language > Region & language, and then select Add a language .
Which file types can be indexed?
For a list of file types that can be indexed, go to the Indexing Options control panel page and select Advanced > File Types.
Can I change how much of a file’s information is indexed?
Yes. There are two options for how much of a file to index: either properties only, or properties and content. For properties only, indexing will not look at the contents of the file or make the contents searchable. You’ll still be able to search by file name—just not file contents.
Choosing not to index the contents of files can reduce the size of the index, but it makes files harder to find in some cases.
To choose an option for each file type, go to the Indexing Options control panel page and select Advanced > File Types.
Search Option Перечисление
Определение
Указывает, следует ли выполнять поиск в текущем каталоге или в текущем каталоге и всех подкаталогах. Specifies whether to search the current directory, or the current directory and all subdirectories.
Включает текущий каталог и все подкаталоги в операцию поиска. Includes the current directory and all its subdirectories in a search operation. Этот параметр включает в поиск точки повторной обработки, такие как подключенные диски и символические ссылки. This option includes reparse points such as mounted drives and symbolic links in the search.
Включает в операцию поиска только текущий каталог. Includes only the current directory in a search operation.
Примеры
В следующем примере выводится список всех каталогов и файлов, начинающихся с буквы «c», как в «c: \ «. The following example lists all the directories and files that begin with the letter «c», as in «c:\». В этом примере TopDirectoryOnly используется для указания того, что поиск выполняется только в каталоге верхнего уровня. In this example, TopDirectoryOnly is used to specify that only the top-level directory should be searched.
Комментарии
Если вы выбираете AllDirectories в поиске, а структура каталогов содержит ссылку, которая создает цикл, операция поиска переходит в бесконечный цикл. If you choose AllDirectories in your search and the directory structure contains a link that creates a loop, the search operation enters an infinite loop.
Windows 7/8/10 File Search Indexing Options
Much better and more configurable than Vista or XP
The built-in search feature in Windows 7/8/10 is significantly better than the horrible search options in Windows Vista and XP. Instead of installing a third-party program to search for files on inside files on your computer, you can now do it with easily from Windows 7/8/10.
For example, let’s say you’re a programmer or web developer and you want to be able to search your code files like .aspx, .html, .java, .php, etc. With Windows 7, you can configure the search indexer to not only index any file you want, but also to index the file contents.
By default, the Search Indexer in Windows 7/8/10 indexes the most common locations where your files would be stored, i.e. all libraries, everything in your User folder, and e-mail. If this is not enough, you can add or remove index locations easily.
However, to be clear, there are some really good third-party programs that will let you do faster and more advanced searches of text files than Windows ever could.
Configure Indexing Options in Windows
That means you can tell Windows 7/8/10 to index and return results from files and folder on network drives or external hard drives. To get started , click on Start, then type in search into the search box.
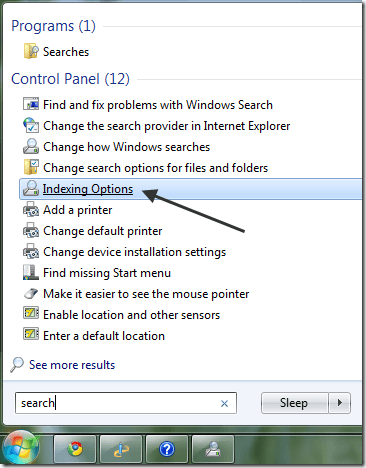
This will bring up the Indexing Options dialog. In Windows 10, you’ll click on Change how Windows searches. At the top, you’ll see the total number of items that have currently been indexed on your computer. Below that, you will see a list of all the locations that have been included for indexing.
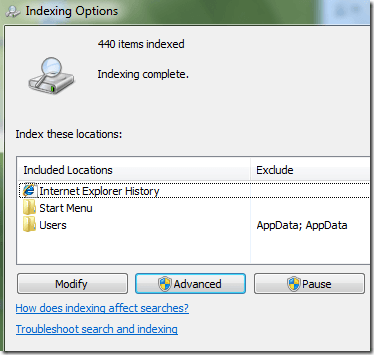
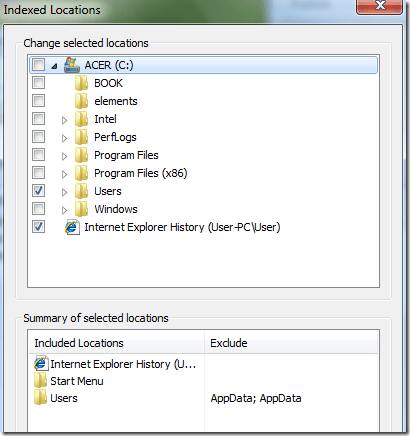
To add a new location to the index, click on the Modify button. Any network drive or external hard drive will show up in the list of possible locations. You can check off any drive or folder that you would like to include in the index.
Depending on how many files and folders are in a location, it could take some time for search indexer to index everything. If you have noticed that certain files are not being indexed by search indexer even though they are included in the search locations, you may have to add the file type.
You can do this by clicking on the Advanced button on the main Indexing Options screen. Then click on the File Types tab.
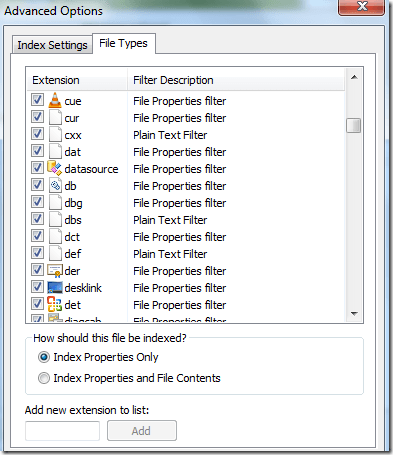
If the file extension is not in the list, go ahead and add it at the bottom. Then select it and choose whether you want to index just the properties or the properties and the file contents. If you know the file contains only text, make sure to select the second radio button.
You can also click on Index Settings to modify some of the settings for the Search Indexer.
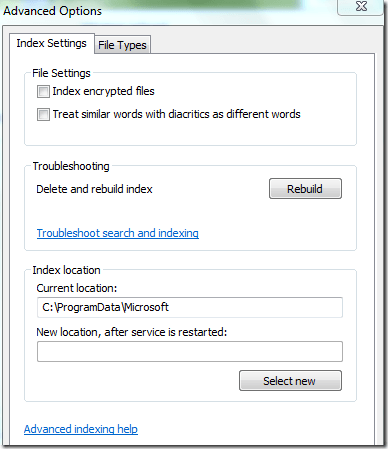
Here you can choose to index encrypted files and other options like treating similar words with diacritics as different words. If you are having problems with Windows search or something has become corrupted, you can rebuild the index by clicking the Rebuild button.
Lastly, you can completely move the search index to another disk or partition. If you have a faster hard drive that the OS is not running on, it might be a good idea to move it so that it performs faster. Similar to how moving the paging file to another disk will make things run faster.
Overall, the new search features in Windows 7/8/10 are greatly enhanced and let you customize most of the search options. Enjoy!
Founder of Help Desk Geek and managing editor. He began blogging in 2007 and quit his job in 2010 to blog full-time. He has over 15 years of industry experience in IT and holds several technical certifications. Read Aseem’s Full Bio


