- Поиск в Linux с помощью команды find
- Общий синтаксис
- Описание опций
- Примеры использования find
- Поиск файла по имени
- Поиск по дате
- По типу
- Поиск по правам доступа
- Поиск файла по содержимому
- С сортировкой по дате модификации
- Лимит на количество выводимых результатов
- Поиск с действием (exec)
- Чистка по расписанию
- Troubleshooting Windows Subsystem for Linux
- Search for any existing issues related to your problem
- Submit a bug report
- Submit a feature request
- Contribute to the docs
- Terminal or Command Line
- Common issues
- I’m on Windows 10 version 1903 and I still do not see options for WSL 2
- Error: 0x1bc when wsl —set-default-version 2
- Cannot access WSL files from Windows
- Can’t start WSL 2 distribution and only see ‘WSL 2’ in output
- command not found when executing windows .exe in linux
- «Error: 0x80370102 The virtual machine could not be started because a required feature is not installed.»
- Bash loses network connectivity once connected to a VPN
- Starting WSL or installing a distribution returns an error code
- Updating Bash on Ubuntu on Windows
- Apt-get upgrade errors
- «Error: 0x80040306» on installation
- «Error: 0x80040154» after Windows update
- Changing the display language
- Installation issues after Windows system restore
- No internet access in WSL
- Permission Denied error when using ping
- Bash is hung
- Check your build number
- Confirm WSL is enabled
- OpenSSH-Server connection issues
- «The referenced assembly could not be found.» when enabling the WSL optional feature
- Correct (SSH related) permission errors
- Running Windows commands fails inside a distribution
- Unable to boot after installing WSL 2
Поиск в Linux с помощью команды find
Утилита find представляет универсальный и функциональный способ для поиска в Linux. Данная статья является шпаргалкой с описанием и примерами ее использования.
Общий синтаксис
— путь к корневому каталогу, откуда начинать поиск. Например, find /home/user — искать в соответствующем каталоге. Для текущего каталога нужно использовать точку «.».
— набор правил, по которым выполнять поиск.
* по умолчанию, поиск рекурсивный. Для поиска в конкретном каталоге можно использовать опцию maxdepth.
Описание опций
| Опция | Описание |
|---|---|
| -name | Поиск по имени. |
| -iname | Регистронезависимый поиск по имени. |
| -type | |
| -size | Размер объекта. Задается в блоках по 512 байт или просто в байтах (с символом «c»). |
| -mtime | Время изменения файла. Указывается в днях. |
| -mmin | Время изменения в минутах. |
| -atime | Время последнего обращения к объекту в днях. |
| -amin | Время последнего обращения в минутах. |
| -ctime | Последнее изменение владельца или прав на объект в днях. |
| -cmin | Последнее изменение владельца или прав в минутах. |
| -user | Поиск по владельцу. |
| -group | По группе. |
| -perm | С определенными правами доступа. |
| -depth | Поиск должен начаться не с корня, а с самого глубоко вложенного каталога. |
| -maxdepth | Максимальная глубина поиска по каталогам. -maxdepth 0 — поиск только в текущем каталоге. По умолчанию, поиск рекурсивный. |
| -prune | Исключение перечисленных каталогов. |
| -mount | Не переходить в другие файловые системы. |
| -regex | По имени с регулярным выражением. |
| -regextype | Тип регулярного выражения. |
| -L или -follow | Показывает содержимое символьных ссылок (симлинк). |
| -empty | Искать пустые каталоги. |
| -delete | Удалить найденное. |
| -ls | Вывод как ls -dgils |
| Показать найденное. | |
| -print0 | Путь к найденным объектам. |
| -exec <> \; | Выполнить команду над найденным. |
| -ok | Выдать запрос перед выполнением -exec. |
Также доступны логические операторы:
| Оператор | Описание |
|---|---|
| -a | Логическое И. Объединяем несколько критериев поиска. |
| -o | Логическое ИЛИ. Позволяем команде find выполнить поиск на основе одного из критериев поиска. |
| -not или ! | Логическое НЕ. Инвертирует критерий поиска. |
Полный набор актуальных опций можно получить командой man find.
Примеры использования find
Поиск файла по имени
1. Простой поиск по имени:
find / -name «file.txt»
* в данном примере будет выполнен поиск файла с именем file.txt по всей файловой системе, начинающейся с корня /.
2. Поиск файла по части имени:
* данной командой будет выполнен поиск всех папок или файлов в корневой директории /, заканчивающихся на .tmp
3. Найти все файлы или папки, которые начинаются на sess_ и заканчиваются на cd
find . -name «sess_*» -a -name «*cd»
* -a: логическое И, -o: логическое ИЛИ.
4. Найти все файлы, кроме .log:
find . ! -name «*.log»
* в данном примере мы воспользовались логическим оператором !.
Поиск по дате
1. Поиск файлов, которые менялись определенное количество дней назад:
find . -type f -mtime +60
* данная команда найдет файлы, которые менялись более 60 дней назад.
2. Поиск файлов с помощью newer. Данная опция доступна с версии 4.3.3 (посмотреть можно командой find —version).
а) дате изменения:
find . -type f -newermt «2019-11-02 00:00»
* покажет все файлы, которые менялись, начиная с 02.11.2019 00:00.
find . -type f -newermt 2019-10-31 ! -newermt 2019-11-02
* найдет все файлы, которые менялись в промежутке между 31.10.2019 и 01.11.2019 (включительно).
б) дате обращения:
find . -type f -newerat 2019-10-08
* все файлы, к которым обращались с 08.10.2019.
find . -type f -newerat 2019-10-01 ! -newerat 2019-11-01
* все файлы, к которым обращались в октябре.
в) дате создания:
find . -type f -newerct 2019-09-07
* все файлы, созданные с 07 сентября 2019 года.
find . -type f -newerct 2019-09-07 ! -newerct «2019-09-09 07:50:00»
* файлы, созданные с 07.09.2019 00:00:00 по 09.09.2019 07:50
По типу
Искать в текущей директории и всех ее подпапках только файлы:
* f — искать только файлы.
Поиск по правам доступа
1. Ищем все справами на чтение и запись:
find / -perm 0666
2. Находим файлы, доступ к которым имеет только владелец:
find / -perm 0600
Поиск файла по содержимому
find / -type f -exec grep -i -H «content» <> \;
* в данном примере выполнен рекурсивный поиск всех файлов в директории / и выведен список тех, в которых содержится строка content.
С сортировкой по дате модификации
find /data -type f -printf ‘%TY-%Tm-%Td %TT %p\n’ | sort -r
* команда найдет все файлы в каталоге /data, добавит к имени дату модификации и отсортирует данные по имени. В итоге получаем, что файлы будут идти в порядке их изменения.
Лимит на количество выводимых результатов
Самый распространенный пример — вывести один файл, который последний раз был модифицирован. Берем пример с сортировкой и добавляем следующее:
find /data -type f -printf ‘%TY-%Tm-%Td %TT %p\n’ | sort -r | head -n 1
Поиск с действием (exec)
1. Найти только файлы, которые начинаются на sess_ и удалить их:
find . -name «sess_*» -type f -print -exec rm <> \;
* -print использовать не обязательно, но он покажет все, что будет удаляться, поэтому данную опцию удобно использовать, когда команда выполняется вручную.
2. Переименовать найденные файлы:
find . -name «sess_*» -type f -exec mv <> new_name \;
find . -name «sess_*» -type f | xargs -I ‘<>‘ mv <> new_name
3. Вывести на экран количество найденных файлов и папок, которые заканчиваются на .tmp:
find . -name «*.tmp» | wc -l
4. Изменить права:
find /home/user/* -type d -exec chmod 2700 <> \;
* в данном примере мы ищем все каталоги (type d) в директории /home/user и ставим для них права 2700.
5. Передать найденные файлы конвееру (pipe):
find /etc -name ‘*.conf’ -follow -type f -exec cat <> \; | grep ‘test’
* в данном примере мы использовали find для поиска строки test в файлах, которые находятся в каталоге /etc, и название которых заканчивается на .conf. Для этого мы передали список найденных файлов команде grep, которая уже и выполнила поиск по содержимому данных файлов.
Чистка по расписанию
Команду find удобно использовать для автоматического удаления устаревших файлов.
Открываем на редактирование задания cron:
0 0 * * * /bin/find /tmp -mtime +14 -exec rm <> \;
* в данном примере мы удаляем все файлы и папки из каталога /tmp, которые старше 14 дней. Задание запускается каждый день в 00:00.
* полный путь к исполняемому файлу find смотрим командой which find — в разных UNIX системах он может располагаться в разных местах.
Troubleshooting Windows Subsystem for Linux
For support with issues related to WSL, please see our WSL product repo on GitHub.
Search for any existing issues related to your problem
For technical issues, use the product repo.
For issues related to the contents of this documentation, use the docs repo.
Submit a bug report
For bugs related to WSL functions or features, file an issue in the product repo: https://github.com/Microsoft/wsl/issues
Submit a feature request
To request a new feature related to WSL functionality or compatibility, file an issue in the product repo.
Contribute to the docs
To contribute to the WSL documentation, submit a pull request in the docs repo: https://github.com/MicrosoftDocs/wsl/issues
Terminal or Command Line
Lastly, if your issue is related to the Windows Terminal, Windows Console, or the command-line UI, use the Windows terminal repo: https://github.com/microsoft/terminal
Common issues
I’m on Windows 10 version 1903 and I still do not see options for WSL 2
This is likely because your machine has not yet taken the backport for WSL 2. The simplest way to resolve this is by going to Windows Settings and clicking ‘Check for Updates’ to install the latest updates on your system. See the full instructions on taking the backport.
If you hit ‘Check for Updates’ and still do not receive the update you can install KB KB4566116 manually.
Error: 0x1bc when wsl —set-default-version 2
This may happen when ‘Display Language’ or ‘System Locale’ setting is not English.
The actual error for 0x1bc is:
For more information, please refer to issue 5749
Cannot access WSL files from Windows
A 9p protocol file server provides the service on the Linux side to allow Windows to access the Linux file system. If you cannot access WSL using \\wsl$ on Windows, it could be because 9P did not start correctly.
To check this, you can check the start up logs using: dmesg |grep 9p , and this will show you any errors. A successfull output looks like the following:
Please see this Github thread for further discussion on this issue.
Can’t start WSL 2 distribution and only see ‘WSL 2’ in output
If your display language is not English, then it is possible you are seeing a truncated version of an error text.
To resolve this issue, please visit https://aka.ms/wsl2kernel and install the kernel manually by following the directions on that doc page.
command not found when executing windows .exe in linux
Users can run Windows executables like notepad.exe directly from Linux. Sometimes, you may hit «command not found» like below:
If there are no win32 paths in your $PATH, interop isn’t going to find the .exe. You can verify it by running echo $PATH in Linux. It’s expected that you will see a win32 path (for example, /mnt/c/Windows) in the output. If you can’t see any Windows paths then most likely your PATH is being overwritten by your Linux shell.
Here is a an example that /etc/profile on Debian contributed to the problem:
The correct way on Debian is to remove above lines. You may also append $PATH during the assignment like below, but this lead to some other problems with WSL and VSCode..
For more information, see issue 5296 and issue 5779.
«Error: 0x80370102 The virtual machine could not be started because a required feature is not installed.»
Please enable the Virtual Machine Platform Windows feature and ensure virtualization is enabled in the BIOS.
If your machine is a VM, please enable nested virtualization manually. Launch powershell with admin, and run:
Please follow guidelines from your PC’s manufacturer on how to enable virtualization. In general, this can involve using the system BIOS to ensure that these features are enabled on your CPU. Instructions for this process can vary from machine to machine, please see this article from Bleeping Computer for an example.
Restart your machine after enabling the Virtual Machine Platform optional component.
Bash loses network connectivity once connected to a VPN
If after connecting to a VPN on Windows, bash loses network connectivity, try this workaround from within bash. This workaround will allow you to manually override the DNS resolution through /etc/resolv.conf .
- Take a note of the DNS server of the VPN from doing ipconfig.exe /all
- Make a copy of the existing resolv.conf sudo cp /etc/resolv.conf /etc/resolv.conf.new
- Unlink the current resolv.conf sudo unlink /etc/resolv.conf
- sudo mv /etc/resolv.conf.new /etc/resolv.conf
- Open /etc/resolv.conf and
a. Delete the first line from the file, which says «# This file was automatically generated by WSL. To stop automatic generation of this file, remove this line.».
b. Add the DNS entry from (1) above as the very first entry in the list of DNS servers.
c. Close the file.
Once you have disconnected the VPN, you will have to revert the changes to /etc/resolv.conf . To do this, do:
- cd /etc
- sudo mv resolv.conf resolv.conf.new
- sudo ln -s ../run/resolvconf/resolv.conf resolv.conf
Starting WSL or installing a distribution returns an error code
Follow these instructions to collect detailed logs and file an issue on our GitHub.
Updating Bash on Ubuntu on Windows
There are two components of Bash on Ubuntu on Windows that can require updating.
The Windows Subsystem for Linux
Upgrading this portion of Bash on Ubuntu on Windows will enable any new fixes outlines in the release notes. Ensure that you are subscribed to the Windows Insider Program and that your build is up to date. For finer grain control including resetting your Ubuntu instance check out the command reference page.
The Ubuntu user binaries
Upgrading this portion of Bash on Ubuntu on Windows will install any updates to the Ubuntu user binaries including applications that you have installed via apt-get. To update run the following commands in Bash:
Apt-get upgrade errors
Some packages use features that we haven’t implemented yet. udev , for example, isn’t supported yet and causes several apt-get upgrade errors.
To fix issues related to udev , follow the following steps:
Write the following to /usr/sbin/policy-rc.d and save your changes.
Add execute permissions to /usr/sbin/policy-rc.d :
Run the following commands:
«Error: 0x80040306» on installation
This has to do with the fact that we do not support legacy console. To turn off legacy console:
- Open cmd.exe
- Right click title bar -> Properties -> Uncheck Use legacy console
- Click OK
«Error: 0x80040154» after Windows update
The Windows Subsystem for Linux feature may be disabled during a Windows update. If this happens the Windows feature must be re-enabled. Instructions for enabling the Windows Subsystem for Linux can be found in the Installation Guide.
Changing the display language
WSL install will try to automatically change the Ubuntu locale to match the locale of your Windows install. If you do not want this behavior you can run this command to change the Ubuntu locale after install completes. You will have to relaunch bash.exe for this change to take effect.
The below example changes to locale to en-US:
Installation issues after Windows system restore
- Delete the %windir%\System32\Tasks\Microsoft\Windows\Windows Subsystem for Linux folder.
Note: Do not do this if your optional feature is fully installed and working. - Enable the WSL optional feature (if not already)
- Reboot
- lxrun /uninstall /full
- Install bash
No internet access in WSL
Some users have reported issues with specific firewall applications blocking internet access in WSL. The firewalls reported are:
- Kaspersky
- AVG
- Avast
- Symantec Endpoint Protection
In some cases turning off the firewall allows for access. In some cases simply having the firewall installed looks to block access.
Permission Denied error when using ping
For Windows Anniversary Update, version 1607, administrator privileges in Windows are required to run ping in WSL. To run ping, run Bash on Ubuntu on Windows as an administrator, or run bash.exe from a CMD/PowerShell prompt with administrator privileges.
For later versions of Windows, Build 14926+, administrator privileges are no longer required.
Bash is hung
If while working with bash, you find that bash is hung (or deadlocked) and not responding to inputs, help us diagnose the issue by collecting and reporting a memory dump. Note that these steps will crash your system. Do not do this if you are not comfortable with that or save your work prior to doing this.
To collect a memory dump
Change the memory dump type to «complete memory dump». While changing the dump type, take a note of your current type.
Use the steps to configure crash using keyboard control.
Repro the hang or deadlock.
Crash the system using the key sequence from (2).
The system will crash and collect the memory dump.
Once the system reboots, report the memory.dmp to secure@microsoft.com. The default location of the dump file is %SystemRoot%\memory.dmp or C:\Windows\memory.dmp if C: is the system drive. In the email, note that the dump is for the WSL or Bash on Windows team.
Restore the memory dump type to the original setting.
Check your build number
To find your PC’s architecture and Windows build number, open
Settings > System > About
Look for the OS Build and System Type fields. 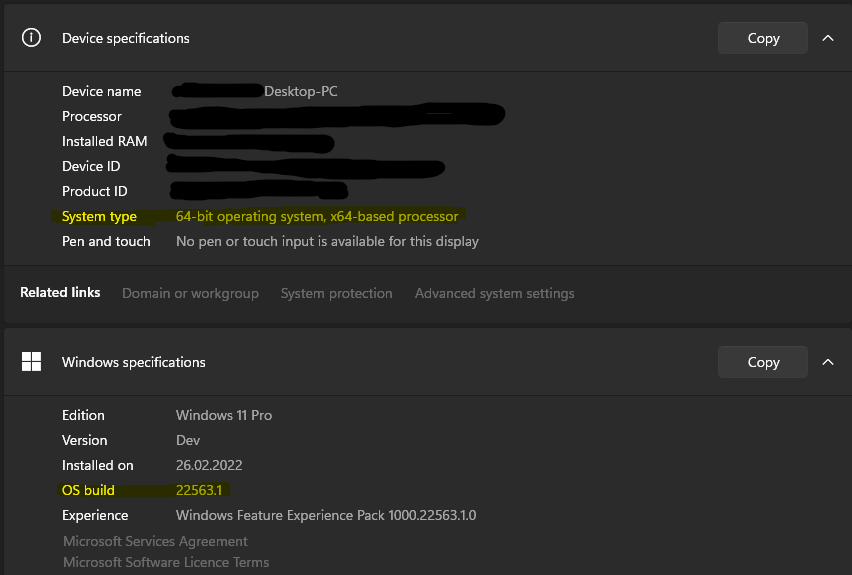
To find your Windows Server build number, run the following in PowerShell:
Confirm WSL is enabled
You can confirm that the Windows Subsystem for Linux is enabled by running the following in PowerShell:
OpenSSH-Server connection issues
Trying to connect your SSH server is failed with the following error: «Connection closed by 127.0.0.1 port 22».
Make sure your OpenSSH Server is running:
Stop the sshd service and start sshd in debug mode:
Check the startup logs and make sure HostKeys are available and you don’t see log messages such as:
If you do see such messages and the keys are missing under /etc/ssh/ , you will have to regenerate the keys or just purge&install openssh-server:
«The referenced assembly could not be found.» when enabling the WSL optional feature
This error is related to being in a bad install state. Please complete the following steps to try and fix this issue:
If you are running the enable WSL feature command from PowerShell, try using the GUI instead by opening the start menu, searching for ‘Turn Windows features on or off’ and then in the list select ‘Windows Subsystem for Linux’ which will install the optional component.
Update your version of Windows by going to Settings, Updates, and clicking ‘Check for Updates’
If both of those fail and you need to access WSL please consider upgrading in place by reinstalling Windows 10 using installation media and selecting ‘Keep Everything’ to ensure your apps and files are preserved. You can find instructions on how to do so at the Reinstall Windows 10 page.
Correct (SSH related) permission errors
If you’re seeing this error:
To fix this, append the following to the the /etc/wsl.conf file:
Please note that adding this command will include metadata and modify the file permissions on the Windows files seen from WSL. Please see the File System Permissions for more information.
Running Windows commands fails inside a distribution
Some distributions available in Microsoft Store are yet not fully compatible to run Windows commands in Terminal out of the box. If you get an error -bash: powershell.exe: command not found running powershell.exe /c start . or any other Windows command, you can resolve it following these steps:
- In your WSL distribution run echo $PATH .
If it does not include: /mnt/c/Windows/system32 something is redefining the standard PATH variable. - Check profile settings with cat /etc/profile .
If it contains assignment of the PATH variable, edit the file to comment out PATH assignment block with a # character. - Check if wsl.conf is present cat /etc/wsl.conf and make sure it does not contain appendWindowsPath=false , otherwise comment it out.
- Restart distribution by typing wsl -t followed by distribution name or run wsl —shutdown either in cmd or PowerShell.
Unable to boot after installing WSL 2
We are aware of an issue affecting users where they are unable to boot after installing WSL 2. While we fully diagnose those issue, users have reported that changing the buffer size or installing the right drivers can help address this. Please view this Github issue to see the latest updates on this issue.


