- Windows 10 Secrets
- View disk usage
- Recover lost space
- Configure Mouse Settings
- Customize the touchpad
- Configure File Explorer
- Configure OneDrive
- Recover from Faults
- Increase your privacy
- 101 Windows 10 Tips, Secret Tricks and Hacks
- Windows 10 Tips, Secret Tricks and Hacks
- 1. Night light
- 2. Opting Custom install instead of Express Install
- 3. Action center
- 4. Remove Old files once you install Windows 10
- 5. Sign Out from User tile menu
- 6. Monitor using Task Manager
- 7. Create a Local Account
- 8. Contact Support
- 9. Activate the Fingerprint Sensor to unlock PC
- 10. Customize Battery Saver
- 11. Tweak Privacy Settings
- 12. Disable Wi-Fi sense in Windows 10
- 13. Make Windows 10 Touch-Friendly
- 14. Snap keyboard Shortcuts
- 15. Stream Media across the Network
- 16. Enable Jump Lists – Windows 10 Tips
- 17. Manage Notifications
- 18. Shake the Title bar to Minimize
- 19. Move Windows between Virtual desktops
- 20. Virtual Desktops Windows 10 tips
Windows 10 Secrets
Top tips you need to know to enable you to work smarter and more efficiently.
View disk usage
Is the disk drive becoming full, leaving very little room for files and apps? If you are not sure then check the amount of space that is used and free using File Explorer.
Recover lost space
If you have a very large disk drive with lots of free space for your photos, music, videos and apps, then you are lucky. Many people struggle for disk space and if you have an old computer that has been upgraded to Windows 10 you might find that there is little disk space left. A new PC with a solid state disk (SSD) also struggles for space because SSDs are often small. Both new and old PCs can struggle to find space for all your apps and media files. So what is the solution?
- Right-click the disk in Explorer and select Properties to see the disk space used.
- Click Disk Clean-up in the previous screenshot and click OK when it finishes scanning.
Cleaning up the disk drive can release several gigabytes of free space and it can make a significant difference to the computer. With an extra few gigabytes you can add more photos, music, documents and apps. Windows provides the means to scan the disk for unnecessary files, junk and temporary files as well as ones that are no longer needed. Right-click a drive in Explorer and select Properties, then use the Disk Clean-up button.
Configure Mouse Settings
The mouse may not be something that you have thought about, but like all components in the computer, it can be customized and the settings can be changed. Click Start and then Settings. Click Devices and then select ‘Mouse & touchpad’ on the left. On the right is an option to set the primary mouse button to left or right. Left handed people might find it more convenient to click with the right button because it is their index finger.
Advanced Mouse Settings
- Double-click speed: Open the Control Panel and click Mouse. Set the double-click speed.
- Pick a pointer: Select the Pointers tab and choose the style from the Scheme list.
- Set pointer options: Set the mouse speed on the Pointer options tab and set trails too.
- Spin the wheel: Set the number of lines to scroll when spinning or tilting the mouse wheel.
Customize the touchpad
If you use a laptop computer, it will have a touchpad or trackpad. There may be left and right buttons below it, or the touchpad itself may be used as a button for clicking. Sometimes the bottom right corner is use to right click. It is also possible to tap with one finger for a left click or two fingers for a right click. Pinch and spread, and swiping up/down or left/right with one, two or three fingers might be used to perform functions too. Go to Start → All apps and click Control Panel. Look for Trackpad, Touchpad, or something similar to access the settings. The options may vary, so choose what suits you.
Find the trackpad settings in the Control Panel for various tap, drag and swipe actions.
Configure File Explorer
Many of the features of Explorer were in Windows 8, but the Windows 10 version has some new features that were not in previous versions of the app and here we take a look at them. Explorer has a search box in the top right corner and it is useful for finding files on the disk. Click in the box, type a word to identify the file and hit Enter. Explorer scans the disk and displays the search results. Explorer is good at finding files when you know the name, but what if you are not sure what it is called? If you know what is in the file, such as a document, you can search within files for words and phrases.
Select the View tab in Explorer, click the Options button and then Change folder and search options. Select the Search tab in the window that is displayed. There is an option to Always search file names and contents. Tick the box. Searches take longer, but are more thorough. If you have zip files, which are compressed archives containing one or more files, there is an option to include them in the search. Tick the box if you need to search within zips.
Use File History
- Control Panel: Open the Control Panel on Start → All apps, and then click File History.
- Turn it on: File History saves backups of files to an external disk for security. Click Turn on.
- Back up files: Click ‘Run now’ to back up files and store a copy on the external disk.
- Set advanced settings: Click Advanced Settings and choose how often to back up files.
Configure OneDrive
OneDrive provides free online storage for your files and it is particularly useful for storing backups of files and photos, and for sharing files across two or more computers. There are some configuration options that can be used to change the way it works. Click the little up arrow at the right side of the taskbar to see a status report. It shows whether the OneDrive folder on the computer is synced with OneDrive online. Right-click the icon and a menu is displayed. Select Manage Storage to open a web browser window that shows how much space you have and how much is free. Select Settings on the menu and a small window opens with several tabs containing configuration settings. These enable you to set performance options, choose whether OneDrive starts with Windows and other options.
Manage OneDrive
- Check OneDrive space: Right-click OneDrive and select Manage storage to see your online space usage.
- Customize OneDrive settings: Right-click OneDrive and click Settings. Save files to the PC or OneDrive.
Check app sizes by going to Settings → System → Storage. Click the disk and then apps.
Recover from Faults
Problems are rare, but if you are really unlucky then a serious one might require the PC to be reset. This solves many problems and it gets the PC working again. Click Start → Settings → Update & Security → Recovery. Click ‘Get started’ under Reset this PC.
There are three ways to reset the PC and the first is ‘Keep my files’. This removes apps and settings, and refreshes Windows with the default settings, but it keeps your files in the Documents, Pictures, Videos and Music folders. You will not lose any files, so this is a safe option to try.
The second option, ‘Remove everything’, completely erases everything — Windows, Settings, your files and so on. It installs a fresh copy of Windows, but you must copy your files to an external disk before starting. The third option, ‘Restore factory settings’, also erases everything and it puts the PC back as it was when you bought it. Back up your files first.
Increase your privacy
There are many privacy settings in Windows 10 and in fact, there are more than in previous versions of the operating system. This gives you greater control over what can be shared and who sees information about you and your computer. The amount of information shared looks scary at first, but there is nothing to be concerned about and if you really don’t want to share anything, there are controls to block everything.
An example is the Privacy options when using Wi-Fi networks. Go to Start → Settings → Network & Internet → Wi-Fi → Advanced options. Use the switch to make your PC discoverable by others or to hide it. The idea is that you can share stuff at home, but hide a laptop when using a public Wi-Fi hotspot. Go to Start → Settings → Network & Internet → Wi-Fi → Manage Wi-Fi settings. There are options to share network login details with your friends and contacts. It is your choice. Clear the tick boxes if you don’t.
Increase Wi-Fi privacy
- Hide your computer: Switch on ‘Find devices and content’ at home, and off in public.
- Shared Wi-Fi: Wi-fi Sense shares login details with others, but can be blocked.
Set privacy options
- Location, location: Some apps can work out your location. Use the switches to block them.
- Who�s watching?: Use these switches to prevent unwanted apps from accessing the webcam.
- Too familiar: Cortana gets to know your voice and writing. Stop it if you prefer.
- Friendly access: Do you want apps to access your contacts? Block them if you don’t.
101 Windows 10 Tips, Secret Tricks and Hacks
101 Windows 10 Tips, Secret Tricks and Hacks with methods and instructions.
Neglecting the negative points, Windows 10 is no doubt an effective mixture of Windows 7 familiarity and Windows 8 functionality. Though it comes with a lot of pre-activated functions still you can trip down or customize certain settings to bring in more magic. Because sticking to and working with an operating system with the same pre-activated features makes it dull and boring. But, knowing secrets about anything makes it better to explore and work with. Just the same way, there are a lot of Windows 10 tips, secret tricks and hacks using which you can easily make your operating system a real superpower.
You can, for example, save your time off doing tricks or hacks or can even streamline your navigation around the system. But only a few users know how interesting it becomes when you turn your system into a customizable gadget. The figures are down because not everywhere you can find a complete list of those to make the actual difference. So here in this article, we are going to tell you almost all the Windows 10 tips, secret tricks and hacks with least hassle involved. So buckle up and enjoy the ride.
Windows 10 Tips, Secret Tricks and Hacks
Here are Windows 10 Tips, Secret Tricks and Hacks –
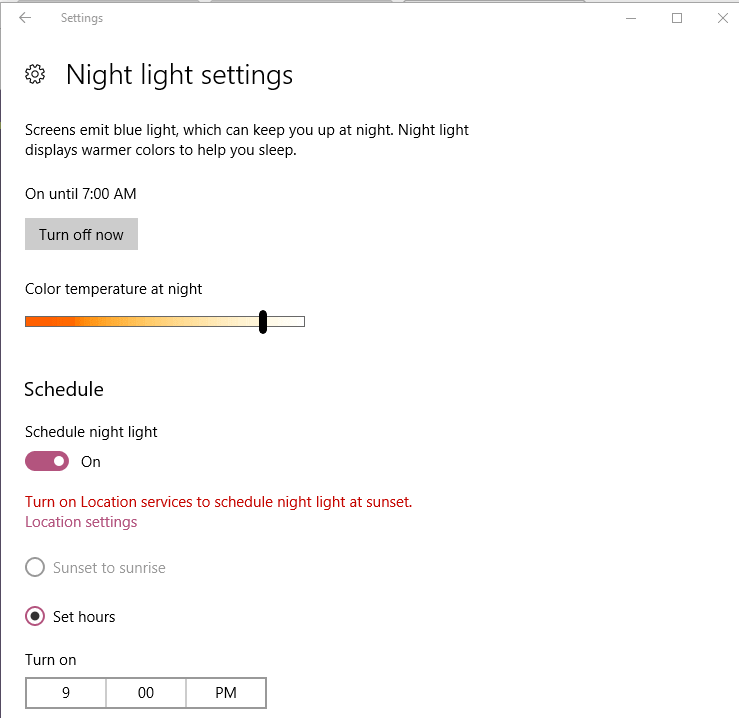
1. Night light
Windows 10 allows you to use Night light to save your eyes from the harmful emission of blue light. In addition you can schedule this feature to automatically enable after sunset.
- Go to Settings => System => Night light settings => Turn on now => Adjust color temperature at night => Schedule.
2. Opting Custom install instead of Express Install
While setting up Windows 10 on a PC, it is always asked if we desire a Custom install or a default Express installation. The default mode for the same is simple and normal. The custom Installation however, lets you install some additional privacy certificates/settings or modify the existing ones more than what default installation allows.
3. Action center
Only a few know this that Windows 10 includes a new action center. This action center tracks notifications from all over the system. So if you want to keep a detailed note about what is actually taking place in your system simply visit the Action center.
Go to the system tray and click the text bubble icon. The panel will come out from the right-hand side of your screen.
4. Remove Old files once you install Windows 10
Even after upgrading to higher Windows version, the old files continue to exist in the drive. You can simply delete them to free a considerable amount of space for the new files. For doing this, navigate to:
“Control panel => System and Security => Administrative Tools => Disk-clean-Up”
and toggle the box named “Previous Windows Installations” in the list.
That’s it, you have successfully assigned a new spot for the upcoming files.
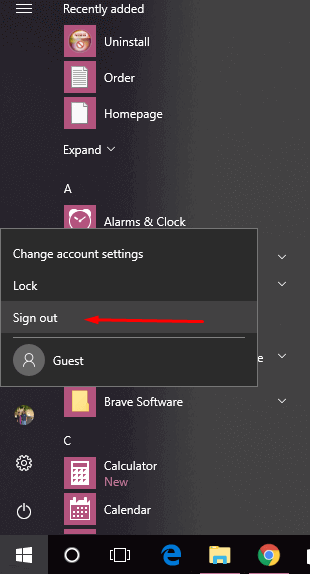
5. Sign Out from User tile menu
The User tile menu holds options like Shutdown and Restart. You can also sign in as another user to the same system using this power menu. Just right click the Start button and then on your name displayed at the top of the Start menu. This will open up a menu with the Sign-out option.
So using this you can easily sign out of Windows 10.
6. Monitor using Task Manager
There is an improved Task Manager present in Windows 10. This manager has a better layout and is a storehouse of useful and digestible information. The stats are represented in the form of graphs which look catchy. So use this Task Manager to monitor those excessive resources on your PC and to end unresponsive programs.

7. Create a Local Account
If you have not an interest in a synchronized account with OneDrive, you can create an offline account in Windows 10. Go to Start => Accounts and select “Sign in with a different account instead” option. Fill in your Microsoft account details there and hit the sign in button to access the Windows version being a local user.
Thus it can be included in Windows 10 tips, secret tricks and hacks.
8. Contact Support
The Contact Support App lets you detect errors and also resolves issues regarding faulty software installations and updates. To use this, simply go to Start and in the “All apps” menu, you’ll see this support app. The app will have answers to all the relevant questions and queries. You, therefore, can read those threads and fix technical issues on your system yourself.
9. Activate the Fingerprint Sensor to unlock PC
Windows 10 consists of a biometric feature also to ensure that security is maintained at its best. This means that you can easily unlock your Windows 10 computer using face detection or fingerprint identification technology. To do this,
Navigate to Start => Settings => Accounts => Sign in to check these biometric features/options. Change these options as per your requirements.
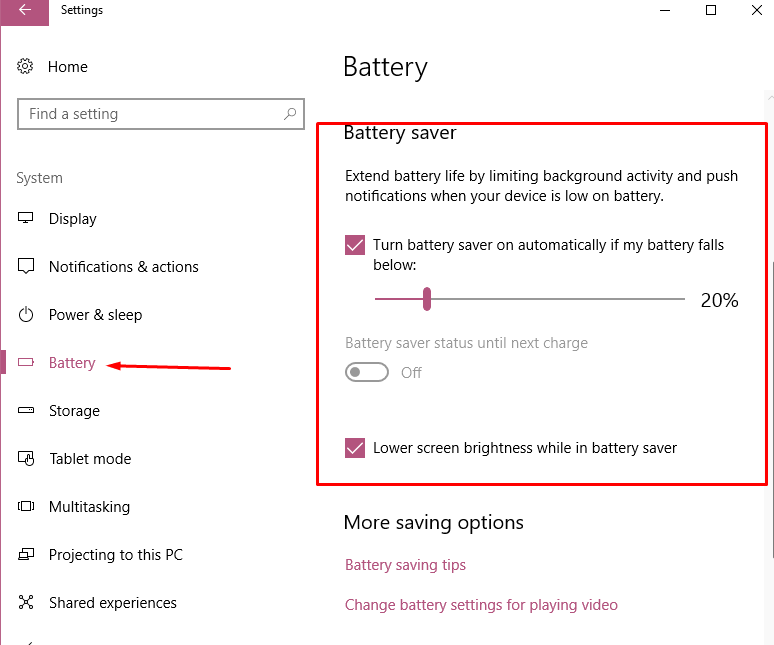
10. Customize Battery Saver
The battery saver ends all the unnecessary tasks running in the background. This enhances the system’s battery back-up. You can enable it from the Start menu as:
Start => Settings => System => Battery Saver. It automatically pops up once the charge goes down to 20%.
11. Tweak Privacy Settings
Windows 10 also facilitates using general and some app-specific privacy options to enhance system’s accessibility towards shared resources (hardware). Using these options, you can take a measure that which app can access system’s hardware like cameras and microphones. Just go to “Start => Settings => Privacy” and then activate to change or to grant access to some specific apps to use the system’s privacy options as their own.
12. Disable Wi-Fi sense in Windows 10
Wi-Fi sense has some security implications which make it not so much useful to stick to. So you can simply disable it permanently to avoid issues. Head to Start => Settings => Network & Internet => Wi-Fi and then Manage Wi-Fi Settings option.
Disable all the options and ask Windows 10 to forget every network you have ever signed to in your lifetime. This will disable the Wi-Fi sense and thus you can start fresh.
13. Make Windows 10 Touch-Friendly
If you have a touch-screen PC, you can enable Windows 10 touch-friendly continuum interface. Through this interface, you can use your PC more like a tablet. So no need to carry the entire weight as the screen is what you want to be with, to do anything.
Just go to Start > Settings > System > Tablet Mode. That’s it.
14. Snap keyboard Shortcuts
You can directly snap your Windows screen with the help of Keyboard shortcuts. Win (key) and Arrow keys are perfectly used to shift Windows to one of the four corners of your screens.
For instance: clicking Win key + left arrow and then Win key + up arrow station the Window in the top-left corner.
This way, keyboard shortcuts save time and efforts both.
15. Stream Media across the Network
You can even stream your favorite media across any network with Windows 10. Simply activating a feature can do this.
Straight away, navigate to the “Control panel => Network & Internet => Network and Sharing Center” and hit Change Advanced Sharing Settings.
Now go to the “All Network Section” and select the “Choose media streaming options” link to turn on media streaming/sharing facility.
16. Enable Jump Lists – Windows 10 Tips
Sometimes you may need to access some important applications/programs faster than ever. Jump lists are formed for the same purpose. To enable these jump lists, simply go to:
Start menu => Settings app => Personalization => and then switch/enable the last option.
This will form jump lists in your Start menu as well as in the taskbar. Now, you can quickly switch the most used apps within real time.
17. Manage Notifications
Customizing the quick-action icons in the Notification center lets you manage all the necessary notifications without any hassle.
For this, navigate to Start => Settings => System and ultimately, Notifications &Actions.
Now, click any of the already available icons in the list to select a completely different icon from the drop-down menu.
This will give you the power to see those notifications only which you opt to.
18. Shake the Title bar to Minimize
Windows 10 allows you easily minimize all the open windows excluding the one you are working at.
Simply press, hold and shake the title bar of the particular window that you require minimizing and that’s it. You can also restore all the minimized windows by repeating the same action.
19. Move Windows between Virtual desktops
In Windows 10, you can even move your windows between two virtual desktops. How?
- Switch to the Task View first.
- Now drag the Window from the current desktop to another desktop where you want to see it actually,
- If you keep just one desktop at the movement, drag the window to the “New Desktop” button to create another desktop location.
- Now leave the window in this newly formed desktop.
20. Virtual Desktops Windows 10 tips
Windows 10 has a feature to enable multiple desktops at once. To deactivate this:
- Click the Task view button first.
- Now click “New Desktop” button number of times equivalent to the no. of desktops you wish to have.
You can now use these desktops in either way you want.


