- Как загрузить и установить Linux на компьютер с UEFI и Secure Boot
- Как работает режим Secure Boot
- Варианты установки Linux
- Как отключить режим Secure Boot
- Загрузка со сменного носителя
- Secure boot linux ��� �����
- What you’ll learn
- What you’ll need
- 2. Understanding FDE and Secure Boot
- Fundamentals of FDE
- Fundamentals of Secure Boot
- Understanding model assertion
- 3. Selecting the image
- Prebuilt images
- Custom images
- 4. Flashing the image
- 5. Wrapping up
- SecureBoot
- What is UEFI Secure Boot NOT?
- MOK — Machine Owner Key
- Generalities
- Generating a new key
- Enrolling your key
Как загрузить и установить Linux на компьютер с UEFI и Secure Boot
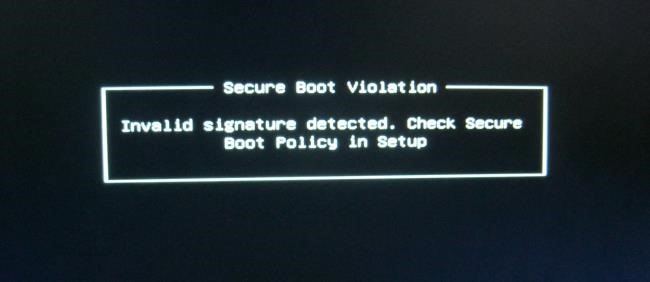
Новые компьютеры с системой Windows поставляются с прошивкой UEFI и с включенной загрузкой Secure Boot. Режим Secure Boot предотвращает загрузку операционных систем, если они не подписаны ключом, загруженным в UEFI; сразу «из коробки» можно загрузить только программное обеспечение, подписанное фирмой Microsoft.
Фирма Microsoft требует, чтобы производители компьютеров позволяли пользователям отключить режим Secure Boot, поэтому вы можете отключить режим Secure Boot или добавить свой собственный ключ для того, чтобы обойти это ограничение. Режим Secure Boot нельзя отключить на устройствах ARM под управлением Windows RT.
Как работает режим Secure Boot
Компьютеры, которые поставляются с системами Windows 8 и Windows 8.1 имеют прошивку UEFI вместо традиционного BIOS. По умолчанию прошивка UEFI машины будет загружать только загрузчики, подписанные ключом, встроенным в прошивку UEFI. Эта особенность известна как «Secure Boot» (безопасная загрузка) или «Trusted Boot» (проверенная загрузка). На традиционных компьютерах без этой функции безопасности, руткит может установить себя и стать загрузчиком boot loader. После этого BIOS компьютера будет загружать руткит в процессе загрузки, во время которой происходит загрузка самого загрузчика и загрузка Windows, скрывая себя от операционной системы и внедряя себя глубоко в систему.
Режим Secure Boot блокирует это — компьютер будет загружать только проверенное программное обеспечение, поэтому вредоносные начальные загрузчики не смогут заразить систему.
На компьютерах Intel x86 (а не на компьютерах ARM) у вас есть возможность управлять режимом Secure Boot. Вы можете выбрать вариант отключения этого режима или даже добавить ключ со своей собственной подписью. Организации могут использовать свои собственные ключи для того, чтобы обеспечить, чтобы могли загружаться только одобренные операционные системы Linux, например
Варианты установки Linux
У вас есть несколько вариантов установки Linux на компьютер с режимом Secure Boot:
- Выберите дистрибутив, в котором поддерживается режим Secure Boot: современные версии Ubuntu, начиная с Ubuntu 12.04.2 LTS и 12.10, будет загружаться и нормально устанавливаться на большинстве ПК с включенным режимом Secure Boot. Это объясняется тем, что загрузчик EFI первоначального этапа загрузки в Ubuntu подписан фирмой Microsoft. Впрочем, один из разработчиков Ubuntu отмечает , что загрузчик в Ubuntu не подписан ключом, который необходим согласно процессу сертификации Microsoft, а просто одним из ключей, о которых говорят, что он «рекомендован» фирмой Microsoft. Это означает, что Ubuntu не обязана загружаться на всех компьютерах с UEFI. Для того, чтобы использовать Ubuntu на некоторых компьютерах, пользователям, возможно, придется отключить режим Secure Boot.
- Отключение режима Secure Boot: Режим Secure Boot можно отключить, что позволит позволить превратить преимущество безопасной загрузки в возможность иметь что-нибудь свое для загрузки компьютера точно также, как это делается на старых компьютерах с традиционным BIOS. Это также потребуется сделать, если вы хотите установить старую версию Windows, которая не разрабатывалась с врозможностью использовать режим Secure Boot, например, Windows 7.
- Добавить в прошивку UEFI подписанный ключ: Некоторые дистрибутивы Linux позволяют подписывать свои загрузчики с помощью их собственного ключа, который вы можете добавить в свою прошивку UEFI. На данный момент, это, кажется, не является обычной практикой.
Вы должны проверить, какой из этих вариантов рекомендуется использовать для вашего дистрибутива Linux. Если вам нужно загрузить старый дистрибутив Linux, в котором нет никакой информации об этом, вы нужно будет просто отключить режим Secure Boot.
На большинстве новых компьютеров у вас должна иметься возможность устанавливать без каких-либо проблем текущие версии Ubuntu — либо релиз LTS, либо последний релиз. Инструкции о том, как загружаться со сменного носителя, смотрите в последнем разделе.
Как отключить режим Secure Boot
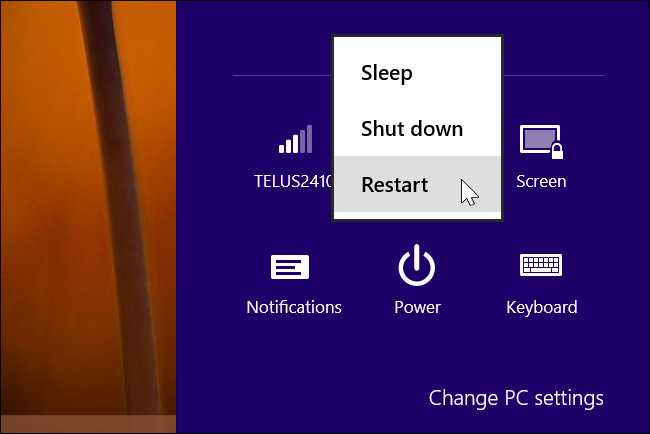
Вы можете управлять режимом Secure Boot из вашего экрана настройки прошивки UEFI — UEFI Firmware Settings. Для доступа к этому экрану, вам нужно будет в Windows 8 получить доступ к меню параметров загрузки. Чтобы сделать это, откройте страницу Settings (Настройки) — чтобы попасть на эту страницу, нажмите клавишу Windows Key + I, затем нажмите кнопку питания, а затем нажмите и удерживайте клавишу Shift и одновременно щелкните мышкой по кнопке Restart (Перезагрузка).
Ваш компьютер будет перезагружен в экран расширенных параметров загрузки. Выберите вариант Troubleshoot (Диагностика), выберите вариант Advanced options (Дополнительные параметры), а затем выберите пункт UEFI Settings (Настройки UEFI). На некоторых компьютерах с системой Windows 8 вы можете не увидеть пункт UEFI Settings, даже если эти компьютеры поставляются с UEFI — в этом случае для того, чтобы получить информацию о том, как добраться до его экрана настроек UEFI, обратитесь к документации разработчика.
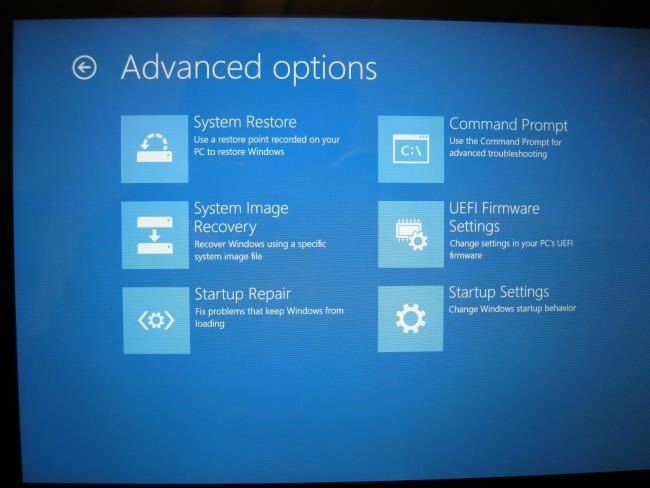
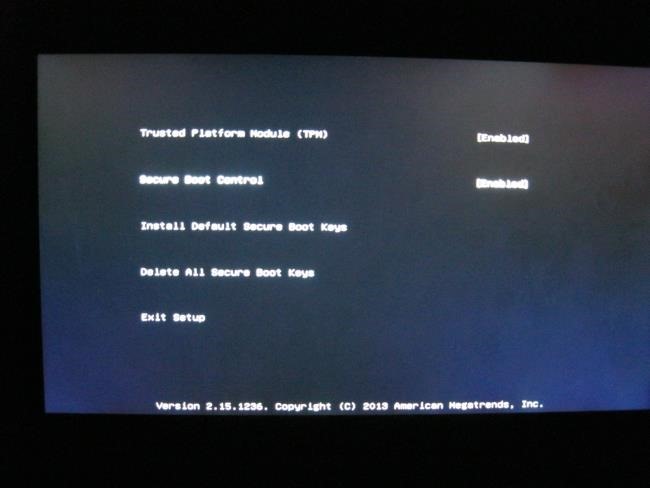
Вы попадете на экран настроек UEFI, где вы можете выбрать отключение режима Secure Boot или добавление своего собственного ключа.
Загрузка со сменного носителя
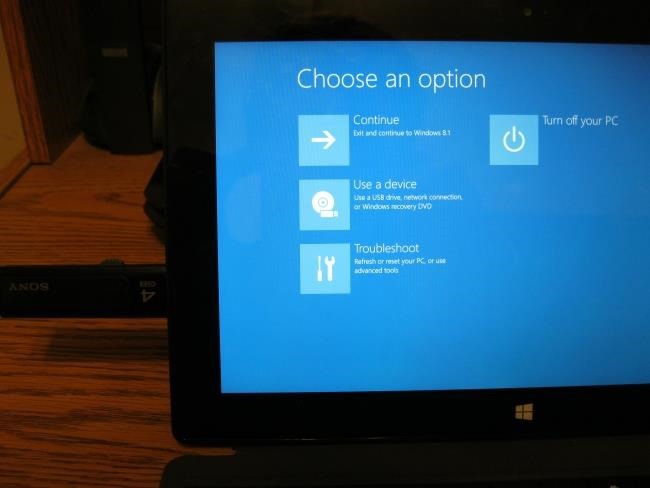
Вы можете загрузиться со сменного носителя при помощи точно такого же доступа к меню параметров загрузки — удерживайте нажатой клавишу Shift и щелкните мышкой по кнопке Restart (Перезагрузка). Подключите загрузочное устройство, выберите вариант Use a device (Использовать устройство), и выберите устройство, с которого необходимо загрузиться.
После загрузки со сменного носителя вы можете установить Linux точно также, как и обычно, или просто можете использовать живую среду сменного носителя (устройство live), не устанавливая его.
Имейте в виду, что режим Secure Boot является полезной функцией безопасности. Вы должны оставить эту возможность включенной в случае, если вам не требуется запускать операционные системы, которые не будут загружаться с включенным режимом Secure Boot.
Источник
Secure boot linux ��� �����
In this tutorial, we will show the simplicity of the process of enabling Full Disk Encryption (FDE) and Secure Boot on Ubuntu Core on platforms with Trusted Platform Module (TPM) support. A quick introduction for understanding the concepts and a simple walk through the process of preparing and flashing an Intel NUC image, will be followed.
FDE and Secure Boot are key security features which have been incorporated into Ubuntu Core 20 release, complementing the out-of-the-box security characteristics already available in previous versions.
Bear in mind, Ubuntu Core is production-friendly, not necessarily developer-friendly. We recommend you use Ubuntu Core for “fire and forget” purposes where you won’t want to iterate on the software.
With Ubuntu Core, you are able to execute remote updates and patches for your appliances and devices, but for development and prototyping, we recommend Ubuntu Server. Let’s start!
What you’ll learn
- Full Disk Encryption and Secure Boot fundamentals
- FDE and Secure Boot enablement
What you’ll need
- An Ubuntu SSO account with an SSH key
- An Intel NUC with BIOS updated to the latest version (update instructions)
- 2 USB 2.0 or 3.0 flash drives (2GB minimum)
- A monitor with an HDMI interface
- A Mini HDMI to HDMI cable
- A USB keyboard and a mouse
- A monitor with VGA or HDMI interface
- A VGA or HDMI cable
- A network connection with Internet access
- An Ubuntu Desktop 20.04.1 LTS image
- An Ubuntu Core image
2. Understanding FDE and Secure Boot
Fundamentals of FDE
Ubuntu Core 20 uses full disk encryption (FDE) whenever the hardware allows, protecting both the confidentiality and integrity of a device’s data when there’s physical access to a device, or after a device has been lost or stolen.
Built-in FDE support requires both UEFI Secure Boot and TPM (Trusted Platform Module) support, but its implementation in Ubuntu Core is generic and widely compatible to help support a range of hardware. TPM-based FDE seals the FDE secret key to the full EFI state, including the kernel command line, which is subsequently unsealed by the initrd code in the secure-boot protected kernel.efi at boot time.
For further reading about FDE, you can find the key aspects here and more extensive documentation can be found here.
Fundamentals of Secure Boot
The boot process can be detrimental to computers, if not secured. This is the case because booting is the initial stage of a computing cycle. Kernel, hardware peripherals, and user space processes are initiated at boot. Therefore, a vulnerability in boot firmware can have cascading effects on the entire system.
Secure Boot is an operation booting mode which denies the execution of any software which is neither signed nor certified, assuring software integrity.
You can read the full Secure Boot story here.
Understanding model assertion
Using FDE and Secure Boot features in Ubuntu Core is as simple as selecting the right image to flash. Ubuntu Core does the rest for you on the booting process.
Although it is possible to build your own Ubuntu Core images, the easiest starting point for any user is to make use of pre-built images. Latest stable images can always be found here.
In either case, each image has an associated model assertion file, a text-based document that contains the fundamental definition of the image for a specific device. It describes what the system image includes and is signed by the brand account owning the device definition.
There are two key fields in the model assertion file related to FDE and Secure Boot:
- grade: It indicates the overall degree of security of the image
- storage-safety: It reflects the preferred mode of filesystem encryption
Grade and Storage-safety are tightly coupled, and their combination along with the platform’s HW TPM support, results in the following operation modes:
- Encrypted: Filesystem gets encrypted on first boot.
- Unencrypted: Filesystem is not encrypted.
- Error output: The image doesn’t boot. An error message is generated.
- Invalid: It’s not possible to generate an image with such combination.
Which are summarized in the following table:

More detailed information on image building and model assertion files can be found in the Ubuntu Core Documentation.
3. Selecting the image
As described in the previous section, using FDE and Secure Boot is just a matter of choosing the right image for your platform.
Prebuilt images
If you are using an standard platform with HW TPM support, such as an Intel NUC, you will probably want to use a prebuilt image, following the steps below:
- Download the latest image from here
- Download also the model assertion file and make sure the right combination of grade and storage-safety is set for your platform according to the previous table
Note: For Intel NUC platforms, the pre-built image enables FDE and Secure Boot by default. This can be checked in the model assertion file [line to the assertion file URL].
Custom images
If you are using your own board or if a custom self-built image is going to be used, it must be ensured that the combination of platform (HW TPM support) + grade + storage-safety, makes it possible to have FDE and Secure Boot support. The steps below must be followed:
- Check that your board has HW TPM support
- Generate a new model assertion file according to this instructions setting the appropriate grade and storage-safety options
- Build your own image as described here
4. Flashing the image
Once you have selected the image, the process of flashing and first configuration of the board does not differ from the standard flashing process. Intel NUC flashing process can be found here.
5. Wrapping up
Full Disk Encryption and Secure Boot are key features of Ubuntu Core. They don’t need to be specifically enabled on a configuration or on-boarding process, they are out-of-the-box features which will be applied if the combination of platform and image model assertion allows it.
In summary, security is no longer an option but a compulsory feature with Ubuntu Core when hardware TPM is available on the platform, making the process as simple as installing the image on the device.
Источник
- SecureBoot
Unified Extensible Firmware Interface. See the main UEFI page for more details.
UEFI Secure Boot (SB) is a verification mechanism for ensuring that code launched by a computer’s UEFI firmware is trusted. It is designed to protect a system against malicious code being loaded and executed early in the boot process, before the operating system has been loaded.
SB works using cryptographic checksums and signatures. Each program that is loaded by the firmware includes a signature and a checksum, and before allowing execution the firmware will verify that the program is trusted by validating the checksum and the signature. When SB is enabled on a system, any attempt to execute an untrusted program will not be allowed. This stops unexpected / unauthorised code from running in the UEFI environment.
Most x86 hardware comes from the factory pre-loaded with Microsoft keys. This means the firmware on these systems will trust binaries that are signed by Microsoft. Most modern systems will ship with SB enabled — they will not run any unsigned code by default, but it is possible to change the firmware configuration to either disable SB or to enrol extra signing keys.
Most of the programs that are expected to run in the UEFI environment are boot loaders, but others exist too. There are also programs to deal with firmware updates before operating system startup (like fwupdate and fwupd), and other utilities may live here too.
Other Linux distros (Red Hat, Fedora, SUSE, Ubuntu, etc.) have had SB working for a while, but Debian was slow in getting this working. This meant that on many new computer systems, users had to first disable SB to be able to install and use Debian. The methods for doing this vary massively from one system to another, making this potentially quite difficult for users.
Starting with Debian version 10 («Buster»), Debian included working UEFI Secure Boot to make things easier.
What is UEFI Secure Boot NOT?
UEFI Secure Boot is not an attempt by Microsoft to lock Linux out of the PC market here; SB is a security measure to protect against malware during early system boot. Microsoft act as a Certification Authority (CA) for SB, and they will sign programs on behalf of other trusted organisations so that their programs will also run. There are certain identification requirements that organisations have to meet here, and code has to be audited for safety. But these are not too difficult to achieve.
SB is also not meant to lock users out of controlling their own systems. Users can enrol extra keys into the system, allowing them to sign programs for their own systems. Many SB-enabled systems also allow users to remove the platform-provided keys altogether, forcing the firmware to only trust user-signed binaries.
shim is a simple software package that is designed to work as a first-stage bootloader on UEFI systems.
It was developed by a group of Linux developers from various distros, working together to make SB work using Free Software. It is a common piece of code that is safe, well-understood and audited so that it can be trusted and signed using platform keys. This means that Microsoft (or other potential firmware CA providers) only have to worry about signing shim, and not all of the other programs that distro vendors might want to support.
Shim then becomes the root of trust for all the other distro-provided UEFI programs. It embeds a further distro-specific CA key that is itself used for signing further programs (e.g. Linux, GRUB, fwupdate). This allows for a clean delegation of trust — the distros are then responsible for signing the rest of their packages. Shim itself should ideally not need to be updated very often, reducing the workload on the central auditing and CA teams.
For extra trust and safety, from version 15 onwards the shim binary build is 100% reproducible — you can rebuild the Debian shim binary yourself to verify that no unexpected changes have been embedded in this key piece of security software.
MOK — Machine Owner Key
Generalities
A key part of the shim design is to allow users to control their own systems. The distro CA key is built in to the shim binary itself, but there is also an extra database of keys that can be managed by the user, the so-called Machine Owner Key (MOK for short).
Keys can be added and removed in the MOK list by the user, entirely separate from the distro CA key. The mokutil utility can be used to help manage the keys here from Linux userland, but changes to the MOK keys may only be confirmed directly from the console at boot time. This removes the risk of userland malware potentially enrolling new keys and therefore bypassing the entire point of SB.
There are more docs online for how to work with MOK, for example:
Generating a new key
Enrolling your key
If you also have a kernel to sign, you may wish to do the next step first as it will save you one reboot.
Источник


