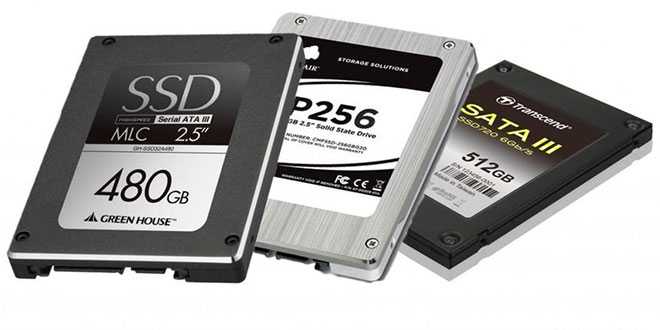
- Как безопасно стереть SSD диск в Windows 10
- Твердотельный жесткий диск в Windows 10. Как безопасно стереть жесткий диск ssd для ноутбука или SSD накопитель в компьютере?
- Как безопасно стереть SSD диск в Windows 10?
- Утилита Secure Erase от производителя SSD
- Примеры утилит безопасного стирания включают Samsung Magician, Intel Solid State Drive Toolbox и Kingston SSD Toolbox.
- Стереть HDD
- Удобные сторонние утилиты
- Окончательный кустарный метод
- 2 Methods to Secure Erase SSD in Windows 10, 8, 7
- When need to secure erase SSD?
- 2 Ways to secure erase SSD drive in Windows PC
- 1. Parted Magic
- 2. AOMEI Partition Assistant Professional
- Summary
- Simple Steps to Securely Erase SSD in Windows 10 without Damaging Its Performance
- Do you need to secure erase SSD?
- Choose a reliable tool to securely erase SSD in Windows 10
- How to securely wipe or erase in Windows 10?
- Wrap up
Как безопасно стереть SSD диск в Windows 10

Твердотельный жесткий диск в Windows 10. Как безопасно стереть
жесткий диск ssd для ноутбука или SSD накопитель в компьютере?
Независимо от того, стираете ли вы твердотельный накопитель SSD диск для перепродажи или удаляете старые данные для нового пользователя, его правильное стирание является обязательным условием. Необходимо убедиться, что ваша конфиденциальная информация не может быть извлечена.
К сожалению, традиционные методы очистки дисков, зарезервированные для жестких дисков, не работают для твердотельных накопителей. Из-за различий в способах хранения данных. Это связано с флэш-памятью NAND, используемой в этих типах жестких дисков.
По сути, использование утилиты «Управление дисками» в Windows для форматирования SSD оставит следы данных. Они могут быть восстановлены и потенциально использованы для злонамеренных целей.
Как безопасно стереть SSD диск в Windows 10?
Как всегда, когда дело доходит до возни с жесткими дисками, пожалуйста, сделайте резервную копию любых данных. Которые вам нужны, прежде чем продолжить. Данные, удаленные с использованием описанных ниже методов, ни при каких обстоятельствах не могут быть восстановлены.
Утилита Secure Erase от производителя SSD

Большинство, если не все, производители SSD предоставляют так называемый набор инструментов. Или утилиту с различными инструментами, специфичными для SSD. Включая функцию безопасного стирания. Безопасное стирание считается наиболее эффективным способом стирания SSD-диска.
Безопасное стирание полностью очищает SSD от любых данных. Возвращает его к заводским настройкам или как «из коробки». Программы восстановления данных не смогут получить данные позже.
Каждый инструментарий работает по-своему. И поэтому мы рекомендуем поискать на веб-сайте производителя вашего жесткого диска не только саму утилиту, но и как выполнить удаление. Во многих случаях инструментарий загружается на сам SSD.
Примеры утилит безопасного стирания включают Samsung Magician, Intel Solid State Drive Toolbox и Kingston SSD Toolbox.
Для справки, давайте возьмем Samsung Magician:
- Загрузите утилиту здесь с сайта Samsung.
- Дважды щелкните исполняемый файл и следуйте инструкциям мастера установки.
- Откройте Samsung Magician и нажмите «Безопасное стирание» в меню. Оно расположено в нижней части окна программы.
- Следуйте инструкциям для запуска утилиты безопасного удаления. В большинстве случаев вам потребуется создать загрузочный USB-накопитель, чтобы утилита работала. Как всегда, помните, что процесс полностью стирает диск, включая Windows 10.
Стереть HDD
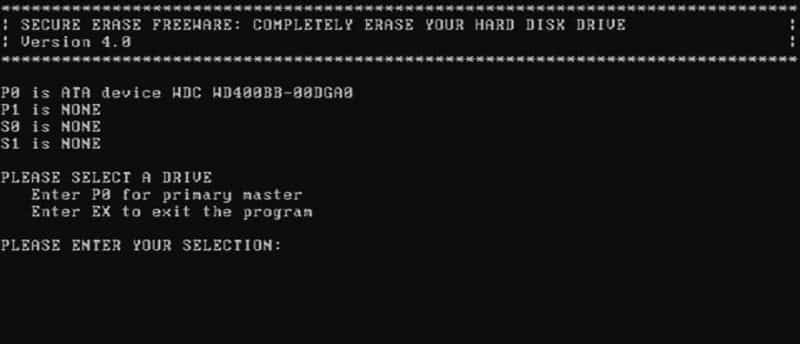
Второй наиболее широко используемый метод — использование непритязательной программы под названием «Очистка жесткого диска». Она в свое время получила благословение АНБ как метод номер один для безопасного стирания дисков. Основные преимущества HDD Erase заключаются:
- он на 100% бесплатен
- работает на всех жестких дисках SSD независимо от производителя.
С другой стороны, HDD Erase работает только в DOS и не так удобен для пользователя, как другие методы в нашем руководстве.
- Скачать HDD Erase здесь .
- Создайте загрузочный диск USB DOS с помощью такой утилиты, как Rufus.
- Скопируйте исполняемый файл Erase HDD на USB-накопитель.
- Перезагрузите компьютер и измените приоритетный порядок загрузки в BIOS системы, чтобы загрузить USB-накопитель.
- Введите » hdderase » в командной строке DOS и нажмите Enter.
- Когда будет предложено продолжить, нажмите «Y» и введите.
- Нажмите любую клавишу для продолжения. После заявления об отказе нажмите «Y», чтобы согласиться.
- Нажмите «Y» еще раз, когда получите предупреждение о питании ПК от розетки, а не от батареи.
- Затем найдите диск, который вы хотите стереть среди списка, и запишите буквы и цифры слева от указанного диска (например, » PO »). Тройная проверка, вы выбираете правильный диск.
- Введите букву и числовое значение и нажмите «Enter».
- Перейдите в меню параметров, введя «Y» и введите.
- Введите «1» и нажмите Enter, чтобы выполнить безопасное стирание.
- Нажмите «Y» и введите еще раз, чтобы запустить процесс безопасного стирания.
- Когда процесс завершится (это может занять от нескольких минут до нескольких часов в зависимости от размера SSD), введите «N» и нажмите «Enter», затем вернитесь в меню параметров и выйдите из программы.
Удобные сторонние утилиты
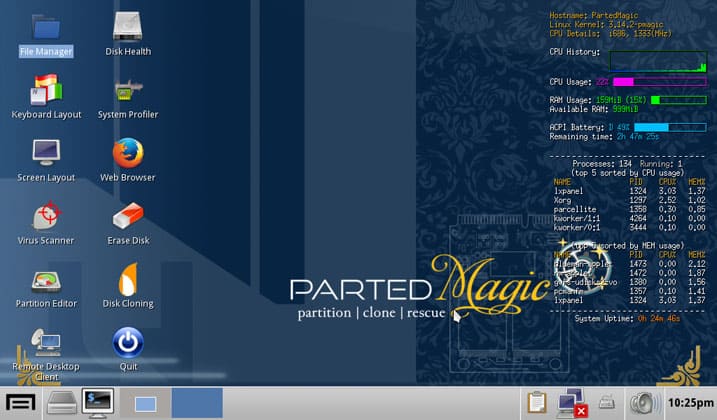
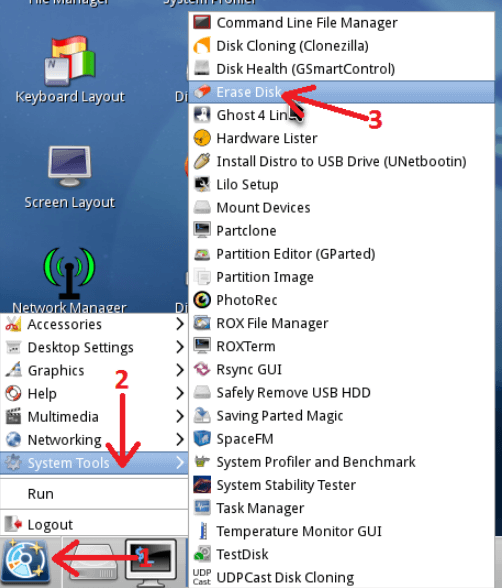
Третий метод включает использование сторонней утилиты, отличной от Erase HDD. Эти программы часто создают удобные для пользователя среды, напоминающие Windows 10, для удобства использования. Примеры включают в себя популярные Parted Magic и Blancco Drive Eraser.
Эти утилиты функционируют почти так же, как и инструментарий производителя. Но, к сожалению, чаще всего к ним прикрепляется ценник. Они, однако, делают процесс намного проще для неопытного пользователя.
Окончательный кустарный метод
SSD действительно удаляет данные только тогда, когда перезаписывает их. Имея это в виду, вы можете вручную стереть конфиденциальную информацию на жестком диске, удалив все данные на диске в проводнике Windows. Заполните медиа-файлами, такими как фильмы или музыка.
После заполнения все старые данные будут уничтожены, что сделает их невосстановимыми. После удалите медиа файлы, и у вас будет чистый SSD. SSD будет пустым. И будут восстановлены только случайные медиа-файлы.
Этот метод работает только для твердотельных накопителей, на которых нет файлов ОС Windows 10.
2 Methods to Secure Erase SSD in Windows 10, 8, 7
With the help of AOMEI Partition Assistant Professional, you can easily secure erase SSD drive from most popular SSD brands. It won’t damage the SSD performance or lifespan while wiping everything on it completely.

By AOMEI  / Last Updated September 15, 2020
When need to secure erase SSD?
Due to the huge difference in internal architecture between a solid-state drive (SSD) and a hard disk drive (HDD), the same method you used to wipe a hard drive cannot be used to erase an SSD. It is reported that regular SSD clean processes will actually leave data behind.
To wipe an SSD may degrade its lifespan and performance if not managed correctly since SSDs have a limited number of writes. To solve all these concerns, a method called Secure Erase was introduced. Secure erase SSD will effectively and securely wipe data from an SSD.
2 Ways to secure erase SSD drive in Windows PC
To securely erase SSD drive completely, there are two tools you can try. One is Parted Magic; another one is the AOMEI Partition Assistant Professional. Look further to get more details about those 2 methods.
1. Parted Magic
Linux-based boot disc Parted Magic is often used to perform ATA Secure Erase for SSDs and HHDs. Secure Erase by Parted Magic will erase your SSD safely or invoke the built-in ATA Secure Erase routine. It supports NTFS, FAT, exFAT, ext3, and ext4, so you can use it under Windows and Linux systems. You can follow the steps below to securely erase an SSD:
Step 1. Download the Parted Magic image and then burn it to a USB disk or CD.
Step 2. Boot your computer from the Parted Magic media. When it is fully loaded, click on the lower-left hard drive icon, click “System Tools”, and then select “Erase Disk”.
Step 3. Click on the button «Internal: Secure Erase command writes zeroes to entire data area» and then click Continue.

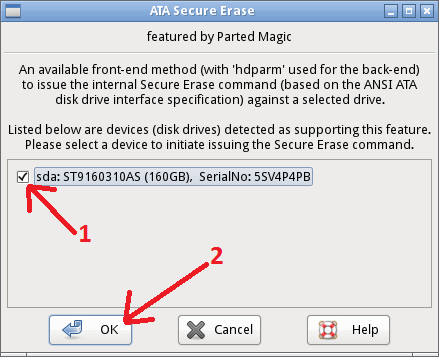
Step 4. choose the SSD that you want to erase and then click the OK.
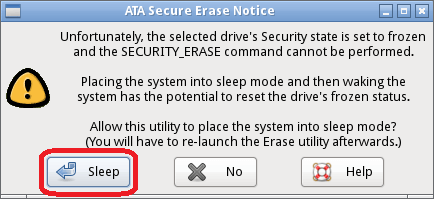
Step 5. If the drive’s security state is set to freeze at boot time in BIOS/EFI, click on the Sleep button to put your computer to sleep. Then wake it up by pressing the power button and repeat Step 2 through Step 4.
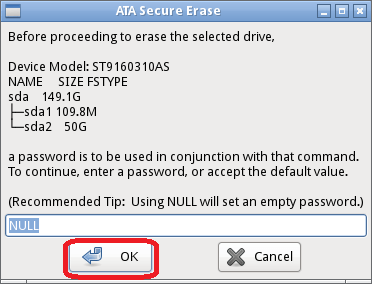
Step 6. Leave the password as default, «NULL», and click OK.
Step 7. Then click “YES” to confirm the operation. If your SSD supports Enhanced Secure Erase, it will ask if you want to use it.
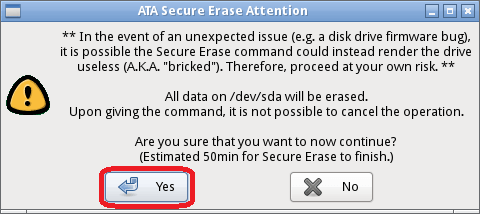
Never disconnect the power or interface cable to the drive before the process of Secure Erase SSD is complete. In this way, all data will be erased and it does not hurt your SSD.
2. AOMEI Partition Assistant Professional
Apart from using the Parted Magic, you can also try the AOMEI Partition Assistant Professional. It is a powerful and reliable disk partition management tool that provides “SSD Secure Erase” feature. You can use it to securely erase any SSDs within Windows 7. If you are using Windows 10 or Windows 8, you need to unplug your SSD and connect it to another computer running Windows 7.
1. Connect your SSD via SATA port to a Windows 7 computer. To ensure the erase process goes smooth, you cannot connect it via USB port. You can download the demo version and have a try.
2. Open AOMEI Partition Assistant, right-click the target SSD and select “SSD Secure Erase”.
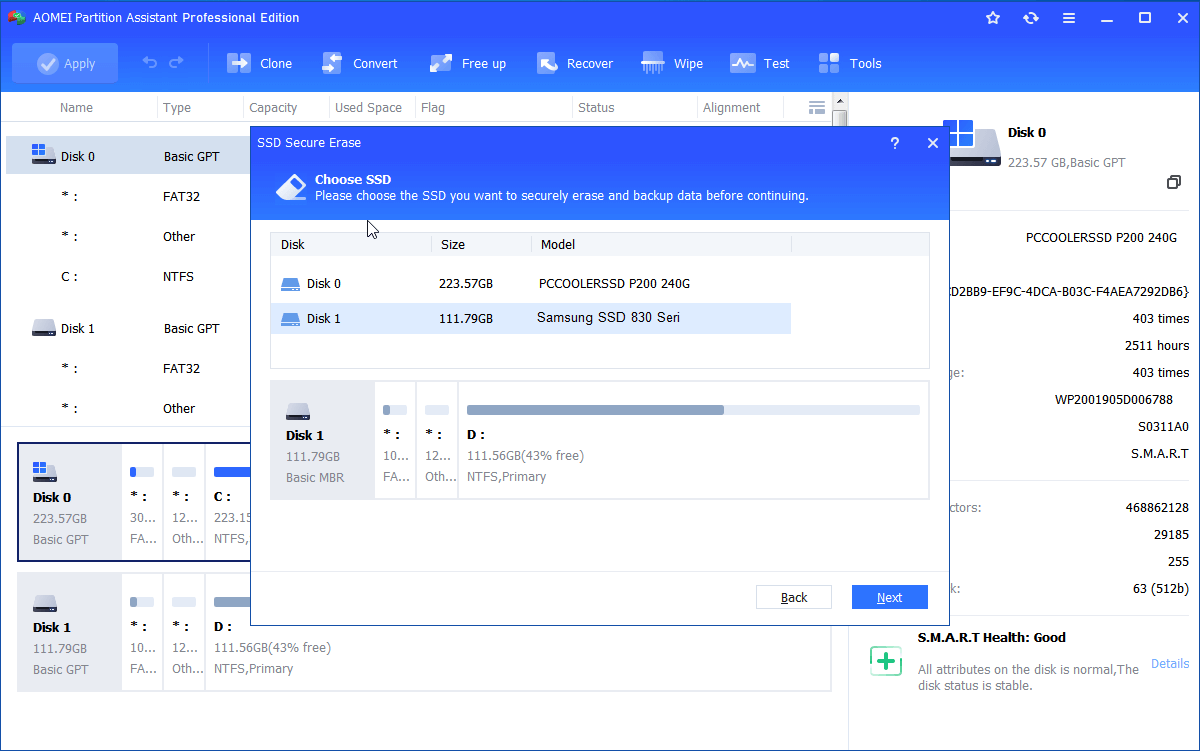
3. Select the SSD that you want to Erase and click Next.
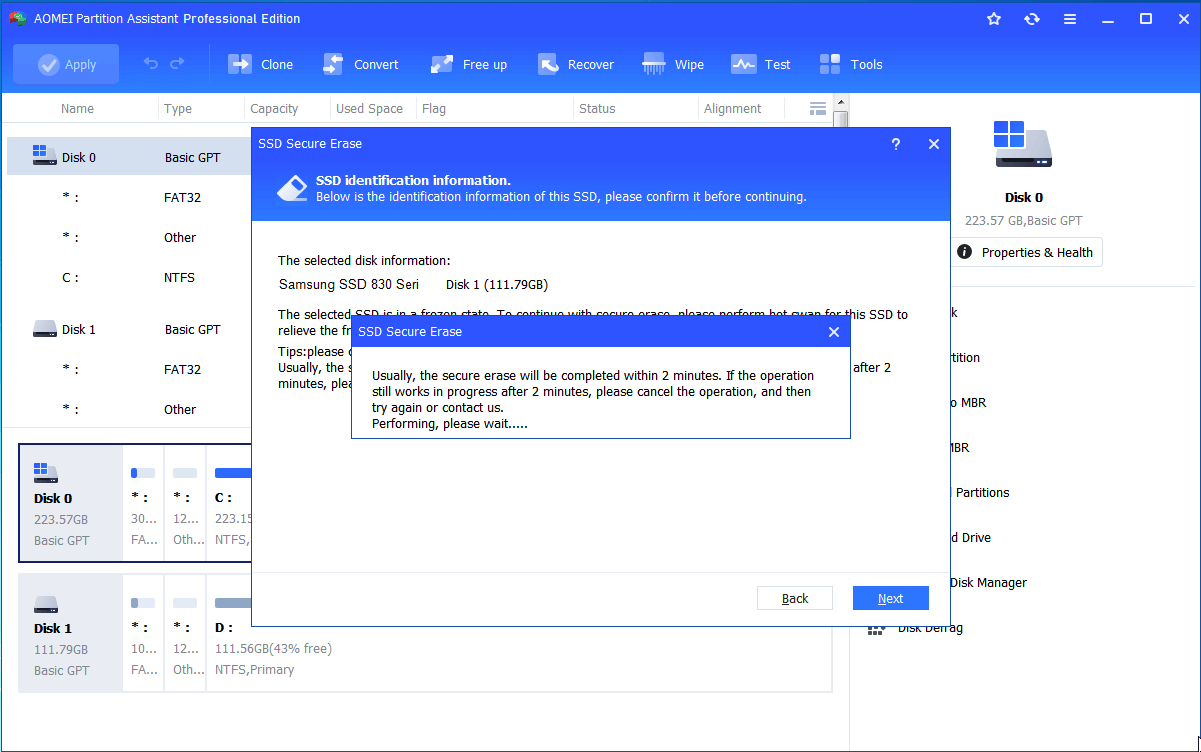
4. Double-check the SSD identification information in case of wiping the wrong SSD. Click Next to continue.
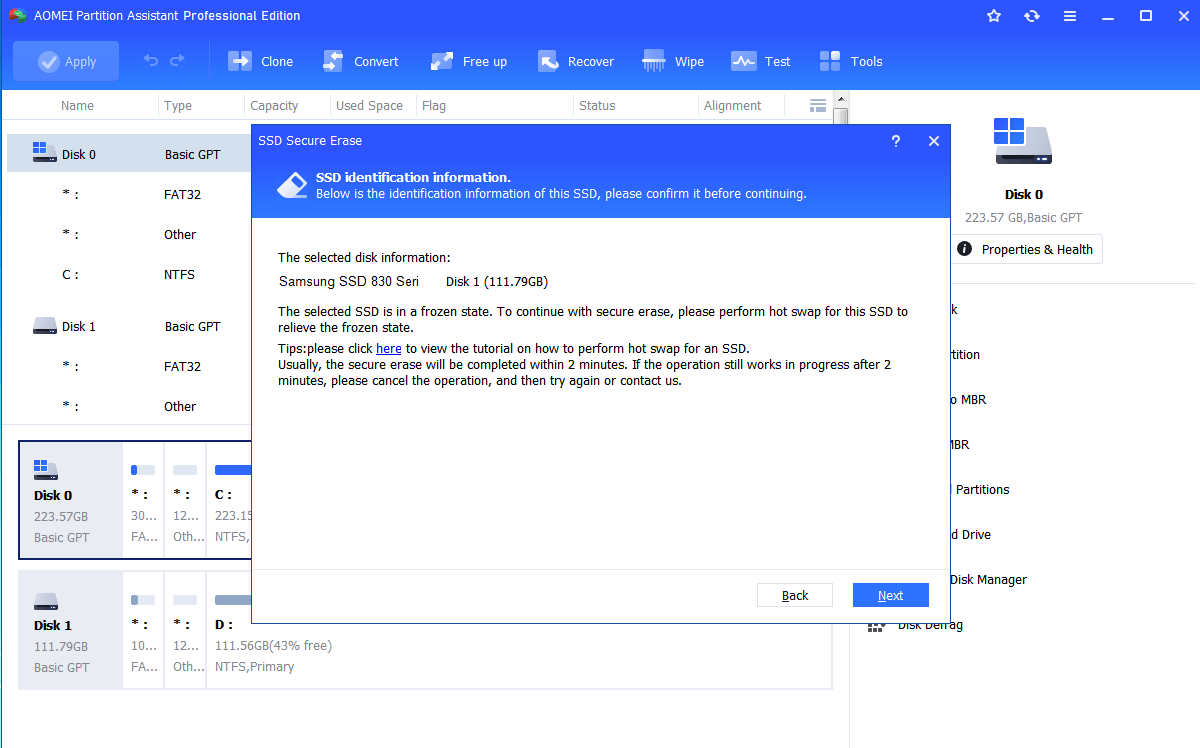
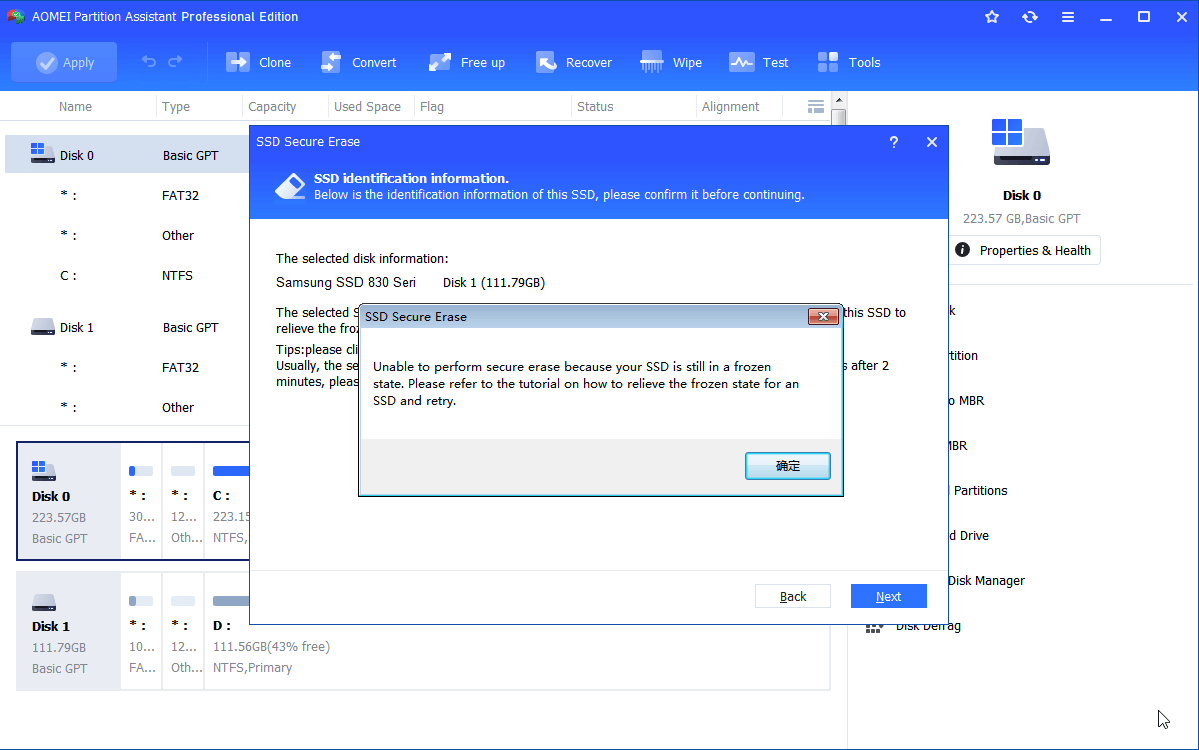
5. In the next screen, you are likely to see the SSD is in Frozen state and it cannot be unlocked. In that case, you can unplug the SATA cable and plug it.
6. After reconnecting your SSD, click OK to start the SSD Secure Erase. And wait for the process to complete.
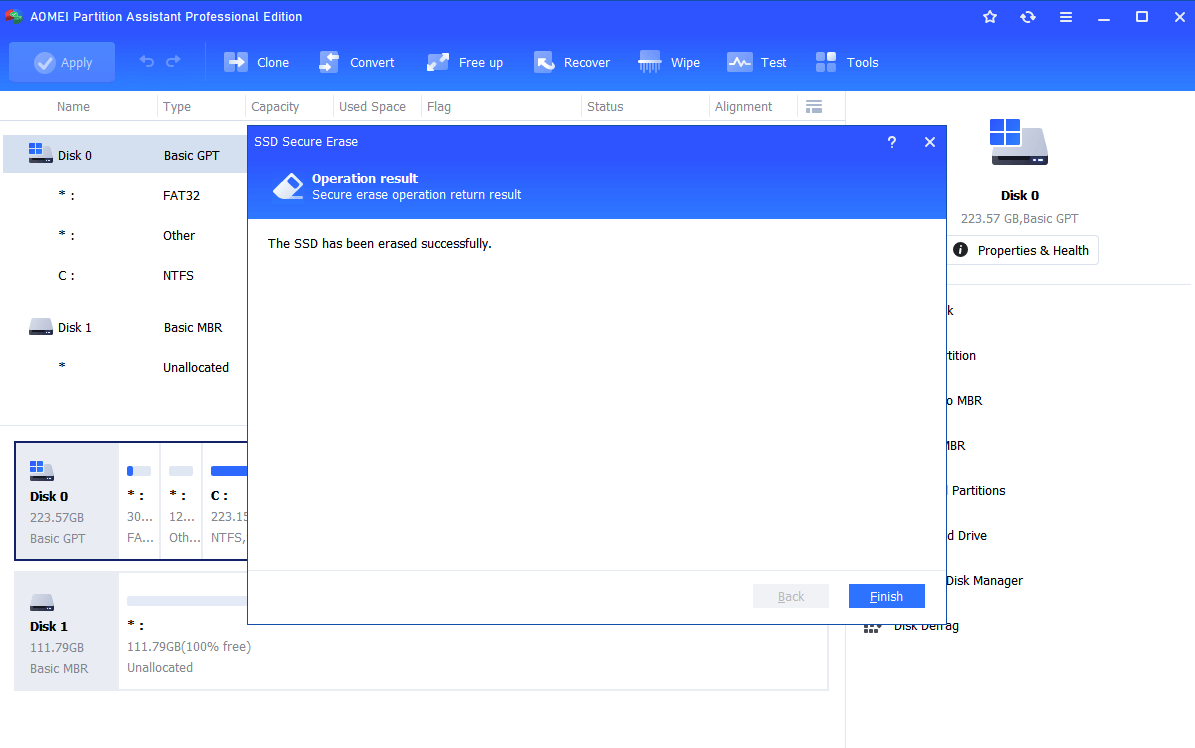
Almost instantly, the Secure Erase process is complete and you will see the SSD shown as a block of unallocated space. Secure Erase can completely wipe all the data clean from your SSD and all the data are not recoverable.
Summary
So, to secure erase SSD drive in Windows 10, 8, 7, you can use Parted Magic or AOMEI Partition Assistant Professional. The latter is specially designed for Windows PC users, allowing you to clone SSD/HDD, clone partition, convert disk between MBR and GPT without deleting partitions, migrate OS to SSD, extend system partition, and more
Simple Steps to Securely Erase SSD in Windows 10 without Damaging Its Performance
This post aims to tell you how to securely erase SSD in Windows 10, 8, 7 without damaging its performance and lifespan. Then you can completely wipe all data on the SSD and protect your privacy.
By AOMEI / Last Updated March 5, 2021
Do you need to secure erase SSD?
Microsoft has well prepared Windows 10 for SSDs. When you install Windows 10 on an SSD drive, you will see a great performance boost. However, after a massive data usage, you may find the SSD performance drops without reason.
If you have not changed other settings that may affect SSD performance, then it is time to do Secure Erase SSD in Windows 10. Secure Erase will wipe everything from your SSD and restore your SSD performance without hurting its lifespan. In addition to, wiping or erasing a solid-state drive is also necessary in the following situations:
Dump or resell the SSD: deleting everything from the SSD drive by securely erasing can prevent others from accessing your personal files.
Eliminate virus and malware on the device: if your SSD drive is infected by a stubborn virus or malware, you can completely remove it by erasing or wiping the drive.
Choose a reliable tool to securely erase SSD in Windows 10
Some of the SSD manufacturers provide a utility for ATA Secure Erase in Windows 10/8/7. Based on the brand of your SSD, you can download Samsung Magician, SanDisk SSD Toolkit, Intel Solid-State Toolbox, or OCZ Toolbox. If you have multiple brands of SSD drives, a universal SSD eraser tool that works on all SSDs is a better choice.
To save your time and energy, here we recommend using AOMEI Partition Assistant Professional. This reliable tool comes with a feature called “SSD Secure Erase” is able to securely erase all types of solid-state drives. At the same, the erasing process will not damage the SSD performance and shorten its lifespan. Apart from erasing SSD drive, it can also wipe HDD with zero filling sectors, random data filling sectors, DoD 5220.22-M, Gutmann methods.
As a versatile hard disk manager, AOMEI Partition Assistant Professional is also widely used to extend NTFS system drive without rebooting computer, migrate OS to SSD with secure boot, convert system disk between MBR and GPT without deleting partitions, clone SSD drive, allocate free space from one partition to another, etc.
How to securely wipe or erase in Windows 10?
In this section, we will show how to securely erase SSD via AOMEI Partition Assistant Professional step by step.
Before proceeding:
1. Back up important files on the SSD you don’t want to lose to cloud or external hard drive because they will be unrecoverable after secure erasing.
2. Connect the target SATA SSD drive to a working Windows 7 computer.
3. Install and launch AOMEI Partition Assistant Professional on Windows 7 computer as well. You can download the Professional Demo version to have a try first.
Then follow the steps to erase an SSD drive and delete everything from it.
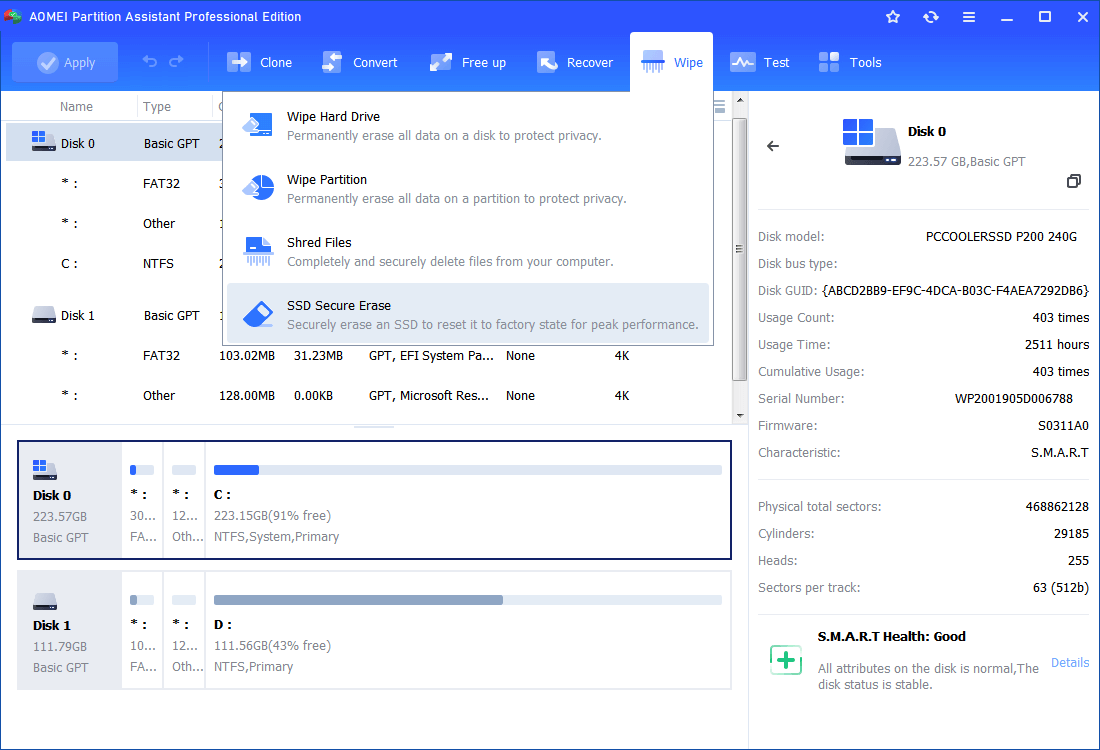
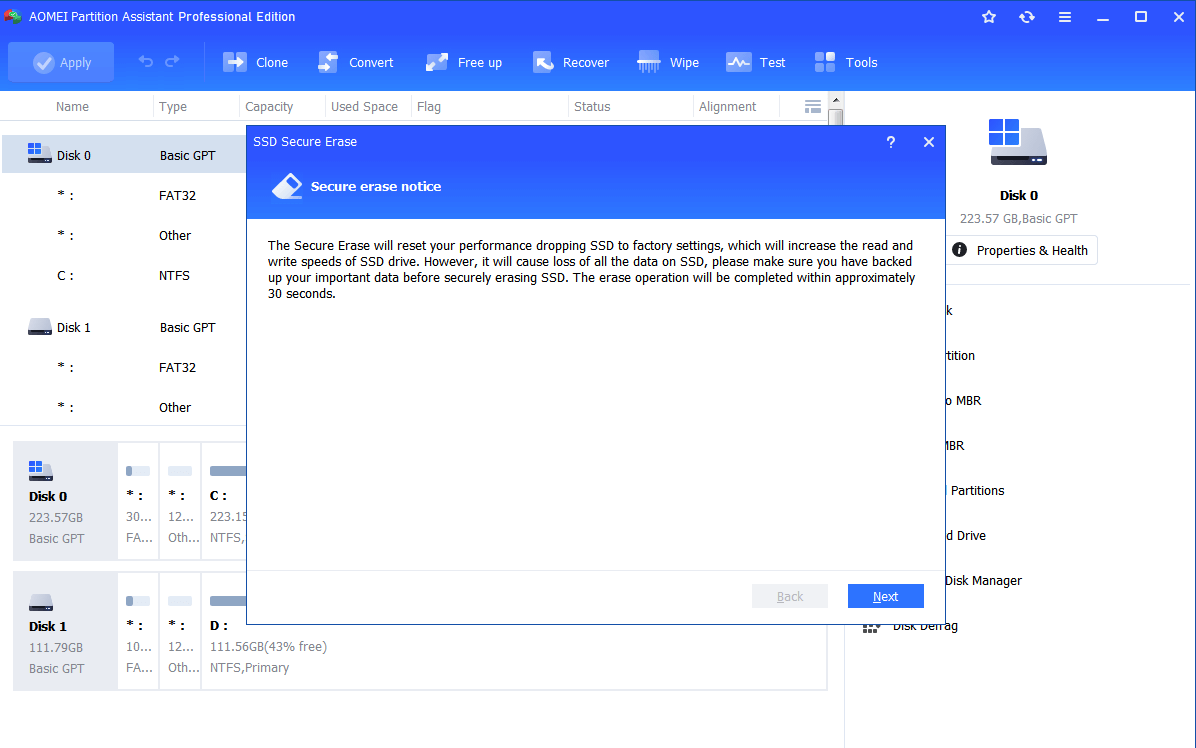
Step 1. Click “SSD Secure Erase” from the given options on the left side. And click “Next” in the pop-out notice window.
Step 2. In this step, choose the SSD drive you need to wipe completely and click “Next”.
Step 3. In this window, you can see the information of the selected disk. To continue, click “Next”.
Step 4. If you meet the error message as shown below, that means your SSD drive is in a frozen state. So you need to relieve the frozen state first.
вњЌSee how to relieve SSD frozen state:
1. Open your computer case. If it is a laptop, open the computer’s rear cover or drive shell.
2. Locate the SSD that needs to be securely erased. And unplug the power cable from the SSD drive.
3. Disconnect the SATA data cable from the SSD.
4. Then reconnect the SATA cable to the SATA port on the SSD.
5. Finally, plug the power cable back into the SSD’s power connector.
Step 5. After the hot-swap, now you can click “Next” again to proceed. And wait for the process to finish.
Step 6. When the SSD has been erased successfully, click “Finish”.
Wrap up
Now, you should know how to securely erase SSD in Windows without damaging its performance and lifespan. After you securely erase SSD, you can also use this software to create partitions before installing Windows. If you want to make such operations on Windows Server 2019/2016/2012/2008/2003, please try AOMEI Partition Assistant Server.


