- About Startup Security Utility
- Open Startup Security Utility
- Set a firmware password
- Change Secure Boot settings
- Full Security
- Medium Security
- No Security
- Security. Built right in.
- More secure hardware means more secure software.
- Apple helps you keep your Mac secure with software updates.
- Safely run apps like never before.
- Protection starts at the core.
- Download apps safely from the Mac App Store. And the internet.
- Your data. Your rules.
- Stay in control of what data apps can access.
- FileVault 2 encrypts your data.
- Safer browsing with Safari.
- Designed to protect your privacy.
- Automatic protections from intruders.
- Вардрайвинг в MAC OS X
- Выбор оборудовния
- Сниффинг в откртых сетях
- Взлом WEP
- Взлом WPA/WPA2
About Startup Security Utility
Use Startup Security Utility to make sure that your Mac always starts up from your designated startup disk, and always from a legitimate, trusted operating system.
If you’re using a Mac with the Apple T2 Security Chip, Startup Security Utility offers three features to help secure your Mac against unauthorized access: Firmware password protection, Secure Boot, and External Boot.

Open Startup Security Utility
- Turn on your Mac, then press and hold Command (⌘)-R immediately after you see the Apple logo. Your Mac starts up from macOS Recovery.
- When you’re asked to select a user you know the password for, select the user, click Next, then enter their administrator password.
- When you see the macOS utilities window, choose Utilities > Startup Security Utility from the menu bar.
- When you’re asked to authenticate, click Enter macOS Password, then choose an administrator account and enter its password.
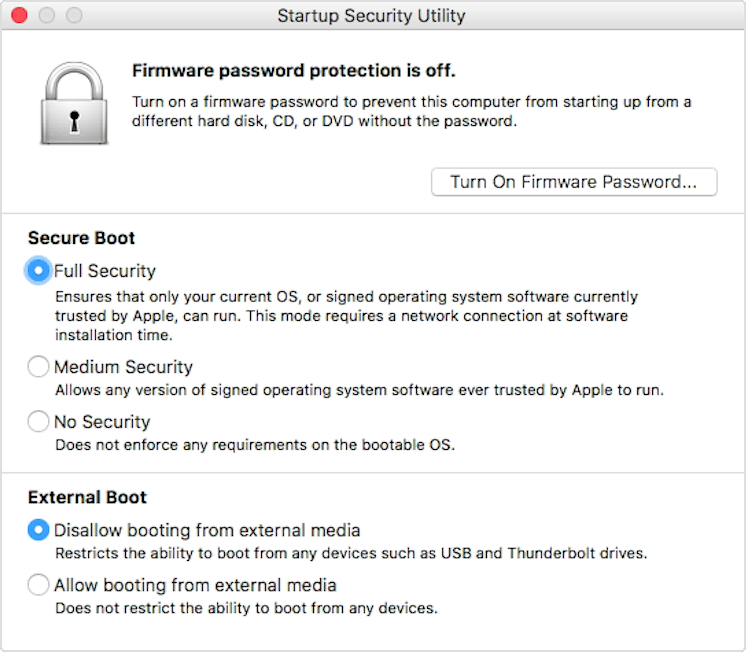
Set a firmware password
You can use a firmware password to prevent anyone who doesn’t have the password from starting up from a disk other than your designated startup disk. To set a firmware password in Startup Security Utility, click Turn On Firmware Password, then follow the onscreen instructions. Learn more about firmware passwords.
You can also change your external boot setting to prevent even those who know the firmware password from starting up from external media.
Change Secure Boot settings
Use these settings to make sure that your Mac always starts up from a legitimate, trusted operating system.
Full Security
Full Security is the default setting, offering the highest level of security. This is a level of security previously available only on iOS devices.
During startup, your Mac verifies the integrity of the operating system (OS) on your startup disk to make sure that it’s legitimate. If the OS is unknown or can’t be verified as legitimate, your Mac connects to Apple to download the updated integrity information it needs to verify the OS. This information is unique to your Mac, and it ensures that your Mac starts up from an OS that is trusted by Apple.
If FileVault is enabled while your Mac is attempting to download updated integrity information, you’re asked to enter a password to unlock the disk. Enter your administrator password, then click Unlock to complete the download.
If the OS doesn’t pass verification:
- macOS: An alert informs you that a software update is required to use this startup disk. Click Update to open the macOS installer, which you can use to reinstall macOS on the startup disk. Or click Startup Disk and choose a different startup disk, which your Mac will also attempt to verify.
- Windows: An alert informs you that you need to install windows with Boot Camp Assistant.
If your Mac can’t connect to the Internet, it displays an alert that an Internet connection is required.
- Check your Internet connection, such as by choosing an active network from Wi-Fi status menu in the menu bar. Then click Try Again.
- Or click Startup Disk and choose a different startup disk.
- Or use Startup Security Utility to lower the security level
Medium Security
During startup when Medium Security is turned on, your Mac verifies the OS on your startup disk only by making sure that it has been properly signed by Apple (macOS) or Microsoft (Windows). This doesn’t require an Internet connection or updated integrity information from Apple, so it doesn’t prevent your Mac from using an OS that is no longer trusted by Apple.
If the OS doesn’t pass verification:
- macOS: An alert informs you that a software update is required to use this startup disk. Click Update to open the macOS installer, which you can use to reinstall macOS on the startup disk. This requires an Internet connection. Or click Startup Disk and choose a different startup disk, which your Mac will also attempt to verify.
- Windows: An alert informs you that you need to install windows with Boot Camp Assistant.
No Security
No Security doesn’t enforce any of the above security requirements for your startup disk.
Источник
Security. Built right in.
We design Mac hardware and software with advanced technologies that work together to run apps more securely, protect your data, and help keep you safe on the web. And with macOS Big Sur available as a free upgrade, it’s easy to get the most secure version of macOS for your Mac.*
More secure
hardware means more secure software.
Apple M1 chip.
A shared architecture for security.
The Apple M1 chip with built-in Secure Enclave brings the same powerful security capabilities of iPhone to Mac — protecting your login password, automatically encrypting your data, and powering file-level encryption so you stay safe. And the Apple M1 chip keeps macOS secure while it’s running, just as iOS has protected iPhone for years.
Apple helps you keep your Mac secure with software updates.
The best way to keep your Mac secure is to run the latest software. When new updates are available, macOS sends you a notification — or you can opt in to have updates installed automatically when your Mac is not in use. macOS checks for new updates every day and starts applying them in the background, so it’s easier and faster than ever to always have the latest and safest version.
Safely run apps like never before.
Protection starts at the core.
The technically sophisticated runtime protections in macOS work at the very core of your Mac to keep your system safe from malware. This starts with state-of-the-art antivirus software built in to block and remove malware. Technologies like XD (execute disable), ASLR (address space layout randomization), and SIP (system integrity protection) make it difficult for malware to do harm, and they ensure that processes with root permission cannot change critical system files.
Download apps safely from the Mac App Store. And the internet.
Now apps from both the App Store and the internet can be installed worry-free. App Review makes sure each app in the App Store is reviewed before it’s accepted. Gatekeeper on your Mac ensures that all apps from the internet have already been checked by Apple for known malicious code — before you run them the first time. If there’s ever a problem with an app, Apple can quickly stop new installations and even block the app from launching again.
Your data. Your rules.
Stay in control of what data apps can access.
Apps need your permission to access files in your Documents, Downloads, and Desktop folders as well as in iCloud Drive and external volumes. And you’ll be prompted before any app can access the camera or mic, capture keyboard activity, or take a photo or video of your screen.
FileVault 2 encrypts your data.
With FileVault 2, your data is safe and secure — even if your Mac falls into the wrong hands. FileVault 2 encrypts the entire drive on your Mac, protecting your data with XTS-AES 128 encryption. Mac computers built on the Apple M1 chip take data protection even further by using dedicated hardware to protect your login password and enabling file-level encryption, which developers can take advantage of — just as on iPhone.
Safer browsing with Safari.
Designed to protect your privacy.
Online privacy isn’t just something you should hope for — it’s something you should expect. That’s why Safari comes with powerful privacy protection technology built in, including Intelligent Tracking Prevention that identifies trackers and helps prevent them from profiling or following you across the web. A new weekly Privacy Report on your start page shows how Safari protects you as you browse over time. Or click the Privacy Report button in your Safari toolbar for an instant snapshot of the cross-site trackers Safari is actively preventing on that web page.
Automatic protections from intruders.
Safari uses iCloud Keychain to securely store your passwords across all your devices. If it ever detects a security concern, Password Monitoring will alert you. Safari also prevents suspicious websites from loading and warns you if they’re detected. And because it runs web pages in separate processes, any harmful code is confined to a single browser tab and can’t crash the whole browser or access your data.
Источник
Вардрайвинг в MAC OS X

Стандартом де-факто в вардрайвинге обычно считается система Linux (модифицированные драйвера, Kismet в связке с aircrack-ng). Но немногие знают, что в маке есть мощные инструменты для взлома аудита безопасности беспроводных сетей, ни чуть не уступающие, а во многом и превосходящие по функционалу Linux-аналоги.
UPD: Описанные в статье инструменты на сегодняшний день устарели. Рекомендуется использовать Linux
Для ознакомления с общими понятиями вардрайвинга рекомендуется почитать эту статью
Kismac — Мощная программа «всё в одном». Большим преимуществом перед линуксом является то, что драйвера wi-fi карт интегрированы сразу в программу и не нужно устанавливать дополнительные модули. Все действия по сканированию сети, сбору и анализу трафика (в линуксе команды airdump, airmon, airplay) выполняются в одном месте из графического интерфейса, что значительно упрощает процесс.

Возможности программы:
- пассивный сканер/сниффер
- инъекция пакетов
- при наличии GPS модуля может отмечать найденные сети на карте
- звуковая индикация мощности сигнала (как металлоискатель)
- запись дампа с сервера kismet drone
В Kismac также есть интструменты для дешифровки WEP/WPA алгоритмов, но авторы программы говорят, что они давно не разрабатываются и рекомендуют использовать последнию версию aircrack-ng, которую можно установить из исходников или с помощью системы портов fink.
Выбор оборудовния
Встроенная в макбук карта «Airport Extreme» не годится для вардрайвинга. Ею невозможно проводить инъекции пакетов, а из-за низкой чувствительности приемника сбор трафика для анализа нужно производить в непосредственной близости от источника сигнала. Единственное, для чего она годится — первичный осмотр сетей: можно узнать тип используемого шифрования, наличие клиентов на точках и т. д.
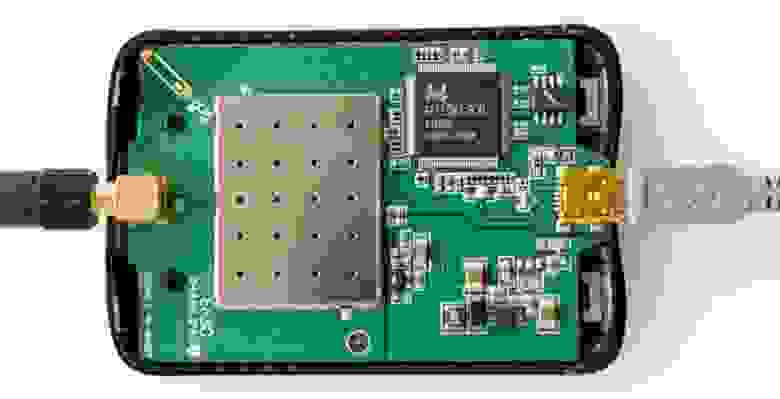
Для более глубокого изучения необходима карта, поддерживающая инъекцию пакетов (см. список устройств). Наиболее оптимальным выбором будет карта Alfa AWUS036H на чипсете RTL8187L. Ее рекомендуют разработчики kismac и aircrack-ng. Поддерживается всеми вардрайверскими программами во всех операционных системах, обладает очень чувствительным приемником. Мощность передачтика 500 милливатт. Оснащена разьемом RP-SMA для подключения внешних антенн.
Китайцы делают эти карты под разными названиями, например G-SKY или IDU-2850UG-8G или Kinmax.
В принципе, можно выбрать любую из поддерживаемых карт, но у этой лучшие характеристики, стоит дешево и легко найти.
Чтобы начать работать, нужно выбрать драйвер для вашего устройства:
KisMac => Preferences… => Driver
Для знакомства с программой и за неимением других карт выбираем Airport Extreme Passive mode.
Channel Hopping — выбираем все европейские каналы 1-11.
Use as primary device — чтобы активировать функцию инъекции пакетов (невозможно в Airport)
Dump Filter — какие данные записывать в дамп-файл, выбираем «Keep everything».
Save Dumps At — путь и название дамп-файла.
Теперь можно начать сканирование. Программа сообщит обо всех найденных сетях. Изменяющееся цифры в нижнем правом углу означают, что устройство находится в режиме Channel Hopping, прыгая по частотам чтобы обнаружить сети работающие на всех каналах. Также необходимо иметь ввиду, что карта прыгает по каналам очень быстро (скорость настраивается при выборе драйвера), поэтому есть вероятность, что некоторые сети могу быть не обнаружены. Чтобы исключить это, можно пройтись по каждому каналу отдельно. Когда вы выбрали интересующую сеть, необходимо остановить Channel hopping и установить канал, на котором работает выбранная сеть.
При двойном клике по выбраной сети будет показана подробная информация.
Слева — техничесская информация, справа — список клиентов подключюенных к точке. Реально подключенные клиенты имеют значение Last Seen.
Важным фактором является уровень сигнала.
Signal — мощность сигнала
AvgSignal — качество сигнала (полезный сигнал с учетом помех)
MaxSignal — максимально зафиксированный уровень сигнала
Для успешных инъекций пакетов сигнал точки и сигнал клиента не должен быть ниже 40-50. Необходимо найти оптимальное положение антенны, при котором сигнал будет максимальным. Иногда изменение положения даже на один сантиметр может существенно повлиять на уровень сигнала. Так же можно включить звуковую индикацию мощности сигнала в меню «Network => Monitor Signal Strenght», в зависимости от уровня сигнала будет меняться тональность звука.
Сниффинг в откртых сетях
В сетях без шифрования весь траффик может быть свободно просмотрен. Для этого достаточно настроить карту на прослушивание частоты, на которой работает сеть (Main channel), и собирать весь трафик в файл. После чего дамп можно просматривать анализатором пакетов.
Вот, например, за соседним столиком в кафе Вася !*SuPeR-ViP*! Пупкин залогинился вконтактик:
В нагруженных сетях дампы наполняются очень быстро, и чтобы ускорить открытие дампа wireshark-ом можно применять фильтры. Например делать выборку только по протколу или IP. Так же можно отключить резолв адресов.
Взлом WEP
Суть состоит в том, чтобы собрать большое количество служебных пакетов, содержащих вектор инициализации (Initial Vector), и из них дешифровать ключ сети. Векторы инициализации передаются для контроля соеднинения точки с клиентом, соответсвенно, атака осуществима только при налии подключений к точке.
Для успешного нахождение ключа необходимо собрать более 70 тысяч пакетов (на практитке достаточно и 20 тысяч). Собрать такое количество, пассивно слушая эфир, не представляется возможным. Для ускорения процесса существует метод инъекции пакетов, чтобы заставить хосты генерировать большое количество IV-пакетов. Для начала инъекции необходимо иметь какое-то количество Initial Vectors, поэтому можно просто подождать или же нагнать трафик флудом авторизации: Network => Authentication Flood (Подобие DoS-атаки. Будьте осторожны с этой опцией, точка доступа может зависнуть). После этого можно начинать инъекции: Network => Reinject Packets.
Если попытка иньекций была удачной, количество нужных нам пакетов (Unique IV’s) начнет резко увеличиваться.
Запустим паралельно дешифровку ключа, используя программу aircrack-ng.
В терминале вводим:
Если не указывать mac-адрес атакуемой точки доступа, программа предложить выбрать из всех точек найденных в дампе. Указать mac-адрес можно опцией -b:
aircrack-ng -b 00:00:00:00:00:00 /path/to_dump.file
Взлом WPA/WPA2
На сегодняшний день алгоритм WPA является достаточно надежным. Единственная возможность взлома — брутфорс (перебор по словарю).
Задача состоит в перехвате «handshake» (рукопожатия) в момент авторизации клиента на точке доступа и последующего перебора паролей по словарю. Для этого нам необходимо либо дождаться момента когда клиент придет логиниться либо попытаться разорвать уже имеющиеся соединения для того чтобы спровоцировать повторное подключение:
Важно поймать обе части рукопожатия: Challenge и «Response. В случаи успеха красная точка Ch/Re станет зеленой.
Часто случается, что удается поймать только ответ точки (Challenge), а ответ маломощного клиента (например мобильного телефона) не удается. В таком случае нужно найти положение антенны, в котором будет максимальным сигнал клиента
Перебор ключа выглядит так:
aircrack-ng -w keys.txt -b 00:00:00:00:00:00 dump.file
где keys.txt — путь к словарю, 00:00:00:00:00:00 — mac-адрес атакуемой точки, dump.file — путь к файлу с хендшейком.
Имея ключ шифрования, можно прослушивать весь трафик проходящий в сети. Для этого используется декриптор дампа:
для WEP шифрования ключ задается опцией -w:
airdecap-ng -w 12345678 /path/to/wep.dump.file
для WPA/WPA2 опцией -e имя_сети -p ключ_сети:
airdecap-ng -e ‘Cool-WiFi’ -p 12345678 /path/to/wpa.dump.file
В результате будет создан дешифрованный дамп-файл который уже можно просматривать анализатором пакетов.
Источник


