- Windows 10 sign-in options and account protection
- Change or manage your password
- Windows Hello
- What data is collected, and why
- To manage Windows Hello
- Using a security key
- Lock your device
- Dynamic lock
- Other sign-in options
- Manage when you’re required to sign in
- To show your account details on the sign-in screen
- To automatically finish setup after an update
- Stay protected with Windows Security
- Important security info
- Understand and customize Windows Security features
- Status icons indicate your level of safety:
- Run a malware scan manually
- Run a quick scan in Windows Security
- Run an advanced scan in Windows Security
- Schedule your own scan
- Schedule a scan
- Turn Microsoft Defender Antivirus real-time protection on or off
- Turn real-time protection off temporarily
- Windows 10: настройки, которые повысят приватность и безопасность вашего ПК
- Безопасность
- Потенциально нежелательные приложения
- Целостность памяти
- Контролируемый доступ к папкам
- Сканирование сети
- Настройки Windows 10, которые повысят вашу конфиденциальность
- Отключите рекламу и отслеживание ваших действий
- Отключить показ рекомендаций в меню «Пуск» и рекламные акции
- Ограничьте диагностику данных
- Управление разрешениями отслеживания местоположения, включения микрофона и камеры
- Отключите опцию временной шкалы в Windows («Журнал действий»)
- Разрешения приложений
Windows 10 sign-in options and account protection
To access your sign-in options, go to Start > Settings > Accounts > Sign-in options. On the Sign-in options page, the following sign-in methods are available:
Windows Hello Face
Windows Hello Fingerprint
Windows Hello PIN
You’ll also find these settings:
Require sign-in—Requires you to sign in to your device after being away.
Dynamic lock—Automatically locks your device when you’re away.
Privacy—Shows or hides personal info on the sign-in screen, and allows your device to use your sign-in info to reopen your apps after an update or restart.
Change or manage your password
To change your password, go to Start > Settings > Accounts > Sign-in options. Select Password, and then select Change.
Note: To change your password if you’re on a domain, press Ctrl+Alt+Del and then select Change a password.
Windows Hello
Windows Hello lets you sign in to your devices, apps, online services, and networks using your face, iris, fingerprint, or a PIN. Even if your Windows 10 device can use Windows Hello biometrics, you don’t have to. If it’s the right choice for you, you can rest assured that the info that identifies your face, iris, or fingerprint never leaves your device. Windows does not stores pictures of your face, iris, or fingerprint on your device or anywhere else.
What data is collected, and why
When you set up Windows Hello biometrics, it takes the data from the face camera, iris sensor, or fingerprint reader and creates a data representation—or graph—that is then encrypted before it’s stored on your device.
To help us keep things working properly, to help detect and prevent fraud, and to continue improving Windows Hello, we collect diagnostic data about how people use Windows Hello. For example, data about whether people sign in with their face, iris, fingerprint, or PIN; the number of times they use it; and whether it works or not is all valuable information that helps us build a better product. The data is pseudonymized, does not include biometric information, and is encrypted before it’s transmitted to Microsoft. You can choose to stop sending diagnostic data to Microsoft at any time. Learn more about diagnostic data in Windows 10
To manage Windows Hello
To turn on Windows Hello, go to Start > Settings > Accounts > Sign-in options, select the Windows Hello method that you want to set up, and then select Set up. If you don’t see Windows Hello in Sign-in options, then it may not be available for your device.
To remove Windows Hello and any associated biometric identification data from the device, go to Start > Settings > Accounts > Sign-in options. Select the Windows Hello method you want to remove, and then select Remove.
Using a security key
A security key is a hardware device that you can use instead of your user name and password to sign in on the web. Since it’s used in addition to a fingerprint or PIN, even if someone has your security key, they won’t be able to sign in without the PIN or fingerprint that you create. Security keys are usually available for purchase from retailers that sell computer accessories. Learn more about security keys
To set up a security key, go to Start > Settings > Accounts > Sign-in options, and select Security Key. Select Manage and follow the instructions.
Lock your device
If you’re stepping away from your device for a few minutes it’s a good idea to lock it so that others can’t see what’s on your screen, or access anything on it. Press the Windows Logo Key + L to immediately lock in. When you return you’ll just need to authenticate and you’ll be right where you left off.
Dynamic lock
Windows can use devices that are paired with your PC to help detect when you’re away, and lock your PC shortly after your paired device is out of Bluetooth range. This makes it more difficult for someone to gain access to your device if you step away from your PC and forget to lock it.
On your Windows 10 PC, select Start > Settings > Accounts > Sign-in options.
Under Dynamic lock, select the Allow Windows to automatically lock your device when you’re away check box.
Use Bluetooth to pair your phone with your PC. Learn how to pair devices using Bluetooth
Once they’re paired, take your phone with you when you walk away, and your PC will automatically lock a minute or so after you’re out of Bluetooth range.
Other sign-in options
Manage when you’re required to sign in
Go to Start > Settings > Accounts > Sign-in options. Under Require sign-in, select an option for when Windows should require you to sign in again.
To show your account details on the sign-in screen
Go to Start > Settings > Accounts > Sign-in options. Under Privacy, turn the first setting On if you want to show your account details on the sign-in screen.
To automatically finish setup after an update
Go to Start > Settings > Accounts > Sign-in options. Under Privacy, turn the second setting On if you want to use your sign-in info to automatically finish setting up your device after an update or restart.
Stay protected with Windows Security
Windows 10 includes Windows Security, which provides the latest antivirus protection. Your device will be actively protected from the moment you start Windows 10. Windows Security continually scans for malware (malicious software), viruses, and security threats. In addition to this real-time protection, updates are downloaded automatically to help keep your device safe and protect it from threats.
Windows 10 in S mode
Some features will be a little different if you’re running Windows 10 in S mode. Because this mode is streamlined for tighter security, the Virus & threat protection area has fewer options. But don’t worry—the built-in security of this mode automatically prevents viruses and other threats from running on your device, and you’ll receive security updates automatically. For more info, see Windows 10 in S mode FAQ.
Important security info
Windows Security is built-in to Windows 10 and includes an antirvirus program called Microsoft Defender Antivirus. (In previous versions of Windows 10, Windows Security is called Windows Defender Security Center).
If you have another antivirus app installed and turned on, Microsoft Defender Antivirus will turn off automatically. If you uninstall the other app, Microsoft Defender Antivirus will turn back on automatically.
If you’re having problems receiving Windows Security updates, see Fix Windows Update errors and the Windows Update FAQ.
For info on how to uninstall an app, see Repair or remove an app in Windows 10.
To change your user account to an admin account, see Create a local user or administrator account in Windows 10.
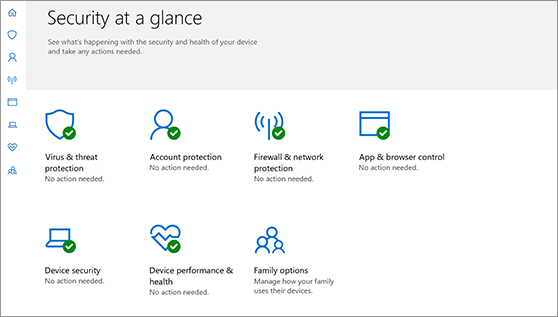
Understand and customize Windows Security features
Windows Security is your home to manage the tools that protect your device and your data:
Virus & threat protection. Monitor threats to your device, run scans, and get updates to help detect the latest threats. (Some of these options are unavailable if you’re running Windows 10 in S mode.)
Account protection. Access sign-in options and account settings, including Windows Hello and dynamic lock.
Firewall & network protection. Manage firewall settings and monitor what’s happening with your networks and internet connections.
App & browser control. Update settings for Microsoft Defender SmartScreen to help protect your device against potentially dangerous apps, files, sites, and downloads. You’ll have exploit protection and you can customize protection settings for your devices.
Device security. Review built-in security options to help protect your device from attacks by malicious software.
Device performance & health. View status info about your device’s performance health, and keep your device clean and up to date with the latest version of Windows 10.
Family options. Keep track of your kids’ online activity and the devices in your household.
You can customize how your device is protected with these Windows Security features. To access them, select Start > Settings > Update & Security > Windows Security . Then select the feature you want to explore.
Open Windows Security settings
Status icons indicate your level of safety:
Green means your device is sufficiently protected and there aren’t any recommended actions.
Yellow means there is a safety recommendation for you.
Red is a warning that something needs your immediate attention.
Run a malware scan manually
When you’re concerned about risks to a specific file or folder, you can right-click the file or folder in File Explorer, then select Scan with Microsoft Defender.
If you suspect there’s malware or a virus on your device, you should immediately run a quick scan. This is much faster than running a full scan on all your files and folders.
Run a quick scan in Windows Security
Select Start > Settings > Update & Security > Windows Security and then Virus & threat protection.
Open Windows Security settings
Under Current threats, select Quick scan (or in previous versions of Windows 10, under Threat history, select Scan now).
If the scan doesn’t find any issues, but you’re still concerned, you may want to check your device more thoroughly.
Run an advanced scan in Windows Security
Select Start > Settings > Update & Security > Windows Security and then Virus & threat protection.
Under Current threats, select Scan options (or in previous versions of Windows 10, under Threat history, select Run a new advanced scan).
Select one of the scan options:
Full scan (check files and programs currently running on your device)
Custom scan (scan specific files or folders)
Microsoft Defender Offline scan (run this scan if your device has been, or could potentially be, infected by a virus or malware). Learn more about Microsoft Defender Offline
Select Scan now.
Note: Because of streamlined security, this process isn’t available if you’re running Windows 10 in S mode.
Schedule your own scan
Even though Windows Security is regularly scanning your device to keep it safe, you can also set when and how often the scans occur.
Schedule a scan
Select the Start button, type schedule tasks in the Search box, and in the list of results, select Task Scheduler.
In the left pane, select the arrow (>) next to Task Scheduler Library to expand it, do the same with Microsoft > Windows, and then scroll down and select the Windows Defender folder.
In the top-center pane, select Windows Defender Scheduled Scan. (Point to the choices to see the full names.)
In the Actions pane on the right, scroll down and then select Properties.
In the window that opens, select the Triggers tab, and then select New.
Set your preferred time and frequency, and then select OK.
Review the schedule and select OK.
Note: Because of streamlined security, this process isn’t available if you’re running Windows 10 in S mode.
Turn Microsoft Defender Antivirus real-time protection on or off
Sometimes you may need to briefly stop running real-time protection. While real-time protection is off, files you open or download won’t be scanned for threats. However, real-time protection will soon turn on automatically again to protect your device.
Turn real-time protection off temporarily
Select Start > Settings > Update & Security > Windows Security and then Virus & threat protection > Manage settings. (In previous versions of Windows 10, select Virus & threat protection > Virus & threat protection settings.)
Open Windows Security settings
Switch the Real-time protection setting to Off and choose Yes to verify.
Note: Because of streamlined security, this process isn’t available if you’re running Windows 10 in S mode.
Windows 10: настройки, которые повысят приватность и безопасность вашего ПК

Продукты от Microsoft не славятся приватностью, и Windows 10 не является исключением и имеет проблемы, связанные с безопасностью и конфиденциальностью пользователей.
Microsoft может отслеживать ваши действия, чтобы улучшить качество своих продуктов и показывать вам персонализированную рекламу.
Если такой расклад вас не устраивает, вам следует внести следующие изменения в параметры своей ОС.
Безопасность
Далее мы расскажем вам о важных параметрах ОС, которые помогут усилить безопасность устройства, работающего на Windows 10.
Потенциально нежелательные приложения
В Windows 10 есть опция, с помощью которой вы можете защитить себя от потенциально нежелательных приложений (англ. PUA). Как и следует из названия, этот параметр дает возможность системе обнаруживать потенциально нежелательные приложения с помощью Защитника Windows (англ. Windows Defender).

Потенциально нежелательные приложения могут создавать проблемы, связанные с работой Windows и других установленных приложений. Более того, они замедляют работу самого устройства. Эти нежелательные приложения нельзя назвать вирусами или вредоносными программами, но существует популярное мнение о том, что они могут изменять настройки веб-браузера, а также выполнять другие действия без разрешения пользователя.
Чтобы активировать защиту от нежелательных приложений в Windows 10, выполните следующие действия:
- Откройте «Настройки».
- Перейдите в раздел «Управление приложениями/браузером» (можно также просто вбить название раздела в «Поиск»).
- Найдите другой раздел под названием «Защита на основе репутации».
Для включения данной опции следует выбрать вариант «Блокировать» .Если вы хотите по-другому настроить этот параметр, следует открыть меню «Настройки защиты на основе репутации».
В нем вы получите доступ к следующим настройкам:
- проверка приложений и файлов;
- SmartScreen для Microsoft Edge;
- SmartScreen для приложений из Microsoft Store.
Целостность памяти
В Windows 10 есть еще одна прекрасная опция под названием «Изоляция ядра», работа которой связана с защитой вашего устройства от вредоносных программ и хакерских атак. Этот параметр изолирует компьютерные процессы от программного и аппаратного обеспечения и дает вам дополнительный уровень защиты во время комплексных атак.
Целостность памяти, которая является частью изоляции ядра, использует аппаратную виртуализацию и Hyper-V для предотвращения попыток внедрения и запуска вредоносных программ в Windows 10.

Чтобы активировать данную опцию, выполните следующие действия:
- Откройте «Настройки».
- Перейдите в раздел «Безопасность Windows».
- Откройте меню «Безопасность устройства».
- В разделе «Изоляция ядра» включите параметр «Целостность памяти».
- Перезагрузите Windows, чтобы изменения вступили в силу.
Контролируемый доступ к папкам
Еще одной интересной функцией безопасности в Windows 10 является «Контролируемый доступ к папкам». Этот параметр дает возможность предотвратить несанкционированный доступ к определенным папкам.
С помощью данной опции вы получаете полный контроль над конфиденциальными папками, чтобы предотвратить вымогательство или любую попытку получения несанкционированного доступа к вашим секретным документам, изображениям и другим файлам.
- Перейдите в раздел «Безопасность Windows».
- Откройте меню «Защита от вирусов и угроз».
- Перейдите в раздел «Защита от программ-шантажистов».
- Найдите параметр «Контролируемый доступ к папкам» и активируйте его.

- Далее найдите параметр «Защищенные папки».

- Укажите здесь все папки, доступ к которым вы хотите ограничить.
Сканирование сети
Сканирование сети как функция входит в полномочия Защитника Windows. С помощью этой опции вы можете просканировать сетевые файлы. Однако по умолчанию эта функция отключена. Пользователю необходимо включить ее вручную с помощью PowerShell.
Чтобы активировать данный параметр, выполните следующие действия:
- Откройте «Поиск» в Windows.
- Найдите PowerShell и запустите программу от имени администратора.
- Введите следующую команду:

- Нажмите на клавишу «Enter», чтобы включить сканирование сетевых файлов.
Выполнив описанные выше действия, вы сможете использовать Защитник Windows для сканирования сетевых файлов. Если вы хотите отключить эту функцию, введите следующую команду в PowerShell:
Настройки Windows 10, которые повысят вашу конфиденциальность
Если вас беспокоит вопрос вашей конфиденциальности и то, как ваши данные используются корпорацией Microsoft, вам следует внести следующие изменения, чтобы повысить свою приватность в Windows 10.
Отключите рекламу и отслеживание ваших действий
Все ориентированные на потребителя версии Windows 10 по умолчанию показывают рекламу своим пользователям. Microsoft создает специальный рекламный идентификатор вашей учетной записи. Он связан с вашей активностью в системе и используется для показа рекомендаций или объявлений.
К счастью, в Windows 10 вы можете отключить показ рекламы, которую вы видите в меню «Пуск» и других приложения от Microsoft.
Чтобы сделать это, выполните следующие действия:
- Откройте «Настройки».
- Перейдите в меню «Параметры конфиденциальности».
- В разделе «Изменить параметры конфиденциальности» отключите следующие опции:
- «Разрешить приложениям использовать идентификатор рекламы, чтобы делать рекламу более интересной для вас на основе ваших действий в приложениях»
- «Разрешить Windows отслеживать запуски приложений для улучшения меню «Пуск» и результатов поиска»
- «Показывать рекомендуемое содержимое в приложении «Параметры»»
Когда вы закончите, ваши настройки должны выглядеть следующим образом:

Отключить показ рекомендаций в меню «Пуск» и рекламные акции
Как уже упоминалось выше, Microsoft использует меню «Пуск» для показа предложений и рекомендаций по скачиванию приложений и служб из Microsoft Store.

Чтобы отключить показ подобных предложений, откройте параметры меню Пуск и выключите опцию «Иногда показывать предложения в меню «Пуск»».
Ограничьте диагностику данных
Windows 10 регулярно собирает диагностические данные о работе аппаратного и программного обеспечения, чтобы улучшить функционирование ОС на вашем устройстве. Сбор данных не может быть полностью отключен, но вы можете взять под контроль, какую информацию корпорация Microsoft собирает о вас, ваших приложениях и ПК.
Чтобы управлять диагностикой данных, перейдите в раздел «Диагностика и отзывы».
Вы увидите два типа диагностических данных: обязательные и необязательные.

Чтобы уменьшить сбор информации о вашем устройстве, выберите первый вариант («обязательные диагностические данные»). Таким образом, компания Microsoft будет записывать и собирать только основную информацию о вашем устройстве, включая установленные параметры, набор функций и общую производительность ОС.
Управление разрешениями отслеживания местоположения, включения микрофона и камеры
В настройках системы вы также можете управлять разрешениями касательно аппаратных функций ПК, таких как отслеживание местоположения, включение или выключение микрофона и камеры. Чтобы в Windows отключить доступ к вашему местоположению, вам нужно открыть «Настройки» и перейти в раздел «Местоположение». Там отключите опцию «Получать доступ к местоположению».
Таким же образом, вы можете открыть страницы с разрешениями на доступ к вашему микрофону и камере и отключить их.
Отключите опцию временной шкалы в Windows («Журнал действий»)
Windows 10 имеет встроенную функцию записи истории действий под названием «Временная шкала». Этот параметр дает вам возможность вернуться назад во времени, чтобы возобновить свою старую деятельность. С помощью него также действия, которые вы осуществляете на своем ПК, в Microsoft Edge и телефоне Android, синхронизируются между собой.
Эта опция собирает данные о вашей активности, что для многих пользователей является слишком большим риском их конфиденциальности. К счастью, есть способ полностью отключить запись истории активности.
Чтобы сделать это, выполните следующие действия:
- Откройте «Настройки».
- Перейдите в раздел «Параметры конфиденциальности».
- Откройте меню «Журнал действий».
- Снимите галочку у параметра «Сохранить мой журнал активности на этом устройстве».

- Отключите свою учетную запись Microsoft в разделе «Показать действия из этих учетных записей».
В конце нажмите на кнопку «Очистить», чтобы удалить историю ваших действий.
Разрешения приложений
Как в Android и в iOS, в Windows 10 есть специальная страница настроек для управления разрешениями приложений.

Чтобы управлять ими, нужно открыть меню «Установленные приложения» и выбрать те приложения, возможности которых вы хотите ограничить.
Подписывайся на Эксплойт в Telegram, чтобы не пропустить новые компьютерные трюки, хитрости смартфонов и секреты безопасности в интернете.


