- Device protection in Windows Security
- Core isolation
- Memory integrity
- Security processor
- Security processor details
- Secure boot
- Hardware security capability
- Your device meets the requirements for standard hardware security
- Your device meets the requirements for enhanced hardware security
- Your device exceeds the requirements for enhanced hardware security ( Note: In Windows 20H2 this message will say «Your device has all Secured-core PC features enabled»)
- Standard hardware security not supported
- Защита с помощью панели «Безопасность Windows»
- Важные сведения о безопасности
- Знакомство с функциями «Безопасности Windows» и их настройка
- Значки состояния обозначают уровень безопасности:
- Запуск проверки наличия вредоносных программ вручную
- Запуск быстрой проверки в системе «Безопасность Windows»
- Запуск расширенной проверки в «Безопасности Windows»
- Создание собственного расписания проверок
- Планирование сканирования
- Включение и отключение защиты, обеспечиваемой антивирусной программой в Microsoft Defender в режиме реального времени
- Временное отключение защиты в режиме реальном времени
- Virus & threat protection in Windows Security
- Run the scans you want
- Manage your Virus & threat protection settings
- Manage your real-time protection
- Get access to cloud-delivered protection
- Send us files with automatic sample submission
- Tamper Protection defends your security settings
- Protect files from unauthorized access
- Exclude items from virus scans
- Curate your notifications
- Protect your device with the latest updates
Device protection in Windows Security
Windows Security provides the following built-in security options to help protect your device from malicious software attacks.
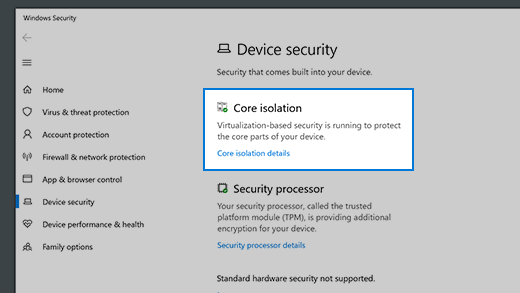
To access the features described below, in the search box on the taskbar, type windows security, select it from the results, and then select Device security.
Notes: What you actually see on the Device security page may vary depending upon what your hardware supports.
For more info about Windows Security, see Stay protected with Windows Security.
For more info about Microsoft Defender Firewall, see Turn Microsoft Defender Firewall on or off.
Core isolation
Core isolation provides added protection against malware and other attacks by isolating computer processes from your operating system and device. Select Core isolation details to enable, disable, and change the settings for core isolation features.
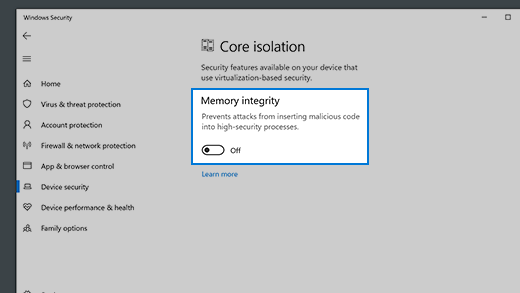
Memory integrity
Memory integrity is a feature of core isolation. By turning on the Memory integrity setting, you can help prevent malicious code from accessing high-security processes in the event of an attack.
Security processor
Your security processor provides additional encryption for your device.
Security processor details

This is where you’ll find info about the security processor manufacturer and version numbers, as well as about the security processor’s status. Select Security processor details for additional info and options.
Note: If you don’t see a Security processor entry on this screen then it’s likely that your device doesn’t have the TPM (Trusted Platform Module) hardware necessary for this feature.
If your security processor isn’t working properly you’ll see a link on the Security processor details page that says Security processor troubleshooting. Select it to see any error messages and advanced options. For more information see: Security Processor troubleshooting.
Secure boot
Secure boot prevents a sophisticated and dangerous type of malware—a rootkit—from loading when you start your device. Rootkits use the same permissions as the operating system and start before it, which means they can completely hide themselves. Rootkits are often part of an entire suite of malware that can bypass local logins, record passwords and keystrokes, transfer private files, and capture cryptographic data.
You may have to disable secure boot to run some PC graphics cards, hardware, or operating systems such as Linux or earlier versions of Windows. For more info, see How to disable and re-enable secure boot.
Hardware security capability
At the bottom of the Device security screen, one of the following messages appears, indicating the security capability of your device.
Your device meets the requirements for standard hardware security
This means your device supports memory integrity and core isolation and also has:
TPM 2.0 (also referred to as your security processor)
Secure boot enabled
Your device meets the requirements for enhanced hardware security
This means that in addition to meeting all the requirements of standard hardware security, your device also has memory integrity turned on.
Your device exceeds the requirements for enhanced hardware security ( Note: In Windows 20H2 this message will say «Your device has all Secured-core PC features enabled»)
This means that in addition to meeting all the requirements of enhanced hardware security, your device also has System Management Mode (SMM) protection turned on.
Standard hardware security not supported
This means that your device does not meet at least one of the requirements of standard hardware security.
Improving hardware security
If the security capability of your device isn’t what you’d like it to be, you might need to turn on certain hardware features (such as secure boot, if supported) or change the settings in your system’s BIOS. Contact your hardware manufacturer to see what features are supported by your hardware and how to activate them.
Защита с помощью панели «Безопасность Windows»
В состав Windows 10 входит «Безопасность Windows», которая и предоставляет последние обновления для антивирусной защиты. Ваше устройство получит активную защиту с момента запуска Windows 10. «Безопасность Windows» регулярно проверяет устройство на наличие вредоносных программ, вирусов и угроз безопасности. В дополнение к этой защите в режиме реального времени обновления скачиваются автоматически, чтобы обеспечить безопасность устройства и защитить его от угроз.
Windows 10 в S-режиме
Если вы используете Windows 10 в S-режиме, некоторые функции панели «Безопасность Windows» будут немного отличаться. Так как этот режим оптимизирован для обеспечения более надежной защиты, область «Защита от вирусов и угроз» содержит меньше параметров. Однако волноваться не стоит. Встроенные средства защиты этого режима автоматически предотвращают запуск вирусов и других угроз на устройстве, и вы будете автоматически получать обновления для системы безопасности. Дополнительные сведения см. на странице Вопросы и ответы: Windows 10 в S-режиме.
Важные сведения о безопасности
Система «Безопасность Windows» встроена в Windows 10 и использует антивирусную программу под названием «Антивирусная программа в Microsoft Defender». (В предыдущих версиях Windows 10 приложение «Безопасность Windows» называлось «Центр безопасности Защитника Windows»).
Антивирусная программа в Microsoft Defender автоматически отключается при установке и включении другого антивирусного приложения. При удалении другого приложения антивирусная программа в Microsoft Defender включится автоматически.
Если у вас возникли проблемы с получением обновлений для системы «Безопасность Windows», см. разделы Устранение ошибок Центра обновления Windows иВопросы и ответы по обновлению Windows.
Инструкции по изменению учетной записи пользователя на учетную запись администратора см. в разделе Создание локально учетной записи пользователя или администратора в Windows 10.
Знакомство с функциями «Безопасности Windows» и их настройка
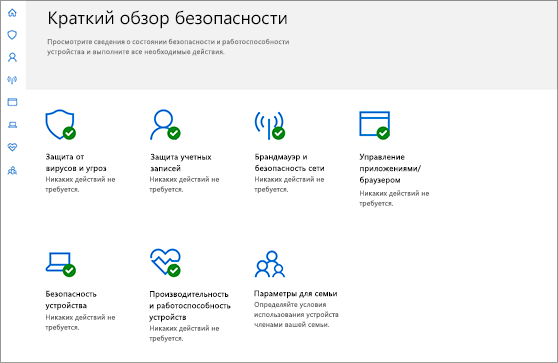
Безопасность Windows — это место для управления инструментами, которые защищают ваше устройство и ваши данные:
Защита от вирусов и угроз. Позволяет отслеживать угрозы для вашего устройства, запускать проверку и устанавливать обновления для обнаружения новейших угроз. (Некоторые из этих параметров недоступны, если вы используете Windows 10 в S-режиме.)
Защита учетных записей. Доступ к параметрам входа в систему и параметрам учетной записи, включая Windows Hello и динамическую блокировку.
Брандмауэр и защита сети. Позволяет управлять параметрами брандмауэра и отслеживать события, происходящие с вашими сетями и подключениями к Интернету.
Управление приложениями и браузером. Обновление параметров фильтра SmartScreen в Microsoft Defender для защиты вашего устройства от потенциально опасных приложений, файлов, сайтов и загрузок, а также обеспечение защиты от эксплойтов, где вы можете настроить параметры защиты для ваших устройств.
Безопасность устройств. Просмотр встроенных параметров безопасности, которые помогают защитить устройство от атак вредоносного программного обеспечения.
Производительность и работоспособность устройства. Просмотр состояния работоспособности и производительности устройства и поддержание устройства в чистом и актуальном состоянии с помощью последней версии Windows 10.
Семья. Отслеживание действий ваших детей в Интернете и устройств вашей семьи.
Можно настроить, каким образом эти функции «Безопасности Windows» будут защищать ваше устройство. Чтобы получить к ним доступ, нажмите кнопку Пуск > Параметры > Обновление и безопасность > Безопасность Windows . Затем выберите функцию, которую вы хотите изучить.
Открыть параметры безопасности Windows
Значки состояния обозначают уровень безопасности:
Зеленый цвет означает, что устройство достаточно защищено и рекомендуемые действия отсутствуют.
Желтый цвет означает, что для вас есть рекомендации по безопасности.
Красный цвет предупреждает, что необходимо немедленно принять меры.
Запуск проверки наличия вредоносных программ вручную
Если вы хотите проверить безопасность определенного файла или папки, щелкните правой кнопкой мыши файл или папку в проводнике, а затем выберите Проверить с помощью Microsoft Defender.
Если вы подозреваете, что устройство может содержать вирусы или вредоносные программы, необходимо незамедлительно проверить ваше устройство, выполнив быструю проверку. Это намного быстрее выполнения полной проверки всех файлов и папок.
Запуск быстрой проверки в системе «Безопасность Windows»
Выберите Пуск > Параметры > Обновление и безопасность > Безопасность Windows и затем нажмите Защита от вирусов и угроз.
Открыть параметры безопасности Windows
В разделе Текущие угрозы выберите Быстрая проверка (или в предыдущих версиях Windows 10 в разделе Журнал угроз выберите Проверить сейчас).
Если проверка не обнаружила никаких проблем, но вы все еще обеспокоены, возможно проверить устройство более тщательно.
Запуск расширенной проверки в «Безопасности Windows»
Выберите Пуск > Параметры > Обновление и безопасность > Безопасность Windows и затем нажмите Защита от вирусов и угроз.
В разделе Текущие угрозы выберите Параметры проверки (или в предыдущих версиях Windows 10 в разделе Журнал угроз выберите Запустить новую расширенную проверку).
Выберите один из вариантов проверки.
Полная проверка (проверка файлов и программ, выполняемых на вашем устройстве)
Выборочная проверка (проверка определенных файлов или папок )
Проверка автономного Microsoft Defender (запустите эту проверку, если ваше устройство было заражено или может быть заражено вирусом или вредоносной программой). Подробнее об автономном Microsoft Defender
Выберите Проверить сейчас.
Примечание: Так как работа системы защиты оптимизирована, этот процесс недоступен при использовании Windows 10 в S-режиме.
Создание собственного расписания проверок
Несмотря на то что функция «Безопасность Windows» регулярно проверяет устройства для обеспечения их безопасности, можно также задать время и периодичность проведения проверок.
Планирование сканирования
Нажмите кнопку Пуск , введите планировщик заданий в строке Поиск и в списке результатов выберите Планировщик задач.
В области слева выберите стрелку (>) рядом с разделом Библиотека планировщика заданий, чтобы развернуть его. Затем сделайте то же самое с пунктами Microsoft > Windows, прокрутите список вниз и выберите папку Windows Defender.
На центральной панели выберите пункт Запланированная проверка в Защитнике Windows. (Наведите указатель мыши на соответствующие пункты, чтобы просмотреть их полные названия.)
В области Действия справа прокрутите список вниз, а затем выберите Свойства.
В открывшемся окне перейдите на вкладку Триггеры и нажмите кнопку Создать.
Задайте время и периодичность, а затем нажмите кнопку OK.
Просмотрите расписание и выберите OK.
Примечание: Так как работа системы защиты оптимизирована, этот процесс недоступен при использовании Windows 10 в S-режиме.
Включение и отключение защиты, обеспечиваемой антивирусной программой в Microsoft Defender в режиме реального времени
Иногда может потребоваться быстро остановить работу защиты в режиме реального времени. Когда защита в режиме реального времени отключена, открываемые или скачиваемые файлы не проверяются на наличие угроз. Однако скоро защита в режиме реального времени будет включена автоматически для возобновления защиты вашего устройства.
Временное отключение защиты в режиме реальном времени
Выберите Пуск > Параметры > Обновление и безопасность > Безопасность Windows и затем Защита от вирусов и угроз > Управление параметрами. (В предыдущих версиях Windows 10 выберите раздел Защита от вирусов и угроз > Параметры защиты от вирусов и угроз.)
Открыть параметры Безопасности Windows
Задайте параметру Защита в режиме реального времени значение Выкл. и нажмите Да для подтверждения.
Примечание: Так как работа системы защиты оптимизирована, этот процесс недоступен при использовании Windows 10 в S-режиме.
Virus & threat protection in Windows Security
If you’re running Windows 10 in S mode, some of the features of the Windows Security interface will be a little different. Windows 10 in S mode is streamlined for tighter security, so the Virus & threat protection area has fewer options than those described here. This is because the built-in security of Windows 10 in S mode automatically prevents viruses and other threats from running on your device. Additionally, devices running Windows 10 in S mode receive security updates automatically.
In previous versions of Windows 10, Windows Security is called Windows Defender Security Center.
Virus & threat protection in Windows Security helps you scan for threats on your device. You can also run different types of scans, see the results of your previous virus and threat scans, and get the latest protection offered by Microsoft Defender Antivirus.
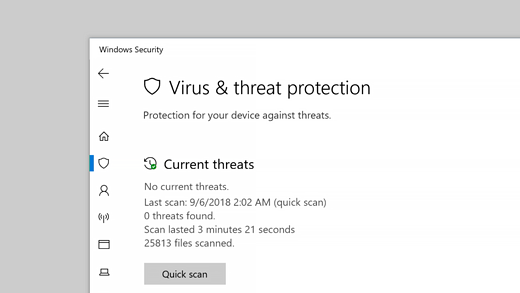
The Current threats area lets you:
See any threats currently on your device.
See the last time a scan was run on your device, how long it took, and how many files were scanned.
Start a new scan.
See threats that have been quarantined before they can affect you.
See anything identified as a threat that you have allowed to run on your device.
Note: If you are using third-party antivirus software, you’ll be able to use its virus and threat protection options here.
Run the scans you want
Even though Windows Security is turned on and scans your device automatically, you can perform an additional scan whenever you want.
Quick scan. Concerned that you may have done something to introduce a suspicious file or virus to your device? Select Quick scan (called Scan now in previous versions of Windows 10) to immediately check your device for any recent threats. This option is useful when you don’t want to spend the time running a full scan on all your files and folders. If Windows Security recommends that you run one of the other types of scans, you’ll be notified when the Quick scan is done.
Scan options .Select this link (called Run a new advanced scan in previous versions of Windows 10) to choose from one of the following advanced scan options:
Full scan. Scans every file or program that’s currently running on your device to make sure there’s nothing dangerous in progress.
Custom scan. Scans only files and folders that you select.
Microsoft Defender Offline scan. Uses the latest definitions to scan your device for the latest threats. Run it when you are concerned that your device has been exposed to malware or a virus, or if you want to scan your device without being connected to the Internet. This will restart your device, so be sure to save files you may have open.
Manage your Virus & threat protection settings
Use Virus & threat protection settings when you want to customize your level of protection, send sample files to Microsoft, exclude trusted files and folders from repeated scanning, or temporarily turn off your protection.
Manage your real-time protection
Want to stop running real-time protection for a short while? You can use the Real-time protection setting to turn it off temporarily; however, real-time protection will turn back on automatically after a short while to resume protecting your device. While real-time protection is off, files you open or download won’t be scanned for threats.
Note: If the device you’re using is part of an organization, your system administrator may prevent you from turning off real-time protection.
Get access to cloud-delivered protection
Provide your device with access to the latest threat definitions and threat behavior detection in the cloud. This setting allows Microsoft Defender to get constantly updated improvements from Microsoft while you’re connected to the internet. This will result in more accurately identifying, stopping, and fixing, threats.
This setting is turned on by default.
Send us files with automatic sample submission
If you’re connected to the cloud with cloud-delivered protection, you can send suspicious sample files to Microsoft to check them for potential threats. Microsoft will notify you if you need to send additional files—and alert you if a requested file contains personal information.
Tamper Protection defends your security settings
Microsoft Defender Antivirus settings can occasionally get changed by malicious, or careless, apps or processes; or sometimes by unaware people. With Tamper Protection turned on, important settings like real-time protection, can’t be easily or accidentally turned off.
This setting is turned on, by default, for consumers.
Protect files from unauthorized access
Use the Controlled folder access setting to manage which folders untrusted apps can make changes to. You can also add additional apps to the trusted list so they can make changes in those folders. This is a powerful tool to make your files safer from ransomware.
When you turn on Controlled folder access, a lot of the folders you use most often will be protected by default. This means that content in any of these folders cannot be accessed or changed by any unknown or untrusted apps. If you add additional folders, they become protected as well.
Exclude items from virus scans
There may be times when you’ll want to exclude specific files, folders, file types, or processes from being scanned, such as if these are trusted items and you are certain you don’t need to take time to scan them. In those rare instances you can add an exclusion for them.
Curate your notifications
Windows Security will send notifications about the health and safety of your device. You can turn these notifications on, or off, on the notifications page. In Virus & threat protection, under Virus & threat protection settings, select Manage settings, scroll down to Notifications and select Change notification settings.
Protect your device with the latest updates
Security intelligence (sometimes referred to as «definitions») are files that contain information about the latest threats that could infect your device. Windows Security uses security intelligence every time a scan is run.
Microsoft automatically downloads the latest intelligence to your device as part of Windows Update, but you can also manually check for it. On the Virus & threat protection page, under Virus & threat protection updates, select Check for updates to scan for the latest security intelligence.


