- 10 Commands to Check Disk Partitions and Disk Space on Linux
- 1. fdisk
- 2. sfdisk
- 3. cfdisk
- 4. parted
- 6. pydf
- 7. lsblk
- 8. blkid
- 9. hwinfo
- 10. Inxi
- Summary
- 47 thoughts on “ 10 Commands to Check Disk Partitions and Disk Space on Linux ”
- 4 Ways to View the Partition Table in Linux
- View partition table through the lsblk command
- Get list of partitions with the fdisk command
- Using sfdisk command to view partitions
- Using the parted command to get harddisk partitions
- Karim Buzdar
- 10 fdisk Commands to Manage Linux Disk Partitions
- 1. View all Disk Partitions in Linux
- 2. View Specific Disk Partition in Linux
- 3. Check all Available fdisk Commands
- 4. Print all Partition Table in Linux
- 5. How to Delete a Partition in Linux
- 6. How to Create a New Partition in Linux
- 7. How to Format a Partition in Linux
- 8. How to Check Size of a Partition in Linux
- 9. How to Fix Partition Table Order
- 10. How to Disable Boot Flag (*) of a Partition
- If You Appreciate What We Do Here On TecMint, You Should Consider:
10 Commands to Check Disk Partitions and Disk Space on Linux
In this post we are taking a look at some commands that can be used to check up the partitions on your system.
The commands would check what partitions there are on each disk and other details like the total size, used up space and file system etc.
Commands like fdisk, sfdisk and cfdisk are general partitioning tools that can not only display the partition information, but also modify them.
1. fdisk
Fdisk is the most commonly used command to check the partitions on a disk. The fdisk command can display the partitions and details like file system type. However it does not report the size of each partitions.
Each device is reported separately with details about size, seconds, id and individual partitions.
2. sfdisk
Sfdisk is another utility with a purpose similar to fdisk, but with more features. It can display the size of each partition in MB.
3. cfdisk
Cfdisk is a linux partition editor with an interactive user interface based on ncurses. It can be used to list out the existing partitions as well as create or modify them.
Here is an example of how to use cfdisk to list the partitions.
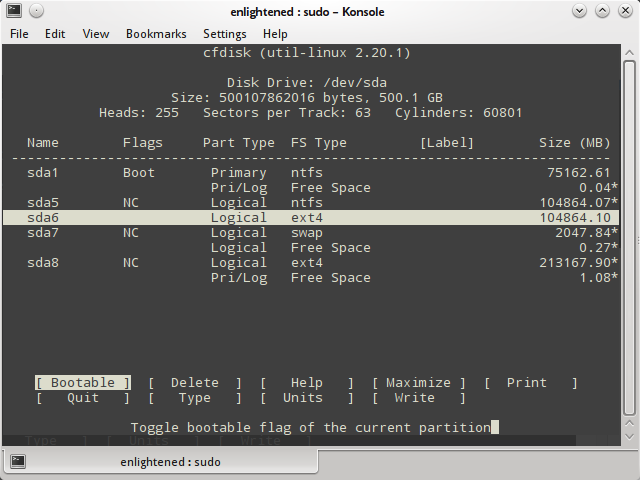
Cfdisk works with one partition at a time. So if you need to see the details of a particular disk, then pass the device name to cfdisk.
4. parted
Parted is yet another command line utility to list out partitions and modify them if needed.
Here is an example that lists out the partition details.
Df is not a partitioning utility, but prints out details about only mounted file systems. The list generated by df even includes file systems that are not real disk partitions.
Here is a simple example
Only the file systems that start with a /dev are actual devices or partitions.
Use grep to filter out real hard disk partitions/file systems.
To display only real disk partitions along with partition type, use df like this
Note that df shows only the mounted file systems or partitions and not all.
6. pydf
Improved version of df, written in python. Prints out all the hard disk partitions in a easy to read manner.
Again, pydf is limited to showing only the mounted file systems.
7. lsblk
Lists out all the storage blocks, which includes disk partitions and optical drives. Details include the total size of the partition/block and the mount point if any.
Does not report the used/free disk space on the partitions.
If there is no MOUNTPOINT, then it means that the file system is not yet mounted. For cd/dvd this means that there is no disk.
Lsblk is capbale of displaying more information about each device like the label and model. Check out the man page for more information
Display UUID and Model of device
The «-o» option can be used to specify the columns to display. The following example shows the UUID and model name column along with other columns.
The above output has all the necessary information about all the storage devices present on the system or connected via usb. You can see the device name, size, mount point, uuid, model name etc.
This is the best command to see all information about storage devices together in one place.
8. blkid
Prints the block device (partitions and storage media) attributes like uuid and file system type. Does not report the space on the partitions.
9. hwinfo
The hwinfo is a general purpose hardware information tool and can be used to print out the disk and partition list.
The output however does not print details about each partition like the above commands.
To learn more about the Hwinfo command check this post:
Check hardware information on Linux with hwinfo command
10. Inxi
Inxi is a very useful command line program that can display information about various hardware components present on the system. To display information about the disk drives and storage devices use the «-D» option with inxi.
The «-x» option prints extra available information.
The output from inxi does not contains details like UUID and mount directory.
To learn more about the inxi command check out this post:
Inxi is an amazing tool to check hardware information on Linux
Summary
The output of parted is concise and complete to get an overview of different partitions, file system on them and the total space. Pydf and df are limited to showing only mounted file systems and the same on them.
Fdisk and Sfdisk show a whole lot of information that can take sometime to interpret whereas, Cfdisk is an interactive partitioning tool that display a single device at a time.
So try them out, and do not forget to comment below.
A Tech Enthusiast, Blogger, Linux Fan and a Software Developer. Writes about Computer hardware, Linux and Open Source software and coding in Python, Php and Javascript. He can be reached at [email protected] .
47 thoughts on “ 10 Commands to Check Disk Partitions and Disk Space on Linux ”
Thank you for this great summary of relevant commands and also showing whether SU privileges are needed or not.
Good article. Thanks for writing this .
I’d also suggest including “ncdu” (stands for ncurses du) – https://dev.yorhel.nl/ncdu – in this as it’s quite useful in knowing the disk usage on the terminal in a graphical way
pydf hands down the best alternative if you want a quick glance at disk usage!
Very useful, thank you!
very useful,
How about GUI tools?
Hardinfo is a GUI tool that shows hardware information including disk drives and partitions..
On ubuntu it can be installed with the following command
sudo apt-get install hardinfo
Another tool is gparted.
It is a partition management tool, but can also be used to list the disk drives and partitions
Well done — I learned something!
glad to know that.
thanks for the comment.
Very useful. Thank you for your effort.
Detailed and to the point post. Thanks A Ton!
Источник
4 Ways to View the Partition Table in Linux

As Linux administrators, we need to view the partition table of our hard disk time and again. This helps us in re-organizing old drives by making space for further partitioning and also create space for new drives if necessary. You can create no more than four primary partitions on a hard disk but a number of logical or extended partitions, depending on the size of the hard disk you have installed on your system.
The partition table, that contains the information about all your logical disks or partitions, resides in the 0 sector of your hard disk. Your device is listed in the partitions table as /dev/sda, /dev/sdb, and so on. The sd* device refers to SCSI or SATA disks on your system. For example, /dev/sda will be the first SATA/SCSI hard disk, /dev/sdb will be the second SATA/SCSI hard disk.
This article lists and explains the use of various Linux commands for you to view the partition table of your device. We will be using the CLI to run these commands. You can open the Ubuntu command line, the Terminal, either through the system Dash or the Ctrl+Alt+T shortcut.
We have run the commands and procedures mentioned in this article on an Ubuntu 20.04 LTS system.
View partition table through the lsblk command
The lsblk command lists all the block devices of your system along with their logical partitions. Enter the following command in your Terminal to list the partition table:

In the above output, you can see all the logical partitions from sda1 till sda5 for my sda device. Here is what the seven columns indicate:
- Name – Name of the devices
- Maj:Min – Major and Min Device numbers
- RM – Whether the device is removable(1) or not (0)
- Size – Size of the device
- RO – Is the device read-only(1) or not (0)
- Type – Type of device, i.e, if it is a disk or partitions, etc.
- MountPoint – The mount point of the device(if applicable).
There are more Linux sysinfo commands.
Get list of partitions with the fdisk command
The fdisk command that stands for Format-disk or Fixed-disk is basically used to create or delete hard disk partitions. It is also used to format the disk, however, here we will use it to list the partitions table by using a particular flag with it.
The -l flag is used with the fdisk to list the partitions table of the specified device and then exit. When you do not mention any device name, fdisk uses the devices mentioned in the /proc/partitions file.
The -l option shows the partition tables for the specified devices and then exit. If no devices are given, those mentioned in /proc/partitions (if that exists) are used. Enter the following command as sudo:
 Advertisement
When you scroll down further, the output displays the partition table as follows:

This is what the various column indicate:
- Device – Name of the device/logical partition
- Boot – The * sign in this column indicated that the respective partition contains the bootloader information that is used to boot your system
- Start – The starting sector allotted to this partition.
- End – The ending sector allotted to this partition.
- Sectors – The number of sectors allocated for these partitions.
- Size – The size of the partition.
- ID – An ID used by the system for the partition
- Type – The file type or system used by this partition.
Using sfdisk command to view partitions
Though the sfdisk command is primarily used to manipulate partition tables on Linux, it can also be used to list the partitions tables of a device by using the following syntax:

As you can see, this command gives the same information of the partition table as the fdisk command. You can only view the results of the fdisk and sfdisk command as an authorized sudo user.
Using the parted command to get harddisk partitions
Another way to list the partition table for a device is through the parted command. The parted command has an edge on the previously mentioned fdisk and sfdisk commands as the former ones do not list partitions whose size is greater than 2 TB.
Use the following syntax in order to view the partitions table for a device:
The command will get into the “(parted)” prompt mode. Here you can enter the following values that will help you in viewing the partition table for a device.
Unit GB: Through this input, you can choose the output to be displayed in GBs.
Unit TB: Through this input, you can choose the output to be displayed in TBs.
Enter your choice after which the system will display the corresponding partition table.

To quit the parted command mode, simply type quit and then hit Enter.
Alternatively, you can use the following command to list all the partition layouts on all the block devices of your system:

Since sda is my only block device, the command displays the partition for that only.
Note: The lsscsi command that is basically used to list the SCSI devices and their attributes also lists the partition tables on some systems. You can install it through this command:
Through the various Linux commands we explained in this article, you are now able to view the partition table of your hard disk devices. Some of the commands have many other basic functions but since they also list the partition table, we have included them in our article. You will now be able to manage disk space and partitions of your storage devices even better.
Karim Buzdar
About the Author: Karim Buzdar holds a degree in telecommunication engineering and holds several sysadmin certifications. As an IT engineer and technical author, he writes for various web sites. You can reach Karim on LinkedIn
Источник
10 fdisk Commands to Manage Linux Disk Partitions
fdisk stands (for “fixed disk or format disk“) is an most commonly used command-line based disk manipulation utility for a Linux/Unix systems. With the help of fdisk command you can view, create, resize, delete, change, copy and move partitions on a hard drive using its own user friendly text based menu driven interface.
This tool is very useful in terms of creating space for new partitions, organising space for new drives, re-organising an old drives and copying or moving data to new disks. It allows you to create a maximum of four new primary partition and number of logical (extended) partitions, based on size of the hard disk you have in your system.
![]() fdisk command to manage disk partition
fdisk command to manage disk partition
This article explains 10 basic fdisk commands to manage a partition table in Linux based systems. You must be root user to run fdisk command, otherwise you will get a “command not found” error.
1. View all Disk Partitions in Linux
The following basic command list all existing disk partition on your system. The ‘-l‘ argument stand for (listing all partitions) is used with fdisk command to view all available partitions on Linux. The partitions are displayed by their device’s names. For example: /dev/sda, /dev/sdb or /dev/sdc.
2. View Specific Disk Partition in Linux
To view all partitions of specific hard disk use the option ‘-l‘ with device name. For example, the following command will display all disk partitions of device /dev/sda. If you’ve different device names, simple write device name as /dev/sdb or /dev/sdc.
3. Check all Available fdisk Commands
If you would like to view all commands which are available for fdisk. Simply use the following command by mentioning the hard disk name such as /dev/sda as shown below. The following command will give you output similar to below.
Type ‘m‘ to see the list of all available commands of fdisk which can be operated on /dev/sda hard disk. After, I enter ‘m‘ on the screen, you will see the all available options for fdisk that you can be used on the /dev/sda device.
4. Print all Partition Table in Linux
To print all partition table of hard disk, you must be on command mode of specific hard disk say /dev/sda.
From the command mode, enter ‘p‘ instead of ‘m‘ as we did earlier. As I enter ‘p‘, it will print the specific /dev/sda partition table.
5. How to Delete a Partition in Linux
If you would like to delete a specific partition (i.e /dev/sda9) from the specific hard disk such as /dev/sda. You must be in fdisk command mode to do this.
Next, enter ‘d‘ to delete any given partition name from the system. As I enter ‘d‘, it will prompt me to enter partition number that I want to delete from /dev/sda hard disk. Suppose I enter number ‘4‘ here, then it will delete partition number ‘4‘ (i.e. /dev/sda4) disk and shows free space in partition table. Enter ‘w‘ to write table to disk and exit after making new alterations to partition table. The new changes would only take place after next reboot of system. This can be easily understood from the below output.
Warning : Be careful, while performing this step, because using option ‘d‘ will completely delete partition from system and may lost all data in partition.
6. How to Create a New Partition in Linux
If you’ve free space left on one of your device say /dev/sda and would like to create a new partition under it. Then you must be in fdisk command mode of /dev/sda. Type the following command to enter into command mode of specific hard disk.
After entering in command mode, now press “n” command to create a new partition under /dev/sda with specific size. This can be demonstrated with the help of following given output.
While creating a new partition, it will ask you two options ‘extended‘ or ‘primary‘ partition creation. Press ‘e‘ for extended partition and ‘p‘ for primary partition. Then it will ask you to enter following two inputs.
- First cylinder number of the partition to be create.
- Last cylinder number of the partition to be created (Last cylinder, +cylinders or +size).
You can enter the size of cylinder by adding “+5000M” in last cylinder. Here, ‘+‘ means addition and 5000M means size of new partition (i.e 5000MB). Please keep in mind that after creating a new partition, you should run ‘w‘ command to alter and save new changes to partition table and finally reboot your system to verify newly created partition.
7. How to Format a Partition in Linux
After the new partition is created, don’t skip to format the newly created partition using ‘mkfs‘ command. Type the following command in the terminal to format a partition. Here /dev/sda4 is my newly created partition.
8. How to Check Size of a Partition in Linux
After formatting new partition, check the size of that partition using flag ‘s‘ (displays size in blocks) with fdisk command. This way you can check size of any specific device.
9. How to Fix Partition Table Order
If you’ve deleted a logical partition and again recreated it, you might notice ‘partition out of order‘ problem or error message like ‘Partition table entries are not in disk order‘.
For example, when three logical partitions such as (sda4, sda5 and sda6) are deleted, and new partition created, you might expect the new partition name would be sda4. But, the system would create it as sda5. This happens because of, after the partition are deleted, sda7 partition had been moved as sda4 and free space shift to the end.
To fix such partition order problems, and assign sda4 to the newly created partition, issue the ‘x‘ to enter an extra functionality section and then enter ‘f‘ expert command to fix the order of partition table as shown below.
After, running ‘f‘ command, don’t forget to run ‘w‘ command to save and exit from fdisk command mode. Once it fixed partition table order, you will no longer get error messages.
10. How to Disable Boot Flag (*) of a Partition
By default, fdisk command shows the boot flag (i.e. ‘*‘) symbol on each partition. If you want to enable or disable boot flag on a specific partition, do the following steps.
Press ‘p‘ command to view the current partition table, you see there is a boot flag (asterisk (*) symbol in orange color) on /dev/sda1 disk as shown below.
Next enter command ‘a‘ to disable boot flag, then enter partition number ‘1‘ as (i.e. /dev/sda1) in my case. This will disable boot flag on the partition /dev/sda1. This will remove the asterisk (*) flag.
I’ve tried my best to include almost all basic commands of fdisk commands, but still fdisk contains a variety of other expert commands you can use them by entering ‘x‘. For more detailed information, check out ‘man fdisk‘ command from the terminal. If I’ve missed any important command, please do share with me via comment section.
Read Also :
If You Appreciate What We Do Here On TecMint, You Should Consider:
TecMint is the fastest growing and most trusted community site for any kind of Linux Articles, Guides and Books on the web. Millions of people visit TecMint! to search or browse the thousands of published articles available FREELY to all.
If you like what you are reading, please consider buying us a coffee ( or 2 ) as a token of appreciation.

We are thankful for your never ending support.
Источник


