- Save a List of Running Processes to a Text File in Windows
- Output Processes From The Tasklist Command
- Save Processes To File Using Powershell
- Save Processes To File Using WMIC
- How To Know Which Process is Using a File or Folder in Windows
- Resource Monitor
- Process Explorer
- My Take
- How to show full command line of all processes in Windows
- 2 Answers 2
- get all running processes info using QProcess
- 2 Answers 2
- Not the answer you’re looking for? Browse other questions tagged windows qt qprocess or ask your own question.
- Linked
- Related
- Hot Network Questions
- Subscribe to RSS
Save a List of Running Processes to a Text File in Windows
In case you want to print them out
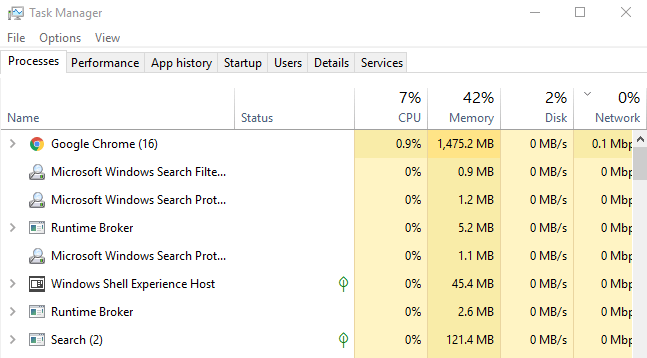
Sometimes, it can seem like there are so many processes running on your computer that you’re unsure which are okay and which might be suspicious or malicious.
A good first step is generating a list of running processes to a text file so you can analyze what processes are running. Usually, people use Task Manager to view all processes, but it doesn’t let you print the list of processes.
Thankfully, saving a list of running processes to a text file in Windows is very simple. You’ll be able to save both the Process ID (PID) and how much memory each process is using.
Note: The steps below to save processes to file work for all versions of Windows including Windows XP, Windows 7, Windows 8, and Windows 10.
Output Processes From The Tasklist Command
The easiest way to get a quick list of processes that are running on your Windows system is using the tasklist command. To run the command properly, you need to run it from the command prompt as an administrator.
To do this, select the start menu and type “command”, then hover the mouse over Command Prompt so it’s highlighted and then select Run as administrator on the right.
Note: You may need to select Yes on a pop-up window to approve running Command Prompt as administrator.

Once the command prompt is open, type tasklist and press enter to see a list of processes running on your system.

This is useful, but it doesn’t provide you the list of running processes in a text file. To save processes to file, repeat the process above, but this time type the command:
tasklist > c:\process_list.txt
This will output a text file named process_list.txt to your C: drive. You can change C:\ to any other path where you’d like to place the file if you want.
To view the file, just open Windows Explorer and browse to the location where you saved the process list file.

To view this process list in Notepad, right-click the file, select Open with, and select Notepad.

This is the quickest and easiest way to see running processes in Windows via a text file. It’ll show you PID, Session name, Session number, and memory usage.
Save Processes To File Using Powershell
Another tool you have available to save a list of running processes to a text file in Windows is Powershell.
Powershell includes a command called “get-process” that provides a list of all active processes that are running on your local computer. To see this in action, launch Powershell by selecting the Start menu and typing Powershell.
Once the blue Powershell window opens, type get-process and press Enter. This will display a list of all active processes on your Windows system.

This provides a little more information about processes than tasklist does. However, you need to know what the headers mean.
- Handles: Number of handles that the process has opened
- NPM(K): Non-paged memory the process is using (in kilobytes)
- PM(K): Pageable memory the process is using (in kilobytes)
- WS(K): Pages in memory recently used by the process (in kilobytes)
- VM(M): Virtual memory used by the process (in megabytes)
- CPU(s): Processor time used by the process across all processors (in seconds)
- ID: Process ID of the process
- ProcessName: Name of the process
This is great, but all of this information is displayed on the screen and not to a file. To output this information to a file, you need to add the Out-File parameter to the Get-Process command.
Back in the Powershell screen, type the command Get-Process | Out-File -FilePath .\Process_list.txt and press Enter.
The .\Process_list.txt parameter puts the file in the path where you run the command, so make note of that path so you know where to find the process list file. After you’ve run the command, use the same process as above to open the process list file in Notepad.

You’ll notice that the data in the file looks identical to the Get-Process output in the previous Powershell window.
Save Processes To File Using WMIC
The last tool you have at your disposal in Windows is the Windows Command Line Utility (WMIC).
You can only use WMIC commands if you are running the command prompt as a local administrator. To do this, use the steps in the first section of this article to launch the Windows command prompt as an administrator.
WMIC provides you with more information about active processes than any other command or tool in Windows. If you just run the WMIC Process command in the command prompt, you’ll see up to 44 process parameters returned for every active process.
The problem with running the command in the command prompt is that the space delimited output looks jumbled and disorganized.

The WMIC command is a perfect example of when an output file is useful. You can output the WMIC process list to a file using the command: wmic /OUTPUT:C:\ProcessList.txt PROCESS get /all.
This will output the entire list to a text file on the C: drive called ProcessList.txt. Instead of opening this file in Notepad, you’ll want to open it using Excel since Excel can properly format a tab delimited file.
- Open Excel
- Select Open to open a new file
- Select Browse and browse to the ProcessList.txt file
- Select the file and select Open (if you don’t see the file, change file type to All Files)
- In the Text Import Window, select Delimited, select My data has headers, and select Next to continue

- In the next wizard screen, select the Space checkbox under the Delimiters section and select the Treat consecutive delimiters as one checkbox. Select Next to continue.

- Select Finish to complete the wizard.
Now you’ll see just about anything you could possibly want to know about every active process on your Windows system.

The header of each column describes what that data item is. You’ll find things like executable path, handle, install date, page faults, page file usage, process ID, and much more.
Now that you know multiple ways to save a list of running processes to a text file in Windows, all you have left to do is choose the one that’s right for you!
Do you know of any other ways to save processes to file? Share your thoughts in the comments section below.
Ryan has been writing how-to and other technology-based articles online since 2007. He has a BSc degree in Electrical Engineering and he’s worked 13 years in automation engineering, 5 years in IT, and now is an Apps Engineer. Read Ryan’s Full Bio
How To Know Which Process is Using a File or Folder in Windows
Ever wondered which program has a particular file or directory open? Quite often, when trying to delete a folder, Windows reports this:
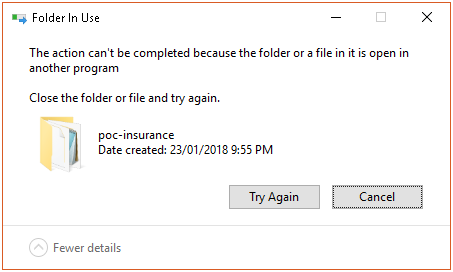
This error also happens with a file, when we tried to move a file, or delete those file. How we can find out which program or application is currently using it and preventing us to delete/move it? To get the process holding those folder or file, we can use these two utilities:
Resource Monitor
For Windows 7 and above, you can use the built-in Resource Monitor.
Open Resource Monitor, which can be found
- By searching for resmon.exe in the start menu, or
- As a button on the Performance tab in your Task Manager

Resource Monitor from Task Manager’s Performance Tab
From CPU tab, use the search field in the Associated Handles section
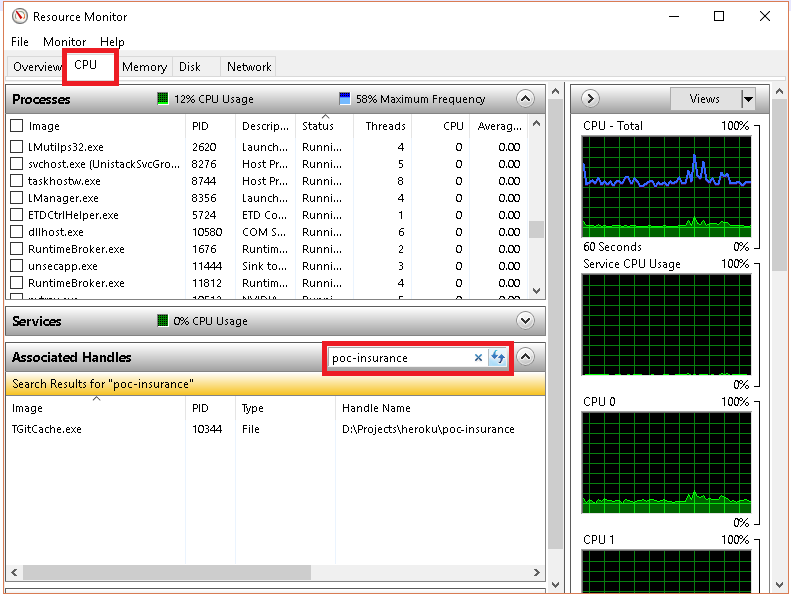
When you’ve found the handle, you can identify the process by looking at the Image and/or PID column. You can then close the application if you are able to do that, or just right-click the row and you’ll get the option of killing the process (End Process) right there.
Process Explorer
Process Explorer shows you information about which handles and DLLs processes have opened or loaded.
- Open Process Explorer (running as «administrator») by running procexp.exe or procexp64.exe.
- Enter the keyboard shortcut Ctrl+F. Alternatively, click the “Find” menu and select “Find a Handle or DLL”.
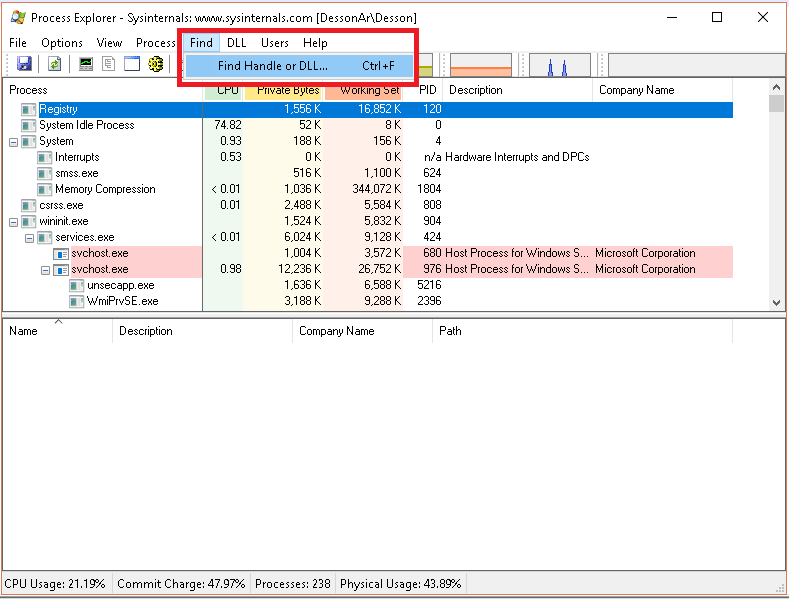
Process Explorer — Find Handle or DLL
- Type in the name of the locked file or other file of interest in the Search dialog box, then click «Search». Partial names are usually sufficient.
- A list will be generated. There may be a number of entries. Click one of the entry, it’ll «Refreshing handles».
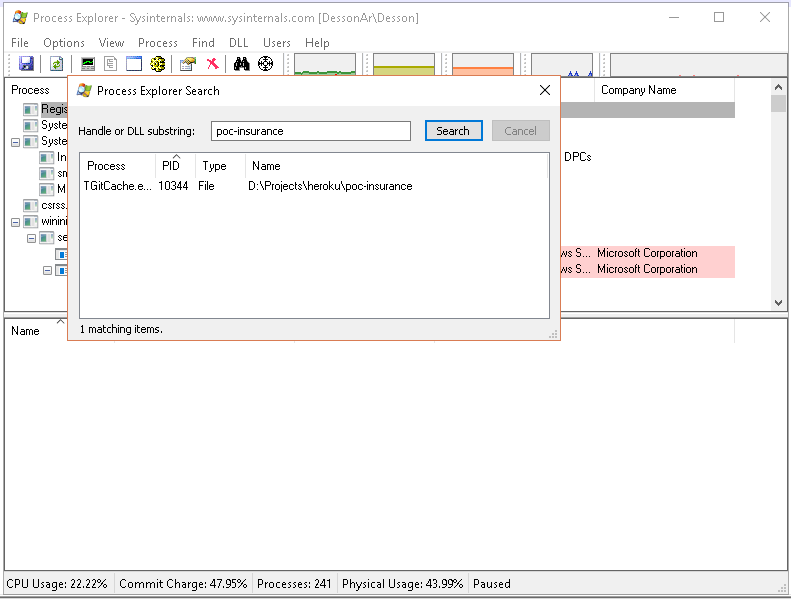
Process Explorer — Search
Same as Resource Monitor, an individual handle in the list can be killed by selecting it and pressing the delete key (or Close Handle). However, please be careful when deleting handles, as system instabilities may occur. Rebooting your system maybe will free the locked file/folder.
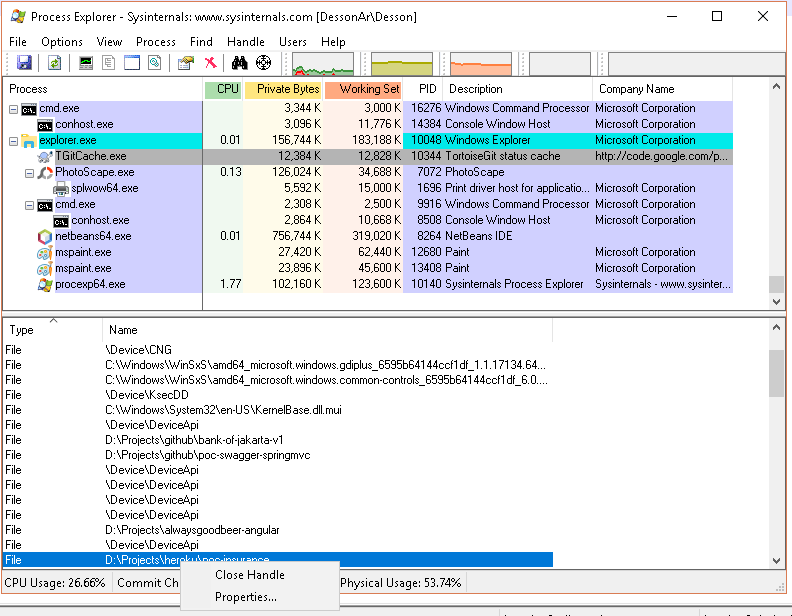
Process Explorer — Close Handle
Handle is a command line version of Process Explorer.
My Take
I prefer to use Resource Monitor compare to Process Explorer since Process Explorer is slower (especially during «Refreshing handles» process). If I can’t find the handle in Resource Monitor, then I use Process Explorer.
Liked this Tutorial? Share it on Social media!
How to show full command line of all processes in Windows
On Windows, in the Task Manager it is possible to see the command line of each processes but it is truncated.
How can I see the complete command line of each running process?
2 Answers 2
In cmd, run the following:
To filter for a particular program:
The other properties that you can query for processes are:
- Caption
- CommandLine
- CreationClassName
- CreationDate
- CSCreationClassName
- CSName
- Description
- ExecutablePath
- ExecutionState
- Handle
- HandleCount
- InstallDate
- KernelModeTime
- MaximumWorkingSetSize
- MinimumWorkingSetSize
- Name
- OSCreationClassName
- OSName
- OtherOperationCount
- OtherTransferCount
- PageFaults
- PageFileUsage
- ParentProcessId
- PeakPageFileUsage
- PeakVirtualSize
- PeakWorkingSetSize
- Priority
- PrivatePageCount
- ProcessId
- QuotaNonPagedPoolUsage
- QuotaPagedPoolUsage
- QuotaPeakNonPagedPoolUsage
- QuotaPeakPagedPoolUsage
- ReadOperationCount
- ReadTransferCount
- SessionId
- Status
- TerminationDate
- ThreadCount
- UserModeTime
- VirtualSize
- WindowsVersion
- WorkingSetSize
- WriteOperationCount
- WriteTransferCount
get all running processes info using QProcess
few days ago i asked about how to get all running processes in the system using QProcess. i found a command line that can output all processes to a file:
C:\WINDOWS\system32\wbem\wmic.exe» /OUTPUT:C:\ProcessList.txt PROCESS get Caption
this will create C:\ProcessList.txt file contains all running processes in the system. i wonder how can i run it using QProcess and take its output to a variable.
it seems every time i try to run it and read nothing happens:
i prefer not to create process.txt at all and to take all the output to a variable.

2 Answers 2
You can run wmic.exe with «/OUTPUT:STDOUT» switch to print the process info directly to stdout. However, I was unable to read this info through QProcess API and save it in variable. Here’s the code I used:
This code successfully captures output of «cmd.exe /C echo test», but doesn’t work on wmic.exe. It seems that process wmic.exe is never finished, and I suppose it’s stdout is never flushed so you don’t receive anything throught QProcess::readAll().
That’s all help I can give you. Maybe you, or some other SO user will find bug in the snippet above.
Try this it will work well.
Not the answer you’re looking for? Browse other questions tagged windows qt qprocess or ask your own question.
Linked
Related
Hot Network Questions
Subscribe to RSS
To subscribe to this RSS feed, copy and paste this URL into your RSS reader.
site design / logo © 2021 Stack Exchange Inc; user contributions licensed under cc by-sa. rev 2021.4.16.39093
By clicking “Accept all cookies”, you agree Stack Exchange can store cookies on your device and disclose information in accordance with our Cookie Policy.


