- How to mount ISO images on Windows 10
- How to mount ISO image with File Explorer
- Mount image with double-click
- Mount image from context menu
- Mount image from ribbon menu
- Unmount image
- How to mount ISO image with PowerShell
- Mount ISO image command
- Unmount ISO image command
- More Windows 10 resources
- The Dell XPS 15 is our choice for best 15-inch laptop
- Halo: MCC’s live service elements make it better, not worse
- Microsoft’s Surface Duo is not ‘failing up’
- These external monitors go perfectly with the Lenovo ThinkPad X1 Carbon
- Использование образов ISO Using ISOs
- Обновление на месте с помощью ISO предварительного просмотра Windows In-place upgrade with a Windows Insider Preview ISO
- Чистая установка с ИСО предварительного просмотра Windows Clean installation with a Windows Insider Preview ISO
- Создание загружаемого USB-интерфейса для ICO windows Insider Creating a bootable USB for Windows Insider ISOs
- Чистая установка с isO Windows 10 Clean installation with a Windows 10 ISO
How to mount ISO images on Windows 10
 Source: Windows Central
An ISO image is a container format designed to store the contents of a physical disk (CD, DVD, or Blu-ray). Software companies usually use this file format as a medium to distribute the applications and tools without the need to ship physical media, which can be costly and time-consuming. For example, Microsoft uses this format to distribute previews of Windows 10 to testers and many other products.
Although you can find a lot of tools to work with images, Windows 10 includes the ability to mount and mount ISO files natively without the need for extra software.
In this Windows 10 guide, we’ll walk you through the steps to mount and unmount the ISO images using File Explorer as well as PowerShell commands.
How to mount ISO image with File Explorer
On Windows 10, you can access the content of an image in at least three different ways using File explorer. You can double-click the file, you can use the content menu option, or the option available in the ribbon menu.
Mount image with double-click
To quickly mount an ISO file on Windows 10, use these steps:
- Open File Explorer.
- Browse to the folder with the ISO image.
Double-click the .iso file file to mount it.
 Source: Windows Central
Once you complete these steps, the ISO file will open like any other folder, allowing you to access and extract the contents as necessary.
Mount image from context menu
To mount an ISO image with the File Explorer context menu, use these steps:
- Open File Explorer.
- Browse to the folder with the ISO image.
Right-click the .iso file and select the Mount option.
 Source: Windows Central
Once you complete the steps, you can access the contents of the image by selecting the virtual drive from the left navigation pane.
Mount image from ribbon menu
To mount an image with the ribbon menu, use these steps:
- Open File Explorer.
- Browse to the folder with the ISO image.
- Select the .iso file.
- Click the Disk Image Tools tab.
Click the Mount button.
 Source: Windows Central
If you have a third-party tool to open compressed files (such as .zip, .tar, .rar, etc.), it’s possible the tool may also be configured as the default application to open ISO images. When this happens, you won’t see an option to mount images. However, you can still right-click, select the Open with submenu, and select the Windows Explorer option to mount the ISO.
Unmount image
Once you are no longer using the image, you can quickly unmount the file by right-clicking the virtual drive under This PC in File Explorer and selecting the Eject option.
- Open File Explorer.
- Expand This PC from the left navigation pane.
Right-click the virtual drive and select the Eject option.
![]() Source: Windows Central
Source: Windows Central
After you complete these steps, the image will no longer be accessible until you mount it again.
How to mount ISO image with PowerShell
It’s also possible to mount and unmount an image using commands with PowerShell.
Mount ISO image command
To mount an ISO image using a PowerShell command, use these steps:
- Open Start.
- Search for PowerShell, right-click the top result, and select the Run as administrator option.
Type the following command to mount an ISO image and press Enter:
Mount-DiskImage -ImagePath «PATH\TO\ISOFILE»
In the command, make sure to replace the «PATH\TO\ISOFILE» with the actual path of the .iso file.
For example, this command mounts an image in the «E:\» virtual drive:
Mount-DiskImage -ImagePath «E:\Windows10.iso»
 Source: Windows Central
Once you complete the steps, the ISO image will mount, and you will be able to access the contents to install the application or extract the image contents from the newly-available drive letter.
Unmount ISO image command
To unmount an image with PowerShell, use these steps:
- Open Start.
- Search for PowerShell, right-click the top result, and select the Run as administrator option.
Type the following command to mount an ISO image and press Enter:
Dismount-DiskImage -ImagePath «PATH\TO\ISOFILE»
In the command, make sure to replace the «PATH\TO\ISOFILE» with the actual path of the .iso file.
For example, this command removes the mount for an image in the «E:\» virtual drive:
Dismount-DiskImage -ImagePath «E:\Windows10.iso»
Source: Windows Central
After you complete the steps, the virtual drive will be removed, and the image will no longer be accessible until you mount it again.
More Windows 10 resources
For more helpful articles, coverage, and answers to common questions about Windows 10, visit the following resources:
![]()
The Dell XPS 15 is our choice for best 15-inch laptop
For a lot of people, a 15-inch laptop is a perfect size that offers enough screen for multitasking, and in a lot of cases, some extra performance from powerful hardware. We’ve rounded up the best of the best at this size.
![]()
Halo: MCC’s live service elements make it better, not worse
Halo: The Master Chief Collection is more popular than ever, but some fans don’t agree with the live service approach 343 Industries has taken with it. Here’s why those elements are, at the end of the day, great for the game and for Halo overall.
![]()
Microsoft’s Surface Duo is not ‘failing up’
Microsoft announced this week that it was expanding Surface Duo availability to nine new commercial markets. While Surface Duo is undoubtedly a work in progress, this is not a sign of a disaster. It’s also doesn’t mean that Surface Duo is selling a ton either. Instead, the reason for the expansion is a lot more straightforward.
![]()
These external monitors go perfectly with the Lenovo ThinkPad X1 Carbon
The Lenovo ThinkPad X1 Carbon is an excellent laptop, but what if you want to project the display onto a larger screen? You’ll need an external monitor for that. Here are our favorite options.
Использование образов ISO Using ISOs
Если устройство трудно использовать из-за проблемы или если вы хотите выйти из канала Dev или прекратить получать сборки предварительного просмотра, может потребоваться использовать ISO для чистой установки или обновления на месте. If your device is hard to use because of an issue, or if you want to switch out of the Dev Channel or stop receiving preview builds, you might need to use an ISO for a clean installation or in-place upgrade. IsOs доступны как для предварительной сборки предварительного просмотра Windows 10, так и для Windows. ISOs are available for both Windows 10 Insider Preview Builds and for Windows.
Обновление на месте с помощью ISO предварительного просмотра Windows In-place upgrade with a Windows Insider Preview ISO
Скачайте выбранный ISO со страницы ISO для Windows Insider, сэкономив его в расположении на устройстве или создав загружаемый USB. Download your chosen ISO from the Windows Insider ISO page by saving it to a location on your device or creating a bootable USB.
Откройте проводник и перейдите в расположение, где сохранен ISO-файл. Open File Explorer and go to where you saved the ISO. Выберите ISO-файл для открытия, что позволит Windows подключить образ, чтобы вы могли получить к нему доступ. Select the ISO file to open it, which lets Windows mount the image so you can access it.
Выберите файл setup.exe для запуска процесса установки. Select the setup.exe file to launch the install process.
Во время настройки выберите параметры Keep Windows, личные файлы и приложения. During setup, select the Keep Windows settings, personal files, and apps option.
После завершения установки перейдите в программу обновления параметров & **** > **** > Windows Insider Program, чтобы убедиться, что параметры windows Insider верны. Once it’s finished installing, go to Settings > Update & Security > Windows Insider Program to make sure your Windows Insider settings are correct.
Чистая установка с ИСО предварительного просмотра Windows Clean installation with a Windows Insider Preview ISO
Создайте резервные копии всех своих файлов и приложений. Back up all your files and applications. Чистая установка с использованием образа ISO программы предварительной оценки Windows приведет к очистке всех ваших файлов, параметров и приложений. A clean install with a Windows Insider ISO will erase all of your files, settings, and applications.
Скачайте выбранный ISO со страницы ISO для Windows Insider, сэкономив его в расположении на устройстве или создав загружаемый USB. Download your chosen ISO from the Windows Insider ISO page by saving it to a location on your device or creating a bootable USB.
Откройте проводник и перейдите в расположение, где сохранен ISO-файл. Open File Explorer and go to where you saved the ISO. Выберите ISO-файл для открытия, что позволит Windows подключить образ, чтобы вы могли получить к нему доступ. Select the ISO file to open it, which lets Windows mount the image so you can access it.
Выберите файл setup.exe для запуска процесса установки. Select the setup.exe file to launch the install process.
Во время установки нажмите параметр Изменить выбранные для сохранения компоненты и выберите Ничего на следующем экране, чтобы выполнить чистую установку. During setup, select the Change what to keep option, and then choose Nothing on the next screen to complete a clean intall.
После завершения установки перейдите в программу обновления параметров & **** > **** > Windows Insider Program, чтобы убедиться, что параметры windows Insider верны. Once it’s finished installing, go to Settings > Update & Security > Windows Insider Program to make sure your Windows Insider settings are correct.
Создание загружаемого USB-интерфейса для ICO windows Insider Creating a bootable USB for Windows Insider ISOs
Если у вас возникли определенные проблемы, препятствующие скачив isO на вашем устройстве, или вам необходимо быстро настроить новое устройство в программе инсайдерской Windows, может помочь загружаемый USB, сделанный из файла ISO Windows Insider. If you’re having certain issues that prevent you from downloading an ISO to your device, or you need to quickly set up a new device in the Windows Insider Program, a bootable USB made from a Windows Insider ISO file can help.
Существует множество сторонних программных приложений, способных преобразовать USB-накопитель в загружаемый формат. There are many third-party software applications that are capable of converting a USB drive into a bootable format. В этом примере мы используем Rufus, так как он бесплатный и легкий на системных ресурсах. We’re using Rufus in this example since it’s free and lightweight on system resources. Вы можете использовать любое программное обеспечение, которое может форматировать USB в загружаемый формат и преобразовать ISO в декомпилируемые файлы установки. You can use any software that can format the USB into a bootable format and convert the ISO into the decompiled installation files.
Скачайте выбранный ISO со страницы ISO для Windows Insider, сэкономив его в расположении на устройстве, которое можно легко запомнить. Download your chosen ISO from the Windows Insider ISO page by saving it to a location on your device you can easily remember.
Подключите USB-накопитель, который имеет не менее 8 ГБ. Connect a USB drive that’s at least 8GB. Сбереите все данные на диске, который необходимо сохранить, так как все данные на нем будут стираться. Back up any data on the drive you want to save, because any data on it will erased.
Запуск Rufus или предпочтительного программного обеспечения. Launch Rufus or your preferred software.
Настройка параметров меню Rufus: Configure the Rufus menu options:
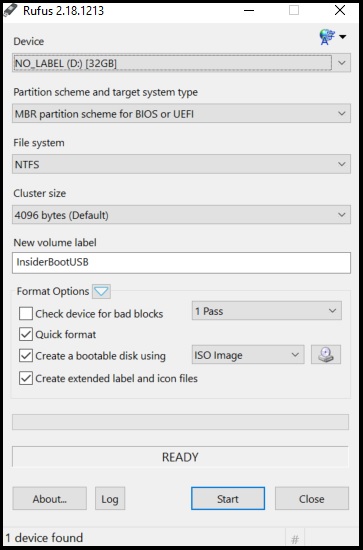
Если у вас есть несколько дисков, подключенных через USB (внешний жесткий диск, большой палец и т.д.), убедитесь, что вы выберите правильное устройство из отсев. If you have multiple drives connected via USB (external hard drive, thumb drive, etc.), make sure you select the right device from the dropdown.
Схема раздела и тип целевой системы должны быть установлены в схеме раздела MBR для BIOS или UEFI. Partition scheme and target system type should be set to MBR partition scheme for BIOS or UEFI.
Файловая система должна быть настроена на NTFS. File system should be set to NTFS. Если по каким-либо причинам это не работает на устройстве, его можно повторно создать с помощью FAT32. If for some reason this doesn’t work on your device, you can re-create it using FAT32.
Размер кластера может оставаться на 4096 bytes (По умолчанию) Cluster size can stay on 4096 bytes (Default)
Для метки New Volumeвведите имя по вашему выбору. For New volume label, enter a name of your choosing.
В формате Параметры, 1 Пропуск должен быть выбран из первого отсев. Under Format Options, 1 Pass should be selected from the first dropdown. Выберите почтовые ящики рядом с форматом Quick, Создайтезагружаемый диск с помощью и создайте расширенные файлы меток и значков. Select the checkboxes beside Quick format, Create a bootable disk using, and Create extended label and icon files. Кроме того, создайте загружаемый диск с помощью, выберите isO Image из выпадаемой папки, а затем выберите значок диска рядом с отсевом и перейдите к скачаемом файлу ISO. Beside Create a bootable disk using, choose ISO Image from the dropdown, then select the disk icon next to the dropdown and navigate to the ISO file you downloaded.
Выберите Начните, и Rufus будет формат вашего USB и decompile ISO. Select Start, and Rufus will format your USB and decompile the ISO.
После того, как она будет завершена, вы все готово. Once it’s finished, you’re all set. Теперь вы можете использовать его на устройстве. Now you can use it on a device.
Если вы используете этот диск для обновления устройства, на нем уже есть Windows, подключите его к устройству, откройте Проводник файлов, найдите диск и запустите setup.exe, чтобы начать работу. If you use this drive to upgrade a device that already has Windows on it, connect it to the device, open File Explorer, locate the drive, and launch setup.exe to get started.
Если этот диск используется для чистой установки Windows, подключите его к устройству и перезагружайте. If you use this drive to do a clean Windows install, connect it to the device and reboot. Возможно, вам также потребуется настроить параметры BIOS или UEFI, чтобы разрешить загрузку с USB-накопителя. You may also need to adjust your BIOS or UEFI settings to allow it to boot from a USB-based drive.
Чистая установка с isO Windows 10 Clean installation with a Windows 10 ISO
Создайте резервные копии всех своих файлов и приложений. Back up all your files and applications. Чистая установка с использованием образа ISO Windows 10 приведет к очистке всех ваших файлов, параметров и приложений. A clean install with a Windows 10 ISO will erase all of your files, settings, and applications.
Скачайте последнюю isO Windows 10, сэкономив ее в расположении на компьютере или создав загружаемый USB. Download the latest Windows 10 ISO by saving it to a location on your PC or creating a bootable USB.
Откройте проводник и перейдите в расположение, где сохранен ISO-файл. Open File Explorer and go to where you saved the ISO. Выберите ISO-файл для открытия, что позволит Windows подключить образ, чтобы вы могли получить к нему доступ. Select the ISO file to open it, which lets Windows mount the image so you can access it.
Выберите файл setup.exe для запуска процесса установки. Select the setup.exe file to launch the install process.
Во время установки нажмите параметр Изменить выбранные для сохранения компоненты и выберите Ничего на следующем экране, чтобы выполнить чистую установку. During setup, select the Change what to keep option, and then choose Nothing on the next screen to complete a clean intall.


