- Создание самоподписанного сертификата SSL
- Creating a Self-Signed SSL Certificate
- В этом руководстве объясняется, как создать самозаверяющий сертификат SSL с помощью инструмента openssl.
- Что такое самоподписанный сертификат SSL?
- Предпосылки
- Создание самоподписанного SSL-сертификата
- Создание самоподписанного SSL-сертификата без запроса
- Вывод
- Generating self-signed certificates on Windows
- 1. PowerShell 4.0
- 2. OpenSSL
- 3. Makecert
- 4. Selfssl7
- 5. IIS
- 6. Pluralsight
- 7. SelfSSL
- 8. SSLChecker
- 9. Hard core
- 10. mkcert
- Create a self signed certificate in Windows [Full Guide]
- Best Hosting Deals for our Readers — Limited offer
- GoDaddy SSL Certificates
- Generate self-signed certificate in Windows 10
- Use OpenSSL to create a self-signed certificate
- Create a Self-Signed Certificate Using PowerShell
- How to add my self-signed certificate into curls ca file on windows
- Frequently Asked Questions
- Can I generate my own SSL certificate?
- How do I get a self-signed certificate?
- What is the risk of self-signed certificates?
Создание самоподписанного сертификата SSL
Creating a Self-Signed SSL Certificate
В этом руководстве объясняется, как создать самозаверяющий сертификат SSL с помощью инструмента openssl.

Что такое самоподписанный сертификат SSL?
Самозаверяющий сертификат SSL — это сертификат, подписанный лицом, которое его создало, а не доверенным центром сертификации. Самозаверяющие сертификаты могут иметь тот же уровень шифрования, что и доверенный CA-подписанный SSL-сертификат.
Самозаверяющие сертификаты, признанные действительными в любом браузере. Если вы используете самозаверяющий сертификат, веб-браузер покажет посетителю предупреждение о том, что сертификат веб-сайта невозможно проверить.
Самозаверяющие сертификаты в основном используются для целей тестирования или внутреннего использования. Вы не должны использовать самозаверяющий сертификат в производственных системах, которые подключены к Интернету.
Предпосылки
Инструментарий openssl необходим для создания самозаверяющего сертификата.
Чтобы проверить, установлен ли пакет openssl в вашей системе Linux, откройте ваш терминал, введите openssl version и нажмите Enter. Если пакет установлен, система распечатает версию OpenSSL, в противном случае вы увидите нечто подобное openssl command not found .
Если пакет openssl не установлен в вашей системе, вы можете установить его, выполнив следующую команду:
Ubuntu и Debian
Чентос и Федора
Создание самоподписанного SSL-сертификата
Чтобы создать новый самоподписанный сертификат SSL, используйте openssl req команду:
Давайте разберем команду и разберемся, что означает каждая опция:
- -newkey rsa:4096 — Создает новый запрос сертификата и 4096-битный ключ RSA. Значение по умолчанию составляет 2048 бит.
- -x509 — Создает сертификат X.509.
- -sha256 — Используйте 265-битный SHA (алгоритм безопасного хэширования).
- -days 3650 — Количество дней для сертификации сертификата. 3650 — это 10 лет. Вы можете использовать любое положительное целое число.
- -nodes — Создает ключ без ключевой фразы.
- -out example.crt — Указывает имя файла, в который будет записан вновь созданный сертификат. Вы можете указать любое имя файла.
- -keyout example.key — Задает имя файла, в который будет записан вновь созданный закрытый ключ. Вы можете указать любое имя файла.
Для получения дополнительной информации о параметрах openssl req команды посетите страницу документации OpenSSL req.
Как только вы нажмете Enter, команда сгенерирует закрытый ключ и задаст вам ряд вопросов, которые она будет использовать для генерации сертификата.
Введите запрашиваемую информацию и нажмите Enter.
Сертификат и закрытый ключ будут созданы в указанном месте. Используйте команду ls, чтобы убедиться, что файлы были созданы:
Это оно! Вы создали новый самозаверяющий сертификат SSL.
Всегда полезно создать резервную копию нового сертификата и ключа для внешнего хранилища.
Создание самоподписанного SSL-сертификата без запроса
Если вы хотите сгенерировать самозаверяющий SSL-сертификат без запроса какого-либо вопроса, используйте -subj параметр и укажите всю информацию о субъекте:
- C= — Название страны. Двухбуквенное сокращение ISO.
- ST= — Название штата или провинции.
- L= — Название населенного пункта. Название города, в котором вы находитесь.
- O= — Полное название вашей организации.
- OU= — Организационная единица.
- CN= — Полное доменное имя.
Вывод
В этом руководстве мы показали, как создать самозаверяющий сертификат SSL с помощью инструмента openssl. Теперь, когда у вас есть сертификат, вы можете настроить приложение для его использования.
Generating self-signed certificates on Windows

If you do anything with Identity, you’ll know you need certificates — lots of them — and that normally means self-signed to keep the costs down or because you just need it for a short time before you tear down the VM or because you don’t have a PKI infrastructure.
This is for testing, proofs of concept etc. This is definitely not for Production purposes. Use at your own risk.
This self-signed certificate also needs a private key otherwise it’s pretty useless for SSL, token signing etc.
Remember that this won’t be signed by a CA so you need to do this to stop the browser complaining once you’ve generated the certificates.
Note: The “ character displayed by Medium does something funny when you cut and paste and run the command. You need to retype it as a “straight” character.

Just calling out Let’s Encrypt. They provide free CA certificates that support multiple SAN and wildcards. The drawback is that the certificate is only valid for 90 days but they provide an automated renew process. This is a very good option for a quick PoC.
So, what other options do we have?
1. PowerShell 4.0
Running as administrator.
$cert = New-SelfSignedCertificate -certstorelocation cert:\localmachine\my -dnsname company.co.nz
Using “mmc”, we can see the certificate in the local computer store. Although it shows “Client Authentication”, it is valid for “Server Authentication” as well.

Now we can do the normal export function or we can create the pfx file ourselves.
$pwd = ConvertTo-SecureString -String ‘password1234’ -Force -AsPlainText
$path = ‘cert:\localMachine\my\’ + $cert.thumbprint
Export-PfxCertificate -cert $path -FilePath c:\junk\certificate\powershellcert.pfx -Password $pwd
and then double-click the pfx file to import via the “Certificate Import Wizard”. You’ll be asked to input the password you used above.
This certificate is only valid for a year (the default).
If we wanted a three-year certificate, we need:
$date_now = Get-Date
$extended_date = $date_now.AddYears(3)
$cert = New-SelfSignedCertificate -certstorelocation cert:\localmachine\my -dnsname company.co.nz -notafter $extended_date

Now what happens if we need multiple SAN (subject alternative name)?
“-DnsName” specifies one or more DNS names to put into the subject alternative name extension of the certificate. The first DNS name is also saved as the Subject Name.
$cert = New-SelfSignedCertificate -certstorelocation cert:\localmachine\my -dnsname company.co.nz, mycompany.co.nz, minecompany.co.nz -notafter $extended_date -KeyLength 4096

And note the keylength parameter if that’s something you need to change.
2. OpenSSL
Originally for the Linux world but you can get a Windows version from Shining Light. Don’t worry about the Win32 reference and the outdated documentation at the top. Scroll down and you’ll see the latest Win64 stuff.
And help with future work by donating $10 😄. It’s a lot easier than having to compile the binaries!
openssl version -a
gives you the version.
openssl req -x509 -newkey rsa:4096 -sha256 -keyout openssl.key -out openssl.crt -subj “/CN=company.co.nz” -days 600
Generating a 4096 bit RSA private key
…………………………………++
…………………………++
writing new private key to ‘opensll.key’
Enter PEM pass phrase:
Verifying — Enter PEM pass phrase:
The crt file is the same as a cer file. You can use it in Windows e.g. to load a signing key for another claims provider in ADFS.
But it doesn’t contain a private key — that’s in a separate file — and Windows doesn’t like that. See below for steps on combining them.
As far as multiple SAN are concerned, OpenSSL currently doesn’t support a way of doing this via the command line.
I believe this is coming in 1.1.1 via:
extension “subjectAltName = DNS:mycompany.co.nz, DNS:minecompany.co.nz”
At the moment, you need to do this via a configuration file.
[req]
distinguished_name = req_distinguished_name
x509_extensions = v3_req
prompt = no
[req_distinguished_name]
C = NZ
ST = NI
L = Auckland
O = Company
OU = Division
CN = company.co.nz
[v3_req]
keyUsage = critical, digitalSignature, keyAgreement
extendedKeyUsage = serverAuth
subjectAltName = @alt_names
[alt_names]
DNS.1 = company.co.nz
DNS.2 = mycompany.com
DNS.3 = minecompany.co.nz
Save this as “san.cnf”.
openssl req -x509 -newkey rsa:4096 -sha256 -keyout opensll.key -out openssl.crt -days 600 -config san.cnf
To make this available to Windows, you need to combine the private and public keys into one pfx file.
openssl pkcs12 -export -name “company.co.nz” -out openssl.pfx -inkey openssl.key -in openssl.crt
where “company.co.nz” is the friendly name.
3. Makecert
As per the documentation, makecert is deprecated and you should use the PowerShell command as above.
Official documentation is here.
To make a self-signed certificate with a private key, use:
makecert -r -pe -n “CN=company.co.nz” -e 01/01/2019 -sky exchange -sv makecert.pvk makecert.cer
“C:\Program Files (x86)\Microsoft SDKs\Windows\v7.1A\Bin\pvk
2pfx.exe” -pvk makecert.pvk -spc makecert.cer -pfx makecert.pfx
(The path to pvk2pfx is as per my PC. YMMV).
Then install the pfx file.
4. Selfssl7
This used to be my go-to tool for generating self-signed certificates.
The current version runs on .NET 3.5 that is not normally installed on the latest servers and PC’s. You can download the code and rebuild for .NET 4.6 and it will work just fine.
One of the best features for me was that it could do the IIS SSL bindings as well as installing the certificate into the appropriate store.
SelfSSL7 /N cn=company.co.nz /K 2048 /V 3652 /X /F c:cert.pfx
This generates a self-signed certificate using a 2048 bit-length key, without a password in .pfx format (including the private key)
5. IIS
This is one of those hidden features that very few people know about.

From the top-level in IIS Manager, select “Server Certificates”.

Then click the “Create” on the right.

This will create a self-signed certificate valid for a year with a private key. It is only for “localhost”.
6. Pluralsight
Yes, they are a training company but they also have some neat utilities.

You can create a PFX file directly or you can save directly to a certificate store of your choice.

7. SelfSSL
This is an old-school utility which is available if you have the Microsoft Internet Information Services (IIS) 6.0 Resource Kit.
selfssl /t /v:200 /n:cn=company.co.nz
The /t option saves you a step by automatically installing the new self-signed SSL certificate into the Web server’s certificate store. The /v option specifies the number of days the certificate will be valid.
8. SSLChecker
This is an online utility.

This will generate a self-signed certificate and a private key in the format:
Save the two texts; call the certificate file “something.crt” and call the private key file “something.key” then use the openssl command above to combine both into a .pfx file that you can then import.
9. Hard core
If you are a developer and insist on rolling your own, there are a number of examples around. .NET doesn’t have the required support so you need to use Bouncy Castle.
10. mkcert
mkcert is a simple tool for making locally-trusted development certificates. It requires no configuration.
“mkcert is written in Go, and you can run it with a Go run command”.
If you have another utility you recommend, note it in a comment and I’ll add it.
The traditional way to look at certificates is to “Run mmc”.
Create a self signed certificate in Windows [Full Guide]

- The process of adding an SSL certificate to your website is pretty straight-forward, and this guide will help.
- We also discuss the 3 most efficient ways to either purchase an SSL certificate, use an open-source SSL, or create your own.
- Explore our Site Owner Hub for more useful guides on this topic.
- Consider bookmarking our detailed Certificate Error section to ensure you’ll never be overwhelmed by this type of issue.

Adding an SSL certificate to your website is a straightforward process. You can either purchase a third-party SSL certificate and renew it on a yearly basis or use an open-source SSL certificate and create a corn job to renew it every month.
However, for development and testing, you can explore the possibility of creating a self-signed SSL certificate in Windows.
Best Hosting Deals for our Readers — Limited offer
 | Best WordPress hosting |  Check offer! Check offer! |
 | 33% off for a three-year plan | Check offer! |
 | Start a website at 2.49$ per month | Check offer! |
 | Currently at 50% discount | Check offer! |
 | Get a plan at a half-price | Check offer! |
Creating a self-signed certificate is an excellent alternative to purchasing and renewing a yearly certification for testing purposes. You can make use of OpenSSL to generate a self-signed certificate for this purpose.
In this article, we explore how to create a self-signed certificate in Windows. The later part of the article also explores how to deploy the self-signed certificate to client machines.
Quick Tip:
Although you can save some money if you create a self-signed certificate, it may lead to a permanent block of your website for some users. This is caused by the certificate error message and in most cases cannot be undone.
Besides that, the process is time-consuming and really not worth your time which also has a certain cost. We strongly recommend using a 3rd party SSL service provider.

GoDaddy SSL Certificates
Generate self-signed certificate in Windows 10
Use OpenSSL to create a self-signed certificate
Install OpenSSL

- Download the latest OpenSSL windows installer from a third-party source.
- Run the installer. OpenSSL requires Microsoft Visual C++ to run. The installer will prompt you to install Visual C++ if it is already not installed.
- Click Yes to install.
- Run the OpenSSL installer again and select the installation directory.
- Click Next.
- Open a command prompt and type OpenSSL to get OpenSSL prompt.
Create a public/private key file pair
- Make sure you have OpenSSL installed.
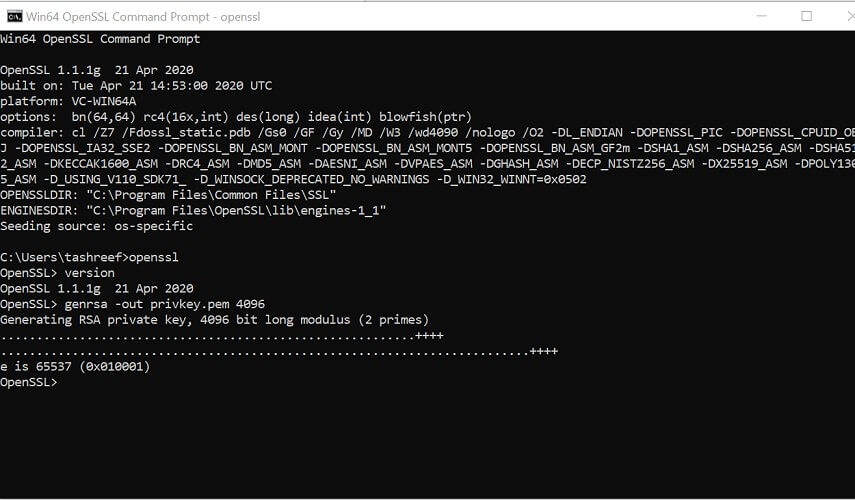
- Open Command Prompt and create a new directory on your C drive:
C: >cd Test - Now go to the new directory:
C: Test> - Now you need to type the path of the OpenSSL install directory followed by the RSA key algorithm.
C: Test>c:opensslbinopenssl genrsa -out privkey.pem 4096 - Run the following command to split the generated file into separate private and public key files:
C: Test>c:opensslbinopenssl ssh-keygen -t rsa -b 4096 -f privkey.pem
Once you have the public/private key generated, follow the next set of steps to create a self-signed certificate file on a Windows system.
Create a self-signed certificate
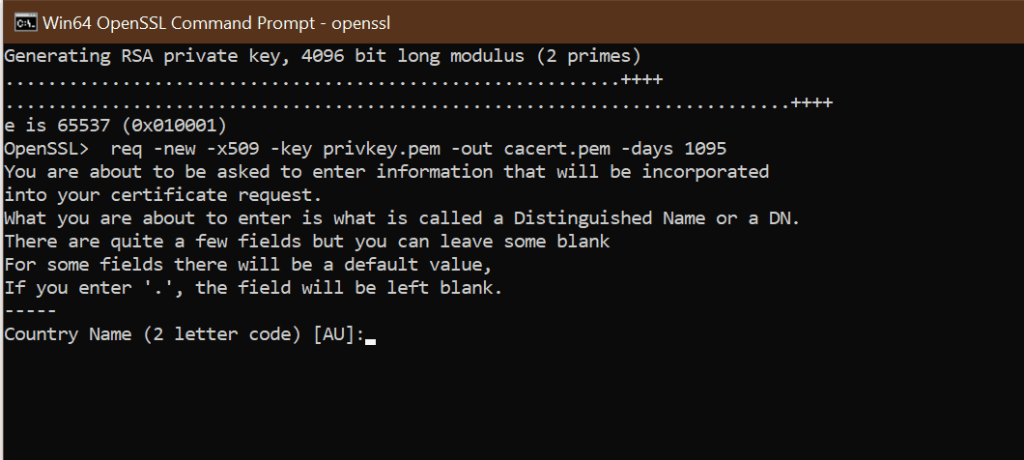
- Open a Command Prompt window.
- Go to the directory that you created earlier for the public/private key file.
C: Test> - Enter the path of the OpenSSL install directory, followed by the self-signed certificate algorithm:
C: Test>c:opensslbinopenssl req -new -x509 -key privkey.pem -out cacert.pem -days 1095
- Follow the on-screen instruction.
- You need to enter information about your organization, region, and contact details to create a self-signed certificate.
If you would rather use PowerShell to create a self-signed certificate, follow the next set of steps instead.
Create a Self-Signed Certificate Using PowerShell
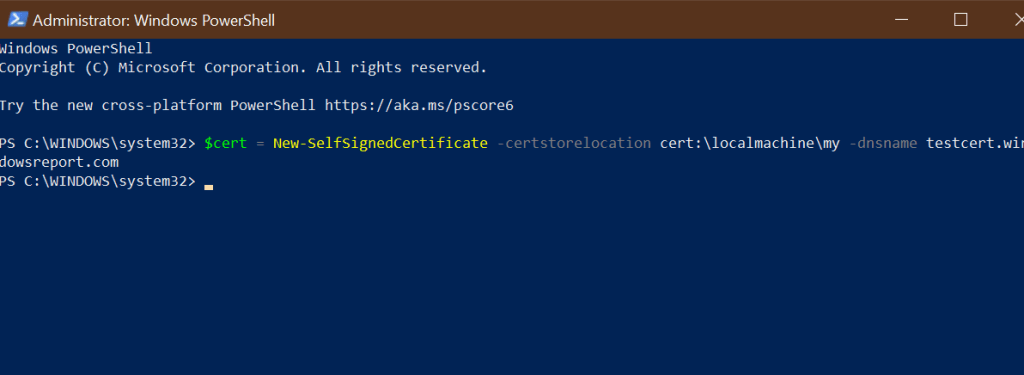
- Open PowerShell as administrator. Press the Windows key, type Powershell. Right-click on PowerShell and select Run as Administrator.
- Run the New-SelfsignedCertificate command, as shown below.
$cert = New-SelfSignedCertificate -certstorelocation cert:localmachinemy -dnsname testcert.windowsreport.com - This will add the certificate to the locater store on your PC. Replace testcert.windowsreport.com with your domain name in the above command.
- Next, create a password for your export file:
$pwd = ConvertTo-SecureString -String ‘password!’ -Force -AsPlainText - Replace Password with your own password.
- Enter the following command to export the self-signed certificate:
$path = ‘cert:localMachinemy’ + $cert.thumbprint Export-PfxCertificate -cert $path -FilePath c:tempcert.pfx -Password $pwd - In the above command replace c:temp with the directory where you want to export the file.
- You can import the exported file and deploy it for your project.
How to add my self-signed certificate into curls ca file on windows

- Once you have created a self-signed certificate and installed it, you may want cURL to trust the certificate as well.
- The later versions of cURL don’t include a trusted listed a .pem file. You can download the .pem file and type the following command in the php.ini file.
curl.cainfo = «C:xamppphpcacert.pem» - Once done, you need to get cURL to trust your self-signed certificate. To do this, open your server.crt file. The file is created when you created your self-signed certificate.
- Copy all the content of the server.crt file and then add it to the cacert.pem file.
Creating a self-signed certificate using OpenSSL can be done using the Command Prompt or PowerShell. Being able to create your self-signed certificate allows you to create a temporary certificate for in-development projects that require an SSL certificate.
Frequently Asked Questions
Can I generate my own SSL certificate?
Yes. You can create your own SSL certificate using OpenSSL for local project development. However, these certificates are not trusted by the web browser and operating system since it is not from a Certificate Authority.
How do I get a self-signed certificate?
You can generate a self-signed certificate using Windows Server IIS or OpenSSL. For IIS, select the name of the server in the Connection column, double-click on Server Certificates, and select Create Self Signed Certificate.
What is the risk of self-signed certificates?
If you are using a self-signed certificate on the production version of your website, then the visitors’ web browser will show a certificate error. It will also deter any potential client from visiting your website.


