- Transferring files between remote server and local system
- Prerequisites
- ⚜️ The list
- ⚜️ Variables Used
- Before starting
- ⚜️ Let’s Begin
- 🔅 File from Local host to the Remote host
- 🔅 File from Remote host to the Local host
- 🔅 Multiple files from Local host to the Remote host
- 🔅 Directory from Local host to the Remote host
- 🔅 Directory from Remote host to the Local host
- That’s it!!
- Happy Coding !!
- ftp ftp
- Синтаксис Syntax
- Параметры Parameters
- Комментарии Remarks
- 5 Easy Ways to Transfer Files Between Computers on the Same Network
- 1. Nearby Sharing: Sharing Files in Windows 10
- 2. Transfer Files by Email
- 3. Transfer Files Via the Cloud
- 4. Use LAN File Sharing Software
- 5. Use FTP Client/Server Software
- Transferring Files Between Windows 10 Computers
Transferring files between remote server and local system


Now these days, playing with remote servers is one of the great skill which is necessary for all kind of developers especially full-stack ones and while with them, there is one problem which every person will face which is Sharing data from your local system to remote server. For instance, It can be some already created or downloaded scripts that you may want to execute on remote server. The one option is to push your scripts on Github and then clone them over remote servers which works fine but there is an another tool which we can use much more efficiently and its totally secure. Yes, I am talking about SCP.
Lets go through its formal definition —
The SCP ( Secure Copy Protocol ) is a network protocol, based on the BSD RCP protocol, which supports file transfers between hosts on a network.
SCP allows files to be copied to, from, or between different hosts. It uses SSH for data transfer and provides the same authentication and same level of security as SSH.
Prerequisites
🔅 I am using temporary AWS’s EC2 Instance as my Remote Host which will be deleted shorty after publishing of this blog post. So, screenshot with ubuntu@ is remote side terminal.
- We are starting with a file at Local host ( localToRemote.txt ) which we will transfer to Remote host & a file at Remote host ( remoteToLocal.txt ) which we will transfer from there to our Local host.
- Make sure you must have added your SSH key on Remote host. Click here to know more about SSH based authentication.
⚜️ The list
- From Local host to the Remote host
- From Remote host to Local host
- Multiple files from Local host to Remote host
- Directory from Local host to Remote host
- Directory from Remote host to Local host
⚜️ Variables Used
- user : Username of the Remote host.
- remote_host : Address of the remote host. Either IP or Domain Name.
- file_path : Path of file on Local host
- remote_file_path : Path of file on Remote host
- remote_dir : Path of directory on Remote host
- local_dir : Path of directory on Local host
Before starting
and for paths which are on remote host we will add server address first. i.e user>@ ip_or_domain_name>: remote_dir> .
⚜️ Let’s Begin
🔅 File from Local host to the Remote host
❗️ Here scp -i «key.pem» is because my remote server is on EC2. So, instead of simple SSH key based auth, EC2 uses PEM file for login. To know more about all this — Visit this link . If you already have SSH key set-up, you can skip both these terms.
🔅 File from Remote host to the Local host
scp user>@ remote_host>: remote_file_path> local_dir>
You Can share any file using these commands. i.e .zip , .tar , etc.
🔅 Multiple files from Local host to the Remote host
🔅 Directory from Local host to the Remote host
🔅 Directory from Remote host to the Local host
That’s it!!
Happy Coding !!
🎧 Listening to “ Beerus Sama tea time — 1 hour” and I am also going to have a cup of tea with snacks.

If you like this article, please give it some claps 👏 and share it! If you do not like this post or have any type of questions regarding anything that i mentioned in this post. Feel free to ask me. Just post an issue in my “ Ask Me Anything” by clicking here .
ftp ftp
Область применения: Windows Server (половина ежегодного канала), Windows Server 2019, Windows Server 2016, Windows Server 2012 R2, Windows Server 2012 Applies to: Windows Server (Semi-Annual Channel), Windows Server 2019, Windows Server 2016, Windows Server 2012 R2, Windows Server 2012
Передает файлы на компьютер, на котором запущена служба протокол FTP (FTP), и с него. Transfers files to and from a computer running a File Transfer Protocol (ftp) server service. Эту команду можно использовать интерактивно или в пакетном режиме, обрабатывая текстовые файлы ASCII. This command can be used interactively or in batch mode by processing ASCII text files.
Синтаксис Syntax
Параметры Parameters
| Параметр Parameter | Описание Description |
|---|---|
| -v -v | Отключает отображение ответов на удаленные серверы. Suppresses display of remote server responses. |
| -d -d | Включает отладку, отображая все команды, передаваемые между FTP-клиентом и FTP-сервером. Enables debugging, displaying all commands passed between the FTP client and FTP server. |
| -i -i | Отключает Интерактивные запросы во время передачи нескольких файлов. Disables interactive prompting during multiple file transfers. |
| -n -n | Подавляет автоматическое имя входа при начальном подключении. Suppresses auto-login upon initial connection. |
| -g -g | Отключает имя файла глобализации. Disables file name globbing. Стандартная маска позволяет использовать звездочку (*) и вопросительный знак (?) в качестве подстановочных знаков в именах локальных файлов и путей. Glob permits the use of the asterisk (*) and question mark (?) as wildcard characters in local file and path names. |
| #d0 -s: | Указывает текстовый файл, содержащий команды FTP . Specifies a text file that contains ftp commands. Эти команды выполняются автоматически после запуска FTP . These commands run automatically after ftp starts. Этот параметр не допускает пробелов. This parameter allows no spaces. Используйте этот параметр вместо перенаправления ( ). Use this parameter instead of redirection ( ). Примечание. В операционных системах Windows 8 и Windows Server 2012 или более поздней версии текстовый файл должен быть написан в кодировке UTF-8. Note: In Windows 8 and Windows Server 2012 or later operating systems, the text file must be written in UTF-8. |
| -a -a | Указывает, что при привязке подключения к данным FTP можно использовать любой локальный интерфейс. Specifies that any local interface can be used when binding the ftp data connection. |
| -A -A | Выполняет вход на FTP-сервер как анонимный. Logs onto the ftp server as anonymous. |
| x -x: | Переопределяет размер SO_SNDBUF по умолчанию 8192. Overrides the default SO_SNDBUF size of 8192. |
| Cерверный -r: | Переопределяет размер SO_RCVBUF по умолчанию 8192. Overrides the default SO_RCVBUF size of 8192. |
| & -b: | Переопределяет число асинхронных буферов по умолчанию, равное 3. Overrides the default async buffer count of 3. |
| Белая -w: | Задает размер буфера перемещения. Specifies the size of the transfer buffer. Размер окна по умолчанию составляет 4096 байт. The default window size is 4096 bytes. |
| Указывает имя компьютера, IP-адрес или IPv6-адрес сервера FTP, к которому осуществляется подключение. Specifies the computer name, IP address, or IPv6 address of the ftp server to which to connect. Имя узла или адрес, если он указан, должен быть последним параметром в строке. The host name or address, if specified, must be the last parameter on the line. | |
| -? -? | Отображение справки в командной строке. Displays help at the command prompt. |
Комментарии Remarks
Параметры командной строки FTP чувствительны к регистру. The ftp command-line parameters are case-sensitive.
Эта команда доступна, только если протокол Internet Protocol (TCP/IP) установлен в качестве компонента в свойствах сетевого адаптера в окне Сетевые подключения. This command is available only if the Internet Protocol (TCP/IP) protocol is installed as a component in the properties of a network adapter in Network Connections.
Команду FTP можно использовать в интерактивном режиме. The ftp command can be used interactively. После запуска FTP создает подсреду, в которой можно использовать команды FTP . After it is started, ftp creates a sub-environment in which you can use ftp commands. Вы можете вернуться в командную строку, введя команду Quit . You can return to the command prompt by typing the quit command. При запуске вспомогательной среды FTP она указывается в ftp > командной строке. When the ftp sub-environment is running, it is indicated by the ftp > command prompt. Дополнительные сведения см. в разделе команды FTP . For more information, see the ftp commands.
При установке протокола IPv6 команда FTP поддерживает использование IPv6. The ftp command supports the use of IPv6 when the IPv6 protocol is installed.
5 Easy Ways to Transfer Files Between Computers on the Same Network
It’s more difficult than it should be
You may think something as simple as transferring files between computers on your home network would be easy. Unfortunately, that’s not the case.
On corporate networks, the company’s IT department will often create a network share drive where anyone with a computer connected to the network can place and exchange files over the network. On your home network, you don’t have an IT department to do this for you.

You don’t have to worry, because there are lots of simple ways to accomplish this.
1. Nearby Sharing: Sharing Files in Windows 10
Prior to April 2018, sharing files over a home network required that you attempt to set up what was known as a “homegroup”. This was essentially a group of your computers on your home network attached to a common network group. It allowed for sharing files, but it was extremely complicated to set up and didn’t always work right due to security software or network firewalls.
Thankfully, Microsoft introduced other, much easier ways to share files over a network (and over the Internet).
Sharing over your local network involves a feature called Nearby Sharing.
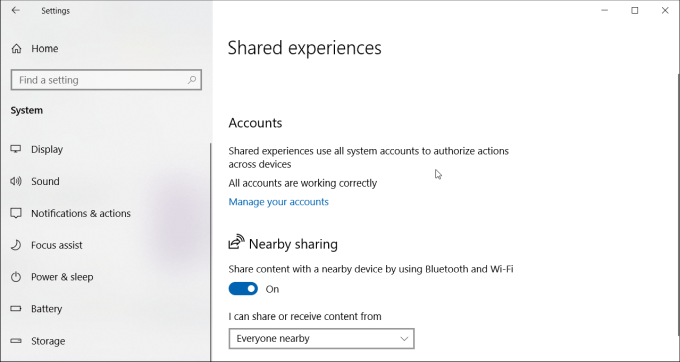
You’ll need to enable Nearby Sharing on all the computers you want to share files with. To do this:
- Open Settings and click System.
- Select Shared experiences.
- Scroll down and find Nearby sharing. Toggle the switch to On.
- Set the dropdown below it to Everyone nearby.
Once you’ve enabled Nearby Sharing on all the Windows 10 computers on your network, you can start sharing files with them.
To do this, open File Explorer, right-click the file you want to share, and select Sharing.
Now you’ll see all computers with Nearby Sharing enabled under the Find more people section.

When you select that remote computer system, a notification will appear on the other computer that there’s an incoming file.

Select either Save & Open or Save to initiate the file transfer.
This process is far easier than using Homeshare ever was.
2. Transfer Files by Email
Another way to transfer files between computers, not only over your local network but over the internet, is sharing by email.
The process is like Nearby Sharing. Just right click the file you want to transfer and select Share.
At the top of the Share window, you’ll see your email contacts to choose from.

Click on Find more people to open your email contacts and choose from your contact list.
This will open an email composition page. You can edit the email or just click Send to send off the file.

If you haven’t used the email service you select to use, you may need to provide Windows with permission to send email on your behalf.
When you receive the file via email, you can receive it on any device – either another computer or any mobile device.
3. Transfer Files Via the Cloud
Another approach you can take to transfer files from your Windows 10 PC to other devices is via the cloud. You can do this by sharing the file to any Windows app that supports services like OneDrive or Google Drive.
Just right click the file you want to transfer and select Share.
At the bottom of the Share window, you’ll see a list of Windows apps to choose from. At least one of these should be OneDrive.
![]()
When the app opens, just click the Add (checkmark) button to add the file to your OneDrive cloud account.
![]()
The file will upload to your OneDrive account. When it’s finished, you can open the OneDrive app on your other computer (or mobile device with the OneDrive app) and upload it there.
On the other computer, open the OneDrive app, right-click on the file, and select Download.
![]()
This will complete your file transfer to the other computer on your network (or over the internet).
4. Use LAN File Sharing Software
If you want to go beyond just transferring files and instead actually browse folders and files on the other computer, there are plenty of LAN file sharing applications for Windows 10 that can help.
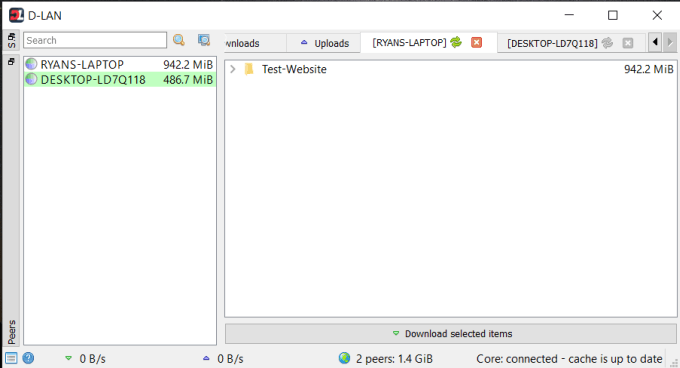
One of those is D-LAN. D-LAN is a free application that’s easy to set up and use. It’s so easy that all you do is install the application on all the computers you want to share files back and forth from, and you’re done.
You right-click in the right pane to add a new folder on that computer. Viewing the D-LAN application on the other computer, you’ll see the new folder show up in the pane for the computer you’re sending from.
Once you see all the folders, you can open them and add or remove files just like you would in File Explorer.
5. Use FTP Client/Server Software
Another excellent solution is using FTP as a quick file transfer over a LAN. Running an FTP Server on one computer allows you to connect to it over Port 21 using FTP client software on another computer.
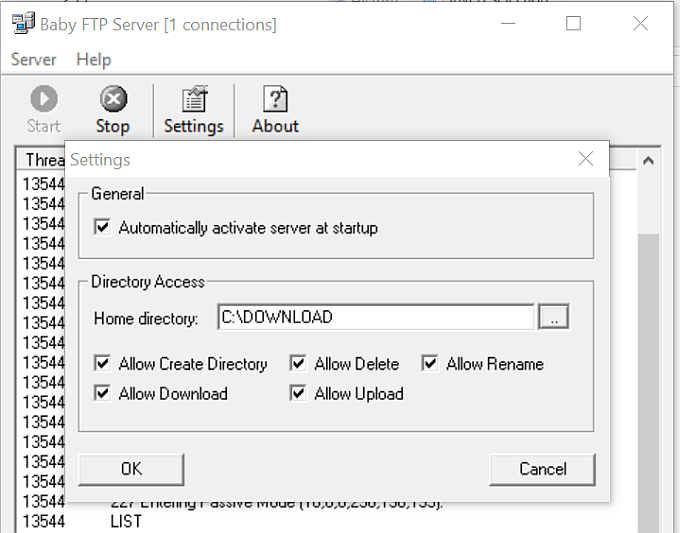
The problem with many FTP server applications is that they’re complicated to set up and configure. Thankfully there are several FTP server apps that are quick and simple. BabyFTP is one of those.
With BabyFTP, you simply install the application and it’ll launch a simple anonymous FTP server on the originating computer. In Settings, you can configure the folder to transfer files from and to, and what actions you want to allow like adding or removing directories and files, and whether those can be modified by the remote client.
Once you start the BabyFTP server, you should see “FTP Server started on port 21” if everything is working properly.

Now, on the other computer, you can use any FTP client, like FileZilla, to open a connection to that remote computer using it’s IP address and port 21.
No ID or password is necessary with this application since it uses only anonymous connections (which is fine inside your secure home network).
![]()
Once you connect, you’ll see the remote directory you’ve set up in the remote site location. You can right click files there to upload them to your local computer, or right-click files on your local computer to transfer them to the remote one.
Transferring Files Between Windows 10 Computers
It’s amazing that something as simple as transferring files between computers can be so difficult without third-party software and other solutions. Thankfully, there are lots of choices for making the process as simple and easy as possible.
Ryan has been writing how-to and other technology-based articles online since 2007. He has a BSc degree in Electrical Engineering and he’s worked 13 years in automation engineering, 5 years in IT, and now is an Apps Engineer. Read Ryan’s Full Bio


