- Как открыть TCP-/UDP-сокет средствами командной оболочки bash
- Как открыть TCP-/UDP-сокет средствами командной оболочки bash
- Открытие и закрытие TCP-/UDP-сокета средствами командной оболочки bash
- Прием и передача данных через TCP-/UDP-сокет средствами командной оболочки bash
- Примеры использования TCP-/UDP-сокетов при работе с командной оболочкой bash
- Заключительные слова
- Packet Sender Documentation
- Sponsors
- Support
- Desktop Download
- Mobile Apps
- Android
- Packet Sender Cloud
- Portable Mode
- IPv4, IPv6, and Custom IP
- Multicast (Experimental)
- UDP Traffic Generator (Experimental)
- Additional Documentation (GUI)
- Hotkeys / Keyboard Shortcuts
- SSL Client and Server
- Smart Responses
- Macros
- Persistent TCP and SSL
- IPv4 Subnet Calculator
- Additional Configuration Options
- Documentation (Command Line)
- Example CLI
- Examples binding to port and custom IP, IPv4, or IPv6
- Example CLI using SSL and ignoring errors
- Building Packet Sender
- Build for Windows and Mac
- Build for Linux
- Enhancements
- License
Как открыть TCP-/UDP-сокет средствами командной оболочки bash
Оригинал: How to open a TCP/UDP socket in a bash shell
Автор: Dan Nanni
Дата публикации: 24 мая 2016 г.
Перевод: А.Панин
Дата перевода: 23 июля 2016 г.
Как открыть TCP-/UDP-сокет средствами командной оболочки bash
Представьте, что вам по какой-либо причине необходимо открыть TCP-/UDP-сокет на работающем под управлением Linux сервере. Например, вам нужно проверить доступность определенного порта на удаленном узле с известным адресом. Также у вас может возникнуть потребность в загрузке определенной веб-страницы с удаленного веб-сервера или задействования restful API для тестирования сетевого сервиса. Кроме того, вы можете просто захотеть соединиться с сервером IRC или каким-либо другим удаленным сервером. Но что делать в том случае, если на вашем сервере имеется лишь очень ограниченное в плане функций рабочее окружение? Так, в нем могут быть просто не установлены такие стандартные инструменты для работы с сетью, как netcat , curl и wget , при этом в вашем распоряжении может иметься лишь командная оболочка bash.
Фактически, одной из встроенных функций командной оболочки bash является функция открытия TCP-/UDP-сокетов с помощью файлов устройств /dev/tcp и /dev/udp соответственно. В данном руководстве мы постараемся разобраться в том, как открывать TCP-/UDP-сокеты, а также осуществлять посредством них прием и передачу данных в процессе работы с командной оболочкой bash.
Открытие и закрытие TCP-/UDP-сокета средствами командной оболочки bash
По сути, вы можете открыть TCP-/UDP-сокет средствами командной оболочки bash, воспользовавшись следующей синтаксической конструкцией:
Вместо строки «дескриптор-файла» следует использовать уникальные неотрицательные целочисленные идентификаторы (дескрипторы), которые будут ассоциированы с каждым из создаваемых сокетов. Файловые дескрипторы 0, 1 и 2 зарезервированы за стандартными потоками ввода ( stdin ), вывода ( stdout ) и ошибок ( stderr ) соответственно. Исходя из этого, вы должны использовать значения, начиная с 3 (которые не используются) в качестве файловых дескрипторов.
Сочетание символов «<>» указывает на то, что сокет должен быть открыт для чтения и записи. В зависимости от ваших потребностей, вы можете открыть сокет только для чтения ( » ) или только для записи ( «>» ).
В поле «протокол» может располагаться строка «tcp», либо «udp». Назначение полей «адрес-узла» и «номер-порта» не требует особых комментариев.
Например, для открытия двунаправленного TCP-сокета, соединенного с основным портом HTTP-сервера ресурса xmodulo.com, с файловым дескриптором 3 достаточно выполнить следующую команду:
После открытия сокет для чтения/записи может быть закрыт с помощью следующей синтаксической конструкции. Первая команда предназначена для закрытия входящего соединения, вторая — исходящего.
Прием и передача данных через TCP-/UDP-сокет средствами командной оболочки bash
После открытия сокета вы можете использовать его для приема или передачи сообщений.
Для передачи сообщения, хранящегося в переменной $MESSAGE , через сокет следует использовать одну из следующих команд:
Для чтения сообщения из сокета и сохранения его в переменной $MESSAGE — одну из следующих команд (в переменных $NUM_BYTES и $COUNT должны храниться числовые значения, равные количеству байт сообщения и количеству сообщений соответственно — прим.пер.):
Примеры использования TCP-/UDP-сокетов при работе с командной оболочкой bash
Ниже я привел несколько примеров сценариев, в рамках которых создаются и используются TCP-сокеты.
1. Получение веб-страницы с удаленного сервера и вывод ее исходного кода
2. Вывод информации о версии установленного на удаленном узле SSH-сервера
Фактически, приведенный выше сценарий может быть сокращен до следующего однострочного сценария:
3. Вывод информации о текущем времени, полученной с веб-сайта nist.gov
4. Проверка работоспособности соединения с сетью Интернет
5. Сканирование TCP-портов удаленного узла
Заключительные слова
Для получения возможности открытия сокетов средствами командной оболочки bash необходима активация механизма поддержки виртуальных файлов устройств сокетов на этапе сборки бинарного файла этой командной оболочки из исходных кодов (т.е., его сборки с активацией возможности «—enable-net-redirections» ). В устаревших версиях дистрибутивов данная возможность bash может быть деактивирована, причем в этом случае вы будете получать следующее сообщение об ошибке после каждой попытки открытия сокета:
Помимо командной оболочки bash, виртуальные устройства сокетов поддерживаются такими командными оболочками, как ksh и zsh.
Источник
Packet Sender Documentation

Packet Sender is an open source utility to allow sending and receiving TCP, UDP, and SSL (encrypted TCP) packets. The mainline branch officially supports Windows, Mac, and Desktop Linux (with Qt). Other places may recompile and redistribute Packet Sender. Packet Sender is free and licensed GPL v2 or later. It can be used for both commercial and personal use.
Sponsors
Packet Sender would like to thank the following sponsors.
IWL is a California company creating computer networking products.
NagleCode is a software publisher and development studio. NagleCode licenses the mobile apps.
JetBrains provides world-class programming tools to help speed development.
GitHub provides repositories, downloads, and issue tracking for any code project.
Support
- Twitter: @NagleCode
- Forums are at: GitHub Discussions.
- Email: Packet Sender Contact
- Connect with me on LinkedIn
NOTE: Try (temporarily) disabling your firewall if having problems in Windows.
- Controlling network-based devices in ways beyond their original apps
- Test automation (using its command line tool and/or hotkeys)
- Testing network APIs (using the built-in TCP, UDP, SSL clients)
- Malware analysis (using the built-in UDP, TCP, SSL servers)
- Troubleshooting secure connections (using SSL ).
- Testing network connectivity/firewalls (by having 2 Packet Senders talk to each other)
- Stress-testing a device (using intense network generator tool)
- Tech support (by sending customers a portable Packet Sender with pre-defined settings and packets)
- Sharing/Saving/Collaboration using the Packet Sender Cloud service.
Desktop Download
Official releases of Packet Sender can be downloaded at PacketSender.com. Some places redistribute Packet Sender.

Mobile Apps
The Packet Sender mobile editions are fully native, contain bare minimum permissions, and collects no data. This is software that respsects you. Thank you for supporting this effort.
Android
The Android version is located on Google Play or on Amazon Appstore

The iOS version is located on the Apple App Store
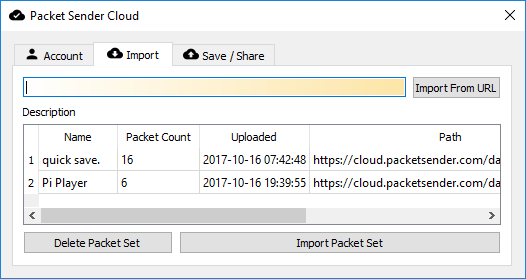
Packet Sender Cloud
Packets sets can be quickly saved/retrieved/shared using the free Packet Sender Cloud service. The cloud may also be used to publicly display and distribute your packets (via an URL) for collaboration, tutorials, end users, etc. Packet Sender may import public packet sets with public URL.
There are various reasons to do this:
- Keeping all your packets ready so you can quickly retrieve them when installing a fresh Packet Sender
- Quickly swapping between packet sets when working on different projects.
- Sharing a login (it is allowed) for collaborative packet set generation
- Having a public page of your packet sets so others can quickly find and import
If you are publishing a network API, maintaining a public cloud page is significantly easier than painfully detailing (IP, port, type, etc) the packets to your users. Plus, updating that page is easy.
More information about it can be found at https://cloud.packetsender.com/help
Portable Mode
Packet Sender has a «portable» mode. At launch, it will look for packets.ini and ps_settings.ini in its run-time directory. For the SSL server, it will look for ps.key and ps.pem .
Windows users, this directory is the same place as the .exe. For Mac users, this run-time directory is at PacketSender.app/Contents/MacOS . If INI files are found, it will use them instead of %APPDATA% or Library/Application Support .
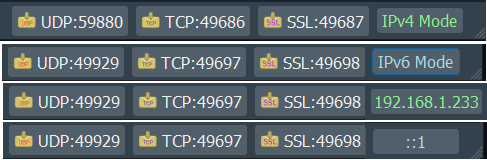
IPv4, IPv6, and Custom IP
Packet Sender’s built-in servers are configured to support either IPv4 or IPv6 but not both at the same time. For clients, Packet Sender GUI and CLI will seemlessly switch between the two modes upon sending (you may need to include the scope ID). Older versions of Packet Sender tried use both simultaneously, but testing found this unreliable. Click the IPv4 / IPv6 toggle on the bottom right to switch between the two.
Inside the settings, you may also force Packet Sender’s servers to bind to a custom IP address. This can be very useful for systems with multiple NICs or complicated IP setups. Packet Sender will trigger an error if told to bind to an address that does not exist.
Multicast (Experimental)
Packet Sender’s multicast support is triggered by attempting to send to a IPv4 multicast address or via the mulitcast submenu). The feature is currently experimental and has these known problems.
- Packet Sender abandons IPv6 support when joining multicast.
- And stays abandoned until you revisit settings or attempt to send to IPv6
- On wifi, it sometimes takes 20 seconds for multicast join to actually take effect.
- Packet Sender has no logic to rejoin a mulitcast group if the switch reboots or some other common error.
There is no IPv6 multicast support, though it is on the roadmap. Sponsors wanting IPv6 multicast support are welcome to contact me.
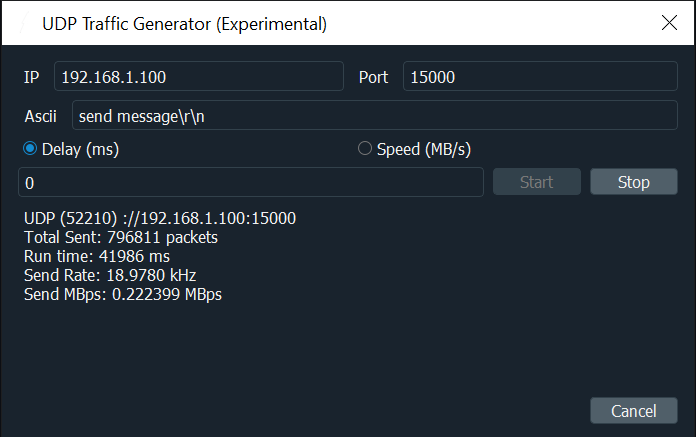
UDP Traffic Generator (Experimental)
For when the normal send system is not enough, you can now hammer a target IP with packets to see if your device can handle it. Please note that this feature is experimental and the metrics displayed have not been fully tested.
Additional Documentation (GUI)
Packet Sender is identical for all the desktop versions. The only difference is its theme to match the operating system.

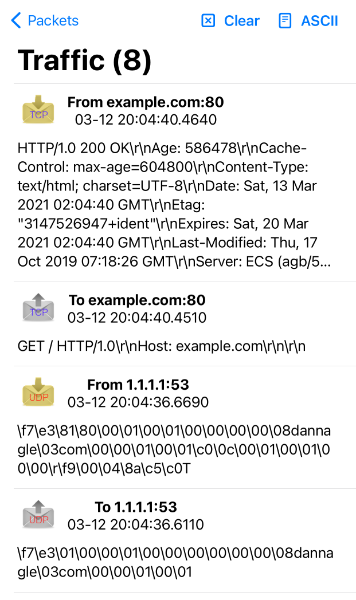
- In the bottom right, there are UDP, TCP, and SSL server status and port(s). You can click to activate or deactivate these. Packet Sender supports binding to any number of ports.
- There is also IPv4 (default), IPv6, custom IP, toggle button
- During packet resending, there will be a button to cancel all resends.
- Please check your firewall. Windows aggressively blocks TCP-based servers. Packet Sender will still work if the firewall blocks it, but it can’t receive unsolicited TCP-based packets.
- In the table, there is a list of saved packets. You can double-click to directly edit fields in this table.
- Select multiple packets to enable «Multi-Send». Selected packets are shown in a quick-send area above the traffic log.
- Fields can be rearranged by drag-and-drop in the settings menu.
- A resend value of «0» means it is a single-shot packet.
- A packet has a name, destination address (domain names are default resolved just before sending), port, and data associated with it.
- Click «Send» to immediately send. Click «Save» to send later.
- For IPv6 sending, you will also need the scope ID.
- Packet Sender supports mixed ASCII and HEX notation:
- \XX gets translated to XX in hex
- \n, \r, \t will get translated to 0A, 0D, and 09
- HEX numbers are space delimited
- The HEX field will attempt to interpret other common delimiters (such as commas, colons (Wireshark), semicolons, » 0x», etc) and auto-correct.
- A single stream of HEX is also supported. If the number of bytes is odd, Packet Sender will assume the front byte needs a zero and then auto-correct.
- Example ASCII: hello world\r
- Example HEX: 68 65 6c 6c 6f 20 77 6f 72 6c 64 0d
- You may save a packet directly from the traffic log. You will be prompted for a name, and the source address and port will be switched for your convenience.
- You may also load a file directly in to the HEX field. The HEX field supports sending up to 10,922 bytes. The theoretical limit for sending via the command line is 200 MB.
- An optional response can be sent. The same response is used for TCP and UDP.
Hotkeys / Keyboard Shortcuts
The fields at the top can be navigated using CTRL+1, CTRL+2, etc, up to CTRL+8 (send button). On Mac, the shortcut key is Command.
- When you navigate to the TCP/UDP/SSL option, you may use up/down or t/u/s characters.
- If you are going to automate with hotkeys (using tools such at AutoHotKey), you may want to turn off «Restore previous session».
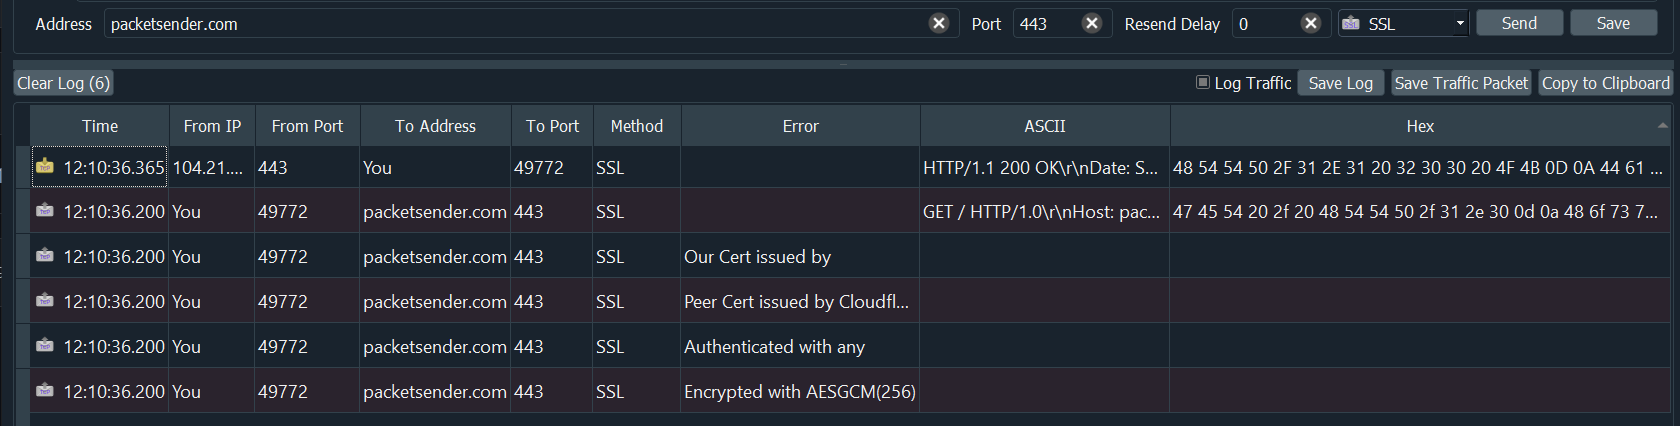
SSL Client and Server
Packet Sender supports establishing encrypted connections over SSL. This is supported in the GUI and on the command line. Some notes on this:
- The certificate negotiation is handled immediately during connection.
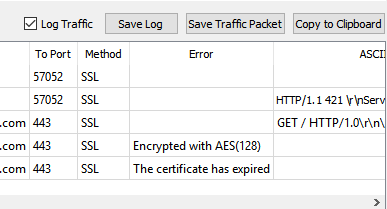
- By default, Packet Sender ignores all SSL errors (expired cert, wrong host name, self-signed, etc).
- Packet Sender outputs the cert negotiation progress in to the traffic log.
- Packet Sender outputs the encryption algorithm used in the traffic log (such as AES 128).
Packet Sender bundles an internal «Snake Oil» certificate for use as a server for Windows. The certificate and key is in the same place as packet and settings.
- Overriding the cert locations in Settings also overrides these snake-oil certificate.
Packet Sender bundles OpenSSL for use in Windows. On Mac and Linux, Packet Sender will use the native SSL libraries.
This product includes software developed by the OpenSSL Project for use in the OpenSSL Toolkit. (http://www.openssl.org/)
- If there is an SSL error, Packet Sender will output it to the traffic log. If the setting is to continue anyway (default), it will continue to negotiate encryption. Otherwise, the connection ends with failure to connect.
Smart Responses
Packet Sender supports up to 5 smart responses. To use it, disable normal responses. 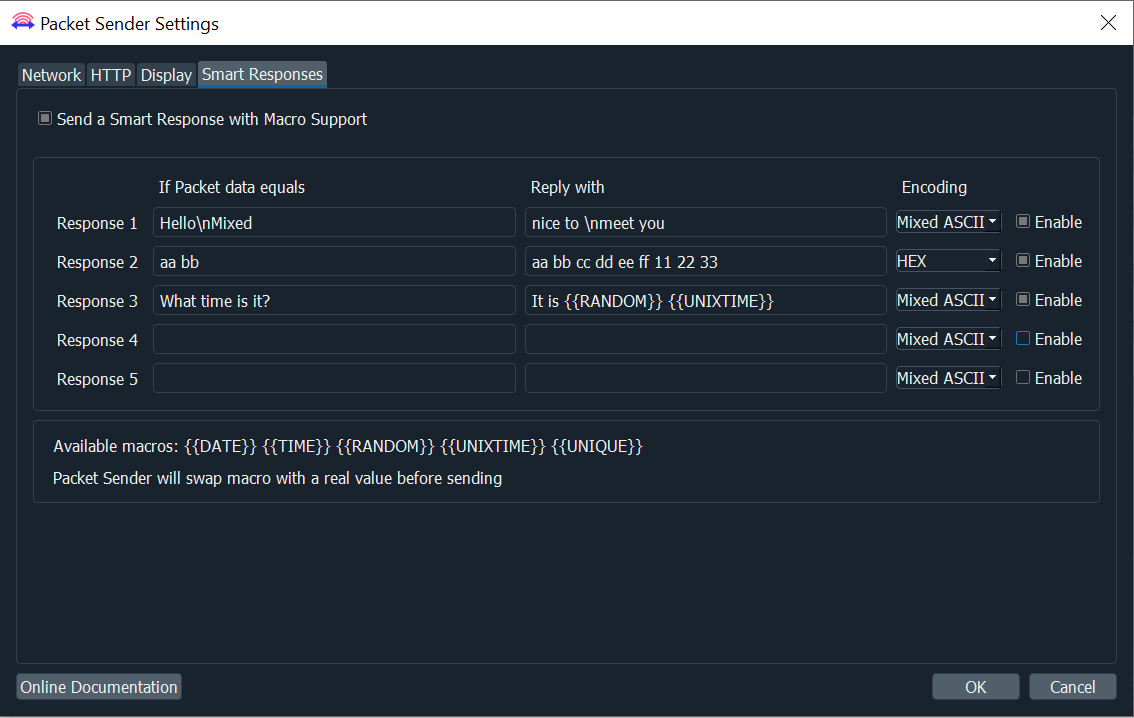
- Packet Sender will compare the packet within the encoding you choose.
- Packet Sender translates the encoding before sending out the reply.
- The available encodings are:
- Mixed ASCII — The standard Packet Sender way of encoding ASCII along with non-printable characters
- HEX — Packet Sender’s normal HEX encoding
- EBCDIC (deprecated) — An encoding used mostly by IBM mainframes. The input field is normal Mixed ASCII and is translated when performing the comparison and sending.
Macros
Packet Sender supports these macros when sending responses:
- <
> — Sends the current date in «yyy-mm-dd» format. - <
- <
> — Sends the current epoch time stamp. - <
> — Sends a random number ranging from either 0 to 32767 or 2147483647, depending on 32-bit or 64-bit (default installer for Windows is 32-bit. Mac is 64-bit). - <
> — Sends a random string. Uses an internal UUID to generate it. Packet Sender will swap the macro with real values before sending.
Persistent TCP and SSL
Packet Sender supports persistent TCP and SSL connections via a separate UI dialog. It is enabled by checkbox on the main window or in the settings dialog.
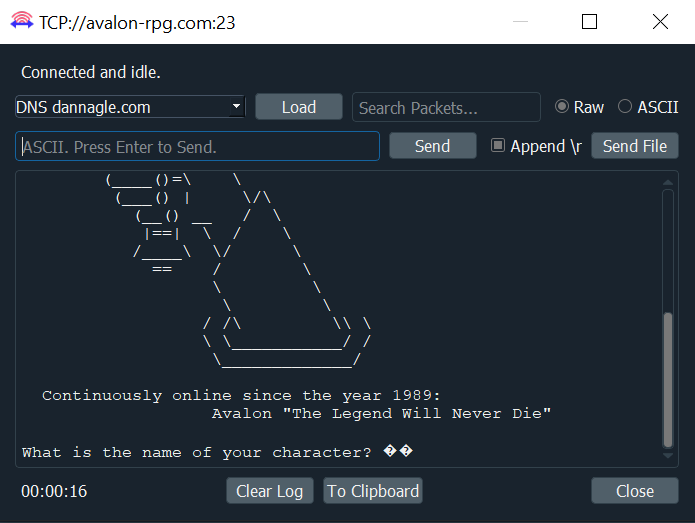
- Any number of persistent connections can be created.
- Previously saved packets can be loaded in the drop-down.
- There is a «raw» view and «ASCII» view. The ASCII view is useful to troubleshoot data that is not printed by the raw view.
- Traffic is also saved in the main window traffic log.
- A file may be uploaded to the persistent connection. You may wish to turn off logging if you use this.
- The timer in the bottom lefts starts as soon as a valid data packet is sent/received. It stops when the connection is closed.
- You may optionally append a carriage return when you quick-send by hitting the return key. This is useful for command-prompt menus over TCP / SSL connections. Packet Sender remembers previous state of \r checkbox.
- Incoming persistent connections to the server will launch the UI dialog.
- During resend, the persistent connection packet is carried over to the new UI dialog. Clicking «Resending(1)» will cancel it.
Persistent connections are not supported via the command line.
IPv4 Subnet Calculator
Packet Sender has a built-in subnet calculator. It is under the Tools menu. 
- The log window will display non-loopback IPv4 and IPv6 addresses found on your computer.
- The top left field allow inputting an IPv4 address.
- The field below is for a subnet, either X.X.X.X or /XX notation.
- The results of the calculation are on the right.
- The field below is a quick check to see if an IPv4 is within one of your subnets.
Additional Configuration Options
- IPv4 Mode, IPv6 Mode, Custom IP in the servers. This is identical to the toggle switch except toggle switch does not remember custom IP.
- The traffic log and packet table is divided by a draggable splitter. This splitter can also be collapsed on either side.
- Copy to the clipboard the raw packet data (default). If your data has a large amount of non-ASCII characters, you may prefer a translated version.
- Resending can be auto-cancelled after X number of packets. Set to 0 to resend forever.
- Traffic log can be set to roll at 100 entries. Otherwise, the log rolls at 10k.
- Import/Export of packets is available via menus.
- Attempt receive before send (some servers expect this behavior).
- 500 ms delay before sending data (some servers are slow).
- Enable keyboard shortcut for ASCII —> EBCDIC translation (deprecated).
- Resolve DNS during input. The default is to resolve DNS just before sending.
- Ignore SSL errors. Packet Sender will note the error and continue with encryption. Otherwise, Packet Sender abandons the connection. The SSL server always ignores errors.
Documentation (Command Line)
The command line extension used in Windows installations is .com. Using .exe will launch the GUI. Leave off the extension and Windows will choose the correct program. The same executable controls the command line and GUI for Mac and Linux operating systems.
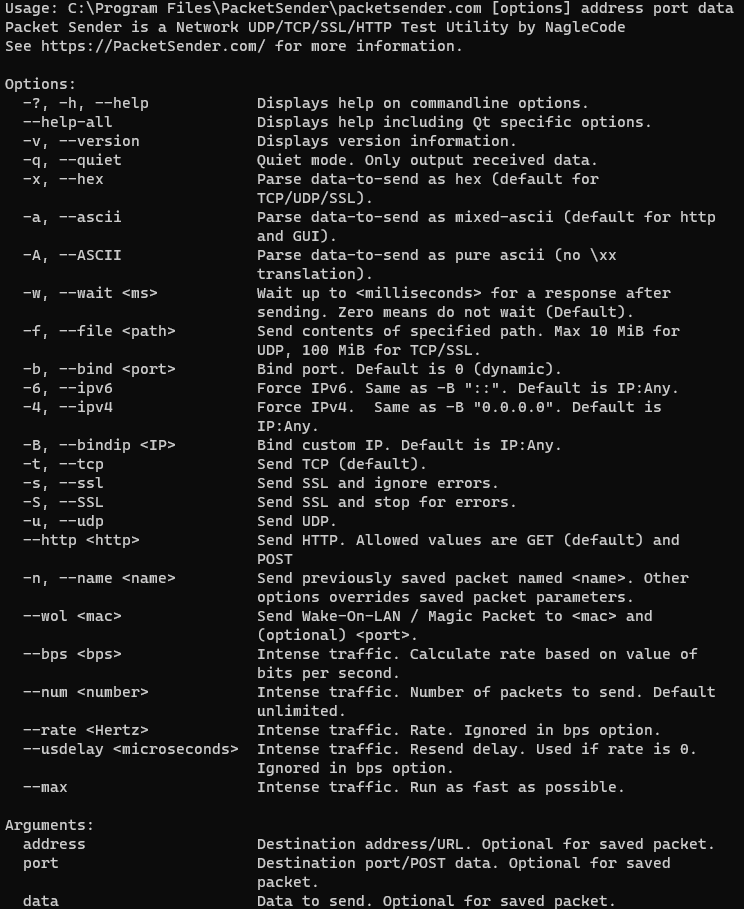
The command line system in Packet Sender follows the same pattern as other Linux utilities. It has a long name (such as —version) and a short name (such as -v). These options can be arranged in any order and Packet Sender will parse them correctly. The last 3 options are positional and must appear last. They are IP, port, and data. These last options are optional if using a stored packet.
Example CLI
Examples binding to port and custom IP, IPv4, or IPv6
Packet Sender command line can bind to custom ports to force IPv4/6 modes or multiple NIC.
Example CLI using SSL and ignoring errors
The command line has the option to ignore or abandon on SSL errors. The default is to ignore.
Building Packet Sender
The only dependency is Qt SDK. Here is how to build the app.
Build for Windows and Mac
- Download the Qt installer from http://www.qt.io/download-open-source/
- Let it install MingGW if you don’t have a compiler.
- Open the project PacketSender.pro
- Build! Qt is the only dependency!
The Windows and Mac versions were built using Qt 5.12
Build for Linux
Here is the sequence of commands for Ubuntu 16.04. Please adapt to your Linux platform. Packet Sender requires no additional libraries beyond the stock Qt SDK. I have been told there are build issues with stock Fedora. If a Fedora wizard has insight, please let me know, and I’ll add your instructions.
If you are feeling adventurous, feel free to build from the master branch. It contains the latest stable build. The development branch should probably be avoided.
If it doesn’t run, you may need to set it executable
Enhancements
License
GPL v2 or Later. Contact me if you require a different license.
Источник


