- Programming UDP sockets in C on Linux – Client and Server example
- UDP sockets
- Simple UDP Server
- UDP Client
- Conclusion
- 16 thoughts on “ Programming UDP sockets in C on Linux – Client and Server example ”
- Send and Receive UDP packets via Linux CLI
- Expectations:
- Netcat Command:
- General Set Up Diagram:
- Send UDP packet:
- Start Server:
- Start Client:
- Check Connection:
- Send UDP packets:
- Check packets in Wireshark:
- Other command to send UDP packets:
- Conclusion:
- Sending TCP/UDP packets using Netcat
- Syntax
- Basic parameters
- Test your Netcat understanding as a client-server
- TCP client
- UDP client
Programming UDP sockets in C on Linux – Client and Server example
UDP sockets
This article describes how to write a simple echo server and client using udp sockets in C on Linux/Unix platform.
UDP sockets or Datagram sockets are different from the TCP sockets in a number of ways.
The most important difference is that UDP sockets are not connection oriented. More technically speaking, a UDP server does not accept connections and a udp client does not connect to server.
The server will bind and then directly receive data and the client shall directly send the data.
Simple UDP Server
So lets first make a very simple ECHO server with UDP socket. The flow of the code would be
socket() -> bind() -> recvfrom() -> sendto()
Run the above code by doing a gcc server.c && ./a.out at the terminal. Then it will show waiting for data like this
Next step would be to connect to this server using a client. We shall be making a client program a little later but first for testing this code we can use netcat.
Test the server with netcat
Open another terminal and connect to this udp server using netcat and then send some data. The same data will be send back by the server. Over here we are using the ncat command from the nmap package.
Note : We had to use netcat because the ordinary telnet command does not support udp protocol. The -u option of netcat specifies udp protocol.
Check open port with netstat
The netstat command can be used to check if the udp port is open or not.
Note the *:8888 entry of output. Thats our server program.
The entry that has localhost:8888 in «Foreign Address» column, indicates some client connected to it, which is netcat over here.
UDP Client
Now that we have tested our server with netcat, its time to make a client and use it instead of netcat.
The program flow is like
Here is a quick example
‘, BUFLEN); //try to receive some data, this is a blocking call if (recvfrom(s, buf, BUFLEN, 0, (struct sockaddr *) &si_other, &slen) == -1) < die("recvfrom()"); >puts(buf); > close(s); return 0; >
Run the above program and it will ask for some message
Whatever message the client sends to server, the same comes back as it is and is echoed.
Conclusion
UDP sockets are used by protocols like DNS etc. The main idea behind using UDP is to transfer small amounts of data and where reliability is not a very important issue. UDP is also used in broadcasting/multicasting.
When a file transfer is being done or large amount of data is being transferred in parts the transfer has to be much more reliable for the task to complete. Then the TCP sockets are used.
A Tech Enthusiast, Blogger, Linux Fan and a Software Developer. Writes about Computer hardware, Linux and Open Source software and coding in Python, Php and Javascript. He can be reached at [email protected] .
16 thoughts on “ Programming UDP sockets in C on Linux – Client and Server example ”
Hello. You seem to have double pasted the second code sample inside itself. THanks for the tutorial
Hey Silver Moon,
I’m a not a programmer but are very interested in electronics and making things automated. This was very helpful example of udp socket communications. What I did find though was the program doesn’t do anything else whilst it waits for data. How would you suggest to say send this server “Blink Led 1” and continue to listen for commands to turn on, blink or turn off leds.
I can for example blink the led no problem in one project, I can get you code also running on a pi and responding to commands I send it now but I would like to be able to continue doing things in the background.
Thanks for you time.
i haven’t done sockets for a long time. right now i can think of using multiple threads do things in parallel.
so the main thread could do its background work, and an extra thread could listen to the udp port for incoming messages.
or the other way round.
but i am not sure if that is the best approach. there might be better alternatives.
Silver Moon’s approach will work but the best way would be to listen for socket connections asynchronously using epoll() and using TCP not UDP, UDP is unreliable so some of your commands might not make it to the server as intended. That’s what is done in most modern socket servers. Try googling how to use epoll() (Linux system call so should work on Raspberry Pi). It will allow you to have an efficient and scalable socket server. (I am actually almost done developing an IoT socket communication system myself using raspberry pi as main server and epoll() with TCP is the best approach for this kind of stuff as far as I know.
Thx! This article was really helpful for understanding some basic things about socket programming.
Thank you so much for this, it was really helpful!
update note: Ubuntu 16.04.3. gcc 5.4.0 complained until slen was declared unsigned int.
And ncat used option -vv which on my Ubuntu system means verbose. The captured text does not have the verbose output. My system had five lines of information for each line of typed in data.
Still, I am new to Linux and Ubuntu and this is an unexpected cool way to test the server app.
Thank you.
Very helpful. Thanks!
Hi, I am new to socket programminga and linux , can you tell me … can we turn a system into a server ? and do communication using above programming? can we establish communication on the microcontroller using above programs?
Excelent example, thanks very much!
I’ve found that it needs only a tiny addition.
To clean the buffer on the server also. So just adding on Server:
//keep listening for data
while(1)
<
printf(“Waiting for data…”);
fflush(stdout);
memset(buf,’\0′, BUFLEN); //Add this line
if that sent character, how about send some file, example a picture, how to change in the script character sent to picture sent.
Please remove gets in Client:46 with:
fgets(message, BUFLEN, stdin);
What if the data sent from client side having some different Server address, SERVER 192.168.16.30 (this IP is pingable)
how to pass array , vector etc. between client and server?
if ((recv_len = recvfrom(s, buf, BUFLEN, 0, (struct sockaddr *) &si_other, &slen)) == -1)
here &slen should be (socklen_t*)&slen . and work perfectly. Thank u
Источник
Send and Receive UDP packets via Linux CLI
Expectations:
Here are the key points to learn from this article
- To understand nc command in Linux.
- Use nc command for sending and receiving UDP packets through network.
- Send some human readable sentences through nc command.
- Capture the UDP packet sent by nc command.
- Check network packet in Wireshark.
- Find out any other command other than netcat for Linux.
Netcat Command:
Netcat(nc) command is installed by default in Linux OS. Open one terminal [Shortcut Alt+Ctrl+t] and use below command to check if nc is present or not.
Here is the expected output
This is nc from the netcat-openbsd package. An alternative nc is available
in the netcat-traditional package.
usage: nc [-46bCDdhjklnrStUuvZz] [-I length] [-i interval] [-O length]
[-P proxy_username] [-p source_port] [-q seconds] [-s source]
[-T toskeyword] [-V rtable] [-w timeout] [-X proxy_protocol]
[-x proxy_address[:port]] [destination] [port]
This means nc command is already exist in Linux.
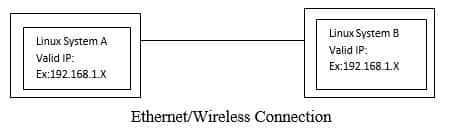
General Set Up Diagram:
Send UDP packet:
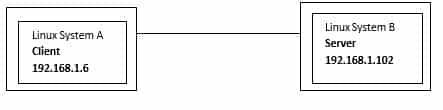
Let’s take an example like we will send UDP packet from System A to System B. So, in server-client concept, we have to run server at System B side and client at System A side.
Also we have valid IP addresses.
Start Server:
To start sever using nc command use below command in System B terminal
Here is the screenshot

This command does not have any output to show as of now. This is just listening mode on port 9999.
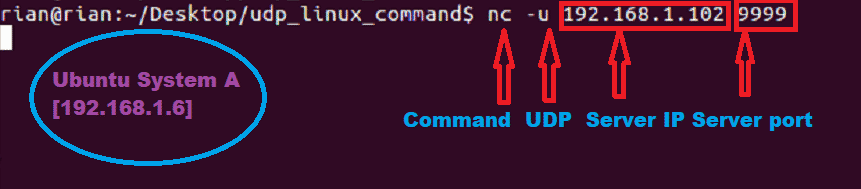
Start Client:
To connect to server using nc command use below command in System A terminal
Now system A has to connect to System B. So we have provided server IP address and port number.
Here is the screenshot
Check Connection:
We can check the below command for the confirmation about client connation to server port.
Here is the screenshot

Send UDP packets:
Now we can send udp packet from System A to B and vice versa.
Step 1:
Now go to system A and send any sentences like

Step 2:
We should able to see this in System B side. Here is the screenshot

We can also send UDP packets from System B to System A.
Step 1:
Go to System B and send sentence like
Here is the screenshot from System B

Step 2:
Here is the screenshot from System A

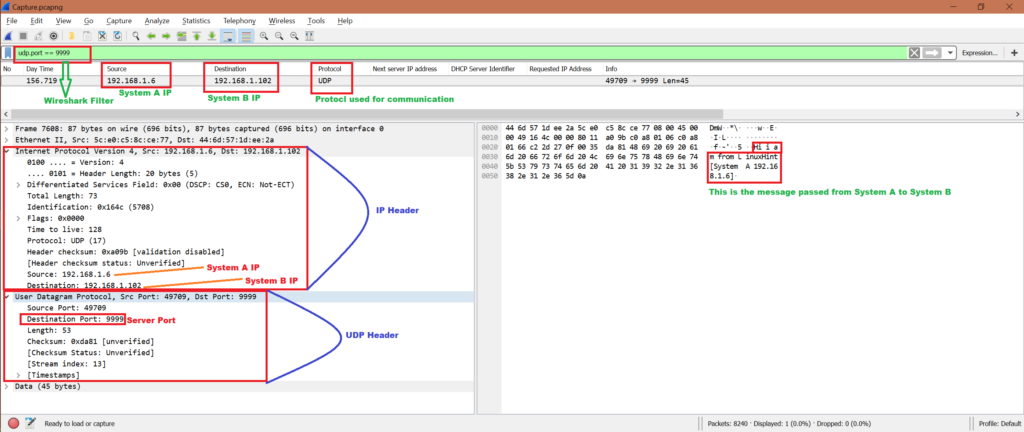
Check packets in Wireshark:
Now while we have been sending UDP packets from System A to System B and vice verse, we can start Wireshark in either System A or System B. Here we have the capture file, let’s do some analysis and confirm if this server and client communication used UDP protocol.
Note that we will only analyze the first communication:
System A has sent:
To:
We will use filter “udp.port == 9999” to get only related packets in Wireshark. Refer below screenshot for analysis from Wireshark capture:
To know how to use Wireshark refer below link
Other command to send UDP packets:
There is another method to send UDP packets
Run server at System B:
Run below command at System A:
But we are able to send only one time “hello”. If we kill server and rerun then it’s working.
Conclusion:
From the above exercise we have learned the mechanism to send some messages using UDP protocol. And the best method is to use nc command in Linux.
Источник
Sending TCP/UDP packets using Netcat

There are a number of protocols powering the Internet of Things. Choosing the right one will depend on your project’s security, bandwidth and reliability needs, or maybe just your device computing limitations. In some cases like cellular transmission, the good old TCP/UDP packet transmission will work just fine. This article will show you how to simulate a client using a useful tool called Netcat and realize the immediate connection using your own computer’s terminal.
To learn how to send data to Ubidots using these protocols, see Send Data to Ubidots over TCP or UDP.
Netcat is a featured networking utility which reads and writes data across network connections, using the TCP/IP protocol. Designed to be a reliable «back-end» tool, Netcat can be used directly with other programs and scripts to send files from a client to a server and back. At the same time, it is a feature-rich network debugging and exploration tool that can specify the network patameters while also establishing a connection to a remote host via a tunnel.
Although Netcat can do many things, its main purpose and most desirable function is to:
Create an initial socket to establish a connection from server to the client.
Once connected, Netcat will automatically generate a second socket to transmit files from the server to the client and visa versa. (This is the really cool part.)
Reference below for a diagram of the data Netcat protocol architecture.

Something so simple happens to be extraordinarily powerful and flexible as you will see below. For simplicity, local connections are used, although, of course, they can be used between different machines.
Syntax
nc [-options] hostname port[s] [ports]
nc -l -p port [-options] [hostname] [port]
Basic parameters
—l: set the «listen» mode, waits for the incoming connections.
—u: set the UDP mode
Test your Netcat understanding as a client-server
Open two computer terminals, the first will act as the server and the second will be the client.
TCP client
With Netcat your PC can be converted in a server, you want to begin as a server that listens at port 2399:
In addition, we can use the server to connect to the port (2399) recently opened, from the client side:
As you can see on the image below, the connection is established:

With the connection established you are now able to write to the server from the client:
In the terminal where the server is running, your text files will appear seamlessly.

UDP client
By default Netcat uses the TCP protocol for its communications, but it can also UDP using the -u option.
As we mentioned at the previous step, Netcat lets you convert your PC in a server. In this case we’re going to establish the connection between the server and the client but using UDP.
From the server side, run the command below. As you can see, the command establishes the UDP connection just requires the -u to be added to the command:
Once you start the server, establish the connection with the client:
Now the client and the server are using UDP protocol for their communication. You can verify commincation using the netstat command in a new (3rd) computer terminal.
$ netstat | grep 2399
udp 0 0 localhost:2399 localhost:57508 ESTABLISHED
As you can see in the images below, the message is received by the server, and the transmission is verified by the connection:

With this introduction to Netcat, you now have a better understanding of this advanced tool to send data quickly and efficiently between client and server. For additional information, check out this link.
This article was originally published on Ubidots’ Blog on June 22, 2017.
Источник


