- unakatsuo / raw_udp4.go
- Send and Receive UDP packets via Linux CLI
- Expectations:
- Netcat Command:
- General Set Up Diagram:
- Send UDP packet:
- Start Server:
- Start Client:
- Check Connection:
- Send UDP packets:
- Check packets in Wireshark:
- Other command to send UDP packets:
- Conclusion:
- Sending TCP/UDP packets using Netcat
- Syntax
- Basic parameters
- Test your Netcat understanding as a client-server
- TCP client
- UDP client
- udp-sender(1) — Linux man page
- Synopsis
- Description
- Options
unakatsuo / raw_udp4.go
| // +build linux |
| package main |
| import ( |
| «fmt» |
| «net» |
| «os» |
| «syscall» |
| «github.com/google/gopacket» |
| «github.com/google/gopacket/layers» |
| ) |
| // This example sends an UDP packet to 127.0.0.1:5000 using Linux raw socket. This program needs root priviledge or CAP_NET_RAW capability. |
| // Run «nc -ul 127.0.0.1 5000» to see the «HELLO» message in the payload. |
| // http://www.pdbuchan.com/rawsock/rawsock.html |
| func open ( ifName string ) (net. PacketConn , error ) < |
| fd , err := syscall . Socket ( syscall . AF_INET , syscall . SOCK_RAW , syscall . IPPROTO_RAW ) |
| if err != nil < |
| return nil , fmt . Errorf ( «Failed open socket(syscall.AF_INET, syscall.SOCK_RAW, syscall.IPPROTO_RAW): %s» , err ) |
| > |
| syscall . SetsockoptInt ( fd , syscall . IPPROTO_IP , syscall . IP_HDRINCL , 1 ) |
| if ifName != «» < |
| iface , err := net . InterfaceByName ( ifName ) |
| if err != nil < |
| return nil , fmt . Errorf ( «Failed to find interface: %s: %s» , ifName , err ) |
| > |
| syscall . SetsockoptString ( fd , syscall . SOL_SOCKET , syscall . SO_BINDTODEVICE , ifName ) |
| > |
| conn , err := net . FilePacketConn ( os . NewFile ( uintptr ( fd ), fmt . Sprintf ( «fd %d» , fd ))) |
| if err != nil < |
| return nil , err |
| > |
| return conn , nil |
| > |
| func buildUDPPacket ( dst , src * net. UDPAddr ) ([] byte , error ) < |
| buffer := gopacket . NewSerializeBuffer () |
| payload := gopacket . Payload ( «HELLO» ) |
| ip := & layers. IPv4 < |
| DstIP : dst . IP , |
| SrcIP : src . IP , |
| Version : 4 , |
| TTL : 64 , |
| Protocol : layers . IPProtocolUDP , |
| > |
| udp := & layers. UDP < |
| SrcPort : layers . UDPPort ( src . Port ), |
| DstPort : layers . UDPPort ( dst . Port ), |
| > |
| if err := udp . SetNetworkLayerForChecksum ( ip ); err != nil < |
| return nil , fmt . Errorf ( «Failed calc checksum: %s» , err ) |
| > |
| if err := gopacket . SerializeLayers ( buffer , gopacket. SerializeOptions < ComputeChecksums : true , FixLengths : true >, ip , udp , payload ); err != nil < |
| return nil , fmt . Errorf ( «Failed serialize packet: %s» , err ) |
| > |
| return buffer . Bytes (), nil |
| > |
| func main () < |
| conn , err := open ( «lo» ) |
| if err != nil < |
| panic ( err ) |
| > |
| dst := & net. UDPAddr < |
| IP : net . ParseIP ( «127.0.0.1» ), |
| Port : 5000 , |
| > |
| b , err := buildUDPPacket ( dst , & net. UDPAddr < IP : net . ParseIP ( "127.0.0.1" ), Port : 5001 >) |
| if err != nil < |
| panic ( err ) |
| > |
| wlen , err := conn . WriteTo ( b , & net. IPAddr < IP : dst . IP >) |
| if err != nil < |
| panic ( err ) |
| > |
| fmt . Printf ( «Sent IP packet %d bytes to %s \n » , wlen , dst ) |
| > |
You can’t perform that action at this time.
You signed in with another tab or window. Reload to refresh your session. You signed out in another tab or window. Reload to refresh your session.
Источник
Send and Receive UDP packets via Linux CLI
Expectations:
Here are the key points to learn from this article
- To understand nc command in Linux.
- Use nc command for sending and receiving UDP packets through network.
- Send some human readable sentences through nc command.
- Capture the UDP packet sent by nc command.
- Check network packet in Wireshark.
- Find out any other command other than netcat for Linux.
Netcat Command:
Netcat(nc) command is installed by default in Linux OS. Open one terminal [Shortcut Alt+Ctrl+t] and use below command to check if nc is present or not.
Here is the expected output
This is nc from the netcat-openbsd package. An alternative nc is available
in the netcat-traditional package.
usage: nc [-46bCDdhjklnrStUuvZz] [-I length] [-i interval] [-O length]
[-P proxy_username] [-p source_port] [-q seconds] [-s source]
[-T toskeyword] [-V rtable] [-w timeout] [-X proxy_protocol]
[-x proxy_address[:port]] [destination] [port]
This means nc command is already exist in Linux.
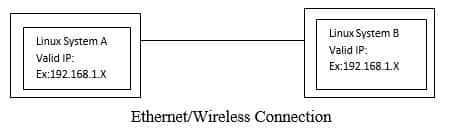
General Set Up Diagram:
Send UDP packet:
Let’s take an example like we will send UDP packet from System A to System B. So, in server-client concept, we have to run server at System B side and client at System A side.
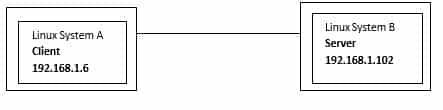
Also we have valid IP addresses.
Start Server:
To start sever using nc command use below command in System B terminal
Here is the screenshot

This command does not have any output to show as of now. This is just listening mode on port 9999.
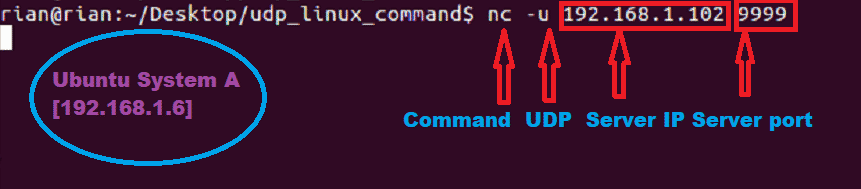
Start Client:
To connect to server using nc command use below command in System A terminal
Now system A has to connect to System B. So we have provided server IP address and port number.
Here is the screenshot
Check Connection:
We can check the below command for the confirmation about client connation to server port.
Here is the screenshot

Send UDP packets:
Now we can send udp packet from System A to B and vice versa.
Step 1:
Now go to system A and send any sentences like

Step 2:
We should able to see this in System B side. Here is the screenshot

We can also send UDP packets from System B to System A.
Step 1:
Go to System B and send sentence like
Here is the screenshot from System B

Step 2:
Here is the screenshot from System A

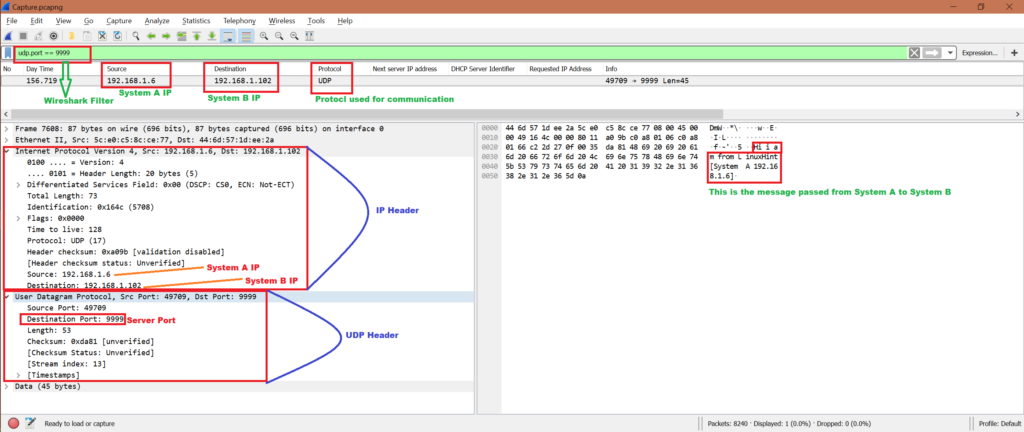
Check packets in Wireshark:
Now while we have been sending UDP packets from System A to System B and vice verse, we can start Wireshark in either System A or System B. Here we have the capture file, let’s do some analysis and confirm if this server and client communication used UDP protocol.
Note that we will only analyze the first communication:
System A has sent:
To:
We will use filter “udp.port == 9999” to get only related packets in Wireshark. Refer below screenshot for analysis from Wireshark capture:
To know how to use Wireshark refer below link
Other command to send UDP packets:
There is another method to send UDP packets
Run server at System B:
Run below command at System A:
But we are able to send only one time “hello”. If we kill server and rerun then it’s working.
Conclusion:
From the above exercise we have learned the mechanism to send some messages using UDP protocol. And the best method is to use nc command in Linux.
Источник
Sending TCP/UDP packets using Netcat

There are a number of protocols powering the Internet of Things. Choosing the right one will depend on your project’s security, bandwidth and reliability needs, or maybe just your device computing limitations. In some cases like cellular transmission, the good old TCP/UDP packet transmission will work just fine. This article will show you how to simulate a client using a useful tool called Netcat and realize the immediate connection using your own computer’s terminal.
To learn how to send data to Ubidots using these protocols, see Send Data to Ubidots over TCP or UDP.
Netcat is a featured networking utility which reads and writes data across network connections, using the TCP/IP protocol. Designed to be a reliable «back-end» tool, Netcat can be used directly with other programs and scripts to send files from a client to a server and back. At the same time, it is a feature-rich network debugging and exploration tool that can specify the network patameters while also establishing a connection to a remote host via a tunnel.
Although Netcat can do many things, its main purpose and most desirable function is to:
Create an initial socket to establish a connection from server to the client.
Once connected, Netcat will automatically generate a second socket to transmit files from the server to the client and visa versa. (This is the really cool part.)
Reference below for a diagram of the data Netcat protocol architecture.

Something so simple happens to be extraordinarily powerful and flexible as you will see below. For simplicity, local connections are used, although, of course, they can be used between different machines.
Syntax
nc [-options] hostname port[s] [ports]
nc -l -p port [-options] [hostname] [port]
Basic parameters
—l: set the «listen» mode, waits for the incoming connections.
—u: set the UDP mode
Test your Netcat understanding as a client-server
Open two computer terminals, the first will act as the server and the second will be the client.
TCP client
With Netcat your PC can be converted in a server, you want to begin as a server that listens at port 2399:
In addition, we can use the server to connect to the port (2399) recently opened, from the client side:
As you can see on the image below, the connection is established:

With the connection established you are now able to write to the server from the client:
In the terminal where the server is running, your text files will appear seamlessly.

UDP client
By default Netcat uses the TCP protocol for its communications, but it can also UDP using the -u option.
As we mentioned at the previous step, Netcat lets you convert your PC in a server. In this case we’re going to establish the connection between the server and the client but using UDP.
From the server side, run the command below. As you can see, the command establishes the UDP connection just requires the -u to be added to the command:
Once you start the server, establish the connection with the client:
Now the client and the server are using UDP protocol for their communication. You can verify commincation using the netstat command in a new (3rd) computer terminal.
$ netstat | grep 2399
udp 0 0 localhost:2399 localhost:57508 ESTABLISHED
As you can see in the images below, the message is received by the server, and the transmission is verified by the connection:

With this introduction to Netcat, you now have a better understanding of this advanced tool to send data quickly and efficiently between client and server. For additional information, check out this link.
This article was originally published on Ubidots’ Blog on June 22, 2017.
Источник
udp-sender(1) — Linux man page
udp-sender — broadcast file on a LAN
Synopsis
udp-sender [—file file] [—full-duplex] [—half-duplex] [—pipe pipe] [—portbase portbase] [—blocksize size] [—interface net-interface] [—mcast-data-address data-mcast-address] [—mcast-rdv-address mcast-rdv-address] [—max-bitrate bitrate] [—pointopoint] [—async] [—log file] [—min-slice-size min] [—max-slice-size max] [—slice-size] [—ttl time-to-live] [—fec stripesxredundancy/stripesize] [—print-seed] [—rexmit-hello-interval interval] [—autostart autostart] [—broadcast] [—min-receivers receivers] [—min-wait sec] [—max-wait sec] [—nokbd] [—retries-until-drop n] [—bw-period n] [—rate-governor module.so:key1=value1,key2=value2] [—stat-period n] [—print-uncompressed-position flag]
Description
"Udp-sender" is used to broadcast a file (for instance a disk image) to multiple "udp-receivers" on the local LAN . In order to do this, it uses Ethernet multicast or broadcast, so that all receivers profit from the same physical datastream. Thus, sending to 10 destinations does not take more time than it would take to send just 2.
Options
Basic options —file file Reads data to be transmitted from file. If this parameter is not supplied, data to be transmitted is read from stdin instead. —pipe command Sends data through pipe before transmitting it. This is useful for compressing/decompressing it, or for stripping out unused blocks. The command gets a direct handle on the input file or device, and thus may seek inside it, if needed. "Udpcast" itself also keeps a handle on the file, which is used for an informal progress display. The command‘s stdout is a pipe to udpcast. —autostart n Starts transmission after n retransmissions of hello packet, without waiting for a key stroke. Useful for unattended operation, where udp-sender is started from a cron-job for a broadcast/multicast at a scheduled time.
Networking options The following networking options should be supplied both on the sender and the receivers: —portbase portbase Default ports to use for udpcast. Two ports are used: portbase and portbase+1 . Thus, Portbase must be even. Default is 9000. The same portbase must be specified for both "udp-sender" and "udp-receiver". —interface interface Network interface used to send out the data. Default is "eth0" —ttl time to live Sets the time-to-live parameter for the multicast packets. Should theoretically allow to use UDPCast beyond the local network, but not tested for lack of a multicast router. —mcast-rdv-address address Uses a non-standard multicast address for the control (rendez-vous) connection. This address is used by the sender and receivers to «find» each other. This is not the address that is used to transfer the actual data.
By default "mcast-rdv-address" is the Ethernet broadcast address if "ttl" is 1, and 224.0.0.1 otherwise. This setting should not be used except in very special situations, such as when 224.0.0.1 cannot be used for policy reasons. The following networking options should be supplied only on the sender: —mcast-data-address address Uses the given address for multicasting the data. If not specified, the program will automatically derive a multicast address from its own IP (by keeping the last 27 bits of the IP and then prepending 232). —pointopoint Point-to-point mode. Only a single receiver is allowed, but the data will be directly send to this receiver (in unicast mode), rather than multicast/broadcast all over the place. If no async mode is chosen, and there happens to be only one receiver, point-to-point is activated automatically. —nopointopoint Don’t use point-to-point, even if there is only one single receiver. —full-duplex Use this option if you use a full-duplex network. T-base-10 or 100 is full duplex if equipped with a switch. Hub based networks, or T-base-2 networks (coaxial cable) are only half-duplex and you should not use this option with these networks, or else you may experience a 10% performance hit.
N.B. On high-latency WAN links, the full-duplex option can lead to substantial performance improvements, because it allows udp-sender to send more data while it is still waiting for the previous batch to get acknowledged. —half-duplex Use half duplex mode (needed for Hub based or T-base-2 networks). This is the default behavior in this version of udpcast. —broadcast Use Ethernet broadcast, rather than multicast. Useful if you have Ethernet cards which don’t support multicast.
By default, "udpcast" uses multicast. This allows sending the data only to those receivers that requested it. Ethernet cards of machines which don’t participate in the transmission automatically block out the packets at the hardware level. Moreover, network switches are able to selectively transmit the packets only to those network ports to which receivers are connected. Both features thus allow a much more efficient operation than broadcast. This option should only be supplied on the sender. -b blocksize Choses the packet size. Default (and also maximum) is 1456.
Unidirectional mode (without return channel) The options described below are useful in situations where no «return channel» is available, or where such a channel is impractical due to high latency. In an unidirectional setup (i.e. without return channel), the sender only sends data but doesn’t expect any reply from the receiver.
Unidirectional options must be used together, or else the transfer will not work correctly. You may for example use the following command line:
"udp-sender --async --max-bitrate 10m --fec 8x8" —async Asynchronous mode. Do not request confirmations from the receiver. Best used together with forward error correction and bandwidth limitation, or else the receiver will abort the reception as soon as it misses a packet. When the receiver aborts the reception in such a way, it will print a list of packets lost in the slice causing the problem. You can use this list to tune the forward error correction parameters. —max-bitrate bitrate Limits bandwidth used by udpcast. Useful in asynchronous mode, or else the sender may send too fast for the switch and/or receiver to keep up. Bitrate may be expressed in bits per second (—bitrate 5000000), kilobits per second ("--bitrate 5000k") or megabits per second ("--bitrate 5m"). This is the raw bitrate, including packet headers, forward error correction, retransmissions, etc. Actual payload bitrate will be lower. —fec interleave»x»redundancy"/"stripesize Enables forward error correction. The goal of forward error correction is to transmit redundant data, in order to make up for packets lost in transit. Indeed, in unidirectional mode, the receivers have no way of requesting retransmission of lost packets, thus the only way to address packet loss is to include redundant information to begin with. The algorithm is designed in such a way that if r redundant packets are transmitted, that those can be used to compensate for the loss of any r packets in the same FEC group (stripe).
In order to increase robustness of the FEC algorithm against burst packet losses, each slice is divided in interleave stripes. Each stripe has stripesize blocks (if not specified, stripesize is calculated by diving slice-size by interleave). For each stripe, redundancy FEC packets are added. Stripes are organized in such a fashion that consecutive packets belong to different stripes. This way, we ensure that burst losses affect different stripes, rather than using all FEC packets of a single stripe. Example: "--fec 8x8/128" —rate-governor module.so:key1=value1,key2=value2 Applies a dynamically loadable rate governor. module.so is the name of the preloadable module, which is followed by a number of property assignments (key1=value1). The rate governor controls the transmission rate according to various criteria, such as congestion information received from a routing or encapsulating device. See comments in "/usr/include/udpcast/rateGovernor.h" and example in "examples/rateGovernor" for more details —rexmit-hello-interval timeout If set, rebroadcasts the HELLO packet used for initiating the casting each timeout milliseconds.
This option is useful together with asyc mode, because with async mode the receiver won’t send a connection request to the sender (and hence won’t get a connection reply). In async mode, the receivers get all needed information from the hello packet instead, and are thus particularly dependant on the reception of this packet, makeing retransmission useful.
This option is also useful on networks where packet loss is so high that even with connection requests, sender and receiver would not find each other otherwise. —retries-until-drop retries How many time to send a REQACK until dropping a receiver. Lower retrycounts make "udp-sender" faster to react to crashed receivers, but they also increase the probability of false alerts (dropping receivers that are not actually crashed, but merely slow to respond for whatever reason) —streaming Allows receivers to join an ongoing transmission mid through
Keyboardless mode The options below help to run a sender in unattended mode. —min-receivers n Automatically start as soon as a minimal number of receivers have connected. —min-wait t Even when the necessary amount of receivers do have connected, still wait until t seconds since first receiver connection have passed. —max-wait t When not enough receivers have connected (but at least one), start anyways when t seconds since first receiver connection have pased. —nokbd Do not read start signal from keyboard, and do not display any message telling the user to press any key to start. —start-timeout sec sender aborts at start if it doesn’t see a receiver within this many seconds. Furthermore, transmission of data needs to start within this delay. Once transmission is started, the timeout no longer applies. —daemon-mode Do not exit when done, but instead wait for the next batch of receivers. If this option is given twice, udp-sender puts itself into the background, closes its standard file descriptors, and acts as a real daemon. —pid-file file Allow to specify a pid file. If given together with "--daemon-mode", udp-sender will write its pid into this file. If given together with "--kill", the process with the given pid will be killed. —kill Shuts down the udp-sender identified by the pid file (which also must be specified). Kill does not interrupt an ongoing transmission, but instead waits until it is finished. Example:
"udp-sender -f zozo --min-receivers 5 --min-wait 20 --max-wait 80" • If one receiver connects at 18h00.00, and 4 more within the next 5 minutes, start at 18h00.20. (5 receivers connected, but min-wait not yet pased)
• If one receiver connects at 18h00.00, and 3 more within the next 5 minutes, then a last one at 18h00.25, start right after.
• If one receiver connects at 18h00.00, then 3 more within the next 15 minutes, then no one, start at 18h01.20. (not enough receivers, but we start anyways after max-wait).
Logging and statistics options The options instruct "udp-sender" to log some additional statistics to a file: —stat-period seconds Every so much milliseconds, print some statistics to stderr: how much bytes sent so far log, position in uncompressed file (if applicable), retransmit count. By default, this is printed every half second. —print-uncompressed-position flag By default, udp-sender only prints the position in uncompressed file if the 2 following conditions are met: • Input is piped via a compressor ("-p " option).
• The primary input is seekable (file or device) With the "--print-uncompressed-position", options, you can change this behavior: • If flag is 0, uncompressed position will never be printed, even if above conditions are met
• If flag is 1, uncompressed position will always be printed, even if above conditions are not met —log file Logs some stuff into file. —no-progress Do not display progress statistics. —bw-period seconds Every so much seconds, log instantenous bandwidth seen during that period. Note: this is different from the bandwidth displayed to stderr of the receiver, which is the average since start of transmission.
Tuning options (sender) The following tuning options are all about slice size. Udpcast groups its data in slices, which are a series of blocks ( UDP packets). These groups are relevant for • data retransmission: after each slice, the server asks the receivers whether they have received all blocks, and if needed retransmits what has been missing
• forward error correction: each slice has its set of data blocks, and matching FEC blocks. —min-slice-size size minimum slice size (expressed in blocks). Default is 16. When dynamically adjusting slice size (only in non-duplex mode), never use smaller slices than this. Ignored in duplex mode (default). —max-slice-size size maximum slice size (expressed in blocks). Default is 1024. When dynamically adjusting slice size (only in non-duplex mode), never use larger slices than this. Ignored in duplex mode (default). —default-slice-size size Slice size used (starting slice size in half-duplex mode). —rehello-offset offs in streaming mode, how many packets before end of slice the hello packet will be transferred (default 50). Chose larger values if you notice that receivers are excessively slow to pick up running transmission
Tuning the forward error correction There are three parameters on which to act: redundancy This influences how much extra packets are included per stripe. The higher this is, the more redundancy there is, which means that the transmission becomes more robust against loss. However, CPU time necessary is also proportional to redundancy (a factor to consider on slow PC ‘s), and of course, a higher redundancy augments the amount of data to be transmitted. interleave This influences among how many stripes the data is divided. Higher interleave improves robustness against burst loss (for example, 64 packets in a row. ). It doesn’t increase robustness against randomly spread packet loss. Note: interleave bigger than 8 will force a smaller stripesize, due to the fact that slicesize is limited to 1024. stripesize How many data blocks there are in a stripe. Due to the algorithm used, this cannot be more than 128. Reducing stripe size is an indirect way of augmenting (relative) redundancy, without incurring the CPU penalty of larger (absolute) redundancy. However, a larger absolute redundancy is still preferable over a smaller stripesize, because it improves robustness against clustered losses. For instance, if 8/128 is preferable over 4/64, because with 8/128 the 8 FEC packets can be used to compensate for the loss of any of the 128 data packets, whereas with 4/64, each group of 4 FEC packets can only be used against its own set of 64 data packets. If for instance the first 8 packets were lost, they would be recoverable with 8/128, but not with 4/64. Considering these, change parameters as follows: • If you observe long stretches of lost packets, increase interleave
• If you observe that transfer is slowed down by CPU saturation, decrease redundancy and stripesize proportionnally.
• If you observe big variations in packet loss rate, increase redundancy and stripesize proportionnally.
• If you just observe high loss, but not necessarily clustered in any special way, increase redundancy or decrease stripesize
• Be aware that network equipment or the receiver may be dropping packets because of a bandwidth which is too high. Try limiting it using "max-bitrate"
Источник


