- How To Check and Use Serial Ports Under Linux
- Display Detected System’s Serial Support Under Linux
- A note about USB based serial ports
- Listing and using USB serial ports on Linux
- Use the setserial command to check and use serial ports
- Debian/Ubuntu Linux install setserial using the apt-get command/apt command
- CentOS/RHEL/Oracle Linux install setserial using the yum command
- Using setserial to list serial ports and devices
- Listing or displaying USB serial ports on Linux
- Linux serial console programs
- Cocnlusion
- Заметки о Linux, электронике, радиолюбительстве
- воскресенье, 27 июля 2014 г.
- Работа с последовательным портом из консоли Linux
How To Check and Use Serial Ports Under Linux
Display Detected System’s Serial Support Under Linux
Simple run the dmesg command:
$ dmesg | grep tty
A note about USB based serial ports
USB to RS232 adapter cable connects from the USB port of a computer to a device. Such serial to USB adapter connects to devices for configuration or programming under Linux. Here is what the dmesg command displays when you enter USB adapter:
$ dmesg
## use grep command/egrep command to filter out USB devices ##
$ dmesg | grep -i serial
$ dmesg | grep -i FTDI
Listing and using USB serial ports on Linux
Here is how it looks when I attached USB device:
$ sudo dmesg | more
Use the setserial command to check and use serial ports
The setserial is a program designed to set and/or report the configuration information associated with a serial port. This information includes what I/O port and IRQ a particular serial port is using, and whether or not the break key should be interpreted as the Secure Attention Key, and so on.
Debian/Ubuntu Linux install setserial using the apt-get command/apt command
$ sudo apt install setserial
CentOS/RHEL/Oracle Linux install setserial using the yum command
$ sudo yum install setserial
Fedora Linux user try the dnf command:
$ sudo dnf install setserial
Using setserial to list serial ports and devices
Now we installed required package. Open the termial and then type the following setserial command:
$ setserial -g /dev/ttyS[0123]
If you get an error/warning that reads as “Permission denied,” try running the command as the root user. For example, I am running it using the sudo command/su command:
$ sudo setserial -g /dev/ttyS[0123]
The setserial with -g option help to find out what physical serial ports your Linux box has.
Listing or displaying USB serial ports on Linux
Try:
$ sudo setserial -g /dev/ttyUSB[01]
- No ads and tracking
- In-depth guides for developers and sysadmins at Opensourceflare✨
- Join my Patreon to support independent content creators and start reading latest guides:
- How to set up Redis sentinel cluster on Ubuntu or Debian Linux
- How To Set Up SSH Keys With YubiKey as two-factor authentication (U2F/FIDO2)
- How to set up Mariadb Galera cluster on Ubuntu or Debian Linux
- A podman tutorial for beginners – part I (run Linux containers without Docker and in daemonless mode)
- How to protect Linux against rogue USB devices using USBGuard
Join Patreon ➔
Linux serial console programs
Once serial ports identified you can configure Linux box and use serial ports using various utilities:
- minicom– The best friendly serial communication program for controlling modems and connecting to dump devices
- wvidial or other GUI dial up networking program – a PPP dialer with built-in intelligence.
- Screen Command: Set Baud Rate [ Terminal Communication ]
- getty / agetty – agetty opens a tty port, prompts for a login name and invokes the /bin/login command.
- grub / lilo configuration – To configure serial port as the system console
Cocnlusion
You learned how to list or check serial ports including USB based adptor on Linux.
🐧 Get the latest tutorials on Linux, Open Source & DevOps via
| Category | List of Unix and Linux commands |
|---|---|
| Documentation | help • mandb • man • pinfo |
| Disk space analyzers | df • duf • ncdu • pydf |
| File Management | cat • cp • less • mkdir • more • tree |
| Firewall | Alpine Awall • CentOS 8 • OpenSUSE • RHEL 8 • Ubuntu 16.04 • Ubuntu 18.04 • Ubuntu 20.04 |
| Linux Desktop Apps | Skype • Spotify • VLC 3 |
| Modern utilities | bat • exa |
| Network Utilities | NetHogs • dig • host • ip • nmap |
| OpenVPN | CentOS 7 • CentOS 8 • Debian 10 • Debian 8/9 • Ubuntu 18.04 • Ubuntu 20.04 |
| Package Manager | apk • apt |
| Processes Management | bg • chroot • cron • disown • fg • glances • gtop • jobs • killall • kill • pidof • pstree • pwdx • time • vtop |
| Searching | ag • grep • whereis • which |
| Shell builtins | compgen • echo • printf |
| Text processing | cut • rev |
| User Information | groups • id • lastcomm • last • lid/libuser-lid • logname • members • users • whoami • who • w |
| WireGuard VPN | Alpine • CentOS 8 • Debian 10 • Firewall • Ubuntu 20.04 |
Comments on this entry are closed.
I don’t know if this is the place, but I’m looking for information that is similar. I have 2 machines setup through a null modem. I want to read through the com port from one machine to the other. The sending machine is running Windows sending through COM1: and the receiving computer is Linux Red Hat. Any help on this would be appreciated.
You can use pyserial ,its a python package,can be used to read and write in serial ports
another simple serial console program not mentioned is gtkterm.
I want to advise you that probably there is an error in the last sentence “seserial with -g option help to find out what physical serial ports your Linux box has.”; isn’t it setserial?
I have 4 standard serial ports defined, /dev/ttyS0-4, but I added a PCI-E 16 port serial adapter, and I have not found a way to connect anything to the upper 16 ports.
How do you create the virtual links? what options do you give setserial to define the new ports?
it dosn’t work 🙁 I can’t connect to my ASA using debian.
Daemon is a program called getty used by UNIX/Linux systems. There are many different versions of getty. The first modem detected is /dev/ttys0 or /dev/ttys1. To create a link to the devices file so that you can view modem information. Type ln -s /dev/ttys1 /dev/modem.
It is essential to set the modem to AUTO ANSWER using getty.
download minicom from alioth.debian.org/projects/minicom.
create a modem config file by entering minicom -s from the root command line
select the options you want to configure using AT commands
connect to the modem by typing in minicom
Thanks very useful..save my time 🙂
Hi,everybody
I have a serial PCI card with two ports but neither of them is working, on Linux fedora 16. I have tried using “gtkterm” and “minicom” but unfortunately I can’t make a serial connection to my Cisco lab. Here is my output when I issue the command: “setserial -g /dev/ttyS[0123]”.
/dev/ttyS0, UART: 16550A, Port: 0xec00, IRQ: 16
/dev/ttyS1, UART: 16550A, Port: 0xe880, IRQ: 16
/dev/ttyS2, UART: unknown, Port: 0x03e8, IRQ: 4
/dev/ttyS3, UART: unknown, Port: 0x02e8, IRQ: 3
also I want to mention that when I try to connet throught the terminal it generates a message like so: ” Cannot open /dev/ttyS0: Permission denied”.
any help please.
abdel
Check the permissions on /dev/ttyS0… Likely problem is it’s owned by root, and is part of the uucp group. Add yourself to the uucp group, and all should be better. I’m curious to know if this is enough for you as I am having problems communicating with a serial port on Linux as well. I got past the permissions stuff, but it is still not working.
Thanks Tom,
I actually I tried but it’s does not work, still says “permission denied”. I would appreciate if you explain to me step by step the procedure how to do it, I’m knew to Linux.
Best Regards
Abdel
1) ls -la /dev/ttyS0 — This will report the permissions on the port. Typically, this will say crw-rw—- 1 root uucp. The “c” in the string indicates that it’s a “character device” the first “rw” indicates that the owner has read/write permission. The second “rw” means that the group has read/write permissions. The “—” indicates that the rest of the world has no permissions. After the “—-“, “root” indicates that the owner of the device is root, and that the group id is “uucp”. So, you either need to be root, or a member of the uucp group to have read/write access to the port.
2) To add yourself to the uucp group (to get read/write access), you need to edit the file /etc/group, and add your user name to the line that begins with “uucp:” User names are separated by commas, so add a comma, then your user name to the end of the line. You will need root permissions to edit this file.
3) log out, and log back in because group associations are made at login time, and are not queried on each request.
Thanks Tom,
here is my output from the group file I have added my username to it but does not work.
I will just give up.Thanks a lot for your help I relay appreciate it.
Your entry in /etc/group is incorrect. If you read my previous post, I said to add your user id to the line that _begins_ with uucp. You added uucp to the group of users that can access your account. You want an entry in the /etc/group file that looks something like:
The critical element is that it’s the line that begins with uucp
It works. I just add my username to ” dialout ” and it worked fine. Iwould like to thank you for you time and support.
Best Regards
Abdel
hi,
I have connected the SIM300(gsm model) to my pc running ubuntu. I need a code to send a AT command to the GSM module and it should read and display the reply.
Please let me know steps.
I tried so many methods and codes, but no use…
i need C code(program).
all my ttyS* shows unknown, earlier it was working fine, now it doesnt recognise
setserial -g /dev/ttyS*
/dev/ttyS0, UART: unknown, Port: 0x03f8, IRQ: 4
/dev/ttyS1, UART: unknown, Port: 0x02f8, IRQ: 3
/dev/ttyS2, UART: unknown, Port: 0x03e8, IRQ: 4
/dev/ttyS3, UART: unknown, Port: 0x02e8, IRQ: 3
#cat /etc/redhat-release
CentOS Linux release 6.0 (Final)
#dmesg | grep tty
console [tty0] enabled
can u pls help me
tried spending time in google two days, still no success, tried connecting a brand new device too, still no success.
Sorry, but that second sentence is not necessarily true. I have a PC with two dual com port adapters. Windows sees them as COM1 -> COM4 (there is no built in COM port). Linux sees them as /dev/ttyS4->/dev/ttyS7.
/dev/ttyS0-/devttyS3 are apparently reserved, exist whether or not a physical port exists, and /dev/ttyS0 for certain is “special” in that it is used by the default terminal window:
I think minicom still superior to other console utility.
Hi All tried all of the above and still get permission denied . HELP
Kevin
/bpq$ setserial -g /dev/ttyS[012345657
/bpq$ setserial -g /dev/ttyS[012345657]
sudo setserial -g /dev/ttyS1
Hiiiiiiiii
Please help me
i am install minicom and use serial modem sim300 v7.03 but there is problem to type AT cmd on minicom console…….
Edgeports are very easy to use the firmware is on Ubuntu they are from 2 ports to 16+ I bought my last two of them on ebay.
Jim
Hi all..
I got problem to connect with my USB serial port,
i already create
ln -s /dev/ttyUS0
and check dmesg | grep tty
[ 0.000000] console [tty0] enabled
[ 7.722004] systemd[1]: Created slice system-getty.slice.
[ 3659.524452] usb 1-1.1: FTDI USB Serial Device converter now attached to ttyUSB0
[ 4850.183339] ftdi_sio ttyUSB0: FTDI USB Serial Device converter now disconnected from ttyUSB0
[ 4857.907567] usb 1-1.1: FTDI USB Serial Device converter now attached to ttyUSB0
when running SDNC program and select com1 will shown “port is already in use”
hi, have are you\
i have a problem with machine xnc . old version sistem operating linux,
pc removed battery cmos . but change battery do it so machine different data serial port linux dont recognized machine.
how can you slove this problem
your help wil be welcome
Источник
Заметки о Linux, электронике, радиолюбительстве
Личный блог Вадима Кузнецова, RA3XDH
воскресенье, 27 июля 2014 г.
Работа с последовательным портом из консоли Linux
В предыдущем посте было показано как запустить UART на отладочной плате Launchpad для MSP430. Теперь рассмотрим как общаться с платой при помощи средств командной строки Linux. Используется плата с прошивкой из предыдущего поста. Для подробностей — см. под кат
Как известно, все устройства последовательных портов представлены файлами устройств в каталоге /dev.Через эти файлы и происходит общение ОС Linux с внешним устройством на последовательном порту. Чтобы передать что-то на внешнее устройство нужно записать данные в файл устройства, а чтобы считать информацию из устройства — прочитать данные из файла устройства. Это можно делать при помощи команд cat и echo так же как для обычных файлов на диске. Или внутри программы на С при помощи вызовов ioctl(), read() и write() или библиотеки termios.
Физическим последовательным портам RS232, к которым подключались диалапные модемы на старых компьютерах, соответствуют файлы устройств /dev/ttyS*, начиная с /dev/ttyS0. Виртуальным последовательным портам, которые создаются различными конвертерами USB UART соответствуют файлы устройств /dev/ttyUSB* и /dev/ttyACM*. Ядро Linux автоматически разпознаёт подключенное устройство, загружает для него драйвер и создаёт файл устройства. Вручную устанавливать драйвер, как в ОС Windows не требуется. Например, если подключить к USB преобразователь USB UART FT232, то создаётся файл устройства /dev/ttyUSB0, с которым можно работать также как и с обычным последовательным портом. На плате Launcpad находится микросхема TUSB3410, которая тоже представляет собой конвертер USB UART. Если подключить её к USB, то создаётся файл устройства /dev/ttyACM0. Чтобы общаться с платой нужно что-либо писать/читать с этого файла.
Чтобы пользователь мог читать или писать в файл устройства последовательного порта, его нужно добавить в группу dialout. Иначе работать с последовательным портом сможет только администратор root.
Простейшим приложением с графическим интерфейсом, которое работает с последовательным портом, является CuteCOM. Он обычно уже есть в вашем дистрибутиве Linux. Его можно установить из репозиториев. При помощи CuteCOM мы работали с платой в предыдущем посте. Выглядит CuteCOM вот так:
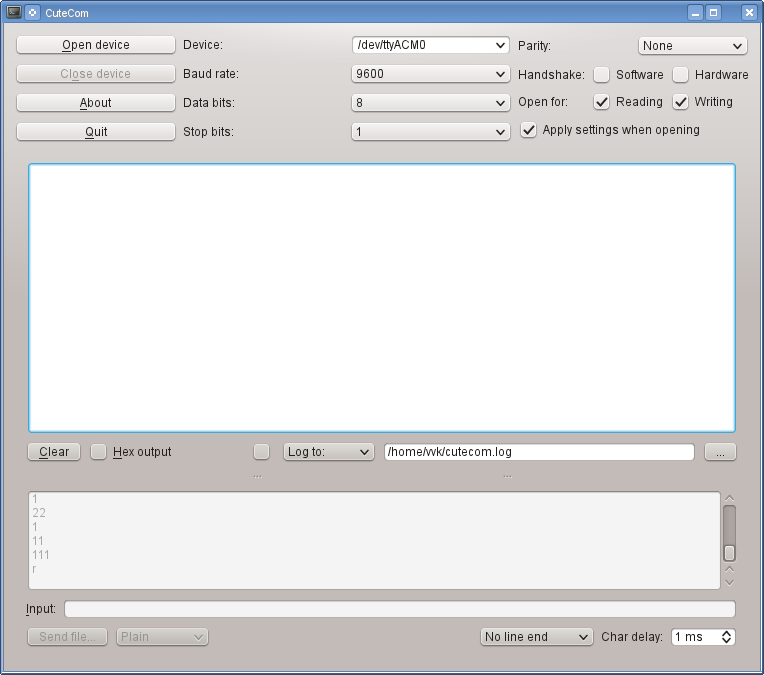
Работать с ним крайне просто. Указываем нужное устройство, если его нет в списке, то его можно впечатать вручную. Затем указываем скорость и параметры и нажимаем OpenDevice. В окне видим данные, которые пришли от устройства. В поле ввода в нижней части можем печать строку символов, которые предаются на устройство. Чтобы передать данный нажимаем Enter и смотрим ответ устройства в окне.
Теперь рассмотрим как работать с COM-портом из командной строки. Для этого служат три команды: stty, cat и echo.
Команда stty устанавливает параметры и скорость COM-порта. Её формат:
stty -F
Чтобы установить параметры для платы Launchpad для соединения на скорости 9600 нужно выполнить:
$ stty 9600 -F /dev/ttyACM0 raw -echo
Параметр raw устанавливает, что данные в компьютер передаются байт за байтом так же как приходят в порт без преобразований. Аппаратное управление потоком отключено. Подробнее о том, что включает и выключает raw — см. man stty. Если не включить raw, то скорее всего ничего работать не будет.
Теперь в той же консоли нужно набрать
$ cat /dev/ttyACM0
И можно смотреть данные, которые приходят от платы. Выход — нажать Ctrl+C.
Теперь нажимаем на плате RESET и видим, что в консоди напечатался текст.
Чтобы передать в плату данные, в другой консоли нужно использовать команду echo и перенаправление вывода в файл устройства. Наберём в другой консоли:
$ echo "1">/dev/ttyACM0
Видим, что на плате загорелся красный светодиод и в первой консоли было выдано сообщение об этом. Чтобы убрать конец строки в передаваемых данных, то нужно использовать запуск echo -n, а чтобы интерпретировать 16-ричные коды — нужно echo -e. Ключи можно комбинировать.
В итоге должно получиться так:

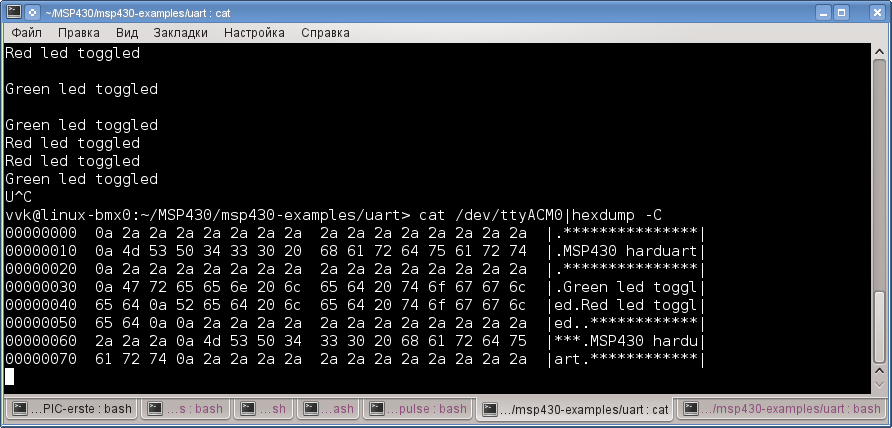
Чтобы увидеть 16-ричные коды данных, приходящих от устройства, нужно использовать команду hexdump:
$ cat /dev/ttyACM0|hexdump -C
Получится вот так:
Чтобы иметь вывод данных от устройство на экран и в текстовый файл нужно использовать tee:
Источник


