- 3 Ways to Create Password for User Account in Windows 10
- How to Set Password for User Account in Windows 10
- Пароль Windows 10: поставить, изменить, убрать и сбросить
- Как работать с паролями в Windows 10
- Как поставить пароль на Windows 10
- Контрольные вопросы Windows 10
- Как изменить пароль Windows 10
- Убрать пароль при входе в Windows 10
- Сброс пароля Windows 10
- Командная строка Windows 10: как поставить, изменить или сбросить пароль
- Список команд:
- Забыт пароль Windows 10
- Этапы сброса пароля Windows 10:
- How to Make a User Account an Administrator on Windows 10
- Method 1: Use Windows 10’s Settings utility
- Method 2: Change user account type from the Control Panel
- Method 3: Change account type from the User Accounts utility
- Method 4: Change user account type from an elevated Command Prompt
3 Ways to Create Password for User Account in Windows 10
If you want to protect your Windows 10 laptop/desktop computer from unknown access, you can put a password on Windows 10 user account. The article presents three efficient methods to create password for user account on Windows 10 computer. Hope it can help you!
How to Set Password for User Account in Windows 10
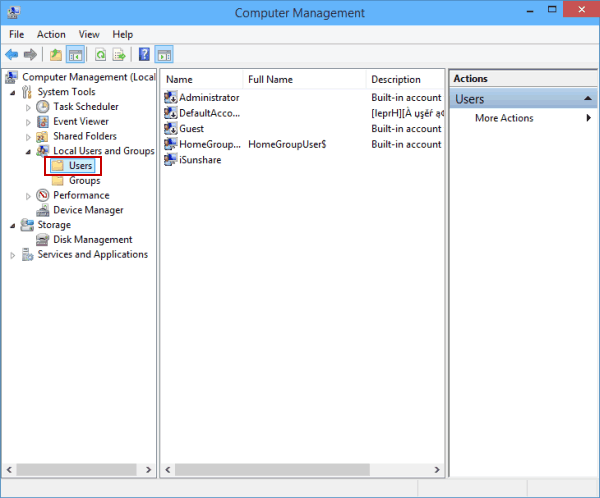
Way 1: Create user password in Computer Management.
Step 2: Open the Users folder in Local Users and Groups.
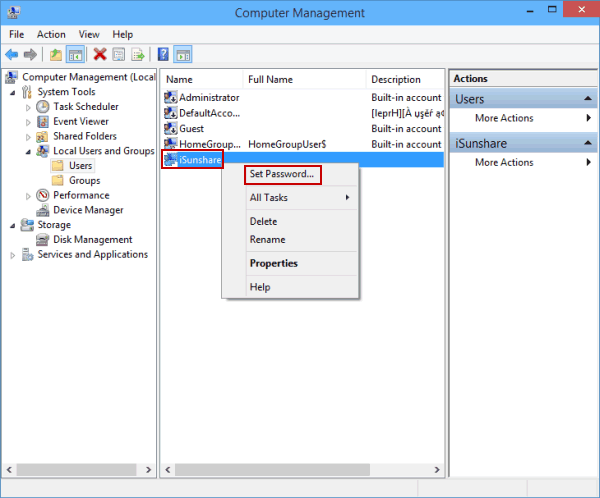
Step 3: Right-click a user account and choose Set Password.
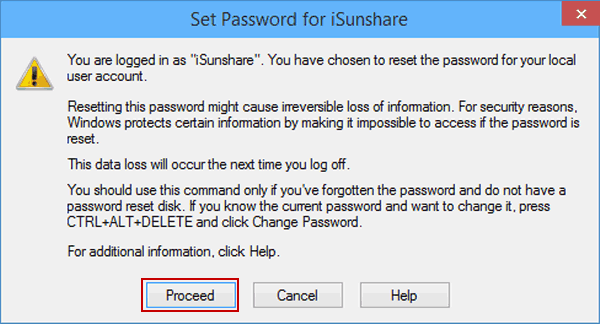
Step 4: Tap Proceed to continue.
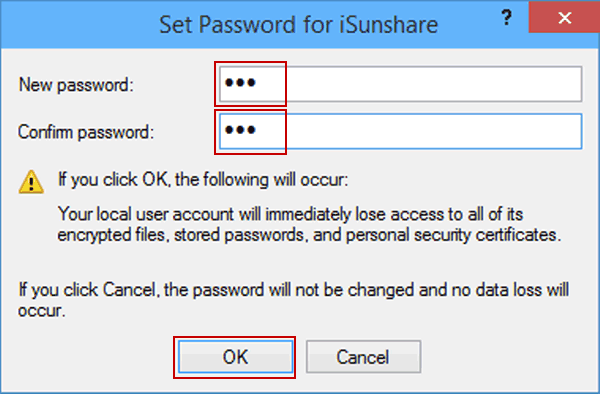
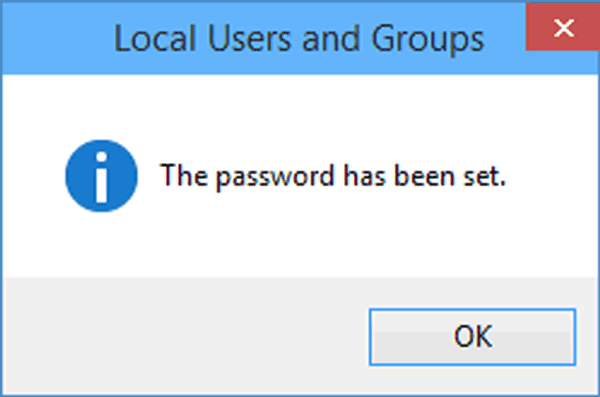
Step 5: Enter a new password, reenter it and click OK.
After these five steps, a dialog shows up, prompting that the password has been set. In other words, your Windows 10 computer is protected with the password. Everyone should enter the password when they login Windows 10 using your account.
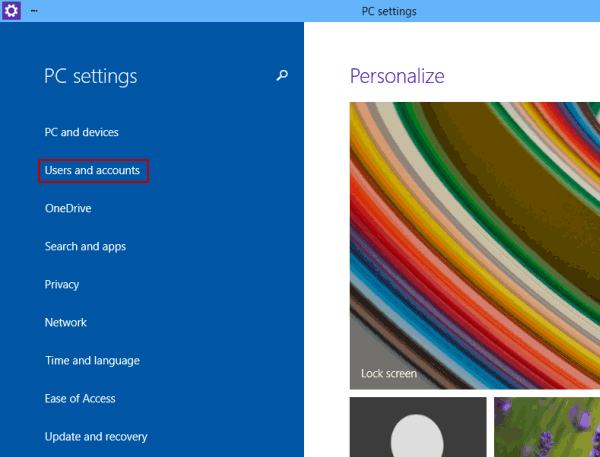
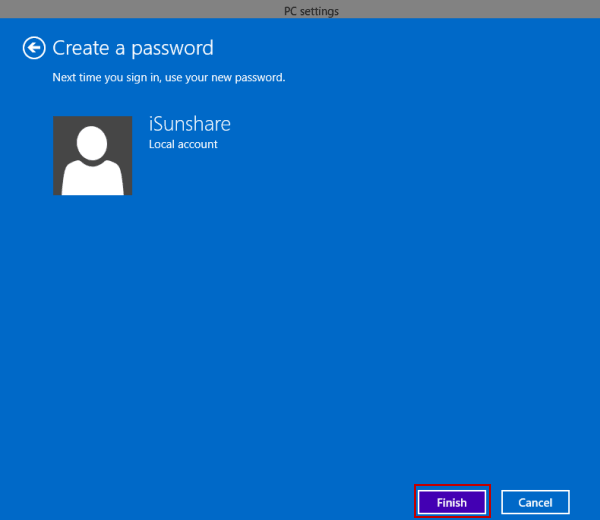
Way 2: Set password for user account in PC settings.
Step 2: Click Users and accounts.
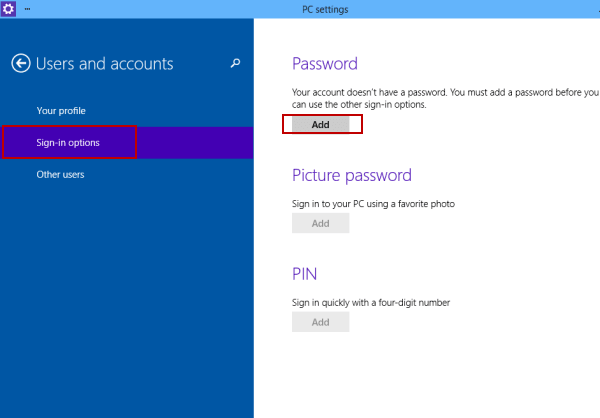
Step 3: Choose Sign-in options and tap the Add button under Password.
Step 4: Type a new password, retype it, input password hint and click Next.
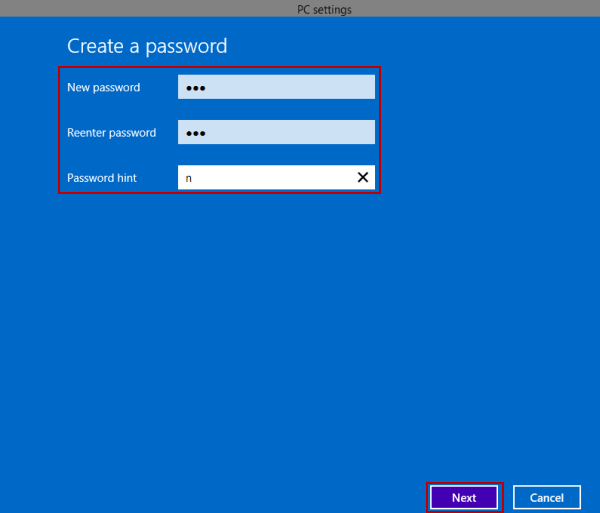
Tip: In this method, the password hint is a required field.
Step 5: Choose Finish.
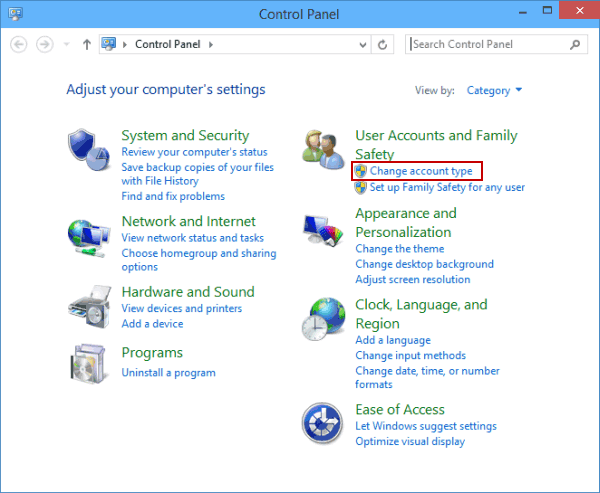
Way 3: Put password on user account in Control Panel.
Step 2: Tap Change account type to move on.
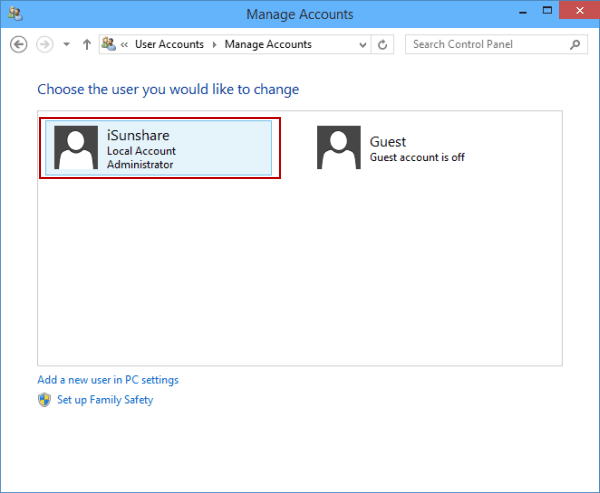
Step 3: Select a user account.
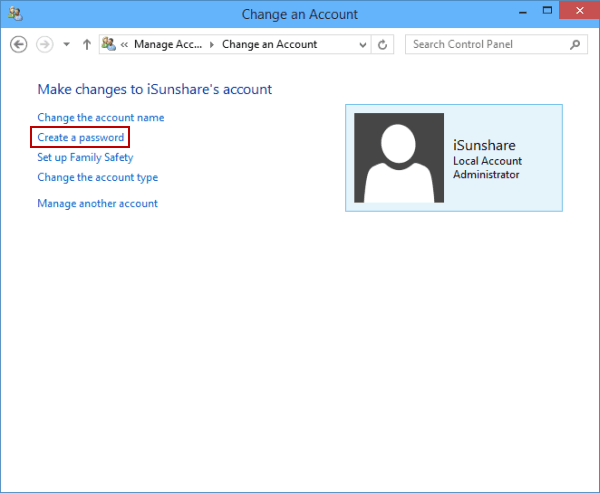
Step 4: Choose Create a password.
Step 5: Enter a new password, reenter it, type password hint and click Create password.
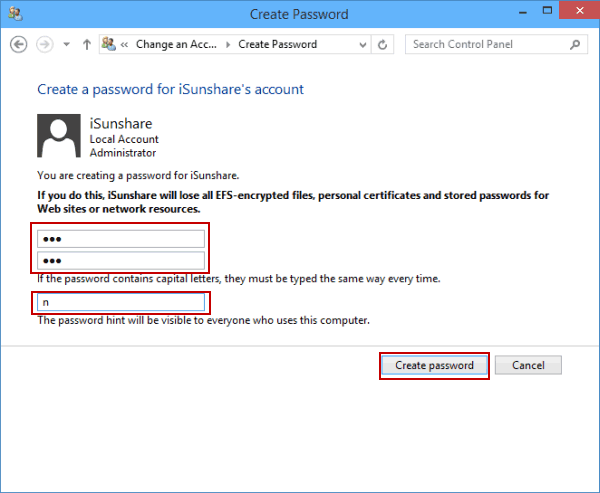
Tip: The password hint is not a required field in this method, so you can skip the password hint box.
Пароль Windows 10: поставить, изменить, убрать и сбросить
Пароль Windows 10 — это пароль учетной записи пользователя, который вводят при входе в Windows 10, является превентивной мерой защиты конфиденциальной информации или результатов работы пользователя. Существует множество ситуаций, при которых, на одном компьютере (ноутбуке) могут работать несколько человек. Windows 10 позволяет не только создавать дополнительные учётные записи, но и назначать им пароли.
Поставить, изменить или убрать/сбросить пароль учётной записи в Windows 10 можно двумя способами: используя пользовательский интерфейс или командную строку с правами администратора.
Вначале, рассмотрим создание, изменение и удаление пароля пользователя стандартными средствами интерфейса Windows 10. Продвинутый вариант работы с паролями через командную строку описан в конце статьи.
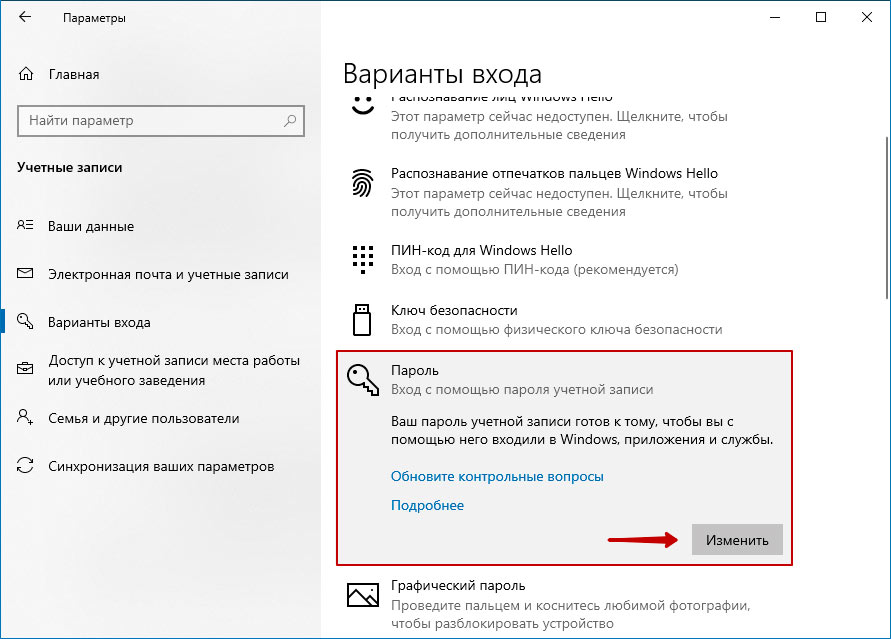
Как работать с паролями в Windows 10
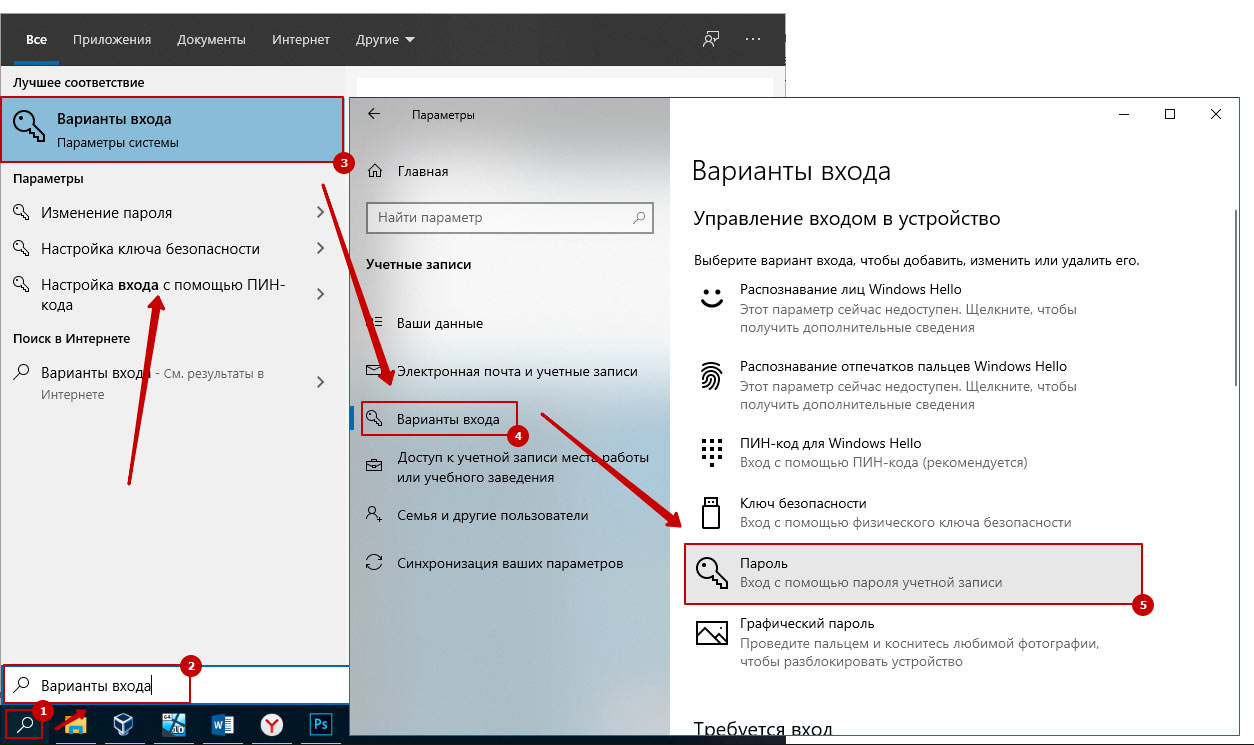
Для работы с паролями в Windows 10, необходимо воспользоваться настройками «Варианты входа» в разделе «Учётные записи», который находится в основном меню «Параметры Windows». Попасть туда можно двумя способами:
1. Пройдите по цепочке: «Пуск» — «Параметры» — «Учётные записи» — «Варианты входа» — «Пароль».
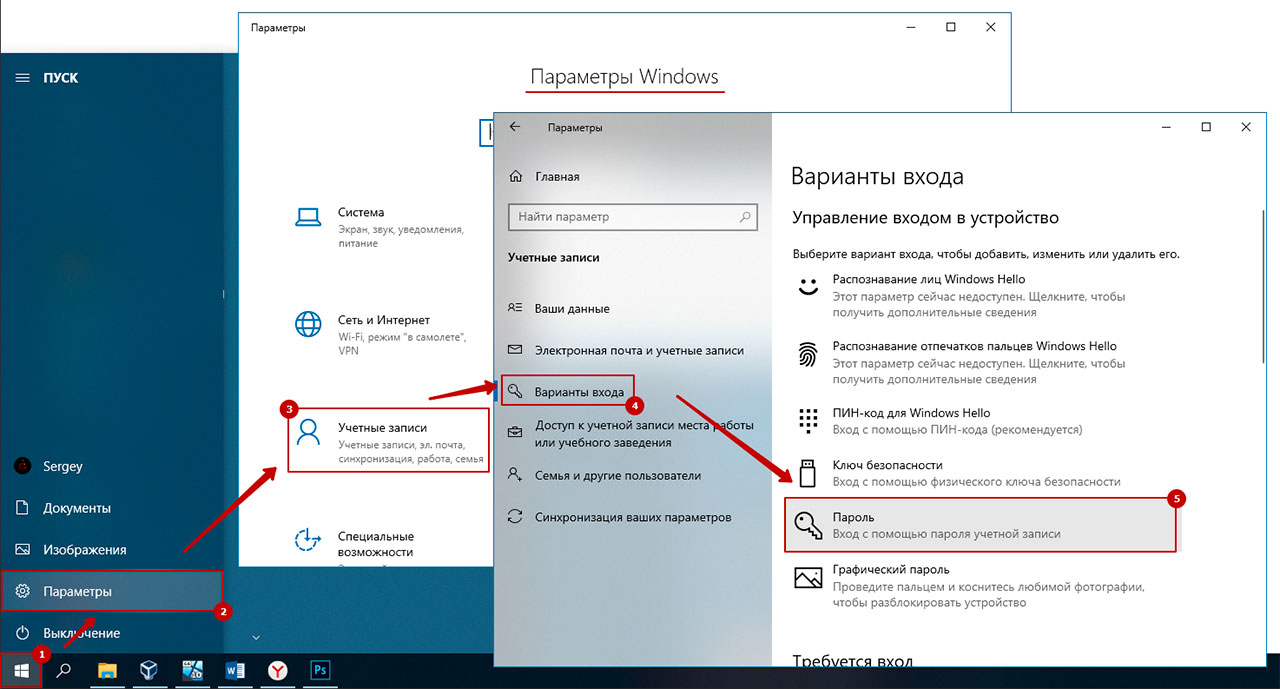
2. Воспользуйтесь поиском в Windows 10: в строке поиска введите «Варианты входа», после чего кликните по соответствующей надписи в результатах поиска и выберите «Пароль» в правой части окна.
Как поставить пароль на Windows 10
Чтобы установить пароль на Windows 10, кликните по надписи «Пароль» и нажмите «Добавить».
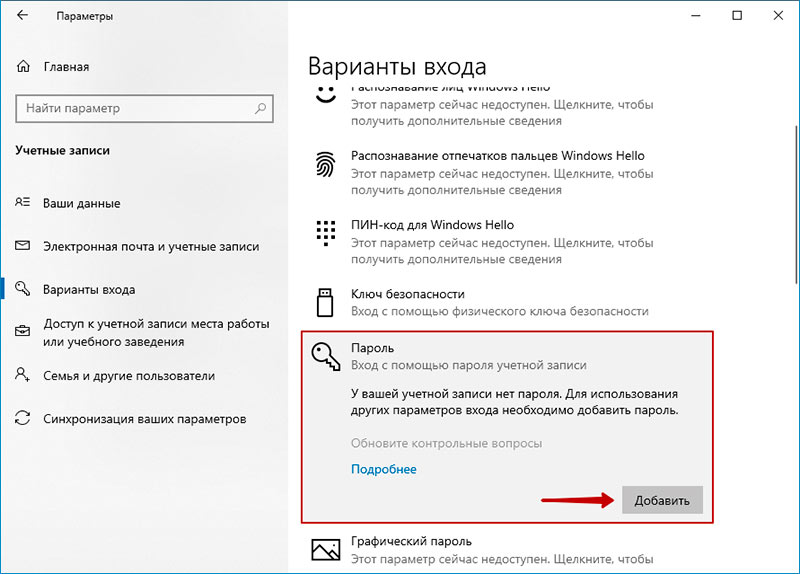
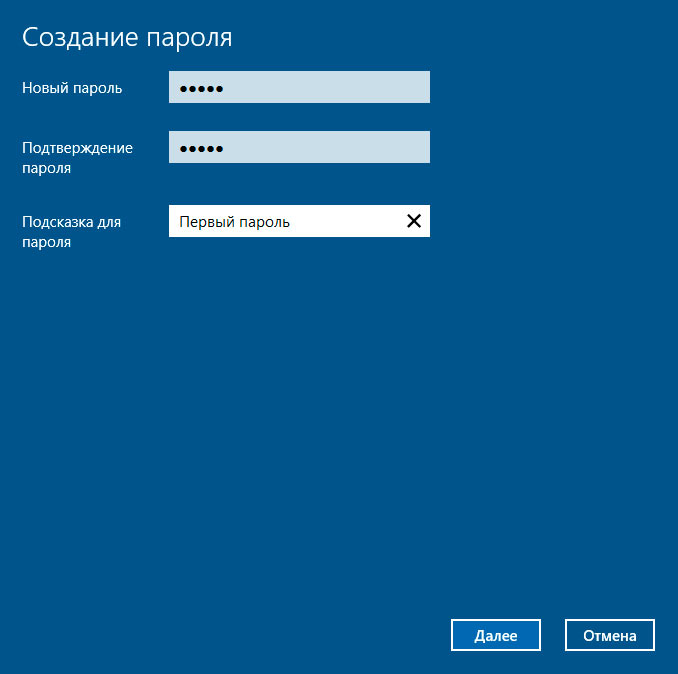
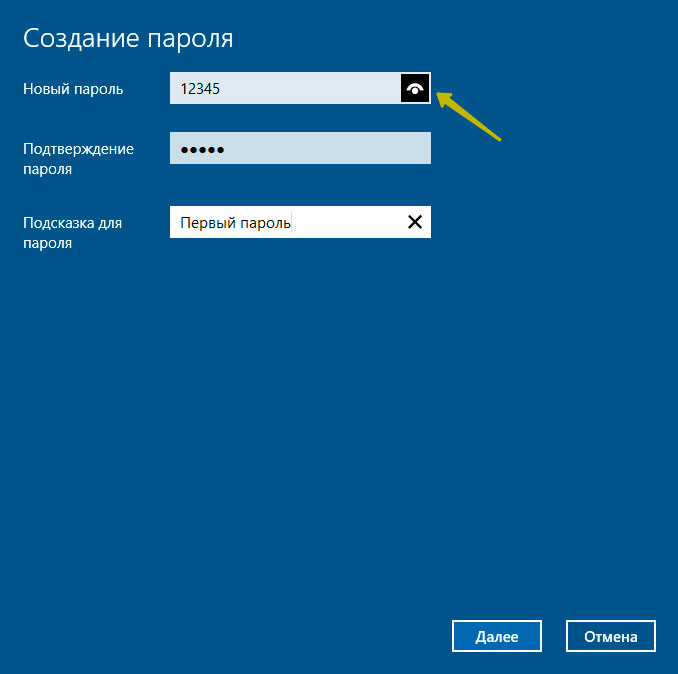
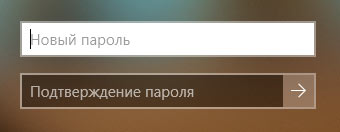
В открывшемся окне «Создание пароля», заполните три поля: «Новый пароль», «Подтверждение пароля» и «Подсказка для пароля». Пароль необходимо указать два раза, чтобы удостовериться в правильности ввода кода. Придумайте подсказку, она будет отображаться при неправильном вводе пароля.
Если вы сомневаетесь в правильности пароля, можно воспользоваться специальной кнопкой, которая находится в правой части поля ввода.
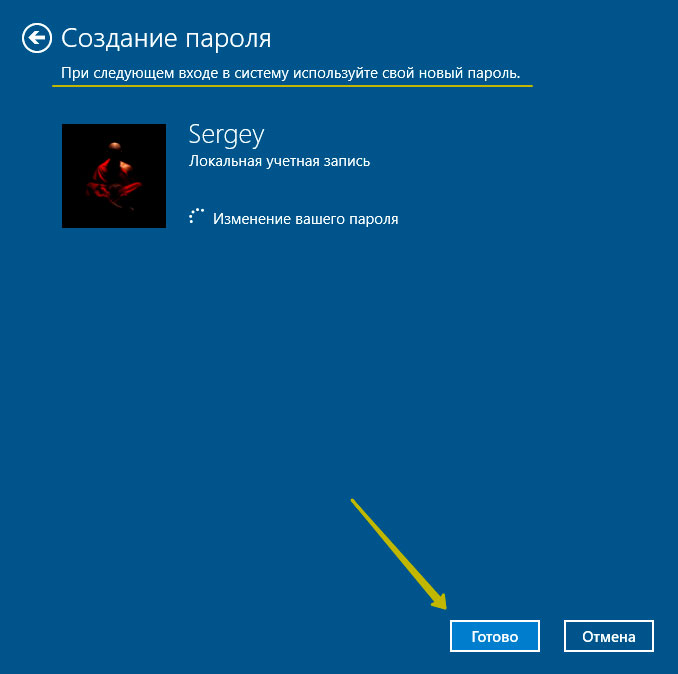
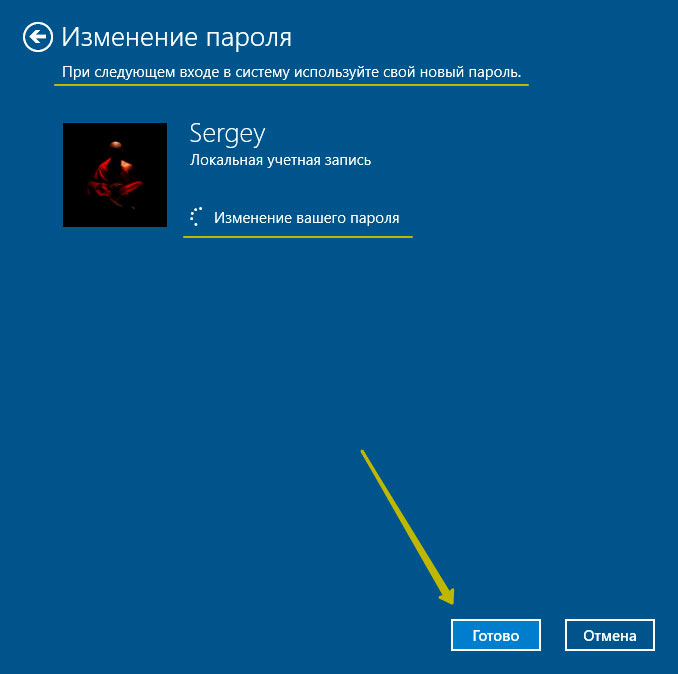
После того как вы нажмёте «Далее», в новом окне система предупредит вас о том, что при следующем входе в Windows 10, необходимо будет ввести пароль. Для сохранения пароля и завершения процесса его создания, нажмите «Готово». Всё, пароль учётной записи Windows 10 установлен.
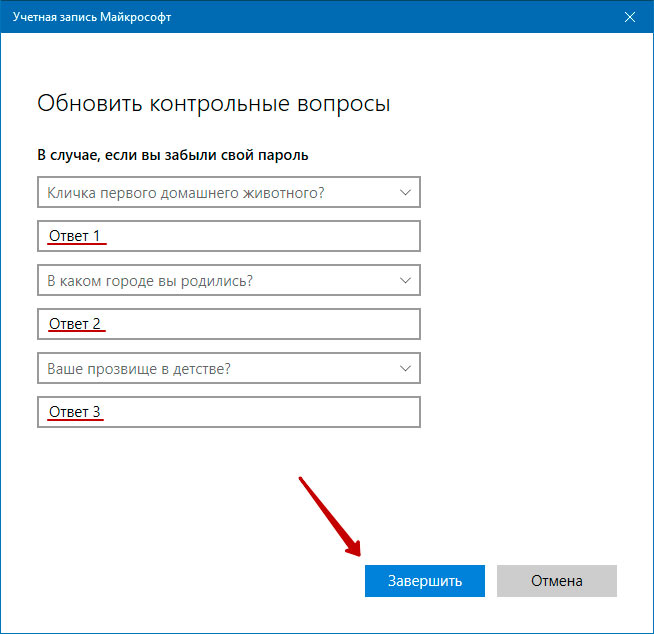
Не забудьте обновить контрольные вопросы к локальной учётной записи Windows 10, которые могут понадобиться для сброса пароля, на тот случай, если вы его забудете.
Контрольные вопросы Windows 10
Процесс обновления вопросов не займёт много времени. Для этого, нажмите «Пароль» и «Обновить контрольные вопросы». Windows 10 запросит текущий пароль пользователя. Далее, выберите контрольные вопросы и ответы на них. Сохраните результат — нажмите «Завершить».

Как изменить пароль Windows 10
Изменить пароль учётной записи пользователя Windows 10 очень просто, для этого кликните по надписи «Пароль» и нажмите «Изменить».
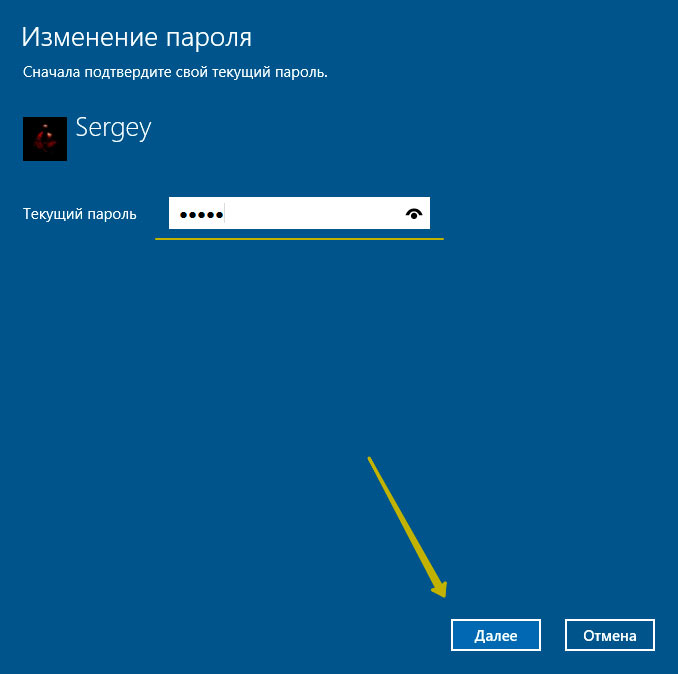
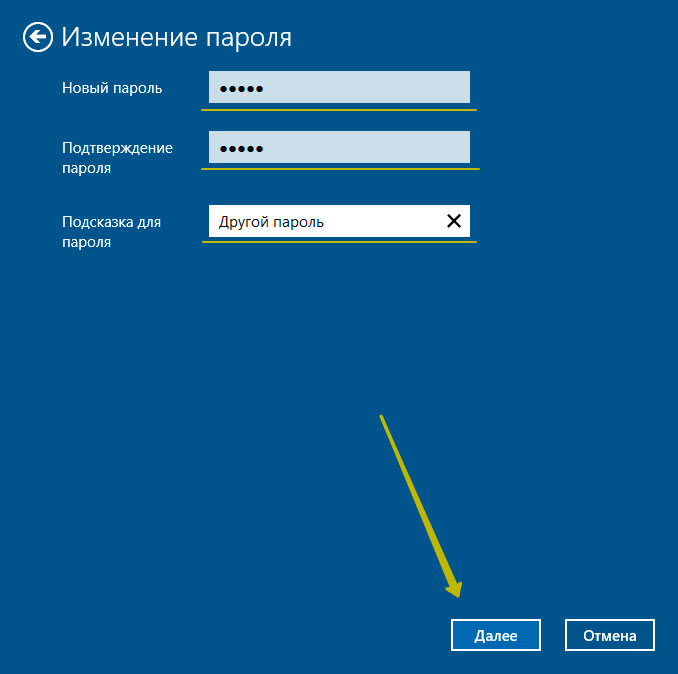
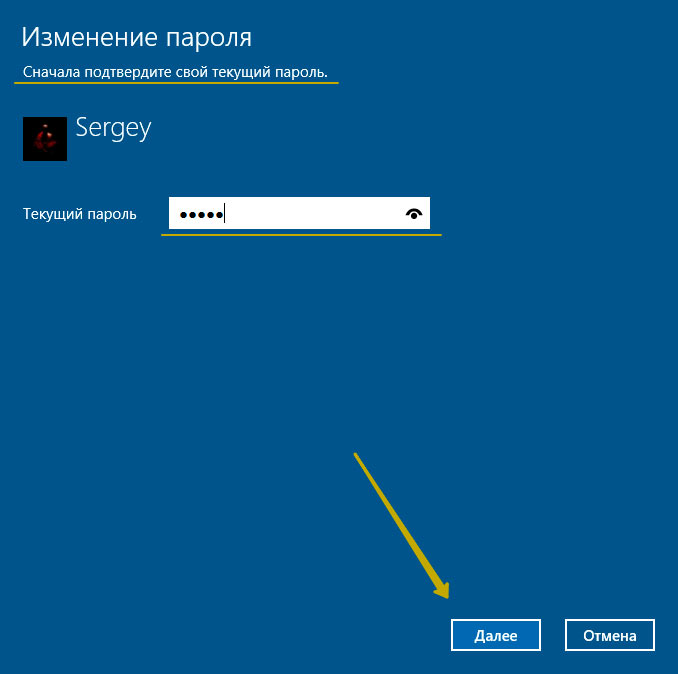
Для начала Windows 10 попросит подтвердить текущий пароль, после чего, перенаправит вас в окно «Изменение пароля». Здесь, так же, как и при создании пароля, потребуется ввести новый пароль, подтвердить его, и придумать новую подсказку. Чтобы сохранить изменения, нажмите «Далее», а в следующем окне «Готово». Пароль учётной записи Windows 10 — изменён.
Убрать пароль при входе в Windows 10
Чтобы отключить пароль в Windows 10, достаточно проделать следующие шаги:
- нажать кнопку «Изменить»,
- указать текущий пароль,
- в окне «Изменение пароля» оставить поля пустыми,
- нажать «Далее» и «Готово».
Всё, пароль учётной записи пользователя Windows 10 отключен.


Сброс пароля Windows 10
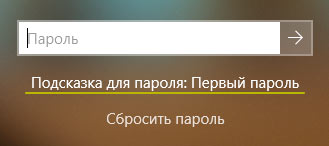
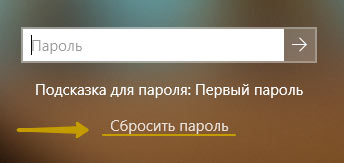
Выполнить сброс пароля можно на этапе входа в Windows 10. Если вы не помните или потеряли доступы от учётной записи Windows 10, нажмите «Сбросить пароль».
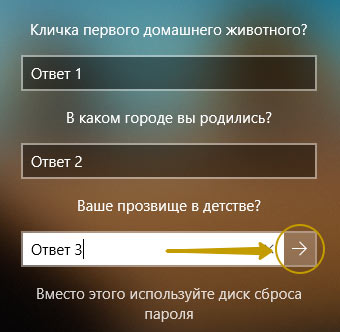
Система предложит ответить на ряд контрольных вопросов. Если вы ответите правильно, Windows 10 отобразит поля для ввода нового пароля и его подтверждения. Укажите новый пароль и нажмите стрелку вправо, произойдёт успешный вход в систему.
Командная строка Windows 10: как поставить, изменить или сбросить пароль
Чтобы создать, изменить или удалить пароль учётной записи Windows 10 достаточно воспользоваться командной строкой с правами администратора. Для этого кликните правой кнопкой мыши «Пуск» и выберите «Командная строка (администратор)».
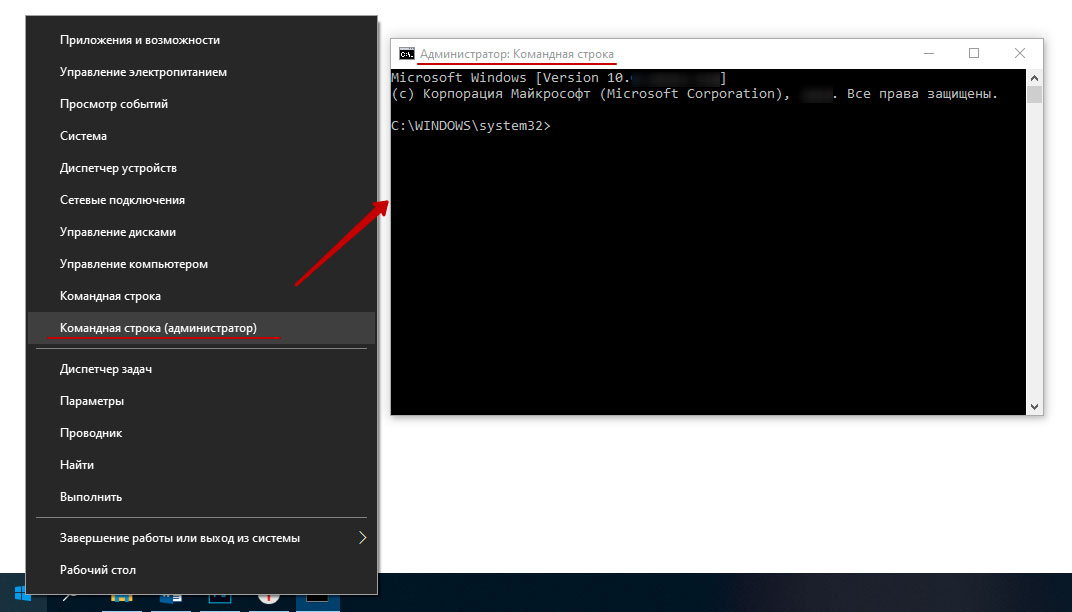
В Windows 10 существует специальная команда для работы с учётной записью пользователя, которая позволяет устанавливать, изменять или сбрасывать пароль:
- net user name password
- net — утилита операционной системы,
- user — подкоманда для работы с настройками пользователя,
- name — имя пользователя (можно использовать кириллицу, в идеале без пробелов),
- password — пароль к учётной записи.
Список команд:
- net user User 12345 — устанавливает пароль 12345 для пользователя User,
- net user User 54321 — изменяет пароль 54321 для User,
- net user User «» — удаляет пароль учётной записи User,
- exit — выход из режима командной строки.

Данные команды можно использовать, не только из-под своей учётной записи, но и при восстановлении доступа к Windows 10, в случае, если вы забыли пароль.
Забыт пароль Windows 10
Сбросить пароль учётной записи пользователя в Windows 10 можно при помощи установочной флешки и командной строки.
Этапы сброса пароля Windows 10:
- Запустите процесс установки с USB-накопителя (как это сделать, читайте здесь).
- Выберите язык установки и нажмите «Далее».
- В новом окне кликните «Восстановление системы».
- Пройдите по цепочке «Поиск и устранение неисправностей» — «Командная строка».
- Запустите «Редактор реестра» командной «regedit».
- В редакторе реестра Windows 10 выберите «HKEY_LOCAL_MACHINE» и выполните следующие действия:
- «Файл» — «Загрузить куст…»;
- найдите диск с вашей операционной системой (может быть любой: D, E…);
- откройте файл по пути D:\Windows\System32\config\SYSTEM и укажите любое имя раздела (например, ResetPass);
- перейдите в ветку «HKEY_LOCAL_MACHINE\ResetPass\Setup» и укажите в параметрах следующие значения:
- CmdLine: cmd.exe
- SetupType: 2
- кликните по «ResetPass», а затем сохраните изменения «Файл» — «Выгрузить куст…»;
- закройте окна редактора реестра и командной строки.
- Нажмите «Продолжить», для загрузки вашей операционной системы и дождитесь, пока не появится командная строка Windows 10.
- Введите команду сброса пароля «net user Имя_пользователя «»», в моём случае «net user User «»».
- Для выхода из режима командной строки, введите «exit» и дождитесь входа в Windows 10.
- Обязательно откройте «Редактор реестра» и перейдите в ветку «HKEY_LOCAL_MACHINE\SYSTEM\Setup» и удалите значения в параметрах «CmdLine» и «SetupType».
Всё, пароль учётной записи пользователя Windows 10 сброшен.
How to Make a User Account an Administrator on Windows 10
There are two different kinds of user accounts on Windows 10 – Standard User accounts and Administrator accounts. The difference between these two user account types is not of functionality but of permissions and authority.
Administrator accounts have complete autonomy and control over every single aspect of a Windows 10 computer – from changing computer settings for all user accounts on the computer and installing applications to getting through User Access Control (UAC), Administrator accounts can do it all. Standard User accounts, on the other hand, are relatively more limited in what they have control over – Standard Users can launch applications but not install any new ones, they can change settings but only as long as the settings they fiddle with don’t affect any other user accounts on the computer, and you need to type in the username and password for an Administrator account to get through any UAC prompts on a Standard User account on Windows 10.
On older versions of Windows, another user account type known as “Guest” used to exist, but nothing of the sort exists on Windows 10. When you create a new user account on a Windows 10 computer, it is created as a Standard User account by default, although you can choose to turn it into an Administrator account while you create it. Standard User accounts are extremely useful for when you need to create a user account for a child or for someone who cannot be trusted to not make a mess of things if given too much power but won’t fit the bill for someone who needs to have a significant amount of access to and control over a computer.
If you want to give a Standard User account on a Windows 10 computer more autonomy and control over the computer, you need to turn it into an Administrator account, which is something that is definitely possible. The following are the four different ways you can go about turning a Standard User account on a Windows 10 computer into an Administrator account:
Note: It is recommended that you try to turn a Standard User account into an Administrator account while logged into an existing Administrator account since most of the methods listed and described require administrative privileges. If you’re not already logged into an Administrator account, you will have to get through UAC prompts using the username and password for an Administrator account on the computer.
Method 1: Use Windows 10’s Settings utility
First and foremost, you can use Windows 10’s Settings utility to turn an already existing Standard User account into an Administrator account. Doing so is quite simple as you use a graphics-based interface to get the job done. If you would like to do so, you need to:
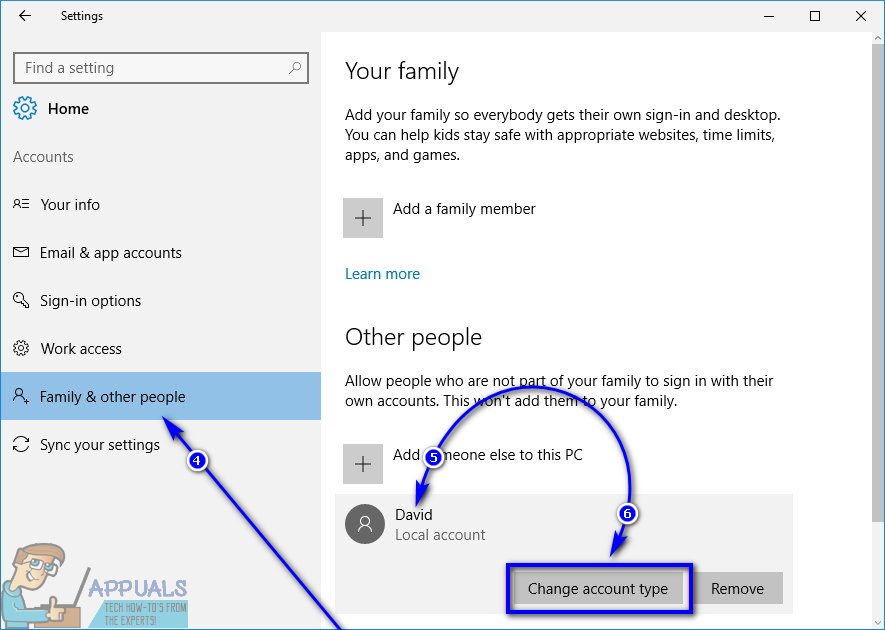
- Open the Start Menu.
- Click on Settings to open Windows 10’s Settings utility.

- Click on Accounts.
- In the left pane of the window, click on Family & other people.
- Under the Other people section in the right pane, locate and click on the Standard User account you want to make an Administrator.
- Click on Change account type.
- Open the dropdown menu located directly under the Account type option and click on Administrator to select it.
- Click on OK.
- Close the Settings utility.
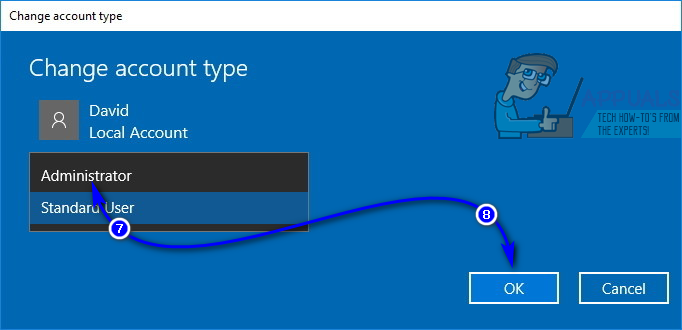
As soon as you do so, the selected Standard User account will be turned into an Administrator account and will be given all the same privileges as the average Administrator account. The same process described above can also be used to turn an Administrator account into a Standard User account – all a user needs to do is click on Standard User instead of Administrator in the dropdown menu in step 7.
Method 2: Change user account type from the Control Panel
One of the most prominent features of the Windows Operating System is the ability to go about doing the same thing a number of different ways. Windows 10 also has the Control Panel – a utility that has been a constant throughout the many different iterations of Windows that have existed, and it too can be used to change the account type of a user account. To turn a Standard User account into an Administrator account using this method, you need to:
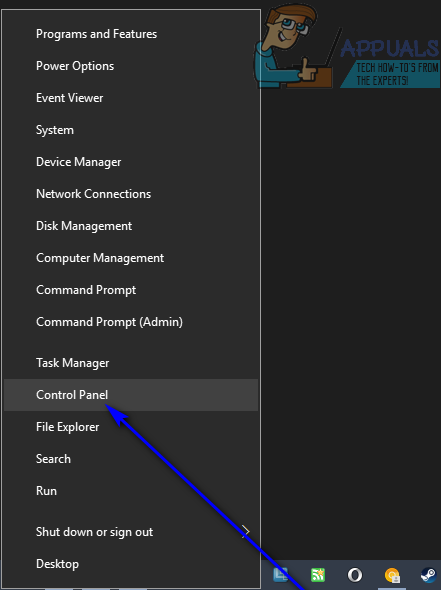
- Right-click on the Start Menu button or press the Windows Logo key + X to open the WinX Menu.
- Click on Control Panel in the WinX Menu to launch the Control Panel.
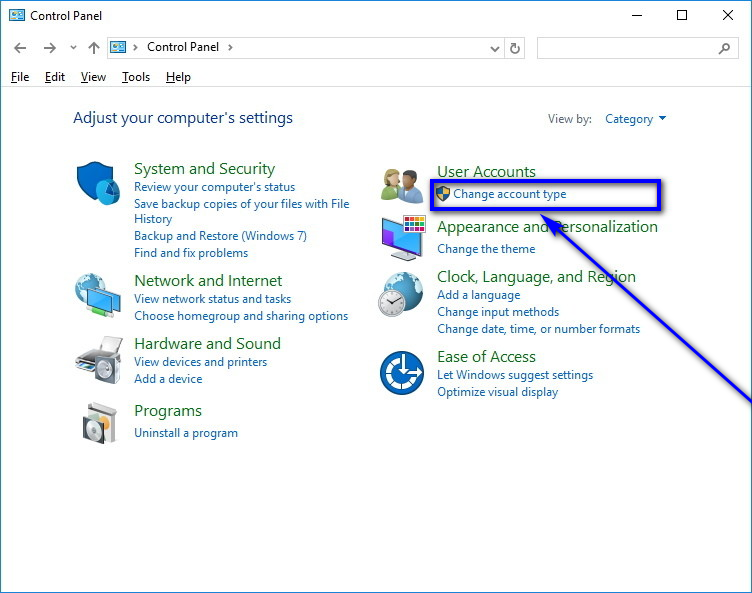
- With the Control Panel in Category view, click on Change account type under the User Accounts section.
- Locate and click on the Standard User account you want to turn into an Administrator account.
- Click on Change the account type.
- Click on the radio button next to the Administrator option to select it.
- Click on Change Account Type and you’re all done!
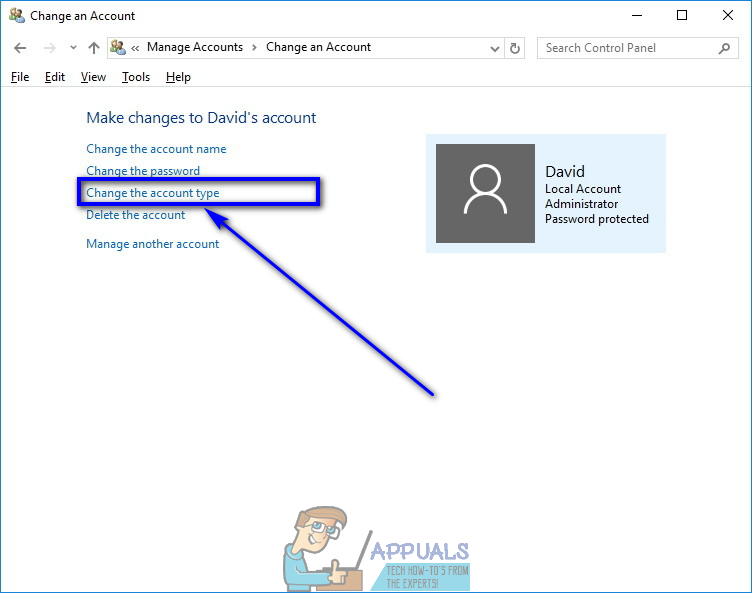
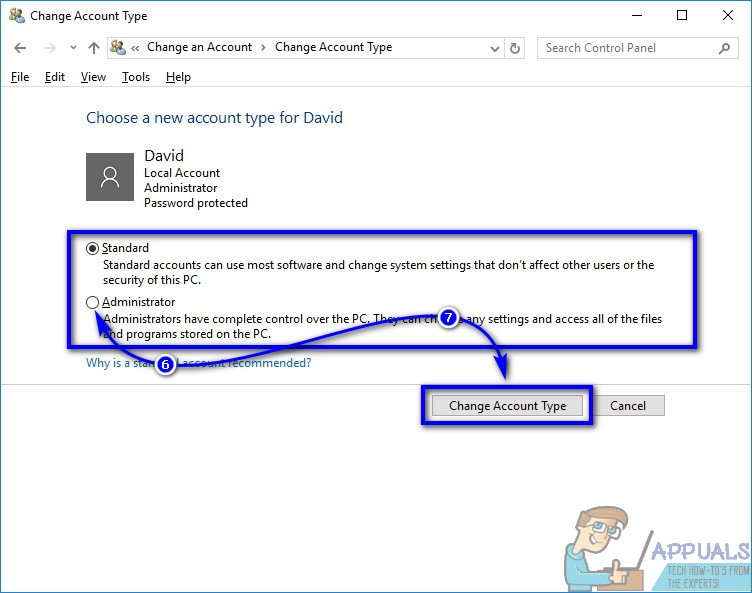
You can now close the Control Panel as the selected Standard User account will have been successfully turned into an Administrator account.
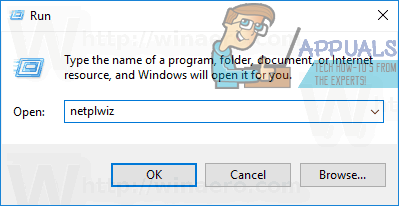
Method 3: Change account type from the User Accounts utility
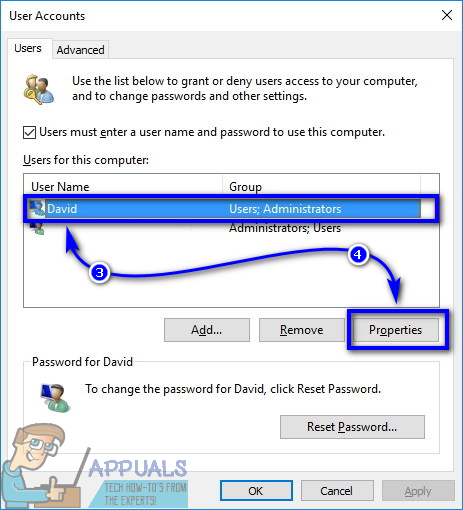
A slightly more sophisticated but a lot more direct way to change the account type of a user account on Windows 10 is to do so from the User Accounts utility that exists on all versions of the Windows Operating System. To use this method, you need to:
- Press the Windows Logo key + R to open a Run dialog.
- Type netplwiz into the Run dialog and press Enter to launch the User Accounts utility.
- Under the Users for this computer: section, locate and click on the Standard User account you want to turn into an Administrator account to select it.
- Click on Properties.
- Navigate to the Group Membership tab.
- Click on the radio button next to the Administrator option to select it. In this dialog, you will also see an option known as Other, selecting which will allow you to choose from an array of different access and control levels ranging from Backup Operators and Power Users to Remote Desktop Users, but none of these have the same access to and control over a Windows 10 computer as an Administrator account, so you’re better off not paying any attention to them.
- Click on Apply and then on OK.
- Click on Apply and then on OK in the User Accounts window.
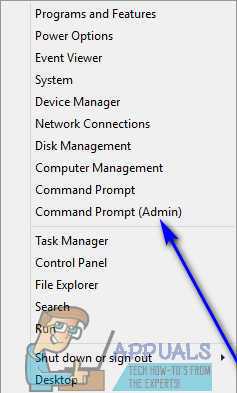
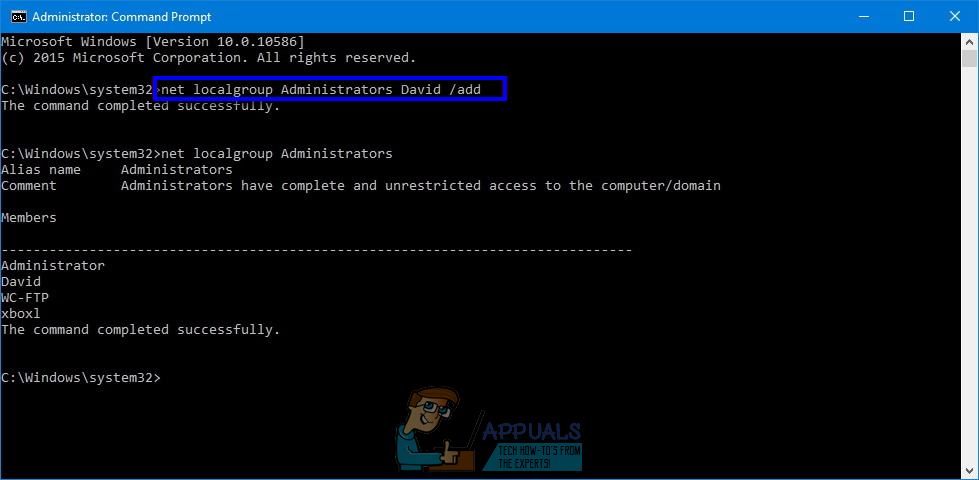
Method 4: Change user account type from an elevated Command Prompt
Last, but certainly not the least, you can turn a Standard User account on a Windows 10 computer into an Administrator account, all from the comfort of an elevated Command Prompt. All it takes is a couple of simple commands! If you would like to use this method to turn a Standard User account into an Administrator account, you need to:
- Right-click on the Start Menu or press the Windows Logo key + X to open the WinX Menu.
- Click on Command Prompt (Admin) to launch an elevated Command Prompt that has administrative privileges.
- Type the following command into the elevated Command Prompt, replacing AccountName with the exact name of the Standard User account you want to turn into an Administrator account, and then press Enter:
net localgroup Administrators AccountName /add - As soon as the command has been executed, close the elevated Command Prompt. The selected Standard User account will have been successfully turned into an Administrator account.
While this guide has been engineered to be used on Windows 10, all of the methods listed and described above (apart from Method 1, of course) can also be used to turn Standard User accounts on older versions of the Windows Operating System into Administrator accounts with just a tiny bit of tinkering to make some of the steps viable – opening the Control Panel a different way on versions of Windows that don’t have the WinX Menu, for example.


