- Boot Options Identifiers
- Boot Option Inheritance
- GUIDs and Identifiers
- Как настроить порядок загрузки Boot order в BIOS или в UEFI
- Что такое Boot order и зачем он нужен?
- Как настроить порядок загрузки Boot order в BIOS
- Как настроить порядок загрузки Boot order в UEFI
- Overview of Boot Options in Windows
- Boot Loading Architecture
- Boot Configuration Data
- Editing Boot Options
Boot Options Identifiers
Many of the bcdedit commands require identifiers. An identifier uniquely identifies entries contained in the boot setting store.
Use bcdedit /enum to display the identifers.
Several entries can be identified by well-known identifiers. If an entry has a well-known identifier, bcdedit displays it in output unless the /v command-line switch is used. For more information, run «bcdedit /? /v».
The common well-known identifiers are often used:
| Identifier | Description |
|---|---|
| Specifies a virtual identifier that corresponds to the boot manager default application entry. | |
| Specifies a virtual identifier that corresponds to the operating system boot application entry for the operating system that is currently running. | |
| Specifies the Windows boot manager application entry. |
These common well-known identifiers can be inherited by any boot application entry:
| Identifier | Description |
|---|---|
| Contains the collection of global settings that should be inherited by all boot application entries. | |
| Contains the collection of global settings that should be inherited by all boot loader application entries. |
These well-known identifiers are also available for use:
| Identifier | Description |
|---|---|
| Contains the global debugger settings that can be inherited by any boot application entry. | |
| Contains the hypervisor settings that can be inherited by any OS loader entry. | |
| Contains the global Emergency Management Services settings that can be inherited by any boot application entry. | |
| Contains the collection of global settings that should be inherited by all Windows resume from hibernation application entries. | |
| Contains the global RAM defect list that can be inherited by any boot application entry. | |
| Specifies the memory diagnostic application entry. | |
| Contains the additional options required by the boot manager for RAM disk devices. |
These well-known identifiers are used with earlier versions of Windows:
| Identifier | Description |
|---|---|
| Specifies a OS loader (Ntldr) that can be used to start operating systems earlier than Windows Vista. | |
| Specifies the firmware boot manager entry, specifically on systems that implement the Extensible Firmware Interface (EFI) specification. |
Boot Option Inheritance
Some boot settings can be inherited. This allows for groups of settings to be used in different boot scenarios, for example when resuming from hibernation.
Use the bcdedit command /enum option to display information about any identifier.
In the example below, displaying information on the
Use the bcdedit /enum command to see which settings are inherited.
In the example below,
Use the inherit option with bcdedit /enum to display information about inheritance.
Use the bcdedit /enum all command to see all of the settings.
GUIDs and Identifiers
An identifier uses a globally unique identifier, or GUID. A GUID has the following format, where each «x» represents a hexadecimal digit. Because working with GUIDs is error prone, it is recommended to use the english identifier name, such as
The position of the dashes (-) and the braces at the beginning and end of the GUID are required.
Use bcdedit /enum /v to display GUIDs associated with identifiers.
Как настроить порядок загрузки Boot order в BIOS или в UEFI
Что такое Boot order и зачем он нужен?
Boot order, в переводе означает последовательность или дословно порядок загрузки, если вариантов загрузки много — с жесткого диска, флешки, сети, привода CD/DVD, то нужно их как-то отсортировать по порядку, и первым выставить основной, это значительно сократит время включения и загрузки компьютера, ведь ему не придется перебирать все варианты загрузки в поиске актуального.
Как настроить порядок загрузки Boot order в BIOS
Существует несколько вариантов настроек, пункты меню могут называться по разному и располагаться в разных местах, но принципиально разных вариантов всего два:
- В меню Boot order указываются конкретные устройства, которые можно выстроить по порядку
- В меню Boot order указываются по порядку типы устройств, и если их больше одного то есть дополнительный пункт меню в котором уже конкретные устройства можно выстроить по порядку.
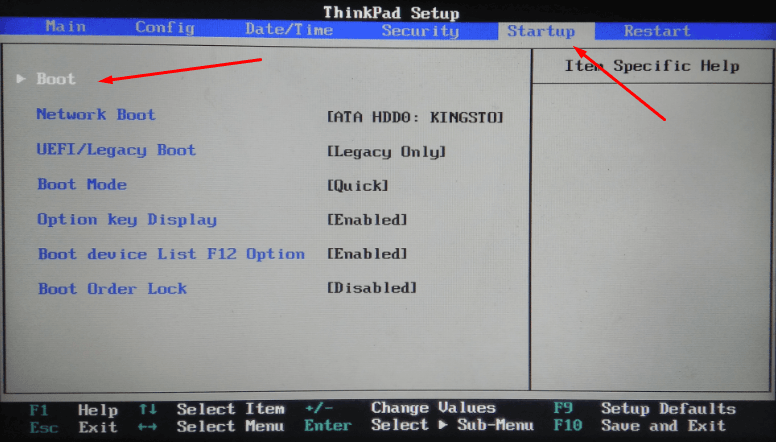
Первый вариант более распространен и немного проще в настройке, нужно зайти в BIOS и найти меню с настройками загрузки обычно он называется Boot или Startup, на этой странице отображаются настройки загрузки комьпютера или ноутбука их список зависит от производителя, в примере Boot order называется просто Boot но может иметь и другое название, заходим в него:
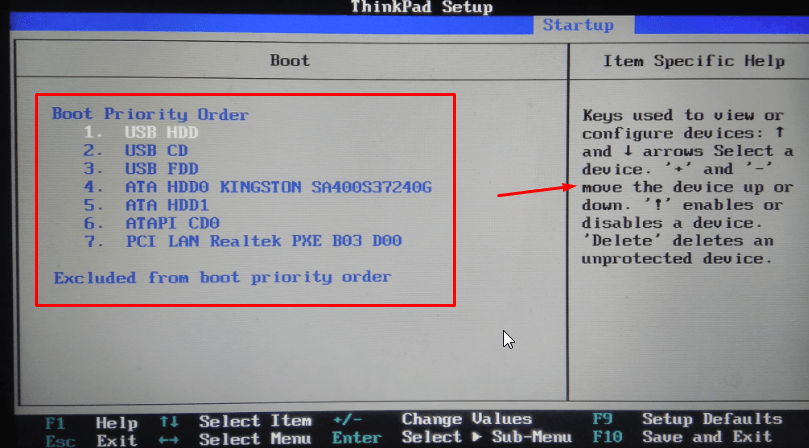
Видим меню Boot Priority Order и слева инструкцию о том как менять порядок, в общем стрелками вверх/вниз выбираете нужный пункт и клавишами + и — поднимаете его в списке или соответственно отпускаете:
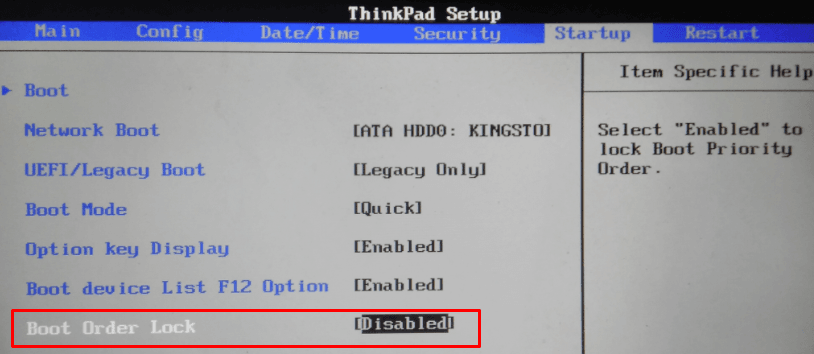
После настройки выходим в предыдущее меню, в подавляющем большинстве BIOS выход — Esc. В примере еще есть пункт Boot Order Lock — он нужен для того чтоб зафиксировать порядок загрузки и он не менялся при подключении других устройств с которых возможна загрузка, косвенно он так же повышает защищенность вашего устройства — злоумышленник не сможет подключить загрузочную флешку и загрузиться с нее:
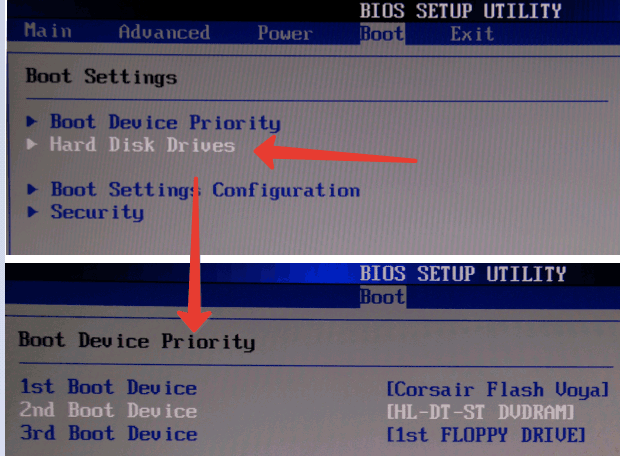
Второй вариант чаще всего встречается на старых компьютерах, тут в Boot Device Priority выстраиваются по списку типы устройств — жесткие диски, флешки, сеть и т. д., а в пункте Hard Disk Drives, который не всегда находится рядом можно настроить приоритет загрузки уже с конкретных устройств:
Настраиваем, сохраняем настройки, перегружаемся и проверяем что всё работает как надо. Ниже еще несколько примеров где искать настройку Boot Order, на совсем старых компьютерах встречается такой вариант:
Заходим в меню Advanced BIOS Features, в прямоугольнике «Boot Order» — первое, второе и соответственно третье загрузочное устройство, из выпадающего меню нужно выбрать тип, если жестких дисков несколько (флешки тоже часто считаются за жесткий диск) то в самом первом пункте — Hard Disk Boot Priority можно указать их приоритет: 
Пункт «Boot Order» может быть запрятан в неожиданном месте: 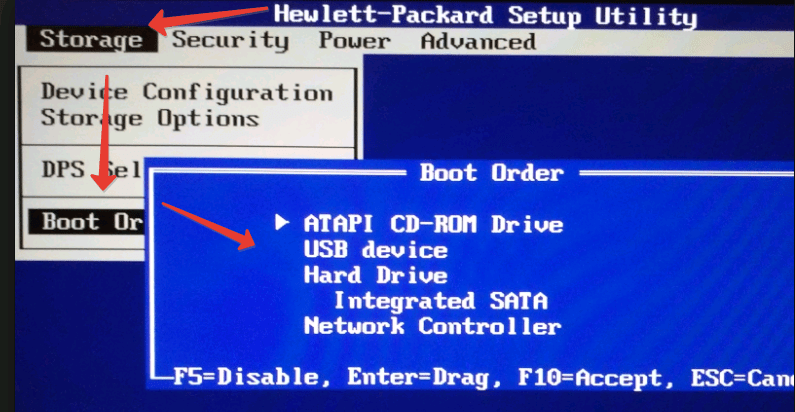
Как настроить порядок загрузки Boot order в UEFI
Настройка Boot Order в UEFI, не сильно отличается от таковой в BIOS, и выполняется по практически такому же алгоритму.
Заходим в BIOS UEFI, при включении обычно внизу экрана выводится подсказка о том как это сделать, для компьютеров в 99% случаев это F2 или DEL, для ноутбуков вариантов больше Esc, F1, F2, F10, F11, F12 (иногда их нужно нажимать вместе с кнопкой Fn) в общем пробуйте. У меня все просто можно жать F2 или DEL:

жму и попадаю в UEFI, интерфейс у всех производителей более-менее стандартизирован и построен по одному принципу, сразу после входа в UEFI вы попадаете на информационный экран с общими данными о компьютере и показаниями основных параметров температур, напряжений и т. п. Тут можно сразу пройти в меню Boot Priority и все настроить, но мы пойдем по старинке — ищем способ переключения в расширенный режим, обычно либо есть соответствующая кнопка (на картинке ниже указана стрелкой), либо внизу указана клавиша с помощью которой можно перейти в Advanced Mode в нашем случае F7, жмем: 
Тут выбираем стрелками вверх вниз или мышкой — Advanced Mode

И попадаем в расширенное меню, отдаленно собой напоминающее BIOS, только побогаче в графическом плане, тут переходим в раздел Boot и далее в Hard Drives BBS Priorities:

и настраиваем приоритет загрузки, выбирая из выпадающего меню напротив каждого пункта Boot Option нужный жесткий диск:

После того как настройка Boot Order закончена жмем на Exit вверху, выбираем Save Changes & Reset для сохранения настроек и перезагрузки компьютера:
 Перегружаемся и проверяем что загрузка пошла сразу с указанного устройства, без потерь времени на опрос остальных.
В общем как видно никакой сложности в настройке Boot Order нет, а с помощью этой статьи вы легко сможете исправить проблемы с загрузкой на своем компьютере или ноутбуке, если что-то не получается — пишите в комментарии, желательно сразу с фото, я подскажу куда жать.
Overview of Boot Options in Windows
The Windows boot loader architecture includes a firmware-independent boot configuration and storage system called Boot Configuration Data (BCD) and a boot option editing tool, BCDEdit (BCDEdit.exe). During development, you can use BCDEdit to configure boot options for debugging, testing, and troubleshooting your driver on computers running Windows 10, Windows 8, Windows Server 2012, Windows 7, and Windows Server 2008.
Administrative privileges are required to use BCDEdit to modify BCD. Changing some boot entry options using BCDEdit could render your computer inoperable. As an alternative, use the System Configuration utility (MSConfig.exe) to change boot settings.
Boot Loading Architecture
Windows includes boot loader components that are designed to load Windows quickly and securely. The previous Windows NT boot loader, ntldr, is replaced by three components:
Windows Boot Manager (Bootmgr.exe)
Windows operating system loader (Winload.exe)
Windows resume loader (Winresume.exe)
In this configuration, the Windows Boot Manager is generic and unaware of the specific requirements for each operating system while the system-specific boot loaders are optimized for the system that they load.
When a computer with multiple boot entries includes at least one entry for Windows, the Windows Boot Manager, which resides in the root directory, starts the system and interacts with the user. It displays the boot menu, loads the selected system-specific boot loader, and passes the boot parameters to the boot loader.
The boot loaders reside in the root directory of each Windows partition. Once selected, the boot loaders take over the boot process and load the operating system in accordance with the selected boot parameters.
Boot Configuration Data
Windows boot options are stored in the Boot Configuration Data (BCD) store on BIOS-based and EFI-based computers.
BCD provides a common, firmware-independent boot option interface for all computers running Windows 10, Windows 8, Windows Server 2012, Windows 7, and Windows Server 2008. It is more secure than previous boot option storage configurations, because it permits secure lockdown of the BCD store and lets Administrators assign rights for managing boot options. BCD is available at run time and during all phases of setup. You can even call BCD during power state transitions and use it to define the boot process for resuming after hibernation.
You can manage BCD remotely and manage BCD when the system boots from media other than the media on which the BCD store resides. This feature is extremely important for debugging and troubleshooting, especially when a BCD store must be restored while running Startup Repair from a DVD, from USB-based storage media, or even remotely.
The BCD store, with its familiar object-and-element architecture, uses GUIDs and names such as «Default» to precisely identify boot-related applications.
BCD includes its own set of boot options. For more information about these boot options, see BCD Boot Options Reference.
Editing Boot Options
To edit boot options in Windows, use BCDEdit (BCDEdit.exe), a tool included in Windows.
To use BCDEdit, you must be a member of the Administrators group on the computer.
You can also use the System Configuration utility (MSConfig.exe) to change boot settings.
To change boot options programmatically in Windows, use the Windows Management Instrument (WMI) interface to boot options. This BCD WMI interface is the best method to programmatically change the boot options. For information about the BCD WMI interface, see Boot Configuration Data WMI Provider in the Windows SDK documentation.


