- Netsh.exe and ProxyCfg.exe Proxy Configuration Tools
- Command Line Parameters
- Usage
- Example Syntax
- Example 1: Use a proxy only for external resources
- Example 2: Use a proxy for all resources
- Example 3: Use a different proxy for secure resources
- Removing ProxyCfg.exe
- ProxyCfg.exe and Authentication
- IWinHttpRequest::SetProxy method
- Syntax
- Parameters
- Return value
- Remarks
- Cloud Foundry Documentation
- Using the cf CLI with a Proxy Server
- Overview
- Format of https_proxy
- Use SOCKS5 with cf v3-ssh
- Set https_proxy in Mac OS or Linux
- Set https_proxy in Windows
- Как узнать и сбросить настройки прокси-сервера WinHTTP в Windows 10
- Что такое WinHTTP прокси
- Проверьте настройки прокси-сервера
- Как сбросить настройки прокси WinHTTP в Windows 10
Netsh.exe and ProxyCfg.exe Proxy Configuration Tools
**WindowsВ Vista and Windows ServerВ 2008:В В **
ProxyCfg.exe has been deprecated. It is replaced by the Netsh.exe winhttp commands.
This topic explains the use of the Microsoft Windows HTTP Services (WinHTTP) proxy configuration tool, «ProxyCfg.exe».
There are two ways to access HTTP and Secure Hypertext Transfer Protocol (HTTPS) servers through a proxy using Microsoft Windows HTTP Services (WinHTTP). First, you can specify proxy settings from within your WinHTTP application. Second, you can specify default proxy settings from outside your application using the proxy configuration utility located in the %windir%\system32 directory.
You can programmatically set the proxy data from within your application or script. If you are writing an application using the WinHTTP API, use one of the following two techniques to change proxy settings.
Use the WinHttpOpen function. Specify access type in the second parameter, the name of the proxy in the third parameter, and a bypass list in the fourth parameter. The following example shows how the WinHttpOpen function can be used to set proxy data.
Use the WinHttpSetOption function. The WINHTTP_OPTION_PROXY flag enables you to specify proxy settings with a WINHTTP_PROXY_INFO structure. The following example code shows how the WinHttpSetOption function can be used to set proxy data.
If you are writing a script or an application using the WinHttpRequest object, use the following technique to change proxy settings.
Use the SetProxy method. Specify the access type in the first parameter, the name of the proxy in the second parameter, and a bypass list in the third parameter. The following example shows how the SetProxy method can be used in script to set proxy data.
To specify default settings and eliminate the need to use either the SetProxy method or the WinHttpSetOption function, use the proxy configuration utility. Using this utility, you can specify that your application access a network either directly, through a proxy, or through a combination of direct and proxy access by specifying a bypass list. When you use the WinHTTP API, the proxy configuration tool only determines the settings when you pass the WINHTTP_ACCESS_TYPE_DEFAULT flag to the WinHttpOpen API. The WinHttpRequest object uses the proxy configuration tool settings by default.
The proxy settings for WinHTTP are not the proxy settings for Microsoft Internet Explorer. You cannot configure the proxy settings for WinHTTP in the Microsoft Windows Control Panel. Using the WinHTTP proxy configuration utility does not alter the settings you use for Internet Explorer.
If you attempt to open and send an HTTP request using WinHTTP and the proxy settings are incorrect, an error occurs.
Command Line Parameters
The following table lists the command line parameters available for use with the ProxyCfg.exe tool.
| Parameter | Description |
|---|---|
| none | When no parameters are specified, the current WinHTTP proxy settings are displayed. |
| ? | Help information is displayed. |
| d | Specifies that WinHTTP applications access the network directly, without a proxy. |
| p | Specifies the proxy server. You can also specify an optional list of servers that are accessed without a proxy. |
| u | Specifies that WinHTTP applications use the current user’s proxy settings for Internet Explorer. This parameter does not work if Internet Explorer is automatically detecting proxy settings, or if it is using an automatic configuration URL to set the proxy information. |
| i | Specifies that WinHTTP applications use the current user’s proxy settings for Internet Explorer. This only works when ProxyCfg.exe was not previously used. If ProxyCfg.exe is installed, specify that the «u» command line parameter use the manual settings. This parameter does not work if Internet Explorer automatically detects proxy settings, or if it uses an automatic configuration URL to set the proxy information. |
You can specify proxies in a space-delimited string. The proxy listings can contain the port number that is used to access the proxy. To list a proxy for a specific protocol, the string must follow the format, =https://
. The valid protocols are HTTP and HTTPS. For example, to list an HTTP proxy, a valid string is http=https://http_proxy_name:80, where http_proxy_name is the name of the proxy server and 80 is the port number that you must use to access the proxy. If the proxy uses the default port number for that protocol, then you can omit the port number. If a proxy name is listed by itself, you can use it as the default proxy for any protocols that do not have a specified proxy. For example, http=https://http_proxy other_proxy uses http_proxy for any HTTP operations, while the HTTPS protocol uses the proxy named other_proxy.
You can list locally known host names or IP addresses in the proxy bypass list. This list can contain wildcards, such as «*», that cause the application to bypass the proxy server for addresses that fit the specified pattern, for example, «*.microsoft.com» or «*.org». Wildcard characters must be the left-most characters in the list. For example, «aaa.*» is not supported. To list multiple addresses and host names, separate them with blank spaces or semicolons in the proxy bypass string. If you specify the macro, the function bypasses any host name that does not contain a period.
After Proxycfg.exe runs, you cannot restore the previous proxy settings. However, you can remove the proxy settings entirely.
Usage
To use the proxy configuration tool, open a command prompt window and run the proxy configuration utility with the appropriate command line parameters. The following section provides syntax examples.
Example Syntax
Example 1: Use a proxy only for external resources
The following is the most common use for Proxycfg.exe. This command specifies that both HTTP and HTTPS servers are accessed through the proxy server named «proxy_server», except for host names that do not contain a period.
proxycfg -p proxy_server «»
Example 2: Use a proxy for all resources
The following example specifies that both HTTP and HTTPS servers are accessed through the proxy server named «proxy_server». No bypass list is specified.
proxycfg -p proxy_server
Example 3: Use a different proxy for secure resources
The following example specifies that HTTP servers are accessed through the http_proxy proxy and HTTPS servers are accessed through https_proxy. Local intranet sites and any site in the *.microsoft.com domain bypass the proxy.
proxycfg -p «http=http_proxy https=https_proxy» «;*.microsoft.com»
Removing ProxyCfg.exe
After using the proxy configuration tool, you cannot restore your original proxy settings. However, if necessary, you can remove the registry settings that the utility creates. To remove the registry entries that ProxyCfg.exe creates, you must delete the WinHttpSettings value from the following registry key.
HKEY_LOCAL_MACHINE\SOFTWARE\Microsoft\Windows\CurrentVersion\Internet Settings\Connections\WinHttpSettings
Deleting the WinHttpSettings value removes all proxy configurations.
ProxyCfg.exe and Authentication
The proxy configuration utility sets the default authentication policy. Because you should not perform NTLM authentication with untrusted hosts, by default, NTLM authentication only occurs automatically with hosts on the proxy bypass list. If there is no proxy, you can still use ProxyCfg.exe to specify a bypass list of hosts that you trust to perform NTLM authentication. A proxy name is required when using ProxyCfg.exe for this purpose, but you can use any valid string in place of a real proxy name.
For more information about the auto-logon policy, see Automatic Logon Policy.
IWinHttpRequest::SetProxy method
The SetProxy method sets proxy server information.
Syntax
Parameters
The flags that control this method. Can be one of the following values.
| Value | Meaning |
|---|---|
| HTTPREQUEST_PROXYSETTING_DEFAULT | Default proxy setting. Equivalent to HTTPREQUEST_PROXYSETTING_PRECONFIG. |
| HTTPREQUEST_PROXYSETTING_PRECONFIG | Indicates that the proxy settings should be obtained from the registry. This assumes that Proxycfg.exe has been run. If Proxycfg.exe has not been run and HTTPREQUEST_PROXYSETTING_PRECONFIG is specified, then the behavior is equivalent to HTTPREQUEST_PROXYSETTING_DIRECT. |
| HTTPREQUEST_PROXYSETTING_DIRECT | Indicates that all HTTP and HTTPS servers should be accessed directly. Use this command if there is no proxy server. |
| HTTPREQUEST_PROXYSETTING_PROXY | When HTTPREQUEST_PROXYSETTING_PROXY is specified, varProxyServer should be set to a proxy server string and varBypassList should be set to a domain bypass list string. This proxy configuration applies only to the current instance of the WinHttpRequest object. |
ProxyServer [in, optional]
Set to a proxy server string when ProxySetting equals HTTPREQUEST_PROXYSETTING_PROXY.
BypassList [in, optional]
Set to a domain bypass list string when ProxySetting equals HTTPREQUEST_PROXYSETTING_PROXY.
Return value
The return value is S_OK on success or an error value otherwise.
Remarks
Enables the calling application to specify use of default proxy information (configured by the proxy configuration tool) or to override Proxycfg.exe. This method must be called before calling the Send method. If this method is called after the Send method, it has no effect.
IWinHttpRequest passes these parameters to Microsoft Windows HTTP Services (WinHTTP).
For Windows XP and Windows 2000, see the Run-Time Requirements section of the WinHTTP Start Page.
Cloud Foundry Documentation
Using the cf CLI with a Proxy Server
Page last updated:
This topic describes using the Cloud Foundry Command Line Interface (cf CLI) with a proxy server.
Overview
If you have an HTTP or SOCKS5 proxy server on your network between a host running the cf CLI and your API endpoint, you must set https_proxy with the hostname or IP address of the proxy server. The https_proxy environment variable holds the hostname or IP address of your proxy server.
https_proxy is a standard environment variable. Like any environment variable, the specific steps you use to set it depends on your operating system.
Format of https_proxy
https_proxy is set with hostname or IP address of the proxy server in URL format, as in the example below:
If the proxy server requires a username and password, you must include the credentials, as in the example below:
If the proxy server uses a port other than 80, you must include the port number, as in the example below:
If the proxy server is a SOCKS5 proxy, you must specify the SOCKS5 protocol in the URL, as in the example below:
Use SOCKS5 with cf v3-ssh
The cf v3-ssh command in cf CLI v6 supports SOCKS5 proxies.
To specify the SOCKS5 proxy server:
Set the all_proxy environment variable, as in the example below:
Note: The cf ssh command for cf CLI v7 does not work through a SOCKS5 proxy.
Set https_proxy in Mac OS or Linux
To set the https_proxy environment variable in Mac OS or Linux:
Use the command specific to your shell. For example, in bash, use the export command, as in the example below:
To make this change persistent, add the command to the appropriate profile file for the shell. For example, in bash, add a line like example below to your .bash_profile or .bashrc file:
Set https_proxy in Windows
To set the https_proxy environment variable in Windows:
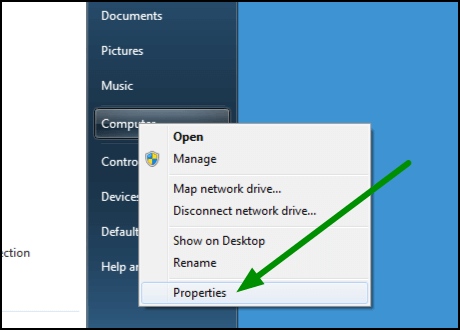
Open the Start menu.
Right-click Computer and select Properties.
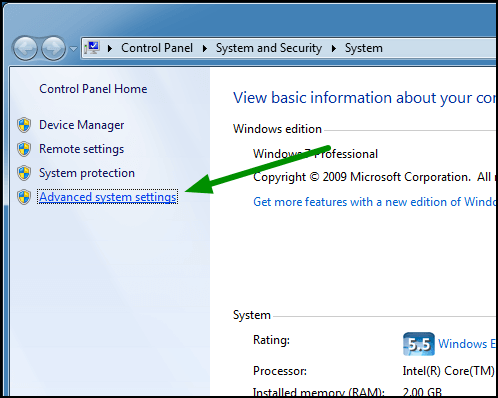
In the left pane of the System window, click Advanced system settings.
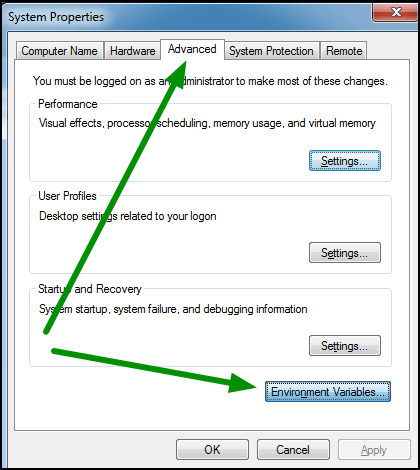
In the System Properties window:
- Select Advanced.
- Click Environment Variables.
Under User variables, click New.
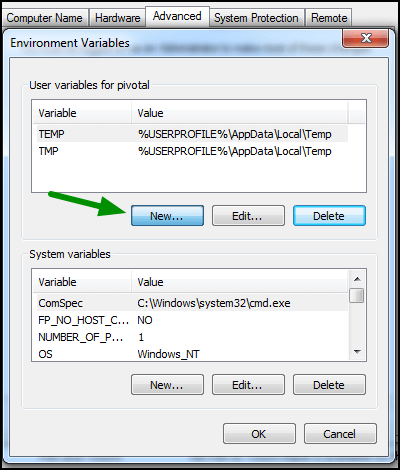
For Variable name, enter https_proxy .
For Variable value, enter your proxy server information.
Как узнать и сбросить настройки прокси-сервера WinHTTP в Windows 10
В этом посте будет показано, как найти настройки прокси-сервера вашего компьютера Windows с помощью PowerShell, CMD, реестра и т. Д. Кроме того, если у вас возникли проблемы с загрузкой обновлений Windows или другие проблемы с сетевым подключением, вы можете выполнить сброс Настройки прокси на вашем компьютере с Windows 10 и посмотрите, поможет ли это вам.
Что такое WinHTTP прокси
Microsoft заявляет, что Windows HTTP Services (WinHTTP) – это технология доступа к HTTP, которая предоставляет разработчикам высокоуровневый интерфейс с поддержкой сервера для интернет-протокола HTTP/1.1. WinHTTP предназначен для использования преимущественно в серверных сценариях серверными приложениями, которые взаимодействуют с HTTP-серверами. WinHTTP также предназначен для использования в системных службах и клиентских приложениях на основе HTTP.
Проверьте настройки прокси-сервера
Я не использую прокси, поэтому некоторые записи могут быть не видны на моих скриншотах.
1] Командная строка

Вы должны использовать встроенный инструмент netsh.exe в вашей операционной системе Windows.
Чтобы просмотреть информацию о прокси-сервере вашего компьютера, откройте командную строку с повышенными привилегиями, введите следующую команду и нажмите клавишу ВВОД:
Есть и другие способы найти настройки прокси вашего ПК.
2] Google Chrome
В браузере Chrome введите следующее в адресную строку и нажмите Enter:
Вы увидите настройки прокси здесь.
3] Mozilla Firefox
В браузере Firefox введите следующее в адресную строку и нажмите Enter:
Прокрутите вниз и нажмите кнопку Настройки сетевого прокси, чтобы увидеть их.
4] Редактор реестра
Откройте REGEDIT и перейдите к следующей клавише:
Клавиша ProxyEnable контролирует настройки прокси. 0 отключает их, а 1 включает их. Если вы используете прокси, вы получите его значение под ключом ProxyServer .
5] PowerShell
Запустите PowerShell от имени администратора и выполните следующую команду:
6] Свойства обозревателя
Откройте «Свойства обозревателя»> вкладка «Подключения»> нажмите кнопку «Настройки сети». Там вы увидите настройки прокси-сервера.
7] Настройки Windows
Откройте «Настройки Windows»> «Сеть и Интернет»> «Прокси». Здесь вы увидите настройки прокси-сервера.
Как сбросить настройки прокси WinHTTP в Windows 10
Если ваша система использует прокси-сервер и вы хотите удалить его, откройте командную строку с повышенными привилегиями, введите следующую команду и нажмите клавишу ВВОД:
Это позволит удалить прокси-сервер и настроить «прямой доступ» к Интернету.
Говоря о сбросе настроек, вот несколько публикаций на этом сайте, которые помогут вам сбросить другие функции:
Сбросить все параметры локальной групповой политики | Сбросить приложения Магазина Windows | Сброс кеша Магазина Windows | Сбросить настройки клавиатуры | Сброс настроек сенсорной панели | Сброс устройства Surface Pro | Сброс настроек браузера Microsoft Edge | Сбросить настройки Internet Explorer | Сбросить корзину | Сброс настроек браузера Chrome | Сброс настроек Firefox | Сброс настроек безопасности Windows | Сбросить настройки брандмауэра Windows | Сброс Winsock | Сбросить TCP/IP | Сброс кеша DNS | Сбросить Центр обновления Windows | Сбросить каждый компонент Центра обновления Windows | Сбросить пароль Windows.


