- Set JAVA_HOME on Windows 7, 8, 10, Mac OS X, Linux
- Get started with Spring 5 and Spring Boot 2, through the Learn Spring course:
- 1. Overview
- 2. Windows
- 2.1. Windows 10 and 8
- 2.2. Windows 7
- 3. Mac OS X
- 3.1. Single User – Mac OS X 10.5 or Newer
- 3.2. Single User – Mac OS X Older Versions
- 3.3. Global Setting
- 4. Linux
- 4.1 Single User
- 4.2 Global Setting
- 5. Conclusion
- Переменная окружения JAVA_HOME – что это такое и она нужна
- Что такое JAVA_HOME
- Какие программы используют JAVA_HOME
- Ошибки, связанные с JAVA_HOME
- Как установить переменную окружения JAVA_HOME в Windows
- Резюме
- How to Set JAVA_HOME on Windows 7/8/10
- Step 1 – Edit Environment Variables
- Step 2 – Set JAVA_HOME on Windows
- Step 3 – Set Path Variable on Windows
- Step 4 – Verify Settings
- Confluence Support
- Knowledge base
- Products
- Jira Software
- Jira Service Management
- Jira Core
- Confluence
- Bitbucket
- Resources
- Documentation
- Community
- Suggestions and bugs
- Marketplace
- Billing and licensing
- Viewport
- Confluence
- Setting the JAVA_HOME Variable in Windows
- Installing Java for Confluence
- On this page
- Related content
- Still need help?
- Set the JAVA_HOME Variable
- Set the JAVA_HOME variable via the command line
- How to set JAVA_HOME on Windows 10?
- 1. Advanced System Settings
- 2. Environment Variables
- 3. Add JAVA_HOME
- 4. Update PATH
Set JAVA_HOME on Windows 7, 8, 10, Mac OS X, Linux
Last modified: January 18, 2020
Get started with Spring 5 and Spring Boot 2, through the Learn Spring course:
If you have a few years of experience in the Java ecosystem, and you’re interested in sharing that experience with the community (and getting paid for your work of course), have a look at the «Write for Us» page. Cheers, Eugen
1. Overview
In this quick article, we’ll take a look at how to set the JAVA_HOME variable on Windows, Mac OS X, and Linux.
2. Windows
2.1. Windows 10 and 8
- Open Search and type advanced system settings
- In the shown options, select the View advanced system settings link
- Under the Advanced tab, click Environment Variables
- In the System variables section, click New (or User variables for single user setting)
- Set JAVA_HOME as the Variable name and the path to the JDK installation as the Variable value and click OK
- Click OK and click Apply to apply the changes
2.2. Windows 7
- On the Desktop, right-click My Computer and select Properties
- Under the Advanced tab, click Environment Variables
- In the System variables section, click New (or User variables for single user setting)
- Set JAVA_HOME as the Variable name and the path to the JDK installation as the Variable value and click OK
- Click OK and click Apply to apply the changes
Open Command Prompt and check the value of the JAVA_HOME variable:
The result should be the path to the JDK installation:
3. Mac OS X
3.1. Single User – Mac OS X 10.5 or Newer
From OS X 10.5, Apple introduced a command line tool (/usr/libexec/java_home) which dynamically finds the top Java version specified in Java Preferences for the current user.
/.bash_profile in any text editor and add:
Save and close the file.
Open a Terminal and run the source command to apply the changes:
Now we can check the value of the JAVA_HOME variable:
The result should be the path to the JDK installation:
3.2. Single User – Mac OS X Older Versions
For older versions of OS X, we have to set the exact path to the JDK installation:
/.bash_profile in any editor and add:
Save and close the file.
Open a Terminal and run the source command to apply the changes:
Now we can check the value of the JAVA_HOME variable:
The result should be the path to the JDK installation:
3.3. Global Setting
To set JAVA_HOME globally for all users, the steps are the same as for single user, but the file /etc/profile is used.
4. Linux
We’re going to manipulate the PATH here, of course – so, if you haven’t done that before, here are the detailed instructions on how to do it.
4.1 Single User
To set JAVA_HOME in Linux for a single user, we can use /etc/profile or /etc/environment (preferred for system-wide setting) or
/.bashrc (user-specific setting).
/.bashrc in any text editor and add:
Save and close the file.
Run the source command to load the variable:
Now we can check the value of the JAVA_HOME variable:
The result should be the path to the JDK installation:
4.2 Global Setting
To set JAVA_HOME in Linux for all users, we can use /etc/profile or /etc/environment (preferred).
Open /etc/environment in any text editor and add:
Please note that /etc/environment is not a script, but a list of assignment expressions (that is why export is not used). This file is read at the time of login.
To set JAVA_HOME using /etc/profile, open the file and add:
Run the source command to load the variable:
Now we can check the value of the JAVA_HOME variable:
The result should be the path to the JDK installation:
5. Conclusion
In this article, we have covered ways to set the JAVA_HOME environment variable on Windows, Mac OS X, and Linux.
Переменная окружения JAVA_HOME – что это такое и она нужна
Во многих статьях в интернете, документации к инструментам для разработки на Java и в книгах зачастую упоминается JAVA_HOME. Что же такое JAVA_HOME?
Что такое JAVA_HOME
JAVA_HOME это переменная окружения, указывающая на директорию с установленным JDK (Java Development Kit, комплект разработчика Java). JAVA_HOME это соглашение, используемое во многих программах из экосистемы Java.
Какие программы используют JAVA_HOME
- Intellij IDEA, Eclipse, NetBeans
- Apache Maven, Apache Ant, Gradle
- Apache Tomcat
- Jenkins
Некоторые игры, написанные на Java (например, Minecraft), тоже могут требовать установленной переменной JAVA_HOME.
Ошибки, связанные с JAVA_HOME
Если переменная окружения JAVA_HOME не определена, некоторые программы могут выдавать следующие ошибки:
- Переменная среды java_home не определена
- Cannot determine a valid Java Home
- JAVA_HOME is set to an invalid directory
- JAVA_HOME is not defined correctly
- JAVA_HOME environment variable is not set
- JAVA_HOME command not found
- JAVA_HOME not found in your environment
- JAVA_HOME does not point to the JDK
При появлении таких ошибок просто установите переменную JAVA_HOME
Как установить переменную окружения JAVA_HOME в Windows
Сперва вам нужно установить JDK или JRE.
- Установите JDK, если вы занимаетесь разработкой программ на Java
- Установите JRE, если вам нужно только запустить прикладную программу на Java
После установки JDK либо JRE запишите путь установки, он понадобится.
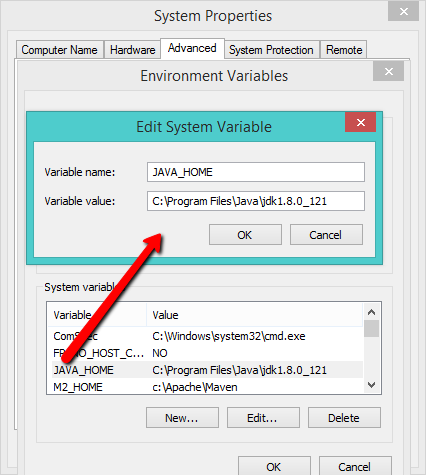
Теперь щёлкните правой кнопкой на «Мой компьютер» → «Свойства» → «Дополнительные параметры системы» → «Переменные среды…». В разделе «Системные переменные» нажмите кнопку «Создать…» и укажите следующие данные:
| Имя переменной | JAVA_HOME |
| Значение переменной | Путь к директории JDK / JRE, например: C:\Java\jdk-11.0.6 |
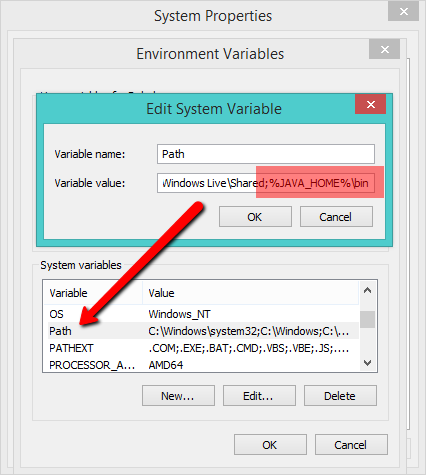
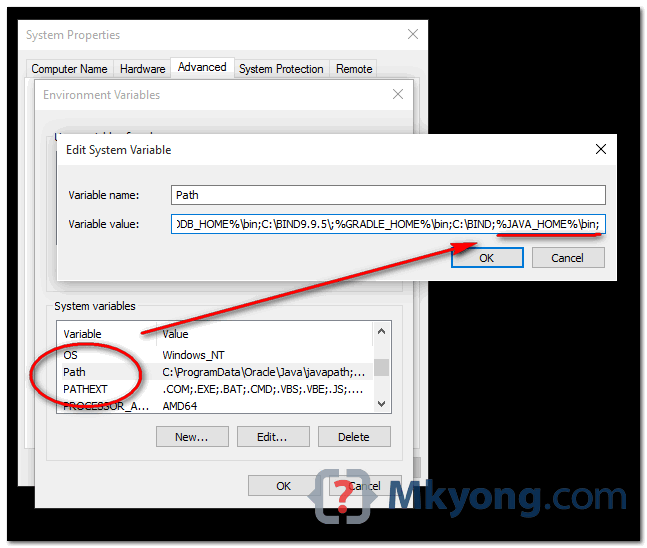
Сохраните изменения, кликнув «OK». Теперь выберите в списке переменную окружения Path и нажмите «Изменить…». В конце списка добавьте строчку со значением «%JAVA_HOME%\bin«
![]()
![]()
Для проверки откройте консоль (Win+R, cmd) и укажите последовательно укажите две команды:
Если вы правильно установили JDK/JRE и правильно установили переменные окружения, вы увидите вывод наподобие этого:
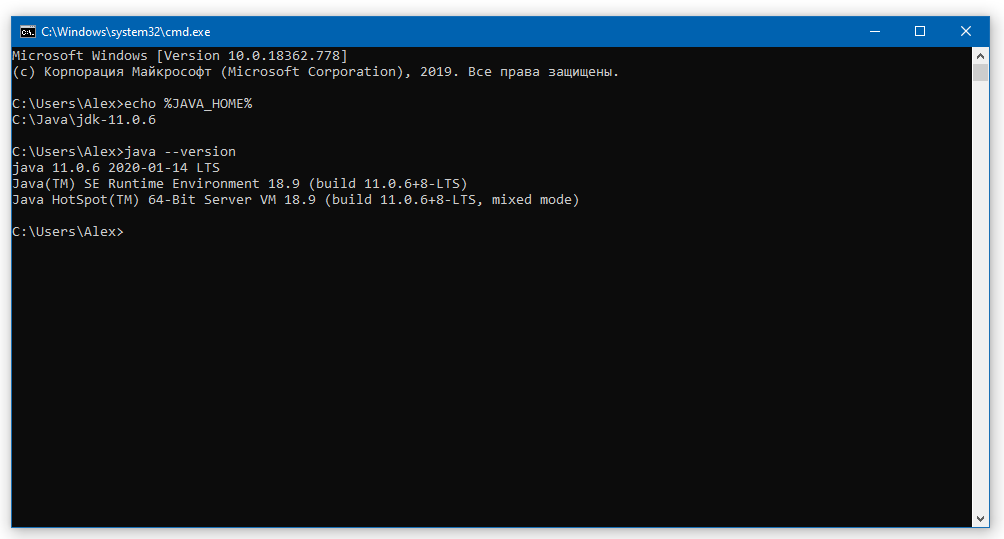
Это будет служить результатом того, что переменная JAVA_HOME установлена правильно и Java работает из командной строки.
Резюме
В данной статье мы рассказали вам, что являет собой переменная окружения JAVA_HOME, где она используется и как её корректно указать.
How to Set JAVA_HOME on Windows 7/8/10
If you have already installed Java on Windows systems. Then you need to set the JAVA_HOME environment variable to make it work properly. Additionally, you also need to add java bin folder location in PATH environment variable. This tutorial will help you to set JAVA_HOME on Windows 7/8/10 operating systems.
Step 1 – Edit Environment Variables
You can set environment variable by opening system properties dialog blog.
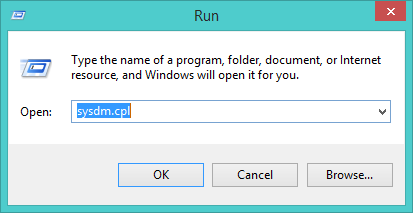
- Type sysdm.cpl on run window or Right-click on My Computer and select Properties.

Step 2 – Set JAVA_HOME on Windows
Now click on New button under system variables. An input dialog will open. Enter the following details. The variable value may differ as per installed Java version.
Step 3 – Set Path Variable on Windows
Additionally, You will also be required to add bin location of your java binaries to the systems Path variable. Edit PATH variable under system variables and append string ;%JAVA_HOME%\bin in variable value and save it.
Step 4 – Verify Settings
Finally, you may need to verify all the settings. To verify, open command prompt and type below commands to check JAVA_HOME and Path environment variables values.
Confluence Support
Knowledge base
Products
Jira Software
Project and issue tracking
Jira Service Management
Service management and customer support
Jira Core
Manage any business project
Confluence
Bitbucket
Git code management
Resources
Documentation
Usage and admin help
Community
Answers, support, and inspiration
Suggestions and bugs
Feature suggestions and bug reports
Marketplace
Billing and licensing
Frequently asked questions
Viewport
Confluence
Versions
Setting the JAVA_HOME Variable in Windows
Installing Java for Confluence
On this page
Related content
Still need help?
The Atlassian Community is here for you.
To install Confluence manually on Windows, you will need to set an environment variable to point Confluence to the your Java installation directory.
This information is only relevant if you’re installing Confluence manually on a Windows server. If you’re using the installer, you don’t need to do this.
In most cases you should set the JRE_HOME environment variable, but if it is not set, Confluence will use JAVA_HOME.
Related pages
Set the JAVA_HOME Variable
To set the JRE_HOME or JAVA_HOME variable:
Locate your Java installation directory
If you didn’t change the path during installation, it’ll be something like C:\Program Files\Java\jdk1.8.0_65
You can also type where java at the command prompt.
In the Variable Value field, enter your JDK or JRE installation path .
If the path contains spaces, use the shortened path name. For example, C:\Progra
Note for Windows users on 64-bit systems
1 = ‘Program Files’
Progra
2 = ‘Program Files(x86)’
You’ll need to close and re-open any command windows that were open before you made these changes, as there’s no way to reload environment variables from an active command prompt. If the changes don’t take effect after reopening the command window, restart Windows.
Set the JAVA_HOME variable via the command line
If you would prefer to set the JAVA_HOME (or JRE_HOME) variable via the command line:
- Open Command Prompt (make sure you Run as administrator so you’re able to add a system environment variable).
Set the value of the environment variable to your JDK (or JRE) installation path as follows:
If the path contains spaces, use the shortened path name.
Restart Command Prompt to reload the environment variables then use the following command to check the it’s been added correctly.
You should see the path to your JDK (or JRE) installation.
How to set JAVA_HOME on Windows 10?
This tutorial shows you how to set a JAVA_HOME system variable on Windows 10.
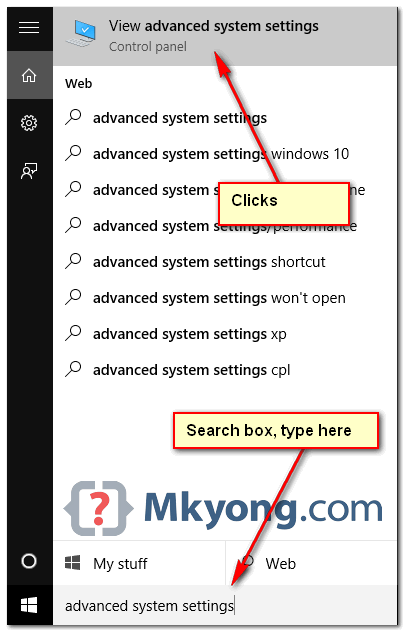
1. Advanced System Settings
Type advanced system settings in the search box (beside the Windows start button), clicks View advanced system settings .
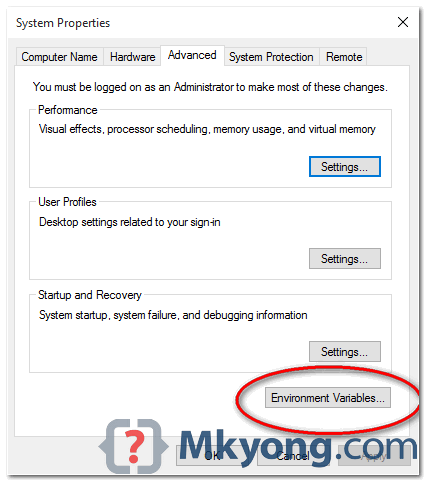
2. Environment Variables
Select Advance tab, clicks Environment Variables
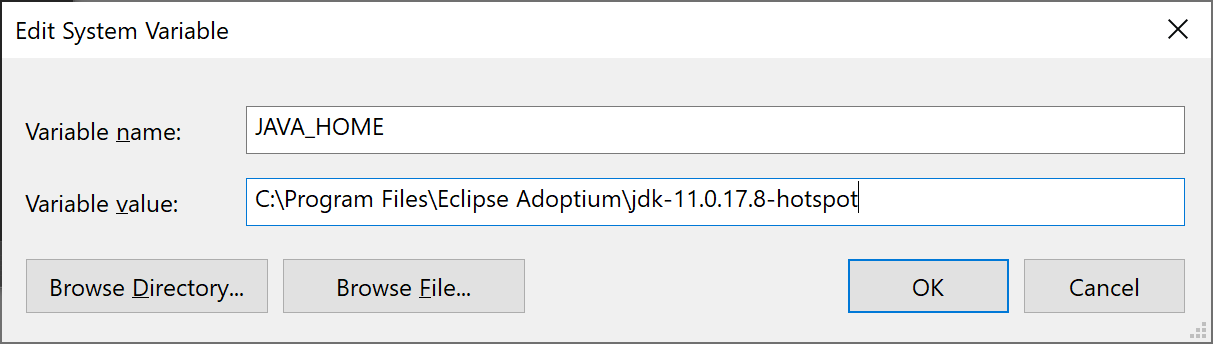
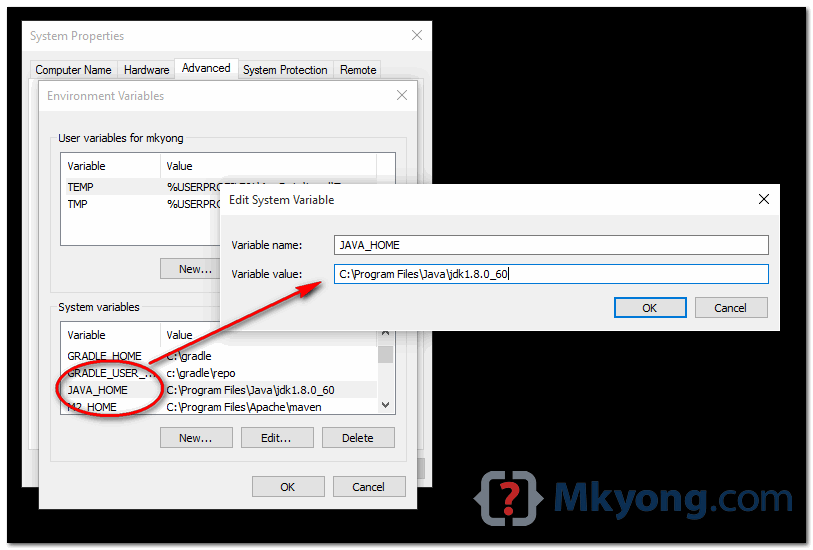
3. Add JAVA_HOME
In System variables, clicks New. button to add a new JAVA_HOME variable and point it to the JDK installed folder.
- Correct – C:\Program Files\Java\jdk1.8.0_60
- Wrong – C:\Program Files\Java\jdk1.8.0_60\bin
4. Update PATH
In System variables, find PATH , clicks edit. button :
4.1 In old version of Windows, it will prompt you below dialog box to edit the values directly, append this %JAVA_HOME%\bin; to the end of the line.
4.2 In latest Windows 10, it will prompt you below dialog box, clicks on New button, and add this %JAVA_HOME%\bin


