- Start up your Mac in Windows or macOS with Boot Camp
- Set the default operating system
- Restart in macOS
- Mac startup key combinations
- On a Mac with Apple silicon
- On an Intel-based Mac
- About Startup Security Utility
- Open Startup Security Utility
- Set a firmware password
- Change Secure Boot settings
- Full Security
- Medium Security
- No Security
- How to set default apps on Mac
- How to change the default Mac app for specific file types
- How to set your default web browser
- How to set your default email reader
- Questions?
- 2 Ways to Change the Default Application to Open Files With in Mac OS X
- 1: How to Set the Default Application for a Specific File in Mac OS
- 2: How to Set Default Applications to Open All Files of a Format Type in Mac OS X
Start up your Mac in Windows or macOS with Boot Camp
After you use Boot Camp Assistant to install Windows on your Intel-based Mac, you can set the default operating system to either macOS or Windows. The default operating system is the one you want to use when you turn on or restart your Mac.
Set the default operating system
In Windows on your Mac, click  in the right side of the taskbar, click the Boot Camp icon
  , then choose Boot Camp Control Panel.
If a User Account Control dialog appears, click Yes.
Select the startup disk that has the default operating system you want to use.
If you want to start up using the default operating system now, click Restart. Otherwise, click OK.
You can’t change your startup volume to an external drive while you’re using Windows.
To learn how to change the default operating system using macOS, see Get started with Boot Camp.
Restart in macOS
In Windows on your Mac, do one of the following:
Restart using Startup Manager: Restart your Mac, then immediately press and hold the Option key. When the Startup Manager window appears, release the Option key, select your macOS startup disk, then press Return.
If you’re using a Mac notebook computer with an external keyboard, make sure you press and hold the Option key on the built-in keyboard.
Restart using Boot Camp Control Panel: Click in the right side of the taskbar, click the Boot Camp icon , then choose Restart in macOS.
This also sets the default operating system to macOS.
For more information about restarting in macOS, see the Apple Support article Restart your Mac in macOS or Windows.
Источник
Mac startup key combinations
Learn about the Mac features and tools that you can access by holding down one or more keys during startup.
On a Mac with Apple silicon
Turn on your Mac with Apple silicon and continue to press and hold the power button until you see the startup options window. From there you can start up from a different disk, start up in safe mode, use macOS Recovery, and more. Learn more about these options, including macOS Recovery.
On an Intel-based Mac
To use any of these key combinations, press and hold the keys immediately after pressing the power button to turn on your Mac, or after your Mac begins to restart. Keep holding until the described behavior occurs.
- Command (⌘)-R: Start up from the built-in macOS Recovery system. Or use Option-Command-R or Shift-Option-Command-R to start up from macOS Recovery over the internet. macOS Recovery installs different versions of macOS, depending on the key combination you use. If your Mac is using a firmware password, you’re prompted to enter the password.
- Option (⌥) or Alt: Start up to Startup Manager, which allows you to choose other available startup disks or volumes. If your Mac is using a firmware password, you’re prompted to enter the password.
- Option-Command-P-R:Reset NVRAM or PRAM. If your Mac is using a firmware password, it ignores this key combination or starts up from macOS Recovery.
- Shift (⇧): Start up in safe mode. Disabled when using a firmware password.
- D: Start up to the Apple Diagnostics utility. Or use Option-D to start up to this utility over the internet. Disabled when using a firmware password.
- N: Start up from a NetBoot server, if your Mac supports network startup volumes. To use the default boot image on the server, press and hold Option-N instead. Disabled when using a firmware password.
- Command-S: Start up in single-user mode. Disabled in macOS Mojave or later, or when using a firmware password.
- T: Start up in target disk mode. Disabled when using a firmware password.
- Command-V: Start up in verbose mode. Disabled when using a firmware password.
- Eject (⏏) or F12 or mouse button or trackpad button: Eject removable media, such as an optical disc. Disabled when using a firmware password.
If a key combination doesn’t work at startup, one of these solutions might help:
- Press and hold all keys in the combination together, not one at a time.
- Shut down your Mac. Then press the power button to turn on your Mac. Then press and hold the keys as your Mac starts up. You might need to wait a few seconds before pressing the keys, to give your Mac more time to recognize the keyboard as it starts up. Some keyboards have a light that flashes briefly at startup, indicating that the keyboard is recognized and ready for use.
- If you’re using a wireless keyboard, plug it into your Mac, if possible. Or use your built-in keyboard or a wired keyboard. If you’re using a keyboard made for a PC, such as a keyboard with a Windows logo, try a keyboard made for Mac.
- If you’re using Boot Camp to start up from Microsoft Windows, set Startup Disk preferences to start up from macOS instead. Then shut down or restart and try again.
Источник
About Startup Security Utility
Use Startup Security Utility to make sure that your Mac always starts up from your designated startup disk, and always from a legitimate, trusted operating system.
If you’re using a Mac with the Apple T2 Security Chip, Startup Security Utility offers three features to help secure your Mac against unauthorized access: Firmware password protection, Secure Boot, and External Boot.

Open Startup Security Utility
- Turn on your Mac, then press and hold Command (⌘)-R immediately after you see the Apple logo. Your Mac starts up from macOS Recovery.
- When you’re asked to select a user you know the password for, select the user, click Next, then enter their administrator password.
- When you see the macOS utilities window, choose Utilities > Startup Security Utility from the menu bar.
- When you’re asked to authenticate, click Enter macOS Password, then choose an administrator account and enter its password.
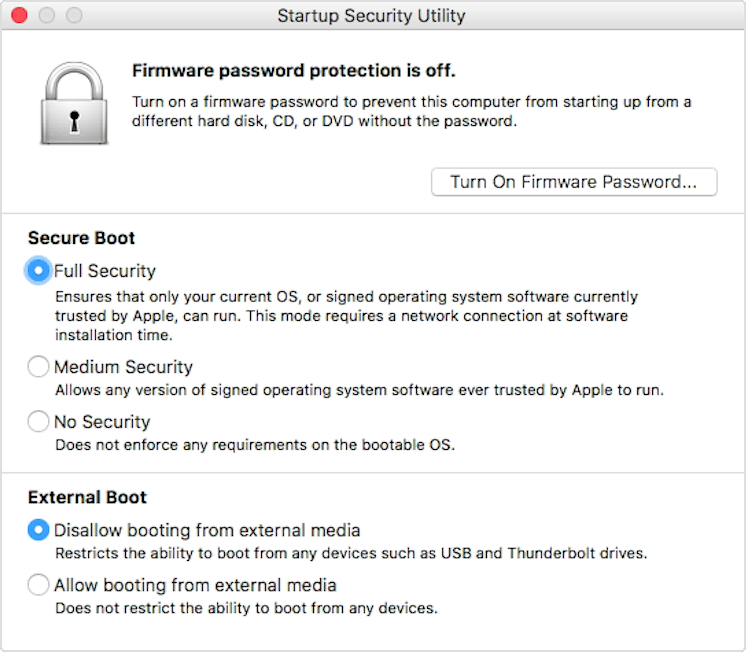
Set a firmware password
You can use a firmware password to prevent anyone who doesn’t have the password from starting up from a disk other than your designated startup disk. To set a firmware password in Startup Security Utility, click Turn On Firmware Password, then follow the onscreen instructions. Learn more about firmware passwords.
You can also change your external boot setting to prevent even those who know the firmware password from starting up from external media.
Change Secure Boot settings
Use these settings to make sure that your Mac always starts up from a legitimate, trusted operating system.
Full Security
Full Security is the default setting, offering the highest level of security. This is a level of security previously available only on iOS devices.
During startup, your Mac verifies the integrity of the operating system (OS) on your startup disk to make sure that it’s legitimate. If the OS is unknown or can’t be verified as legitimate, your Mac connects to Apple to download the updated integrity information it needs to verify the OS. This information is unique to your Mac, and it ensures that your Mac starts up from an OS that is trusted by Apple.
If FileVault is enabled while your Mac is attempting to download updated integrity information, you’re asked to enter a password to unlock the disk. Enter your administrator password, then click Unlock to complete the download.
If the OS doesn’t pass verification:
- macOS: An alert informs you that a software update is required to use this startup disk. Click Update to open the macOS installer, which you can use to reinstall macOS on the startup disk. Or click Startup Disk and choose a different startup disk, which your Mac will also attempt to verify.
- Windows: An alert informs you that you need to install windows with Boot Camp Assistant.
If your Mac can’t connect to the Internet, it displays an alert that an Internet connection is required.
- Check your Internet connection, such as by choosing an active network from Wi-Fi status menu in the menu bar. Then click Try Again.
- Or click Startup Disk and choose a different startup disk.
- Or use Startup Security Utility to lower the security level
Medium Security
During startup when Medium Security is turned on, your Mac verifies the OS on your startup disk only by making sure that it has been properly signed by Apple (macOS) or Microsoft (Windows). This doesn’t require an Internet connection or updated integrity information from Apple, so it doesn’t prevent your Mac from using an OS that is no longer trusted by Apple.
If the OS doesn’t pass verification:
- macOS: An alert informs you that a software update is required to use this startup disk. Click Update to open the macOS installer, which you can use to reinstall macOS on the startup disk. This requires an Internet connection. Or click Startup Disk and choose a different startup disk, which your Mac will also attempt to verify.
- Windows: An alert informs you that you need to install windows with Boot Camp Assistant.
No Security
No Security doesn’t enforce any of the above security requirements for your startup disk.
Источник
How to set default apps on Mac
 Source: iMore
Certain actions that you perform on your Mac will cause macOS Big Sur default apps to open. For example, clicking a document may open Pages. But what if you want Microsoft Word to open instead? You can also set your default web browser and email reader, meaning your best Mac can easily open your favorite apps. Here’s how to set default apps on Mac!
How to change the default Mac app for specific file types
- Right-click on a file that uses the file type you’d like to change the default for. For example, one with a .jpg extension (a photo).
- Click on Get Info in the pop-up.
Click Open With if the section isn’t already expanded.
 Source: iMore
Click the drop-down menu.
Click the app you want to use.
Source: iMore
Click Continue when the Finder asks you if you’re sure.
Source: iMore
Now, anytime you open a file with that extension, the Finder will automatically open it with the app you’ve selected.
How to set your default web browser
- Launch System Preferences from the dock, Finder, or by clicking the Apple icon in the Menu bar.
- Click General at the top left of the window.
- Click the drop-down next to Default web browser.
Click the web browser you’d like to use as the default.
 Source: iMore
How to set your default email reader
Mail is likely the default email app on your Mac, but just in case you have others downloaded, you can set the default reader. Here’s how:
- Launch Mail from your dock or the Finder.
- Click Mail in the menu bar at the top of the screen.
- Click Preferences.
- Click the drop-down next to Default Mail Reader.
Click the app you’d like to set as the default.
Source: iMore
Questions?
Let us know in the comments below.
Updated August 2021: Updated for the latest version of macOS Big Sur.
Источник
2 Ways to Change the Default Application to Open Files With in Mac OS X

Each file type has a default application that is associated with it on the Mac. This means that when you double-click a file from the Finder it will open a specific application, for example on a fresh Mac OS installation, all image files (png, jpg, gif, pdf, etc) will default to opening in Preview, and all text documents (txt, rtf, etc) will open in TextEdit.
Over time, the default applications and file associations can change as you install more applications, which sometimes set themselves as the new default app to open a file format with.
If you want to change these default file format associations and have files open in other applications of your choosing, you’ll find there are two simple ways to do this: the first method defines the default application to launch for a specific single file, and the second method will change the application associated with all files of a given format type.
1: How to Set the Default Application for a Specific File in Mac OS
This provides file-specific control over default applications, meaning you can have a document or two that open in one app, while the overall general file type defaults to open in another application. For example, you could set one single PSD file to always open exclusively in Pixelmator, while all other PSD formatted documents continue to open in Adobe Photoshop.
- From the Mac Finder, right-click (or Control+Click) on the file to change the default app for and hold down the OPTION key so that the “Open With” menu becomes “Always Open With”
- Continue to hold OPTION and select the application you want to set as the default for this file
The file will open in the application you selected, and that file will now associate the chosen application as it’s new default to always open within.
By the way, if you’re setting a file type this way and notice duplicate entries in that Open With menu, you can remove those duplicate entries with this quick trick to clean up the Open With contextual menu.
Again, this is specific to the file you chose, and this method will not apply to all files sharing that same file format. If you want to set the default application universally for a file type, that’s what the next tip is for.
2: How to Set Default Applications to Open All Files of a Format Type in Mac OS X
This approach will change the default application universally for all files of a specific format. For example, you could use this to set all files of the type PNG to open within Skitch, all TXT files to open with TextWrangler, and all ZIP files to open with The Unarchiver.
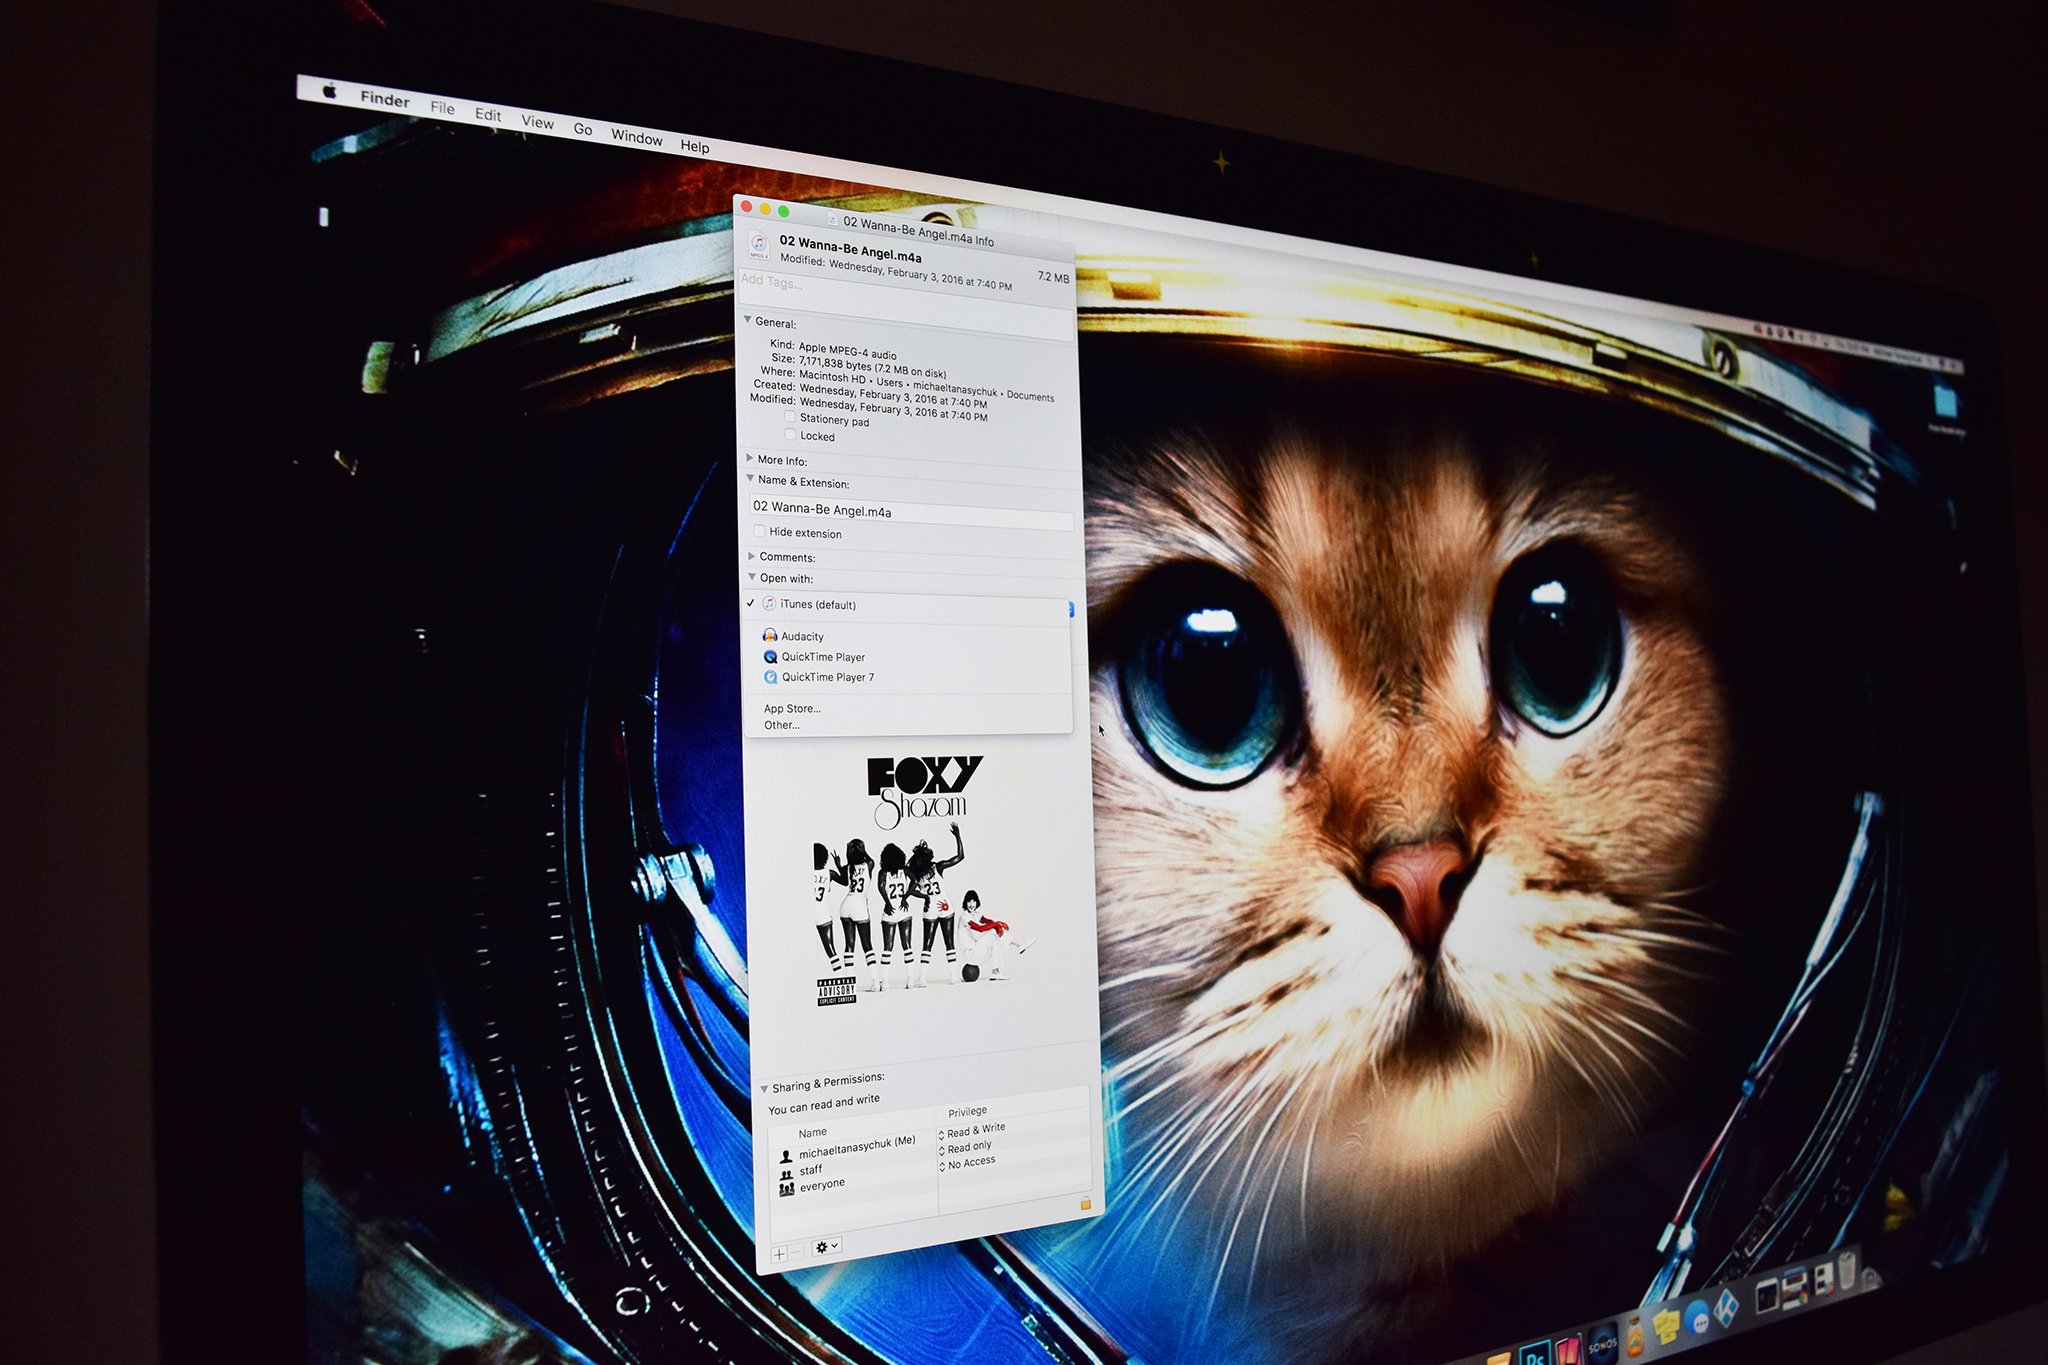
- From the Mac file system, select a file of the general format type you wish to change the default application for
- Pull down the “File” menu and choose “Get Info” (or hit Command+i) to access the Get Info window
- Click the “Open with:” sub menu, then click on the contextual menu and select the new application to associate all files of this format type with
Click the “Change All” button and confirm the change when requested
(Note: if the Change All button is greyed out and unclickable it’s because you have not set an application that is different than the currently set default app. Use the pulldown menu to choose the new application for the Change All button to be usable and to apply the adjustment to all files of the file format type)
This change carries throughout all files of that format used within Mac OS for the active user account, and the filetype-to-application association will stay in place until it has been changed again through the same “Get Info” trick, or until a third party application claims the file format and associates with it directly.
You’ll find this one particularly useful if a newly installed application has assumed control over a file format, like what often happens with Adobe Reader claiming all PDF documents. This ‘Change All‘ trick will allow you to quickly reclaim PDF file types to reopen again in Preview (or your app of choice), which is typically much faster than launching such files in more resource heavy apps like Reader.
The video below demonstrates the latter trick, changing the default application for all files of a given type:
Note these tricks work to set the default application for files in all versions of macOS, Mac OS X, and OS X, including Big Sur, Catalina, Mojave, High Sierra, Sierra, Yosemite, El Capitan, Snow Leopard, Lion, Mountain lion, Tiger, and earlier releases too. Therefore it does not matter which version of Mac system software you are running, you can always changes the default application that opens with a file or file type.
Have any other tips or suggestions for changing application file associations on the Mac? Share in the comments!
Источник


