- How to: Set permissions
- To create a user account that has User permissions
- To grant access to shared project files
- To grant access to the profiling driver
- Set the folder permissions for Everyone on Windows-7 (10, 8.1), how to?
- The solution is simple to Set the folder permissions for Everyone on Windows 10, 8.1, 7, .. and MS Server 2016, 2019!
- 1.) . Set the folder permissions for Everyone! (Image 1 to 3) 2.) . File and Folder Permissions!
- 1.) Set the folder permissions for Everyone!
- how to change folder and file permissions in windows 10
- Replies (6)
- Give permissions to files and folders in Windows 10
- Replies (24)
- How to change File and Folder permissions in Windows 10
- How to change File and Folder permissions
- 1] Type of users in Windows & Permissions
- 2] Change File and Folder Permissions which you own in Windows 10
- How to apply the same permission to subfolders and files
- 3] Manage permission when sharing a file or folder with other users
- 4] Change Files and Folders Permissions which you DONT own
How to: Set permissions
This article describes how an Administrator of a computer grants the security permissions required for profiling to a user or group that does not have Administrator permissions on that computer.
A basic security principle states that applications should run with no more than the permissions they need. This principle also applies to users. If users can be fully effective when they are logged on as members of the Users group instead of the Administrators group, they should not be granted Administrator permissions. The first procedure, «To create a user account that has User permissions,» describes how to create a user account for a member of the Users group.
Members of the Users group will need access to the folders and files on disk that are shared with other members of the team. The second procedure, «To grant access to shared project files,» describes how to grant that access.
Members of the Users group can run the profiling tools if an administrator grants them access to the software driver for the profiling tools. The last procedure, «To grant access to the profiling driver,» describes how to grant access to that driver.
You need administrator permissions to follow the steps in these procedures.
To create a user account that has User permissions
Right-click My Computer and then click Manage.
The Computer Management window opens.
Expand Local Users and Groups.
Right-click the Users folder and then click New User.
The New User dialog box appears.
Complete the fields in this dialog box with the information for the user account you are creating. Specify a password. Optionally, select the check box that requires that the user change the password at the next logon.
Click Create and then click Close.
The new user appears in the Users group, a group of users who do not have Administrator permissions.
To grant access to shared project files
In Windows Explorer (or File Explorer), locate the root of the folder tree for project files used by this user and shared by the project team.
The path of this folder might resemble the following:
Right-click the folder and then click Properties.
The Properties dialog box appears.
Click the Security tab.
Click the name of the user’s account in the Group or user names box.
In the Permissions for box, select the check box for Full Control.
Click OK.
This grants permissions to the user for the shared folder tree that begins with the folder selected in step 5.
To grant access to the profiling driver
Open a command prompt as an administrator.
Change the directory to:
Run the following command:
This command installs and starts the driver for the profiling tools.
This command starts the profiling driver and service so that non-admin users may use profiling features that are available in their User process space. Only an Administrator may run the command; and it will fail for non-administrative Users.
Notice that the effects of this step are undone after the computer restarts, unless you also perform the final step in this procedure.
Run the command to allow access to profiling driver functionality by a user or group that does not have administrator access to the computer:
This command grants the or account access to the Profiling tools. The option determines the profiling functionality the user can access. The option can be one or more of the following values:
FullAccess — allows access to all profiling methods including collecting performance data from services, sampling, and cross session profiling.
SampleProfiling — allows access to sample profiling methods
CrossSession — allows access to cross session profiling which is required for profiling services.
(Optional) To preserve the results of any of the previous steps after computer restarts, run the following command:
The specified users, after logging on, will now be able to use the profiling tools without Administrator permissions.
Set the folder permissions for Everyone on Windows-7 (10, 8.1), how to?
The solution is simple to Set the folder permissions for Everyone on Windows 10, 8.1, 7, .. and MS Server 2016, 2019!
1.) . Set the folder permissions for Everyone! (Image 1 to 3)
2.) . File and Folder Permissions!
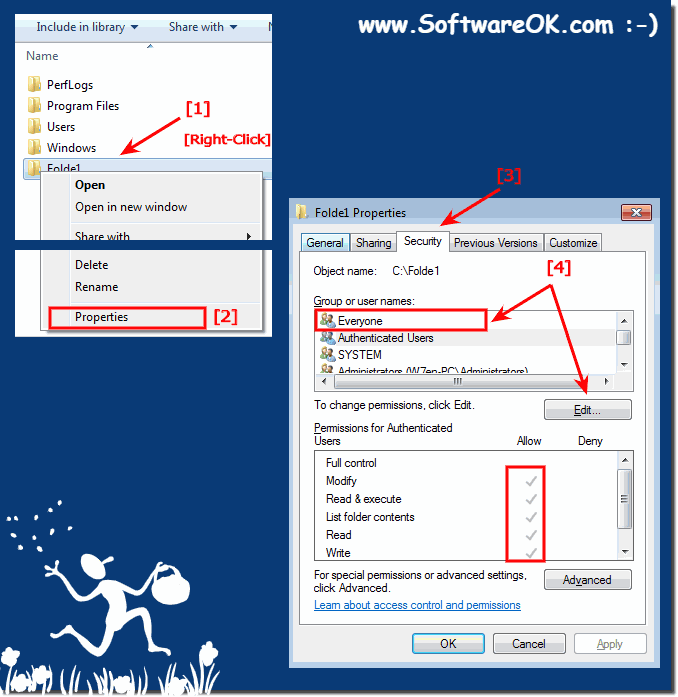
1.) Set the folder permissions for Everyone!
1. Please Start the MS-Explorer for example via [Windows-Logo]+[E] keyboard shortcut.
2, Browse to Folder and select via right mouse click!
3, In Context-Menu go to (select) Properties and select the Tab Security
(. see Image-1 Point 1 to 3)
| (Image-1) Windows-7 — Set the folder permissions for Everyone on! |
 |
In order to secure a windows (7, 8.1, 10, ie 11) computer and its resources, you must consider the rights that users will have. You can safely a computer or multiple computers by imparting users or groups specific user rights. You can help secure an object, such as a file or folder, by assigning permissions to allow users or groups to perform specific actions on that object. (permission rights for users on windows)

| (Image-2) Folder permissions for User on Windows-7! |
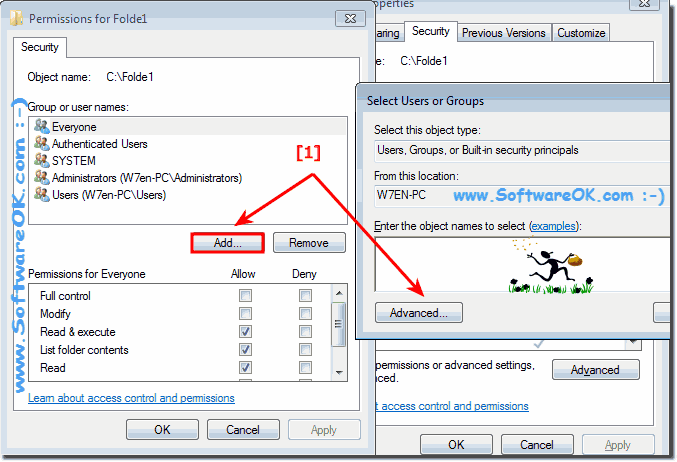 |
The windows permissions for Folders include Full Control, Modify, Read & Execute, List Folder Contents, Read, and Write access. For information about these permissions, see File and Folder Permissions. Each of these permissions consists of a logical group of special permissions, which are listed and defined below. Not all of the special permissions will apply to all objects
Please click Find Now and select Everyone (. see Image-3 Arrow-1,2,3)! and «OK»
how to change folder and file permissions in windows 10
Replies (6)
![]()
Thank you for contacting Microsoft Community.
- Are you trying to give permission to particular files and folders?
I suggest you to follow the below step and check if it helps.
- Once you choose the file that you want to give permission, right click on it.
- Click on properties and go to security tab, check whether any permission have been set.
- After you have viewed the permissions that are already set, you can now click on the Advanced Button that is right below the «Permissions for Authenticated Users»
- Once you have clicked Advanced, a box like this should appear, the «Permission Entries» box, which shows all the permissions that are set for the users. Now, after you have spotted the user whose permissions you wish to change, click «Change Permissions.
- Click on the user you would like to edit, and then click the option that says «Change Permissions» which is right below the box.
- Once that is clicked, you are going to get the same box pop up, but this time, you can actually edit the options. You do that by clicking the «Administrators» user again, and this time, you are going to click the «Edit» option.
Hope this information was helpful and do let us know if you need further assistance. We will be glad to assist.
56 people found this reply helpful
Was this reply helpful?
Sorry this didn’t help.
Great! Thanks for your feedback.
How satisfied are you with this reply?
Thanks for your feedback, it helps us improve the site.
How satisfied are you with this reply?
Thanks for your feedback.
All boxes are grey . How should I continue ?
80 people found this reply helpful
Was this reply helpful?
Sorry this didn’t help.
Great! Thanks for your feedback.
How satisfied are you with this reply?
Thanks for your feedback, it helps us improve the site.
How satisfied are you with this reply?
Thanks for your feedback.
Thank you for contacting Microsoft Community.
- Are you trying to give permission to particular files and folders?
I suggest you to follow the below step and check if it helps.
- Once you choose the file that you want to give permission, right click on it.
- Click on properties and go to security tab, check whether any permission have been set.
- After you have viewed the permissions that are already set, you can now click on the Advanced Button that is right below the «Permissions for Authenticated Users»
- Once you have clicked Advanced, a box like this should appear, the «Permission Entries» box, which shows all the permissions that are set for the users. Now, after you have spotted the user whose permissions you wish to change, click «Change Permissions.
- Click on the user you would like to edit, and then click the option that says «Change Permissions» which is right below the box.
- Once that is clicked, you are going to get the same box pop up, but this time, you can actually edit the options. You do that by clicking the «Administrators» user again, and this time, you are going to click the «Edit» option.
Hope this information was helpful and do let us know if you need further assistance. We will be glad to assist.
this is for a file. how for a folder and ALL subfolders and files
8 people found this reply helpful
Was this reply helpful?
Sorry this didn’t help.
Great! Thanks for your feedback.
How satisfied are you with this reply?
Thanks for your feedback, it helps us improve the site.
Give permissions to files and folders in Windows 10
Original title: REad only
Windows 10 has set all my files and folders to read only. I am not able to turn this off. Is there a trick to this as right clicking and unchecking read only I get you need admin rights message and it doesn’t work. This is causing some games and programs I have to not work correctly.
Replies (24)
* Please try a lower page number.
* Please enter only numbers.
* Please try a lower page number.
* Please enter only numbers.
![]()
Thank you for posting in Microsoft Community. I understand your concern and I’ll be glad to assist you.
Please follow through.
- In Windows Explorer, right-click the file or folder you want to work with.
From the pop-up menu, select Properties, and then in the Properties dialog box click the Security tab.
In the Name list box, select the user, contact, computer, or group whose permissions you want to view. If the permissions are dimmed, it means the permissions are inherited from a parent object.
Turn off UAC (User Account Control)
Before you can do anything, you must turn off the UAC, or you will be locked out of the following steps.
1) Start -> Settings -> Control Panel -> User Accounts
2) Click «Change User Account Control Settings»
3) Move slider all the way down to «Never Notify»
4) Reboot
2) Take Ownership
Yes take ownership. Even though you are logged on as an Administrator, you can’t change files that don’t belong to you. The Program Files folder is set to the Trusted Installer group and the Administrator doesn’t have the rights to change anything. So now we have to claim all the files and folders.
1) Open Windows Explorer
2) R-Click on Program Files -> Properties -> Security Tab
3) Click Advanced -> Owner
4) Click Edit
5) Select Administrators -> Put a checkmark in Replace owner on subcontainers & objects -> Apply
6) Wait a while.
7) When it finishes, Click OK on all boxes to close everything
3) Fix Permissions
Now that you own the files, you have to give yourself permission to modify them
1) R-Click on Program Files -> Properties -> Security Tab
2) Click Advanced -> Change Permission
3) Select Administrators (any entry) -> Edit
4) Change the Apply To drop down box to This Folder, Subfolder & Files
5) Put check in Full Control under Allow column -> OK -> Apply
6) Wait some more.
7) When it finishes, the dialog boxes may hide behind the Explorer window. Minimize it and click OK on all the the dialog boxes
Hope this post helps. Get back to us for further queries. We are happy to help.
How to change File and Folder permissions in Windows 10
Every file and folder on Windows 10 has permission attributes. It gives your authority to edit, read, write, execute, and modify it. It is relatively easy to change file and folder permissions in Windows 10. However, it depends on the specific criteria. In this post, we will show how you can change file and folder permissions in Windows 10.
How to change File and Folder permissions
I was talking about individual criteria that you need to meet. Those criteria are user authority or power. If you are an admin user, you can almost change anything in Windows. It includes the ability to modify files that are owned by others. However, if you are standard users, you are limited to changing files that only belong to you. In this post, we will discuss the following:
- Types of Users and Permissions
- Change Files and Folders Permissions which you own
- Manage permission when sharing a file or folder with other users
- Change Files and Folders Permissions which you DON’T own.
While it looks complicated, it is relatively easy to manage permissions. What you need to be careful about is the type of permissions.
1] Type of users in Windows & Permissions
While its not necessary, I think its a good idea that you know about this. There are broadly two types of users— local user accounts and local system accounts.
- Local user accounts include Administrators, Standard users, Child, and Guest account.
- Windows OS manages local System accounts. Accounts with a name such as System, Network service, Local service are all system accounts.
An Administrator can also take over System accounts as well or at least modify the file permissions along with other local user accounts.
Another essential thing, but you should know this. Some of these permissions will not be available for files.
- Full Control
- Modify
- Read and Execute
- List folder contents
- Read
- Write
- Special Permissions
2] Change File and Folder Permissions which you own in Windows 10
This section applies to all kinds of users. As long as you are managing files and folders which you won, there is not much of a problem. But at times, users have experienced that they are not able to edit files that they own or are created by them. Follow the steps to fix those problems.
- Right-click on any folder or file and click on Properties.
- Switch to Security tab, and you should see two sections
- Group or usernames that have an ownership right on that file
- Permissions for the selected user
- If you have trouble editing the file or copying files into that folder, then you need to change the permission. Click on the Edit button.
- It will open another window where you can select a user, and add missing permissions by checking the box against the type of permission.
- Once you are done, click on ok, and then apply the changes.
When changing permission for yourself, it is best to check on the box against Full Control. It will keep you off from any trouble you were having with the file or folder.
How to apply the same permission to subfolders and files
It only makes sense to have full control of all the files and folders inside it. Doing it one by one is cumbersome, and thats where you need to use the Advanced button.
- First, make sure to choose the set of permissions or Full control for the top folder
- Then go back to the Security tab, click on the Advanced button.
- Then select the user, which is yourself, and check the box which says—Replace all child object permission entries with inheritable permission entries from this object.
- Click on Apply and then Ok button.
In simple words, whatever the permission, the object, i.e. User, which in this case is you, will be applied to all files, and subfolders.
3] Manage permission when sharing a file or folder with other users
There can be multiple scenarios here:
- The file can be shared, but it cannot be modified.
- Folders shared with multiple users, but they are not allowed to delete the file or add any file.
- Some users are allowed to modify files while others can have read-only access.
Open the permission window by clicking on the Edit button. Next, select the user for which you want to modify. If the user is not there, you can add a new user by clicking on the Add button. It will open a search window which you can use to find the user. Add when you find it.
Once the user is available, select it and then assign appropriate permission. Select what you want to allow, and what you want to deny. It is how you would assign for yourself, except that you are doing it for some other account.
4] Change Files and Folders Permissions which you DONT own
That is where ownership comes into the picture. If you do not own a folder or someone else has modified files in such a way, then you can change it. However, only an admin user can change it for you.
Follow our detailed guide to learn how to take ownership of files and folders which you don’t own.
It might be too much to grasp for once, but once you are through, there will be no confusion left. I hope you were able to understand it clearly.
PS: Attribute Changer lets you change file & folder attributes in Windows 10 easily.
Date: November 14, 2019 Tags: Files, User Account


