- Add a new user account with admin access on Linux
- Create a new user account with admin (sudo) access on Ubuntu or Debian Linux
- A note about granting sudo account for an existing Ubuntu/Debian Linux user
- RHEL or CentOS create a new user account with admin (sudo) access
- How to grant sudo access for an existing RHEL/CentOS Linux user
- Conclusion
- How to Give Standard Users Admin (Root) Rights on Ubuntu 16.04 | 18.04
- Option 1: Changing Ubuntu Account Types on the Desktop
- Option #2: Changing User Account Type via Command line
- Creating a new user and modifying its privileges in Linux
- Simple way to create a new user in Linux.
- Universal way to create a new user in Linux.
- New user’s system privileges
- Setting password and account expiration
- How to delete a user
- How to Make a User an Administrator in Ubuntu
- Make a User an Administrator in Ubuntu Through the GUI
- Make a User an Administrator in Ubuntu Through the Command Line
- Method 1: The usermod command
- Method 2: The gpasswd command
- Karim Buzdar
Add a new user account with admin access on Linux
Create a new user account with admin (sudo) access on Ubuntu or Debian Linux
Commands to add or create a sudo user (admin) on an Ubuntu or Debian Linux server:
- Open the terminal application
- For remote Ubuntu/Debian server use the ssh command and log in as the root user using either su or sudo.
- Create a new user named marlena , run: adduser marlena
- Make marlena user ‘sudo user’ (admin) run: usermod -aG sudo marlena
- Verify it by running the id marlena command
- Log in as marlena: su — marlena . Than run sudo command for verification. For example: sudo ls -l /etc/shadow

A note about granting sudo account for an existing Ubuntu/Debian Linux user
The syntax is (must run as the root user):
# adduser
## add user named ‘sai’ to sudo group ##
# adduser sai sudo
Another syntax:
usermod -aG sudo UserNameHere
Log in as the root user and add an existing user accout named ‘sai’ to sudo group:
usermod -aG sudo sai
id sai
See “How to create a new sudo user on Ubuntu Linux server” for more info.
RHEL or CentOS create a new user account with admin (sudo) access
Procedure to add or create a sudo user (admin) on CentOS or RHEL:
- Open the terminal application
- For remote CentOS server use the ssh command and log in as the root user using either su or sudo.
- Create a new CentOS user named vivek , run: useradd vivek
- Set the password, execute: passwd vivek
- Make vivek user ‘sudo user’ on CentOS/RHEL, run : usermod -aG wheel vivek
- Verify it by running the id vivek command
How to grant sudo access for an existing RHEL/CentOS Linux user
The syntax is as follows for the usermod command and id command:
# usermod -aG wheel User-Name-Here
Add an existing user account named kirsh to wheel group. In other words, type the following two commands:
# usermod -aG wheel krish
# id krish
See Add / Create a Sudo User on CentOS Linux 8 for more info.
- No ads and tracking
- In-depth guides for developers and sysadmins at Opensourceflare✨
- Join my Patreon to support independent content creators and start reading latest guides:
- How to set up Redis sentinel cluster on Ubuntu or Debian Linux
- How To Set Up SSH Keys With YubiKey as two-factor authentication (U2F/FIDO2)
- How to set up Mariadb Galera cluster on Ubuntu or Debian Linux
- A podman tutorial for beginners – part I (run Linux containers without Docker and in daemonless mode)
- How to protect Linux against rogue USB devices using USBGuard
Join Patreon ➔
Conclusion
You learned how to create a sudo (admin level access) user account on both Ubuntu/Debian and RHEL/CentOS Linux servers. See sudo docs here.
🐧 Get the latest tutorials on Linux, Open Source & DevOps via
Источник
How to Give Standard Users Admin (Root) Rights on Ubuntu 16.04 | 18.04

This brief tutorial shows students and new users how to give standard user administrative rights or privileges to make changes to Ubuntu systems. If you want a standard user to make changes in Ubuntu, you’ll want to give them administrative privileges.
In Ubuntu, you can change which users have administrative privileges and which ones do not. Users who have admin rights or are member of the sudo system tool can make global changes to Ubuntu, including deleting critical files and other user accounts on the system.
A good way to keep your system secure from authorized changes is to limit some user accounts types to standard. which may keep them from making potentially damaging changes to your system.To get started with changing user account types in Ubuntu, follow the steps below:
Option 1: Changing Ubuntu Account Types on the Desktop
There are multiple ways one can change Ubuntu account types. Most desktop users will use the graphical user interface (GUI) to make account changes.
You need administrator privileges to change account types. The first user account on the system is usually the one that has administrator privileges. This is the user account that was created when you first installed the system.
To change account types via the desktop, follow the steps below:
- Open the Activities overview and start typing Users.
- Click Users to open the panel.
- Press Unlock in the top right corner and type in your password when prompted.
- Select the user whose privileges you want to change.
- Click the label Standard next to Account Type and select Administrator.
- The user’s privileges will be changed when they next log in.
You can also select System setting from the top right corner of the menu.

Then navigate to Details –> Users panel. Press Unlock in the top right corner and type in your password when prompted.

Now you can select the user account and change the type to Administrator as shown below:

Exit and the account privileges will change the next time the user logs on.
Option #2: Changing User Account Type via Command line
If you prefer the command line or on a server environment, you can use the command line below to make give an account administrative rights or privileges.
Linux, including Ubuntu has a tool called sudo. which allows users to run programs with administrative rights.
By default on Ubuntu systems, members of the sudo group are granted with sudo access. If you want a standard account to run commands or programs with admin rights, make them a member of the sudo group.
To make janedoe standard member of the sudo group, run the commands below:
sudo usermod -aG sudo janedoe
The next time Jane Doe logs in, that account will have sudo privileges granted.
To validate, run the commands below to switch to janedoe account.
Then run whoami command to see what the user account type is.
The output should be:
Congratulations! You have successfully learned how to change account types in Ubuntu via the GUI and command line.
Источник
Creating a new user and modifying its privileges in Linux
In this post, you will learn:
If you use Linux with a graphical desktop environment like Ubuntu, for example, you can add or remove new users through its Settings. But this is simplified and I have to say a limited way to do that. The right way is to use the command line. And it is the only way if you work with a server Linux system. Below, you will learn all you need to know about how to create, delete, and modify users in the Linux command line.
Simple way to create a new user in Linux.
Many Linux systems have a user-friendly command to add a new user. The command is adduser. You type this command and the username of a new user.
The command will prompt you to create a user password, full name, and some additional information which can be skipped if you want.

And that’s it. The new user is created. This command also creates a home directory for new user ( /home/username )
However, if you also need to grant this user the administrative privileges, you need to add it to the sudo group:
Now, this new user will be able to execute the administrative commands with sudo .
This was the simplest way to create a new user in Linux. The adduser command is available in many Linux ditros, but in fact, it is a more user-friendly type of the command useradd , which is more advanced. Below, I would like to show you how to use this more advanced command too.
Universal way to create a new user in Linux.
If adduser is not available in your distro or you want to have little more control over the new user. You need to use the command useradd . I know the names are similar and easy to mix. But try to remember that useradd is a more important command. Basically, adduser just points to useradd .
To create a new user with the default options, run:
To check what default options were used to create a user, run:
These are the default rules on my Debian VPS (they may differ for your system. ):
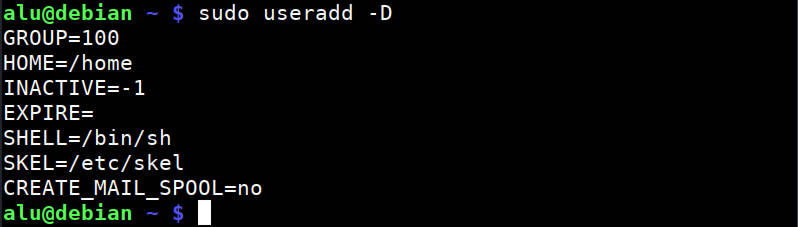
You can change these options and use some more. To see all available options of the useradd command, check its help:
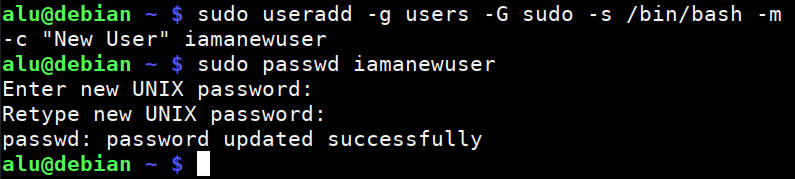
Based on these options, a more complete command would be:
Finally, you need to set a password for this user with passwd.
New user’s system privileges
As you have seen I added a new user to the sudo group and granted it administrative privileges. This is what I did on my server and this what you would want to do if you are an admin of the system. But if you create a user on your Linux system for someone else, you probably do not want them to have administrative privileges. So, do not add them to the sudo group.
Setting password and account expiration
If you are a system administrator and you have many uses in your system, besides not including them in the sudo group, you may also want to enhance the security of your system by the expiration time on the passwords and accounts of these new users.
You can do this with the command chage . Note, it is without n . The command is short of change age.
You can see all the available options of this command:
To check if there are any limitations set on a user, run:
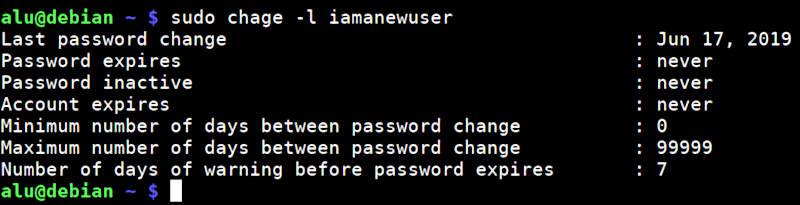
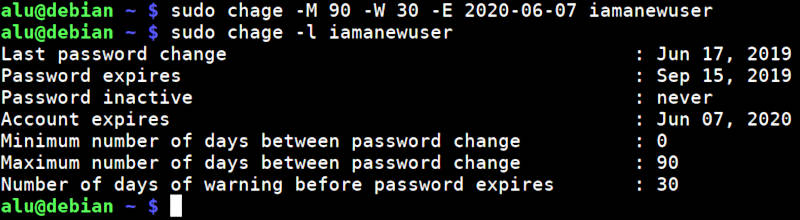
Usually, there are no expiration dates by default. But you can set some limits with the command chage :
The above command will set a password expiration date to 90 days and warning about the need to update the password to 30 days before the expiration. And the account will expire on June 6, 2020.
You can see that if you check the status of the user:
You can also do some manipulation with users using the command usermod . But I have to skip it because this post will be too long.
How to delete a user
Finally, to delete a user, run this command:
If you also want to remove the home directory of this user, add option -r. But be careful, because it will remove all the data of this user:
Источник
How to Make a User an Administrator in Ubuntu

If you have more than one user on your Linux system, you might not want all of them to perform administrative tasks or mess up with private system settings. In that case, you can avoid giving administrative privileges on Ubuntu to those users. Unauthorized users can not install or uninstall software on your system and neither can they change key system settings and configurations. Even if you are away from your computer, any unauthorized user cannot perform these tasks as all of them require sudo rights and need to know the password for sudo.
However, if by will you want to grant administrative rights to a user, this article is here for your help.
In this article, I will describe how to make a user an Administrator through the Graphical User Interface and also explain what commands to use in the command line in order to add a user to the sudo (authorized) user group.
We have run the commands and procedures mentioned in this article on an Ubuntu 20.04 LTS system.
Make a User an Administrator in Ubuntu Through the GUI
In order to change user settings through the UI, you need to open the Users tab in the System Settings utility. You can access it through the following two ways:
Enter the ‘users’ keyword in the system Dash and click on the “Users” search result.

Click on the downward arrow located in the top-right corner of your Ubuntu desktop, click on your username in the following view and then click Account Settings from the drop-down.

The Settings utility will open, displaying the Users tab. Please note that only an authorized user can change user settings in Ubuntu. First, you need to unlock the tab in order to make changes as an administrator by clicking the Unlock button located in the top-right corner of the Users view:
 Advertisement
This will open the following Authentication dialog where you can provide the Password for the authorized user:

Enter the password and then click the Authenticate button. Now you can make changes to any user’s settings. Click on the username of the user you want to make an Administrator.

In the Account Type of the user you will see two buttons; the Standard button and the Administrator button. Click on the Administrator button to make this user an Administrator. As soon as you do this, the user will be given administrative privileges and can now perform all operations that need root rights.
Make a User an Administrator in Ubuntu Through the Command Line
We will describe two ways to make a standard Ubuntu user an Administrator through the command line:
- Through the usermod command
- Through the gpasswd command
We will use the Ubuntu command line application, the Terminal, to perform this operation. You can open the Terminal either through the system Dash or the Ctrl+Alt+T shortcut.
Method 1: The usermod command
Open the Terminal and enter the following command as sudo as only an authorized user can edit user settings in Ubuntu:
$ sudo usermod -aG sudo “username”
In this example we will use the following command to make a user with the username “sampleuser” an administrator:

Enter the password for sudo and the user will be added to the “sudo” group which means that he/she can perform all administrative tasks on Ubuntu.
You can verify that the user is now in the “sudo” group by checking the groups a user belongs to, through the following command:
The following output of the ‘groups’ command for our “sampleuser” indicates that he/she is now part of the sudo group.

Method 2: The gpasswd command
Open the Terminal and enter the following gpasswd command as sudo as only an authorized user can edit user settings in Ubuntu:
$ sudo gpasswd -a “username” sudo
In this example, we are adding the “sampleuser” to the sudo group through the following command:

You can also remove a user from the sudo group through the -r switch in the same gpasswd command:
$ sudo gpasswd -d “username” sudo
In this example, we are removing the “sampleuser” from the sudo group through the following command:

Through the methods described in this article, you can make an ordinary Ubuntu user an Administrator so that they can perform all tasks that require root privileges on the system.
Karim Buzdar
About the Author: Karim Buzdar holds a degree in telecommunication engineering and holds several sysadmin certifications. As an IT engineer and technical author, he writes for various web sites. You can reach Karim on LinkedIn
Источник


