- Set-Service
- Syntax
- Description
- Examples
- Example 1: Change a display name
- Example 2: Change the startup type of services
- Example 3: Change the description of a service
- Example 4: Start a service
- Example 5: Suspend a service
- Example 6: Stop a service
- Example 7: Stop a service on a remote system
- Example 8: Change credential of a service
- Example 9: Change the SecurityDescriptor of a service
- Parameters
- Inputs
- Outputs
- Notes
- How to start and stop services manually on Windows 10
- How to manage services using Services console
- Stop service
- Start service
- Disable service
- Enable service
- How to manage services using Task Manager
- How to manage services using PowerShell
- Stop service
- Start service
- Disable service
- Enable service
- How to manage services using Command Prompt
- Stop service
- Start service
- Disable service
- Enable service
- More Windows 10 resources
- The Dell XPS 15 is our choice for best 15-inch laptop
- Halo: MCC’s live service elements make it better, not worse
- Microsoft’s Surface Duo is not ‘failing up’
- These are the best PC sticks when you’re on the move
Set-Service
Starts, stops, and suspends a service, and changes its properties.
Syntax
Description
The Set-Service cmdlet changes the properties of a service such as the Status, Description, DisplayName, and StartupType. Set-Service can start, stop, suspend, or pause a service. To identify a service, enter its service name or submit a service object. Or, send a service name or service object down the pipeline to Set-Service .
Examples
Example 1: Change a display name
In this example, a service’s display name is changed. To view the original display name, use Get-Service .
Set-Service uses the Name parameter to specify the service’s name, LanmanWorkstation. The DisplayName parameter specifies the new display name, LanMan Workstation.
Example 2: Change the startup type of services
This example shows how to change a service’s startup type.
Set-Service uses the Name parameter to specify the service’s name, BITS. The StartupType parameter sets the service to Automatic.
Get-Service uses the Name parameter to specify the BITS service and sends the object down the pipeline. Select-Object uses the Property parameter to display the BITS service’s status.
Example 3: Change the description of a service
This example changes the BITS service’s description and displays the result.
The Get-CimInstance cmdlet is used because it returns a Win32_Service object that includes the service’s Description.
Get-CimInstance sends the object down the pipeline to Format-List and displays the service’s name and description. For comparison purposes, the command is run before and after the description is updated.
Set-Service uses the Name parameter to specify the BITS service. The Description parameter specifies the updated text for the services’ description.
Example 4: Start a service
In this example, a service is started.
Set-Service uses the Name parameter to specify the service, WinRM. The Status parameter uses the value Running to start the service. The PassThru parameter outputs a ServiceController object that displays the results.
Example 5: Suspend a service
This example uses the pipeline to pause to service.
Get-Service uses the Name parameter to specify the Schedule service, and sends the object down the pipeline. Set-Service uses the Status parameter to set the service to Paused.
Example 6: Stop a service
This example uses a variable to stop a service.
Get-Service uses the Name parameter to specify the service, Schedule. The object is stored in the variable, $S . Set-Service uses the InputObject parameter and specifies the object stored $S . The Status parameter sets the service to Stopped.
Example 7: Stop a service on a remote system
This example stops a service on a remote computer. For more information, see Invoke-Command.
Get-Credential prompts for a username and password, and stores the credentials in the $Cred variable. Get-Service uses the Name parameter to specify the Schedule service. The object is stored in the variable, $S .
Invoke-Command uses the ComputerName parameter to specify a remote computer. The Credential parameter uses the $Cred variable to sign on to the computer. The ScriptBlock calls Set-Service . The InputObject parameter specifies the service object stored $S . The Status parameter sets the service to Stopped.
Example 8: Change credential of a service
This example changes the credentials that are used to manage a service.
Get-Credential prompts for a username and password, and stores the credentials in the $credential variable. Set-Service uses the Name parameter to specify the Schedule service. The Credential parameter uses the $credential variable and updates the Schedule service.
Example 9: Change the SecurityDescriptor of a service
This example changes a service’s SecurityDescriptor.
The SecurityDescriptor is stored in the $SDDL variable. Set-Service uses the Name parameter to specify the BITS service. The SecurityDescriptorSddl parameter uses $SDDL to change the SecurityDescriptor for the BITS service.
Parameters
Prompts you for confirmation before running Set-Service .
| Type: | SwitchParameter |
| Aliases: | cf |
| Position: | Named |
| Default value: | False |
| Accept pipeline input: | False |
| Accept wildcard characters: | False |
Specifies the account used by the service as the Service Logon Account.
Type a user name, such as User01 or Domain01\User01, or enter a PSCredential object, such as one generated by the Get-Credential cmdlet. If you type a user name, this cmdlet prompts you for a password.
Credentials are stored in a PSCredential object and the password is stored as a SecureString.
For more information about SecureString data protection, see How secure is SecureString?.
This parameter was introduced in PowerShell 6.0.
| Type: | PSCredential |
| Position: | Named |
| Default value: | None |
| Accept pipeline input: | False |
| Accept wildcard characters: | False |
Specifies a new description for the service.
The service description appears in Computer Management, Services. The Description isn’t a property of the Get-Service ServiceController object. To see the service description, use Get-CimInstance that returns a Win32_Service object that represents the service.
| Type: | String |
| Position: | Named |
| Default value: | None |
| Accept pipeline input: | False |
| Accept wildcard characters: | False |
Specifies a new display name for the service.
| Type: | String |
| Aliases: | DN |
| Position: | Named |
| Default value: | None |
| Accept pipeline input: | False |
| Accept wildcard characters: | False |
Specifies the Stop mode of the service. This parameter only works when -Status Stopped is used. If enabled, Set-Service stops the dependent services before the target service is stopped. By default, exceptions are raised when other running services depend on the target service.
| Type: | SwitchParameter |
| Position: | Named |
| Default value: | False |
| Accept pipeline input: | False |
| Accept wildcard characters: | False |
Specifies a ServiceController object that represents the service to change. Enter a variable that contains the object, or type a command or expression that gets the object, such as a Get-Service command. You can use the pipeline to send a service object to Set-Service .
| Type: | ServiceController |
| Position: | 0 |
| Default value: | None |
| Accept pipeline input: | True |
| Accept wildcard characters: | False |
Specifies the service name of the service to be changed. Wildcard characters aren’t permitted. You can use the pipeline to send a service name to Set-Service .
| Type: | String |
| Aliases: | ServiceName, SN |
| Position: | 0 |
| Default value: | None |
| Accept pipeline input: | True |
| Accept wildcard characters: | False |
Returns a ServiceController object that represents the services that were changed. By default, Set-Service doesn’t generate any output.
| Type: | SwitchParameter |
| Position: | Named |
| Default value: | False |
| Accept pipeline input: | False |
| Accept wildcard characters: | False |
Specifies the SecurityDescriptor for the service in Sddl format.
| Type: | String |
| Aliases: | sd |
| Position: | Named |
| Default value: | None |
| Accept pipeline input: | False |
| Accept wildcard characters: | False |
Specifies the start mode of the service.
The acceptable values for this parameter are as follows:
- Automatic — The service is started or was started by the operating system, at system start-up. If an automatically started service depends on a manually started service, the manually started service is also started automatically at system startup.
- AutomaticDelayedStart — Starts shortly after the system boots.
- Disabled — The service is disabled and cannot be started by a user or application.
- InvalidValue — Has no effect. The cmdlet does not return an error but the StartupType of the service is not changed.
- Manual — The service is started only manually, by a user, using the Service Control Manager, or by an application.
| Type: | Microsoft.PowerShell.Commands.ServiceStartupType |
| Aliases: | StartMode, SM, ST, StartType |
| Accepted values: | Automatic, AutomaticDelayedStart, Disabled, InvalidValue, Manual |
| Position: | Named |
| Default value: | None |
| Accept pipeline input: | False |
| Accept wildcard characters: | False |
Specifies the status for the service.
The acceptable values for this parameter are as follows:
- Paused. Suspends the service.
- Running. Starts the service.
- Stopped. Stops the service.
| Type: | String |
| Accepted values: | Paused, Running, Stopped |
| Position: | Named |
| Default value: | None |
| Accept pipeline input: | False |
| Accept wildcard characters: | False |
Shows what would happen if Set-Service runs. The cmdlet isn’t run.
| Type: | SwitchParameter |
| Aliases: | wi |
| Position: | Named |
| Default value: | False |
| Accept pipeline input: | False |
| Accept wildcard characters: | False |
Inputs
System.ServiceProcess.ServiceController, System.String
You can use the pipeline to send a service object or a string that contains a service name to Set-Service .
Outputs
By default, Set-Service doesn’t return any objects. Use the PassThru parameter to output a ServiceController object.
Notes
This cmdlet is only available on Windows platforms.
Set-Service requires elevated permissions. Use the Run as administrator option.
Set-Service can only control services when the current user has permissions to manage services. If a command doesn’t work correctly, you might not have the required permissions.
To find a service’s service name or display name, use Get-Service . The service names are in the Name column and the display names are in the DisplayName column.
How to start and stop services manually on Windows 10
 Source: Windows Central
On Windows 10, services are programs that run in the background without a user interface and enable system features (such as printing, networking, remote access, File Explorer, Windows Search, updates, etc.) and apps to operate as intended.
Although the system does a pretty good job managing background services, sometimes, you may need to control them manually when a feature or app isn’t working correctly, or an app requires you to manage its services manually.
Whatever the case it might be, Windows 10 includes at least four methods to stop, start, disable, or enable services using the Services console, Task Manager, Command Prompt, and PowerShell.
In this Windows 10 guide, we’ll walk you through the steps to manage system and apps services on your computer.
How to manage services using Services console
Using the Services consoles is perhaps the simplest method to stop, start, disable, or enable one or multiple services on Windows 10.
Stop service
To stop a running service using Services, use these steps:
- Open Start.
- Search for Services and click the top result to open the console.
- Double-click the service that you intend to stop.
Click the Stop button.
 Source: Windows Central
Quick tip: You can also manage the state by right-clicking the service and selecting the option. Or you can select the service and then use the controls at the top to start, stop, pause, or restart.
Once you complete the steps, the service will stop running on the device.
If you’re unable to stop a system service, consider that some services are required for the operation of Windows 10, and they can’t be stopped.
Start service
To start a service on Windows 10, use these steps:
- Open Start.
- Search for Services and click the top result to open the console.
- Double-click the service that you intend to stop.
Click the Start button.
Source: Windows Central
After you complete the steps, the service you specified will start for the current session.
Disable service
To set a service a disabled, use these steps:
- Open Start.
- Search for Services and click the top result to open the console.
- Double-click the service that you intend to stop.
- Click the Stop button.
Use the «Start type» drop-down menu and select the Disabled option.
Source: Windows Central
Once you complete the steps, the service will no longer start automatically after restarting your device.
Enable service
To enable a specific service, use these steps:
- Open Start.
- Search for Services and click the top result to open the console.
- Double-click the service that you intend to stop.
- Click the Start button.
Use the «Start type» drop-down menu and select the Automatic option.
These are the Startup types on Windows 10:
- Automatic – service starts at boot.
- Automatic (Delayed Start) – service start after boot.
- Manual – starts service manually as needed.
- Disabled – stops service from running.
Source: Windows Central
After you complete the steps, the Windows 10 or app service will enable, but if it was in a stopped state, you’d need to start it manually or restart the device for the service to run.
How to manage services using Task Manager
Task Manager also includes a section to quickly manage services for Windows 10 and apps.
To stop, start, or restart a service using Task Manager, use these steps:
- Open Start.
Search for Task Manager and click the top result to open the app.
Quick tip: Windows 10 includes many other ways to open the experience, including right-clicking the taskbar and selecting the Task Manager option and using the Ctrl + Shift + ESC keyboard shortcut.
Right-click the service name, and select one of the options:
- Stop.
- Start.
- Restart.
Source: Windows Central
Quick note: Task Manager only displays the service name, not the display name. For example, if you’re using this method, you’ll the «Print Spooler» defined as «Spooler.»
Once you complete the steps, the service will respond to the option you selected.
How to manage services using PowerShell
You can also use PowerShell commands to manage background services for Windows 10 and apps.
Stop service
To stop a specific service with PowerShell, use these steps:
- Open Start.
- Search for PowerShell, right-click the top result, and select the Run as administrator option.
(Optional) Type the following command to view a list of all the services and press Enter:
 Source: Windows Central
Type the following command to stop a service and press Enter:
Stop-Service -Name «SERVICE-NAME»
For example, this command stops the printer spooler service on Windows 10:
Stop-Service -Name «spooler»
Source: Windows Central
In the command, replace «SERVICE-NAME» for the name of the service that you intend to stop. If you want to use the display name, replace -Name for -DisplayName and then specify the display name of the service.
Alternatively, you can also use this variant of the command to stop the service:
Set-Service -Name «SERVICE-NAME» -Status stopped
Source: Windows Central
In the command, replace «SERVICE-NAME» for the name of the service that you intend to stop. If you want to use the display name, replace -Name for -DisplayName and then specify the display name of the service. You only need the quotation marks if there’s a space within the name.
Quick tip: If you’re getting a dependency error, you can append the -force option in either of the commands to stop the service. For example, Stop-Service -Name «SERVICE-NAME» -Force .
After you complete the steps, the PowerShell command will stop the service on your device.
Start service
To start a Windows 10 or app service with PowerShell, use these steps:
- Open Start.
- Search for PowerShell, right-click the top result, and select the Run as administrator option.
Type the following command to start a service and press Enter:
Start-Service -Name «SERVICE-NAME»
For example, this command starts the printer spooler service on Windows 10:
Start-Service -Name «spooler»
Source: Windows Central
In the command, replace «SERVICE-NAME» for the name of the service. Using the display name is supported, replacing -Name for -DisplayName and then specify the display name of the service.
Alternatively, you can also use this variant of the command to start a service:
Set-Service -Name «SERVICE-NAME» -Status running
Source: Windows Central
In the command, replace «SERVICE-NAME» for the name of the service. If you want to use the display name, replace -Name for -DisplayName and then specify the display name of the service.
Once you complete the steps, the service will start on your computer.
Disable service
To disable a service using a PowerShell command, use these steps:
- Open Start.
- Search for PowerShell, right-click the top result, and select the Run as administrator option.
Type the following command to disable a service and press Enter:
Set-Service -Name «SERVICE-NAME» -Status stopped -StartupType disabled
In the command, update «SERVICE-NAME» for the name of the service. If you want to use the display name of the service, then replace -Name for -DisplayName and specify the service name. If you want to disable the service without stopping it immediately, you can remove the -Status stopped portion of the command.
For example, this command disables the printer spooler service on Windows 10:
Set-Service -Name «spooler» -Status stopped -StartupType disabled
Source: Windows Central
After you complete the steps, the PowerShell command will disable the specified service.
Enable service
To enable a specific background service with PowerShell, use these steps:
- Open Start.
- Search for PowerShell, right-click the top result, and select the Run as administrator option.
Type the following command to enable a service and press Enter:
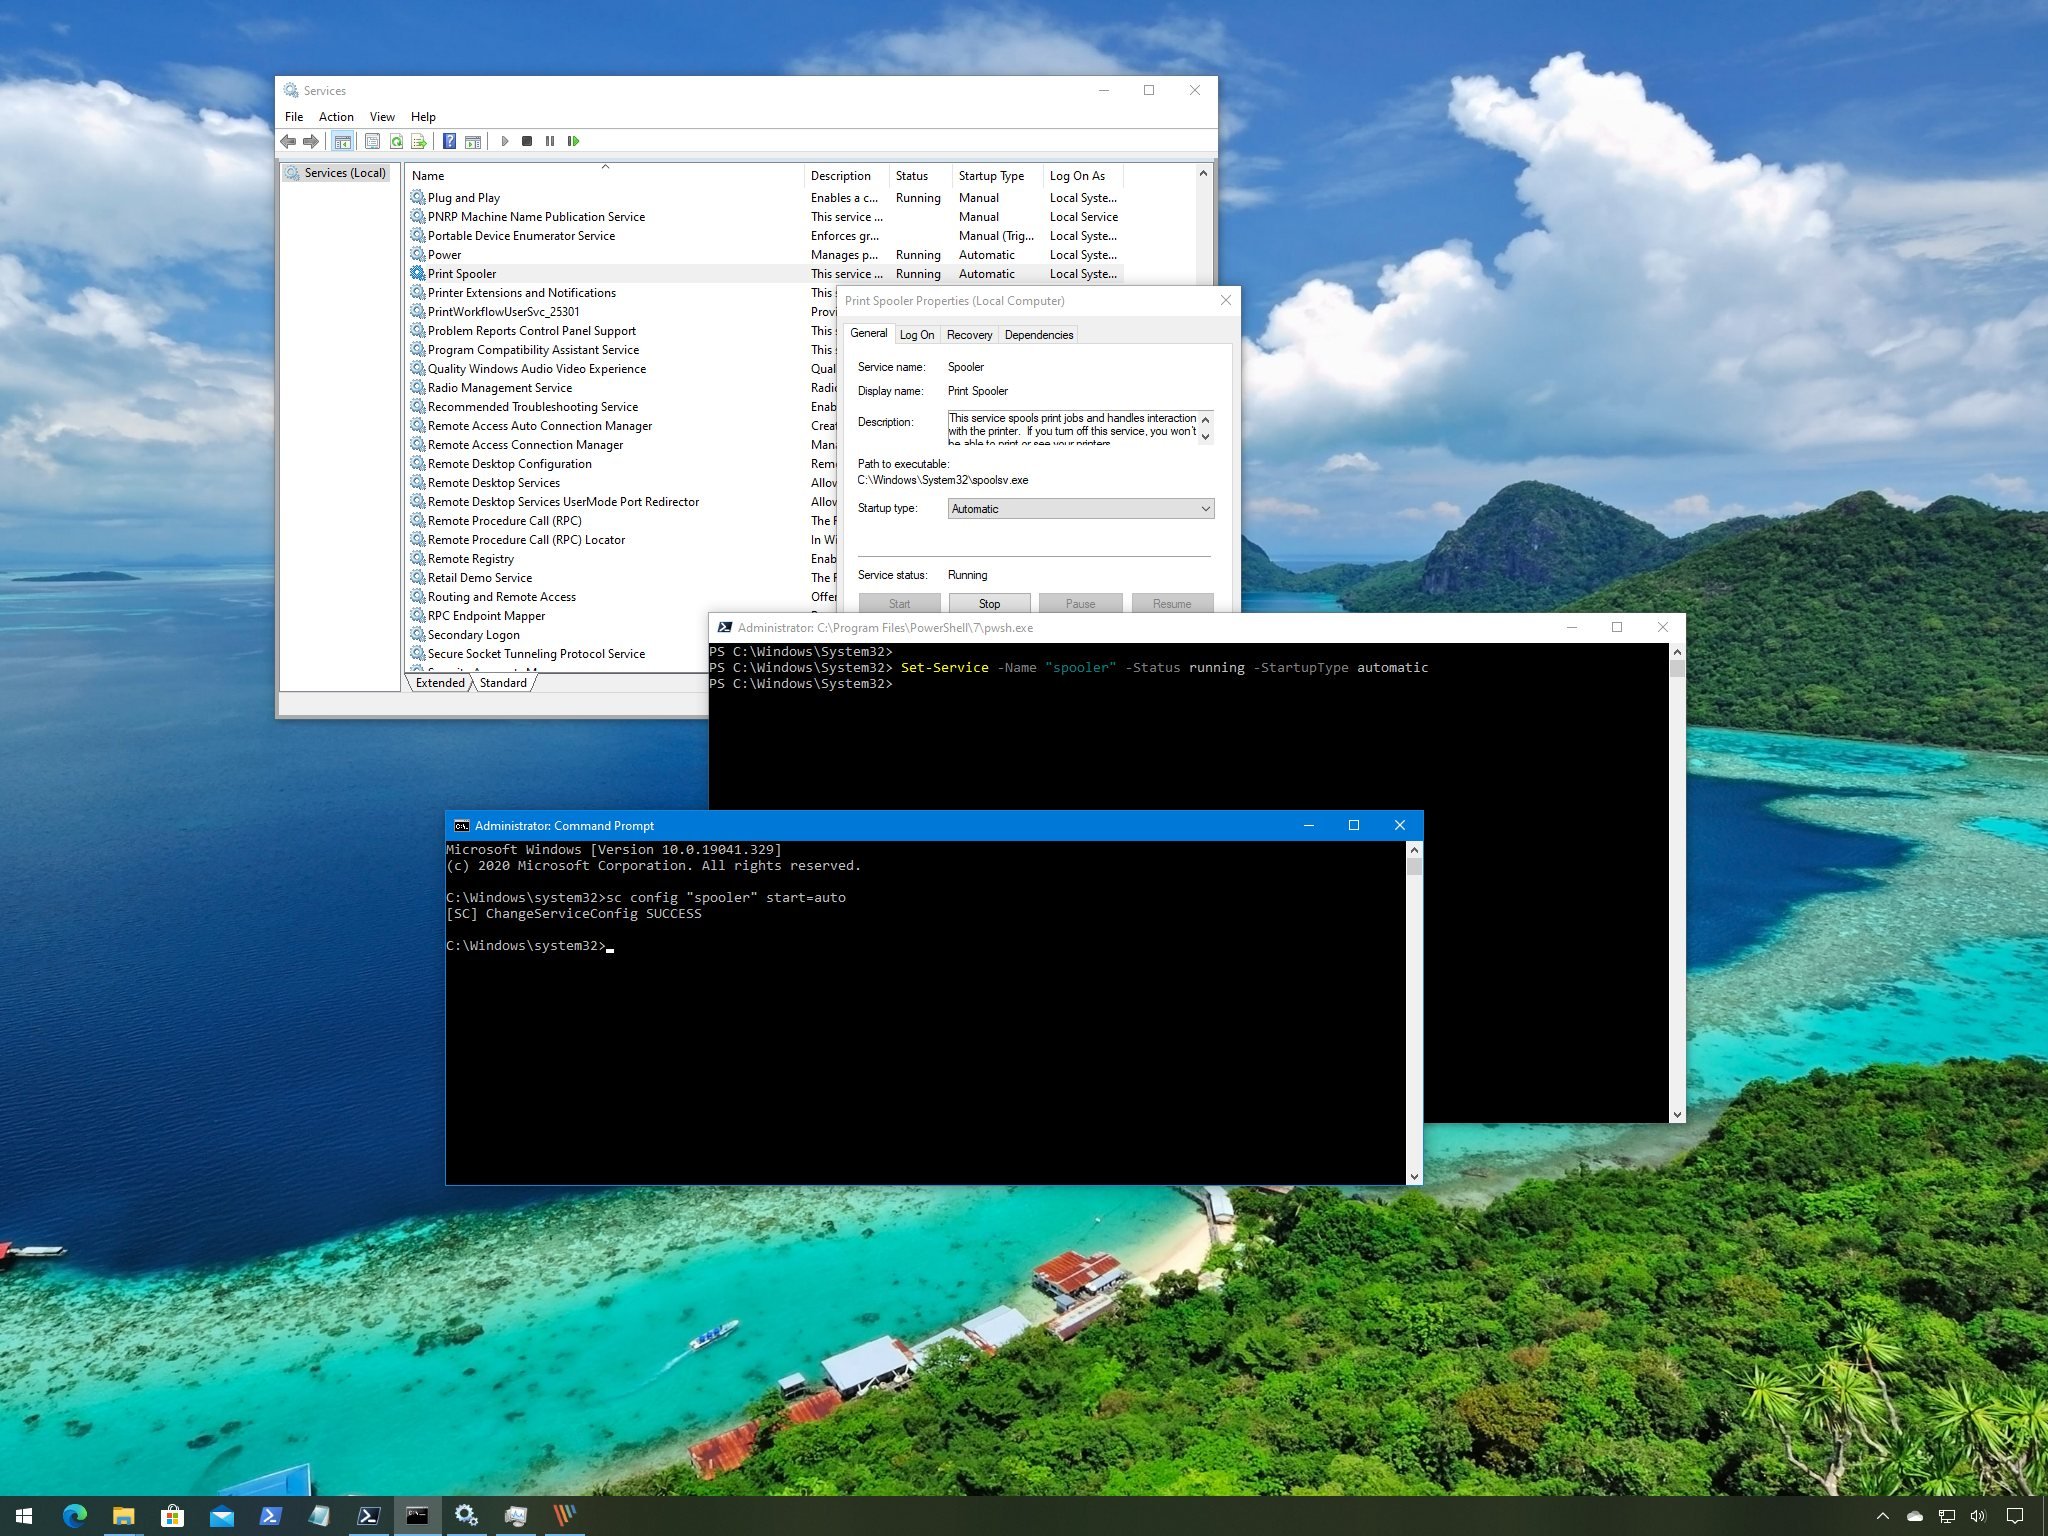
Set-Service -Name «SERVICE-NAME» -Status running -StartupType automatic
For example, this command enables the printer spooler service using PowerShell:
Set-Service -Name «spooler» -Status running -StartupType automatic
Source: Windows Central
Quick note: You may able to use the display -DisplayName option, but the command may also prompt you to supply the name of the service, adding an extra step to the process. If you want to enable the service without starting it immediately, you can remove the -Status running portion of the command.
Once you complete the steps, PowerShell will enable the service specified with the command.
How to manage services using Command Prompt
If you’re comfortable using the command line, Command Prompt offers the «net» command (older) to stop or start, or the «sc» command (newer) to stop, start, disable, or enable services on Windows 10.
Stop service
To stop a Windows 10 or app service with Command Prompt, use these steps:
- Open Start.
- Search for Command Prompt, right-click the top result, and select the Run as administrator option.
(Optional) Type the following command to view a list of all the services and press Enter:
sc queryex state=all type=service
Source: Windows Central
Type the following command to stop a service and press Enter:
net stop «SERVICE-NAME»
In the command, replace «SERVICE-NAME» for the name or display name of the service. You only need the quotation marks if there’s a space within the name.
For example, this command stops the printer spooler using the service name:
net stop «spooler»
Source: Windows Central
Alternatively, you can also use the more advanced «sc» command:
sc stop «SERVICE-NAME»
For example, this command stops the printer spooler using the service name:
sc stop «spooler»
Source: Windows Central
After you complete the steps, the command will stop the specified service on Windows 10.
Start service
To start a service with the command line, use these steps:
- Open Start.
- Search for Command Prompt, right-click the top result, and select the Run as administrator option.
Type the following command to start a service and press Enter:
net start «SERVICE-NAME»
In the command, replace «SERVICE-NAME» for the name or display name of the service. You only need the quotation marks if there’s a space within the name.
For example, this command starts the printer spooler using the service name:
net start «spooler»
Source: Windows Central
Alternatively, you can also use the «sc» command:
sc start «SERVICE-NAME»
For example, this command starts the printer spooler using the service name:
sc start «spooler»
Source: Windows Central
Once you complete the steps, the command will execute and start the service you specified.
Disable service
To disable a service with Command Prompt, use these steps:
- Open Start.
- Search for Command Prompt, right-click the top result, and select the Run as administrator option.
Type the following command to disable a service and press Enter:
sc config «SERVICE-NAME» start=disabled
In the command, replace «SERVICE-NAME» for the name of the service that you want to disable.
For example, this command disables printer spooler using the service name:
sc config «spooler» start=disabled
Source: Windows Central
(Optional) Type the following command to stop the service and press Enter:
sc stop «SERVICE-NAME»
Quick note: When you disable a service, it doesn’t stop the current state of the service. You can either restart your computer or stop the service using the above command.
After you complete the steps, the sc command will run disabling the Windows 10 or app service you specified.
Enable service
To enable a service with a command, use these steps:
- Open Start.
- Search for Command Prompt, right-click the top result, and select the Run as administrator option.
Type the following command to enable a service and press Enter:
sc config «SERVICE-NAME» start=auto
In the command, replace «SERVICE-NAME» for the name of the service that you want to enable.
For example, this command enables the printer spooler automatically using the service name:
sc config «spooler» start=auto
Source: Windows Central
These are alternative commands to enable a particular service:
- Manual: sc config «SERVICE-NAME» start=demand
- Automatic Delayed: sc config «SERVICE-NAME» start=delayed-auto
(Optional) Type the following command to start the service and press Enter:
sc start «SERVICE-NAME»
Once you complete the steps, the service will enable and start automatically on reboot according to the command you used.
You can only use the «net» command to start or stop services. The «sc» command allows you to perform more tasks, including start, stop, enable, or disable services, among other options. If you’re choosing to manage services with command lines, then, in either case, it’s best to use the service name instead of the display name.
Also, when using any of the methods outlined above, consider that making modifications to the default settings can alter the operation of one or more features that depend on that service negatively affecting the experience. Furthermore, if you restart a service, you might be required to start its dependencies manually as well to make the app or feature operational again.
We’re focusing this guide on Windows 10, but the ability to manage services has been available for several years, which means that you can refer to this guide if you’re still running Windows 8.1, Windows 7, and older versions.
More Windows 10 resources
For more helpful articles, coverage, and answers to common questions about Windows 10, visit the following resources:
![]()
The Dell XPS 15 is our choice for best 15-inch laptop
For a lot of people, a 15-inch laptop is a perfect size that offers enough screen for multitasking, and in a lot of cases, some extra performance from powerful hardware. We’ve rounded up the best of the best at this size.
![]()
Halo: MCC’s live service elements make it better, not worse
Halo: The Master Chief Collection is more popular than ever, but some fans don’t agree with the live service approach 343 Industries has taken with it. Here’s why those elements are, at the end of the day, great for the game and for Halo overall.
![]()
Microsoft’s Surface Duo is not ‘failing up’
Microsoft announced this week that it was expanding Surface Duo availability to nine new commercial markets. While Surface Duo is undoubtedly a work in progress, this is not a sign of a disaster. It’s also doesn’t mean that Surface Duo is selling a ton either. Instead, the reason for the expansion is a lot more straightforward.
![]()
These are the best PC sticks when you’re on the move
Instant computer — just add a screen. That’s the general idea behind the ultra-portable PC, but it can be hard to know which one you want. Relax, we have you covered!


