- Set NTP Server Windows 2016 or Windows 2019
- What is NTP?
- How Time is synchronized in a Windows Server domain
- Configuring Windows Time Service with W32tm.exe
- Final Thoughts
- Как синхронизировать время на RLP-сервере с ПК на ОС Windows 10
- Настройка сервера NTP на ОС Windows 10
- Автоматическая настройка
- Настройка вручную
- Настройка синхронизации времени и часового пояса на сервере RLP
Set NTP Server Windows 2016 or Windows 2019
There is no question about it, having accurate time in your environment set in critical infrastructure systems is a must. Many business-critical applications and infrastructure systems rely on accurate time synchronized between them to ensure the system functions as expected. Time skew can cause all kinds of weirdness when it is misconfigured or out of sync between different servers/systems. This is especially true in a Windows Server Active Directory domain. Having accurate time between a client computer and domain controllers is essential. Let’s take a look at how to set ntp server Windows 2016 or Windows 2019 to see how this can be easily carried out.
What is NTP?
Wen it comes to synchronizing time in most enviornments, Network Time Protocol (NTP) is the protocol that is used to ensure accurate time across your environent. In most environments, NTP servers, special time servers, are configured that provide an external time source for which your internal servers can synchronize with.
There are several widely known NTP IP addresses on the Internet that provide reliable time sources for your network. The NTP.org servers are one such set of time servers that provide an NTP source for configuration.
There are a few NTP values to be aware of:
- NTP Server – This is a specialized server that is able to detremine the precise time from an external timing reference such as GPS and passes these precise time values on to your network
- Offset – This is the difference in time between the external time server and the time on a local client computer. The larger the offset, the more inaccurate the timing source is.
- Delay – This is the value of the round-trip time (latency) of the timing message between the client to the server and back again.
How Time is synchronized in a Windows Server domain
In a Windows domain, Microsoft has default configuration in place that takes care of a good portion of the NTP configuration. Starting with Windows 2000 Server, Windows clients are configured as NTP Clients. When configured as an NTP client, Windows computers only attempt to contact the domain controller for NTP synchronization or a manually specified NTP server.
Microsoft has made the domain controller the default in a Windows domain since it makes sense that clients already have a secure channel established with DCs for other types of communications. Additionally, accurate and synchronized time between domain controllers and clients is especially important for all kinds of things such as logins, group policy synchronization and other tasks/operations.
The order of operations or hierarchy in a Windows domain is as follows:
- Domain members attempt to synchronize time with any domain controller located in the domain
- Domain controllers synchronize with a more authoritative domain controller
- The first domain controller that is installed in the environment is automatically configured to be a reliable time source.
- Other than the first domain controller installed, the PDC emulator (if role has been moved from the first DC installed) generally holds the position of best time source.
An important point to consider and that comes into play when thinking about why we set ntp server in Windows 2016 or Windows 2019 is the authoritative domain controller must have a reliable source to synchronize with as well. This is generally an external time server outside of the domain hierarchy.
Now that we know how the domain hierarchy for time is configured, how is the external time source configured on your domain controller that is configured as the reliable source of time?
Configuring Windows Time Service with W32tm.exe
When it comes to Windows Server environments like Windows Server 2016 or Windows Server 2019, there is a special Windows service that controls the time synchronization of your Windows hosts. This is the Windows Time Service.
Microsoft provides a command line tool to interact with the Windows Time Service called W32tm.exe. This has been included in Windows operating systems since Windows XP/Windows 2003 and later. It can be used to configure Windows Time service parameters as well as diagnose time service problems. This is generally the tool of choice when it comes to configuring, monitoring, and administering Windows Time.
Using the W32tm.exe utility is fairly straightforward. It can be used from a normal command prompt as well as from a PowerShell prompt. There are several command parameters included that allow not only configuring the NTP servers you want to query, but also parameters that allow viewing the low level registry configuration as well as the synchronization status.
You can read the official Microsoft KB on the Windows Time service and the W32tm.exe utility here:
However, there are a few commands I would like to show you for the purposes of configuring your Domain controller that is to be the reliable time source (PDC Emulator) for your domain.
The first command is the command line entry to specify your NTP servers, which in this case I am using the NTP.org servers to set as the source of my NTP synchronization.

If you want to view the status of the NTP synchronization on your server after you have configured the values and restarted the w32time service, you can use the following command:

You can also check the values configured in your registry key hkey local machine system currentcontrolset services w32time config using the commands below. You can drill into the configuration parameters using the /dumpreg /subkey command.

Final Thoughts
As shown, you can easily set NTP Server Windows 2016 or Windows 2019 using the w32tm command utility that allows interacting with the time service in Windows Server.
In a Windows domain, you want to configure your authoritative time source domain controller, which by default is the PDC Emulator, to pull time information from an authoritative source like NTP.org or some other reliable NTP time server.
After configuring the time source, the other domain controllers will synchronize with this server and then the Windows clients joined to the domain will synchronize with the domain controllers that have the corrected time from the authoritative server.
Как синхронизировать время на RLP-сервере с ПК на ОС Windows 10
Настройка сервера NTP на ОС Windows 10
Для настройки сервера понадобятся права администратора у пользователя Windows.
Автоматическая настройка
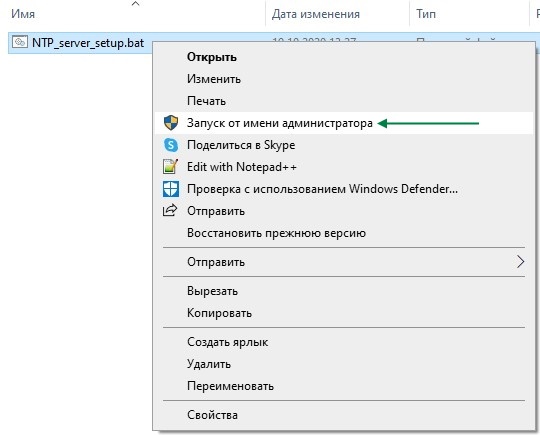
Нажмите на файл правой кнопкой мыши и в меню выберите Запуск от имени администратора. Если Windows запросит разрешения на внесение изменений приложением, нажмите кнопку Да.
Настройка вручную
- Зайдите в редактор реестра одним из способов:
- Нажмите клавиши Win+R, в появившемся окне Выполнить наберите regedit и нажмите Enter.
- Нажмите клавиши Win+R, в появившемся окне Выполнить наберите regedit и нажмите Enter.
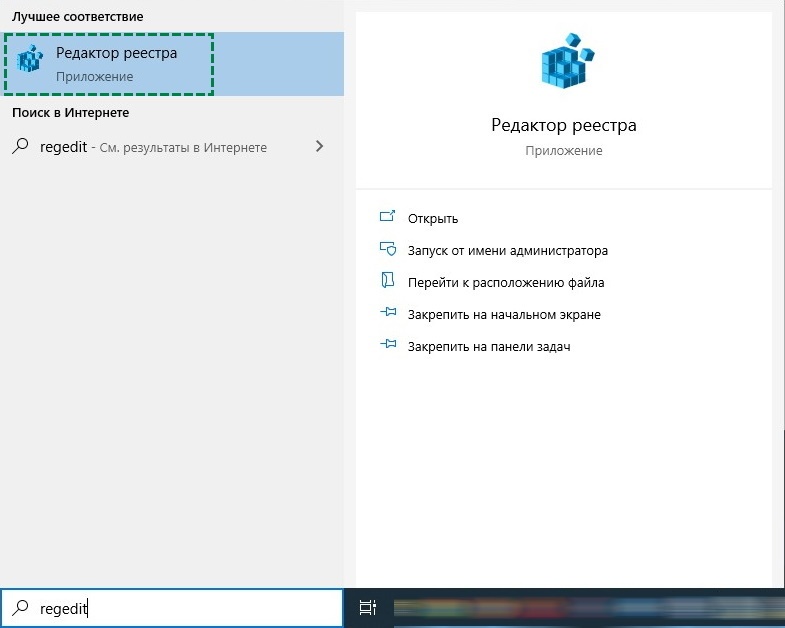
В строке поиска Windows наберите regedit и выберите найденное приложение Редактор реестра.
Если Windows запросит разрешения на внесение изменений приложением Редактор реестра, нажмите кнопку Да.
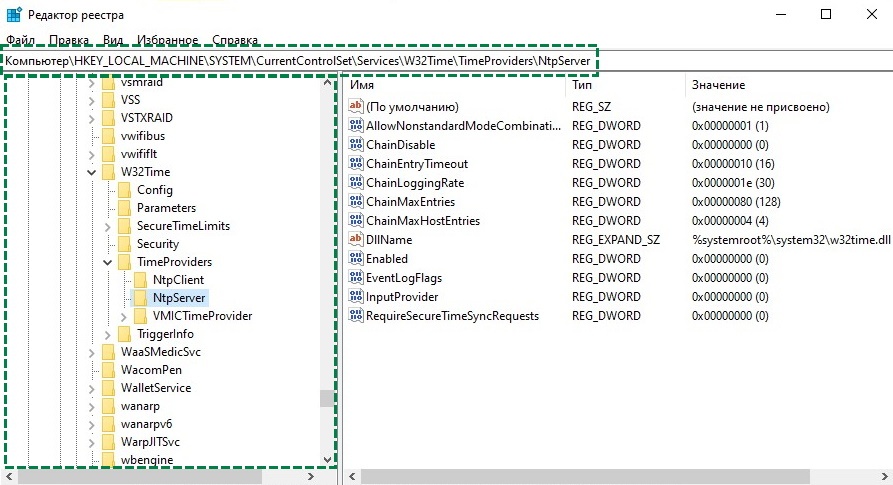
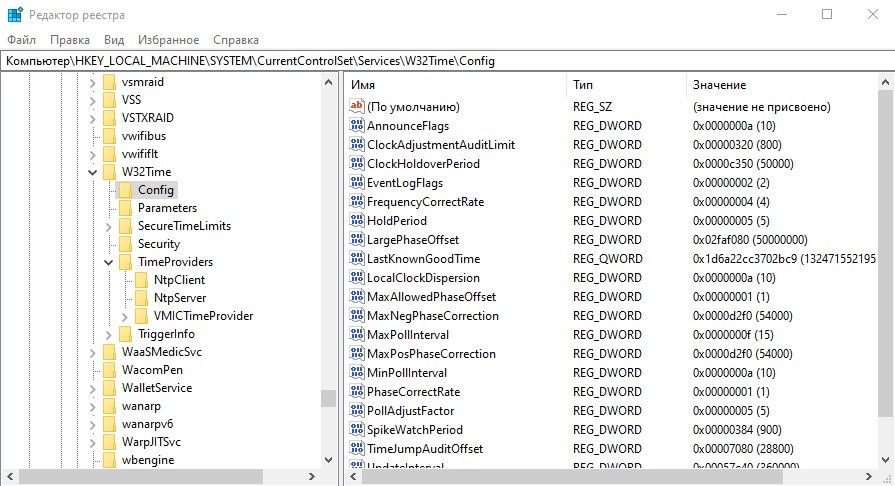
В Редакторе реестра перейдите по пути \HKEY_LOCAL_MACHINE\SYSTEM\CurrentControlSet\Services\W32Time\TimeProviders\NtpServer
Для этого можно воспользоваться деревом в левой части окна или скопировать и добавить строку пути в поле в верхней части окна.
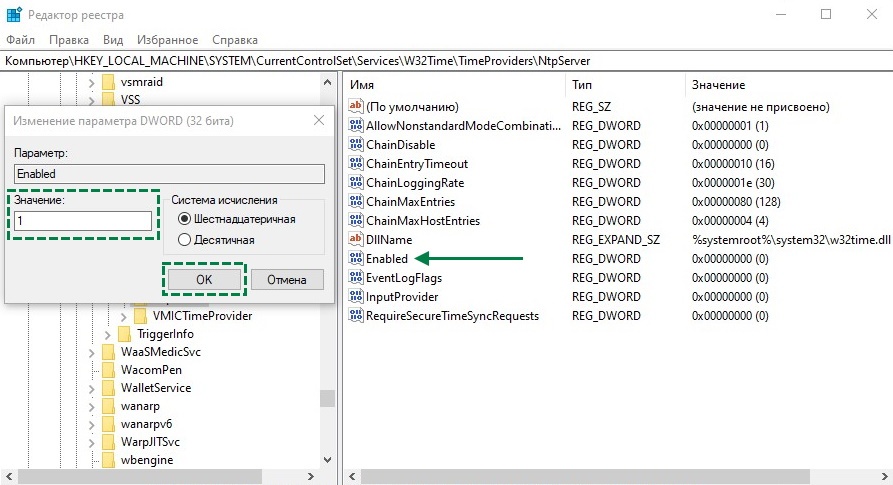
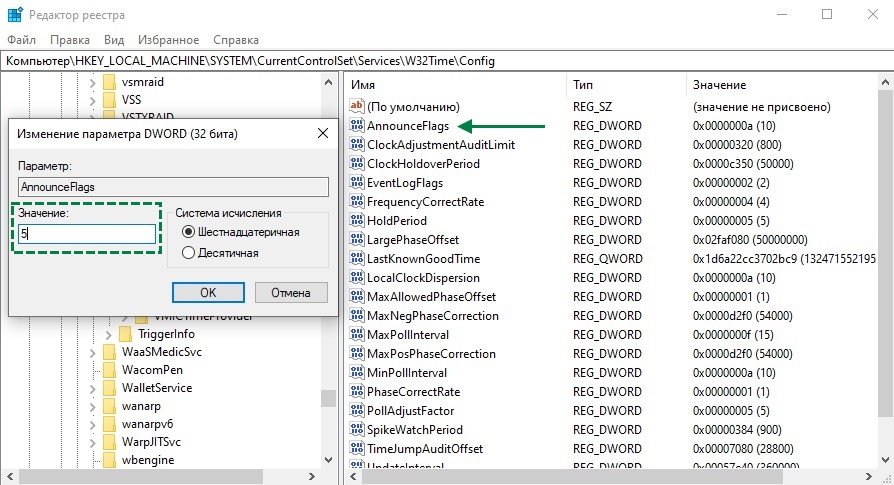
Откройте окно изменения параметра Enabled двойным щелчком мыши по нему в правой части окна Редактора реестра. Измените значение параметра на 1 и нажмите кнопку ОК.
Закройте Редактор реестра.
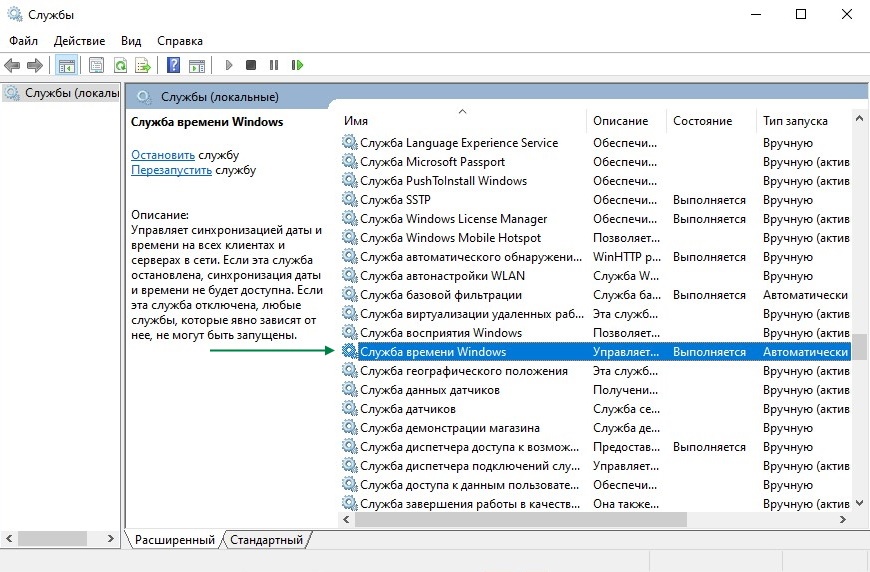
Чтобы изменения вступили в силу, необходимо перезапустить службу времени Windows. Зайдите в управление службами одним из способов:
- Нажмите клавиши Win+R, в появившемся окне Выполнить наберите services.msc и нажмите Enter.
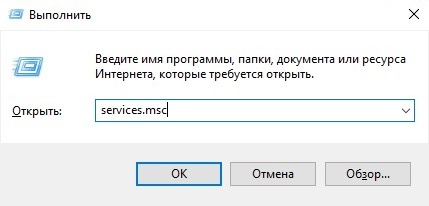
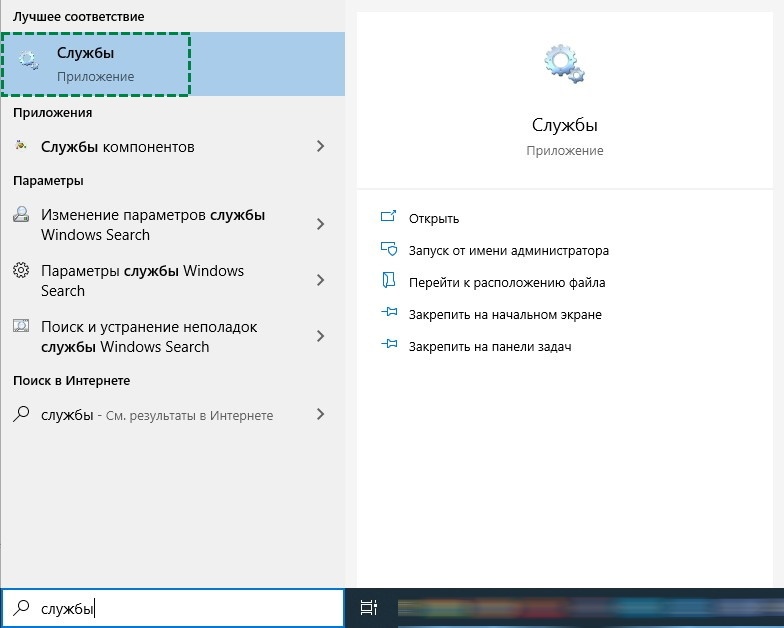
В строке поиска Windows наберите службы и выберите найденное приложение Службы.
В списке служб найдите Службу времени Windows.
Дважды щёлкните на службу, чтобы зайти в окно её настройки.
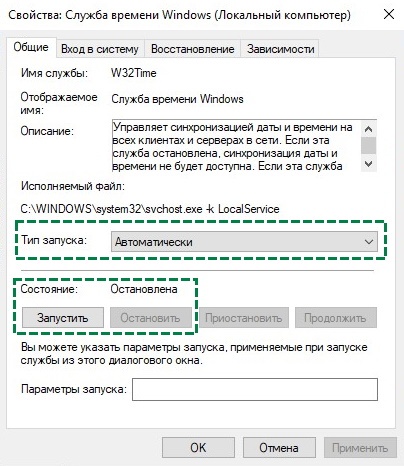
Если служба в состоянии Остановлена, то нажмите кнопку Запустить и дождитесь запуска службы.
Если служба в состоянии Выполняется, сначала нажмите кнопку Остановить, дождитесь остановки службы, нажмите кнопку Запустить и дождитесь запуска службы.
Установите Тип запуска в Автоматически и нажмите кнопку ОК, чтобы сохранить настройку.
Закройте окно Служб Windows.
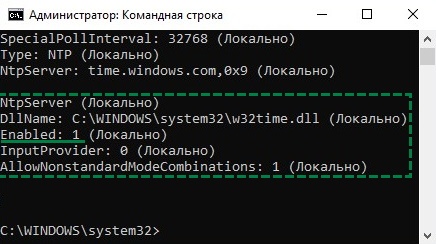
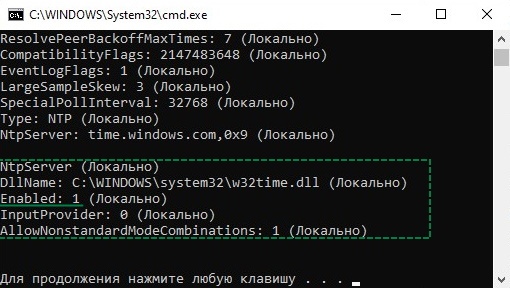
Для проверки, что сервер NTP запустился, можно использовать команду w32time командной строки Windows.
Запустите командную строку Windows одним из способов:
- Нажмите клавиши Win+R, в появившемся окне Выполнить наберите cmd и нажмите Enter.

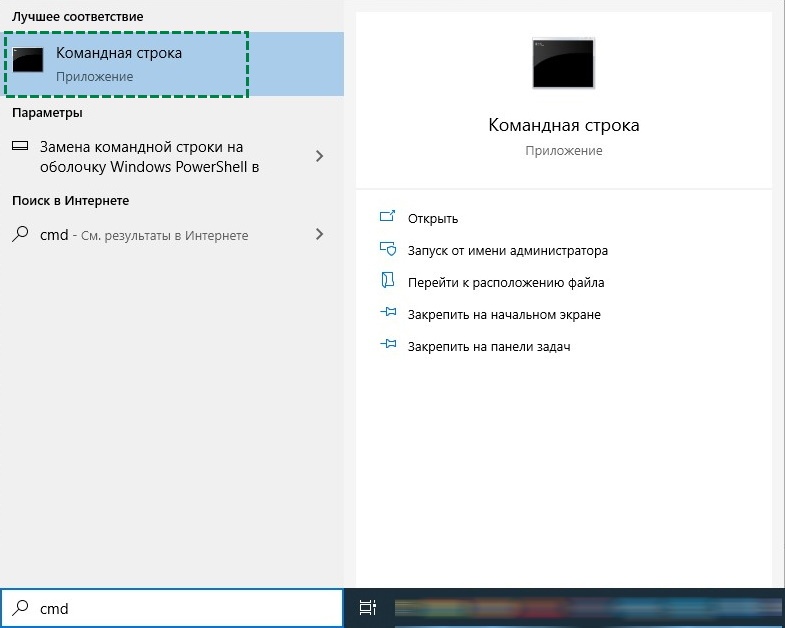
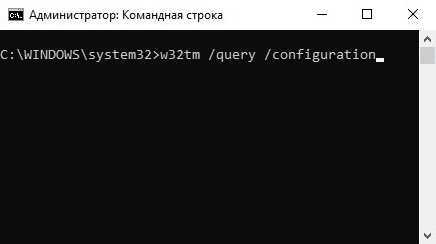
Команда выведет текущую конфигурацию службы времени. Если сервер NTP запущен, то в разделе NtpServer опция Enabled будет выставлена в 1. Закройте окно Командной строки.
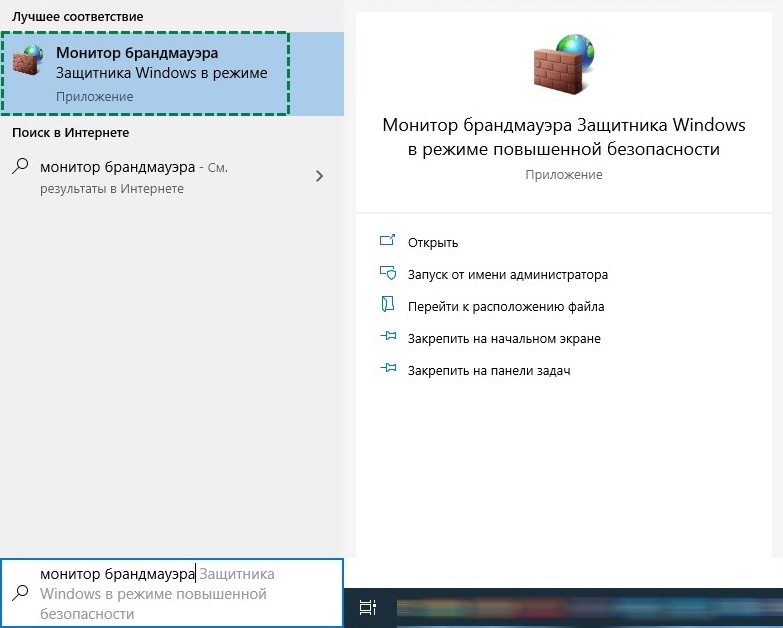
Для работы сервера NTP нужно разрешить в Брандмауэре Windows UDP траффик по порту 123. Откройте Монитор брандмауэра Защитника Windows в режиме повышенной безопасности одним из способов:
- Нажмите клавиши Win+R, в появившемся окне Выполнить наберите wf.msc и нажмите Enter.
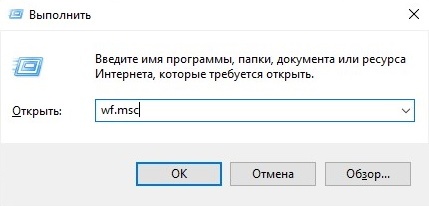
В строке поиска Windows наберите и выберите найденное приложение.
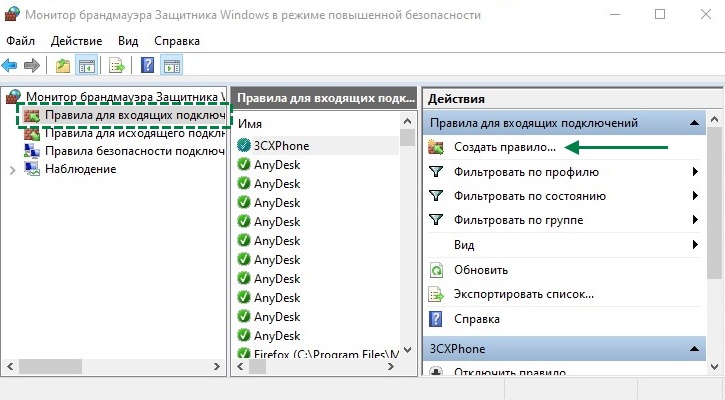
В окне Монитора брандмауэра. переключитесь на Правила для входящих подключений и нажмите на Создать правило.
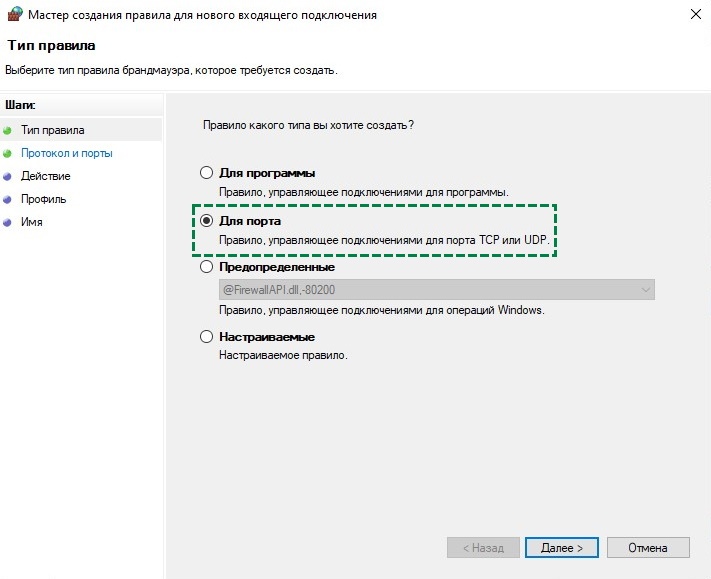
Выберите тип правила Для порта и нажмите кнопку Далее.
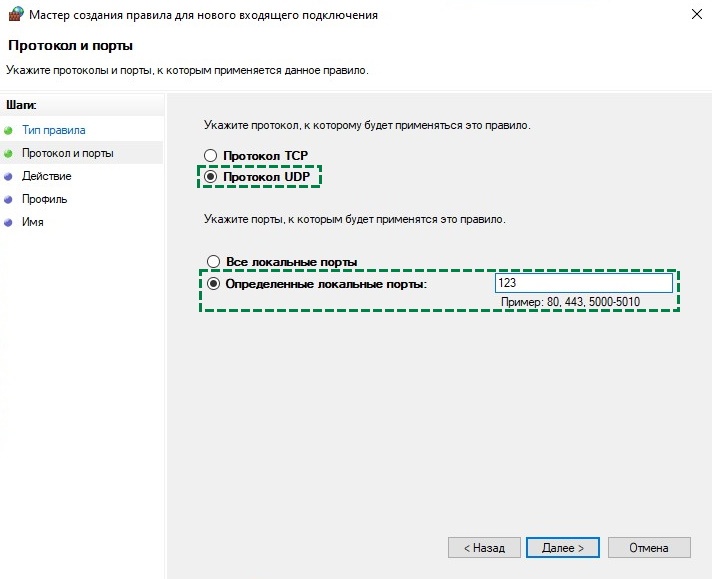
Выберите ПротоколUDP, впишите номер порта 123 и нажмите кнопку Далее.
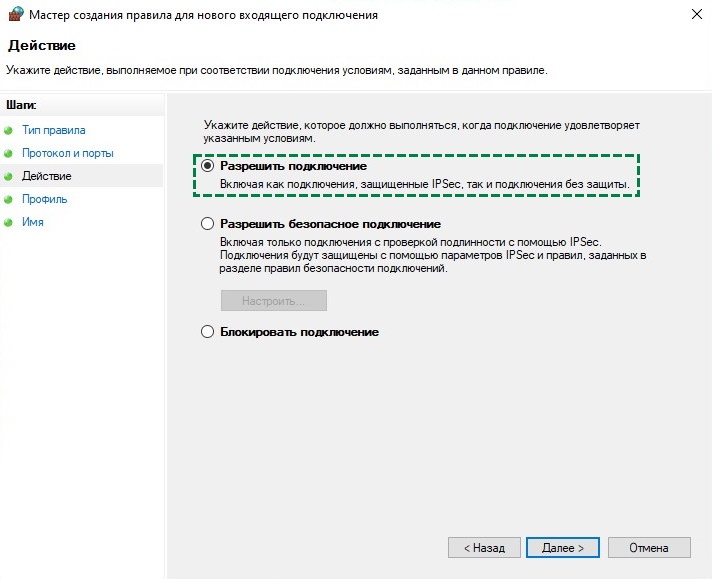
Выберите Разрешить подключение и нажмите кнопку Далее.
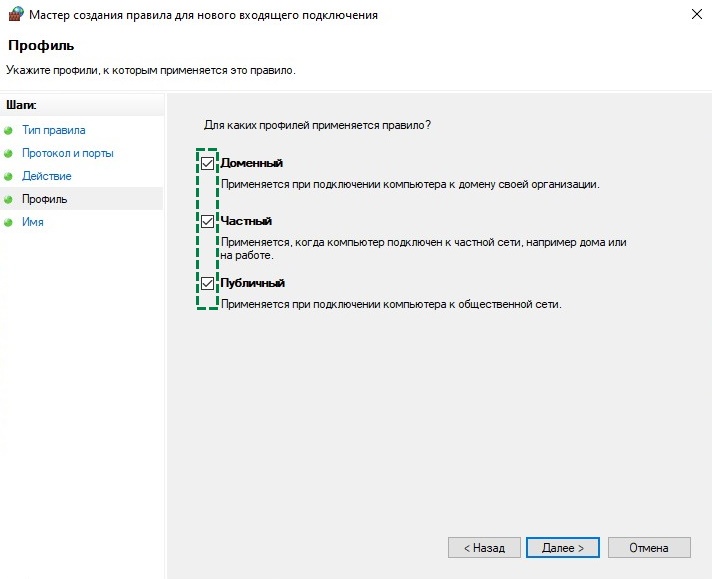
Установите галочки для всех профилей и нажмите кнопку Далее.
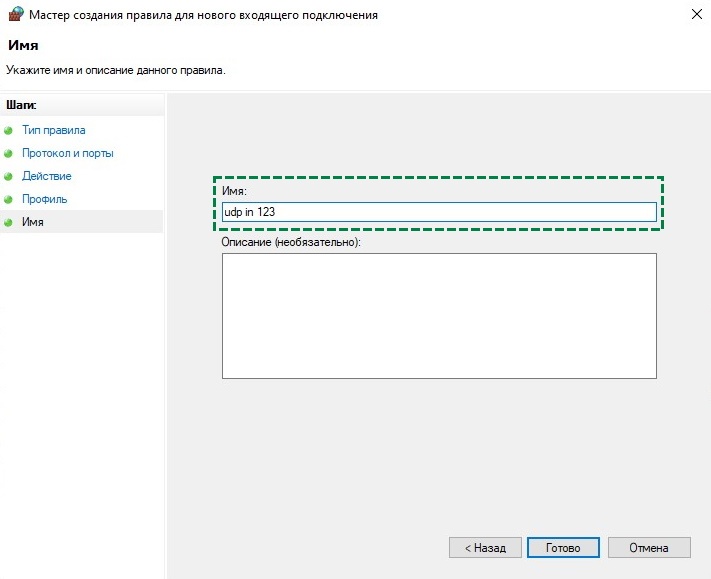
Введите имя правила, например, udp in 123 и нажмите кнопку Готово.
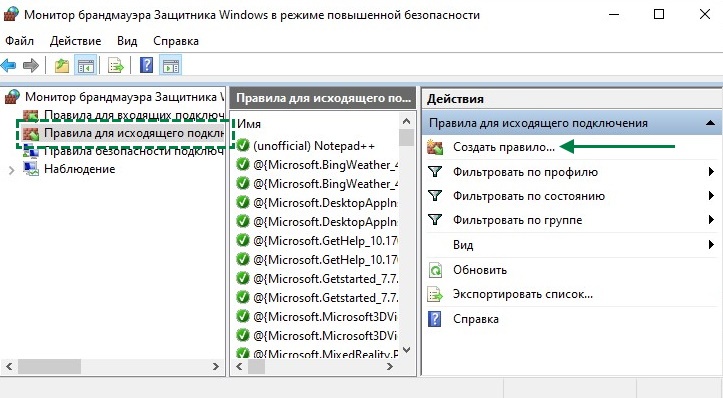
Переключитесь на Правила для исходящего подключения и нажмите Создать правило. Создайте правило с такими же настройками (тип правила, протокол и порты и т.д.), как и в предыдущих пунктах.
Настройка синхронизации времени и часового пояса на сервере RLP
Для копирования файлов по сети из ОС Windows можно использовать WinSCP .
Команды можно вводить как локально на сервере, так и удалённо по SSH. Для удалённого подключения можно использовать PuTTY.
Данные для подключения по умолчанию:
Логин: root
Пароль: root (при наборе пароля он может не отображаться, даже символами «звёздочка»)
Скопируйте получившуюся папку ntp_local_install в папку home на сервере RLP.
Зайдите на сервер локально или удалённо.
systemctl stop t1daemon
yum install -y /home/ntp_local_install/*.rpm
Зайдите в редактирование файла настроек планировщика задач командой:
crontab -e
Нажмите клавишу Insert для перехода в режим редактирования.
Добавьте строку */5 * * * * sudo ntpdate IP-адрес компьютера на Windows с настроенным NTP-сервером
Пример: */5 * * * * sudo ntpdate 192.168.1.1
Нажмите клавишу Esc, чтобы выйти из режима редактирования. Введите :wq! и нажмите клавишу Enter, чтобы сохранить изменения и выйти из редактора.
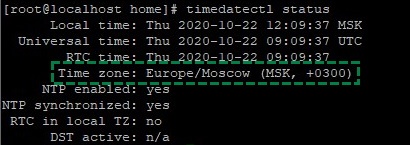
Проверьте текущий часовой пояс на сервере RLP командой
timedatectl status
Часовой пояс и город указаны в разделе Time zone:
Установите нужный часовой пояс командой: timedatectl set-timezone выбранный город
Пример: timedatectl set-timezone Asia/Vladivostok
Город нужно указать в том же виде, в котором он выводится командой timedatectl list-timezones , включая регистр букв. Если указать город неправильно, часовой пояс не изменится.
Проверьте текущее время на сервере RLP командой:
date
Время должно совпадать со временем на компьютере с настроенным NTP-сервером. Если время не совпадает, то подождите пять минут (настроенный период синхронизации) и введите команду ещё раз.
systemctl start t1daemon

