- Restart your Mac in macOS or Windows
- How to start up in macOS from Windows
- How to start up in Windows from macOS
- Learn more
- Установка Windows 10 на компьютере Mac с помощью приложения «Ассистент Boot Camp»
- Необходимые условия для установки Windows 10 на компьютере Mac
- Инструкции по установке Windows 10 на компьютере Mac
- 1. Проверьте настройки функции «Безопасная загрузка»
- 2. Использование приложения «Ассистент Boot Camp» для создания раздела Windows
- 3. Форматирование раздела Windows (BOOTCAMP)
- 4. Установка Windows
- 5. Использование установщика Boot Camp в Windows
- Процедура переключения между Windows и macOS
- Дополнительная информация
- Start up your Mac in Windows or macOS with Boot Camp
- Set the default operating system
- Restart in macOS
- How to Run Mac On Windows -XP,7,8,8.1,10
- Methods to Dual Boot Mac alongside Windows on PC or Laptop
- Requirements to Run Mac On Windows
- Tools Needed to Install Mac On Windows PC or laptop
- How To Run Mac On Windows [Guide]
Restart your Mac in macOS or Windows
After installing Microsoft Windows on your Mac, you can choose whether your Mac starts up in macOS or Windows.
How to start up in macOS from Windows
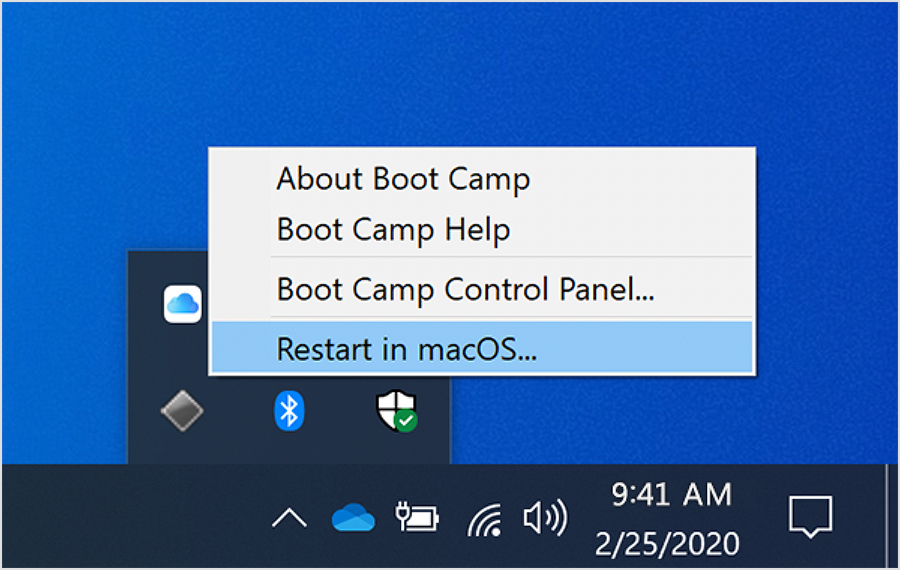
- From the notification area on the right side of the Windows taskbar, click to show hidden icons.
- Click the Boot Camp icon .
- From the menu shown, choose Restart in macOS.
If you haven’t installed the latest Boot Camp updates, you might get the message ”Could not locate the OS X boot volume.»
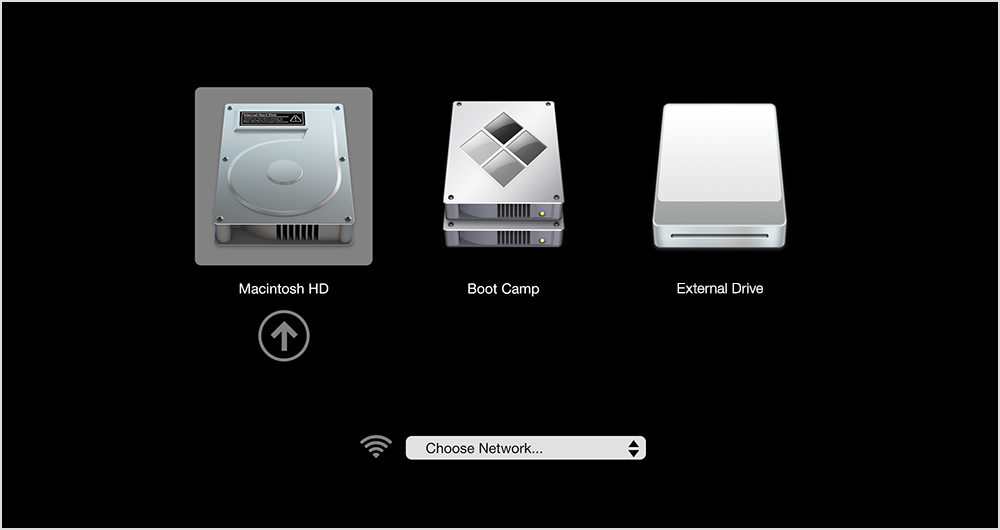
Or use Startup Manager as your Mac starts up:
- Restart your Mac from the Start menu in Windows.
- Press and hold the Option (or Alt) ⌥ key as your Mac begins to restart.
- Select your Mac startup volume (Macintosh HD) in the Startup Manager window, then press Return or click the up arrow:
How to start up in Windows from macOS
- Use Startup Manager to choose your Windows (Boot Camp) volume during startup.
- Or select your Boot Camp volume in Startup Disk preferences, then restart.
Learn more
- If you’re having difficulty using VoiceOver or another screen reader to complete these steps, please contact Apple Support.
- Learn how to install Windows 10 on your Mac.
Information about products not manufactured by Apple, or independent websites not controlled or tested by Apple, is provided without recommendation or endorsement. Apple assumes no responsibility with regard to the selection, performance, or use of third-party websites or products. Apple makes no representations regarding third-party website accuracy or reliability. Contact the vendor for additional information.
Установка Windows 10 на компьютере Mac с помощью приложения «Ассистент Boot Camp»
С помощью Boot Camp можно установить Microsoft Windows 10 на компьютере Mac и переключаться между macOS и Windows при его перезагрузке.
Необходимые условия для установки Windows 10 на компьютере Mac
- MacBook, выпущенный в 2015 г. или позже
- MacBook Air, выпущенный в 2012 г. или позже
- MacBook Pro, выпущенный в 2012 г. или позже
- Mac mini, выпущенный в 2012 г. или позже
- iMac, выпущенный в 2012 г. или позже 1
- iMac Pro (все модели)
- Mac Pro, выпущенный в 2013 году или позже
Последние обновления macOS, которые могут включать обновления приложения «Ассистент Boot Camp». Приложение «Ассистент Boot Camp» необходимо для установки Windows 10.
Не менее 64 ГБ свободного места на загрузочном диске Mac:
- Достаточно 64 ГБ дискового пространства, но для оптимальной работы требуется не менее 128 ГБ. Это минимальный объем, необходимый для автоматических обновлений Windows.
- Если объем оперативной памяти (ОЗУ) компьютера iMac Pro или Mac Pro составляет 128 ГБ или больше, на загрузочном диске должно быть как минимум столько же свободного места 2 .
Внешний флеш-накопитель USB объемом памяти не менее 16 ГБ, если только не используется компьютер Mac, для которого не требуется флеш-накопитель для установки Windows.
64-разрядная версия Windows 10 Home или Windows 10 Pro в виде образа диска (ISO) или на другом установочном носителе. При первой установке Windows на компьютере Mac используйте полную версию Windows, а не обновление.
- Если ваша копия Windows записана на флеш-накопитель USB или у вас есть ключ продукта Windows и нет установочного диска, загрузите образ диска Windows 10 на сайте Microsoft.
- Если ваша копия Windows записана на диск DVD, может потребоваться создать его образ.

Инструкции по установке Windows 10 на компьютере Mac
Для установки Windows используйте приложение «Ассистент Boot Camp», входящее в комплект поставки компьютера Mac.
1. Проверьте настройки функции «Безопасная загрузка»
Узнайте, как проверить настройки функции «Безопасная загрузка». В настройках функции «Безопасная загрузка» по умолчанию выбран параметр «Высший уровень безопасности». Если вы выбрали параметр «Функции безопасности отключены», перед установкой Windows снова включите параметр «Высший уровень безопасности». После установки Windows вы можете использовать любые настройки функции «Безопасная загрузка». Это не повлияет на запуск ОС Windows.
2. Использование приложения «Ассистент Boot Camp» для создания раздела Windows
Откройте приложение «Ассистент Boot Camp» во вложенной папке «Утилиты» папки «Программы». Следуйте инструкциям на экране.
- Если появится сообщение о необходимости использовать накопитель USB, вставьте флеш-накопитель USB в компьютер Mac. Приложение «Ассистент Boot Camp» использует его, чтобы создать загружаемый накопитель USB для установки Windows.
- Когда приложение «Ассистент Boot Camp» попросит указать размер раздела Windows, руководствуйтесь минимальными требованиями к объему памяти, указанными в предыдущем разделе. Укажите размер раздела в соответствии со своими потребностями. В дальнейшем изменить его будет нельзя.
3. Форматирование раздела Windows (BOOTCAMP)
По завершении работы приложения «Ассистент Boot Camp» компьютер Mac перезагрузится в среде установки Windows. Если установщик спросит, куда установить Windows, выберите раздел BOOTCAMP и нажмите «Форматировать». В большинстве случаев установщик автоматически выберет и отформатирует раздел BOOTCAMP.
4. Установка Windows
Отсоедините все внешние устройства, которые не требуются во время установки. Затем нажмите «Далее» и следуйте инструкциям на экране, чтобы начать установку Windows.
5. Использование установщика Boot Camp в Windows
По завершении установки Windows компьютер Mac запускается в Windows и отображает приветствие установщика Boot Camp. Следуйте инструкциям на экране, чтобы установить Boot Camp и вспомогательное программное обеспечение Windows (драйверы). По завершении будет предложено выполнить перезапуск.
- Если установщик Boot Camp не открывается, откройте его вручную и используйте для выполнения установки Boot Camp.
- При наличии внешнего дисплея, подключенного к порту Thunderbolt 3 на компьютере Mac, его экран во время установки (до 2 минут) будет пустым (черным, серым или синим).
Процедура переключения между Windows и macOS
Перезапустите компьютер, во время запуска нажмите и удерживайте клавишу Option (или Alt) ⌥ для переключения между операционными системами Windows и macOS.
Дополнительная информация
Если используется одна из перечисленных ниже моделей Mac на базе процессора Intel с OS X El Capitan или более поздней версии, для установки Windows не требуется флеш-накопитель USB.
- MacBook, выпущенный в 2015 г. или позже
- MacBook Air, выпущенный в 2017 г. или позже 3
- MacBook Pro, выпущенный в 2015 г. или позже 3
- iMac, выпущенный в 2015 г. или позже
- iMac Pro (все модели)
- Mac Pro, выпущенный в конце 2013 г. или позже
Для получения дополнительных сведений об использовании Windows на компьютере Mac откройте приложение «Ассистент Boot Camp» и нажмите кнопку «Открыть Справку Boot Camp».
1. Если используется компьютер iMac (с дисплеем Retina 5K, 27 дюймов, конец 2014 г.), iMac (27 дюймов, конец 2013 г.) или iMac (27 дюймов, конец 2012 г.) с жестким диском объемом 3 ТБ и операционной системой macOS Mojave или более поздней версии, узнайте об оповещении, которое может отображаться во время установки.
2. Например, если объем ОЗУ на компьютере Mac составляет 128 ГБ, то на загрузочном диске должно быть доступно не менее 128 ГБ для Windows. Чтобы узнать объем ОЗУ компьютера Mac, перейдите в меню Apple > «Об этом Mac». Чтобы узнать объем доступного дискового пространства, перейдите на вкладку «Хранилище» в этом же окне.
3. Эти модели Mac также были доступны с жесткими дисками емкостью 128 ГБ. Компания Apple рекомендует жесткие диски емкостью не менее 256 ГБ, чтобы можно было создать раздел Boot Camp размером не менее 128 ГБ.
Информация о продуктах, произведенных не компанией Apple, или о независимых веб-сайтах, неподконтрольных и не тестируемых компанией Apple, не носит рекомендательного или одобрительного характера. Компания Apple не несет никакой ответственности за выбор, функциональность и использование веб-сайтов или продукции сторонних производителей. Компания Apple также не несет ответственности за точность или достоверность данных, размещенных на веб-сайтах сторонних производителей. Обратитесь к поставщику за дополнительной информацией.
Start up your Mac in Windows or macOS with Boot Camp
After you use Boot Camp Assistant to install Windows on your Intel-based Mac, you can set the default operating system to either macOS or Windows. The default operating system is the one you want to use when you turn on or restart your Mac.
Set the default operating system
In Windows on your Mac, click  in the right side of the taskbar, click the Boot Camp icon
  , then choose Boot Camp Control Panel.
If a User Account Control dialog appears, click Yes.
Select the startup disk that has the default operating system you want to use.
If you want to start up using the default operating system now, click Restart. Otherwise, click OK.
You can’t change your startup volume to an external drive while you’re using Windows.
To learn how to change the default operating system using macOS, see Get started with Boot Camp.
Restart in macOS
In Windows on your Mac, do one of the following:
Restart using Startup Manager: Restart your Mac, then immediately press and hold the Option key. When the Startup Manager window appears, release the Option key, select your macOS startup disk, then press Return.
If you’re using a Mac notebook computer with an external keyboard, make sure you press and hold the Option key on the built-in keyboard.
Restart using Boot Camp Control Panel: Click in the right side of the taskbar, click the Boot Camp icon , then choose Restart in macOS.
This also sets the default operating system to macOS.
For more information about restarting in macOS, see the Apple Support article Restart your Mac in macOS or Windows.
How to Run Mac On Windows -XP,7,8,8.1,10
Mac OS X is an advanced operating system, easy to use and extremely stable when used daily, and sometimes one would prefer to have OSX on PC rather than using Windows 7 or latest Windows 10. Well we have brought something interesting for you – The Guide to Run OSX on Windows which means users can Run Mac OS alongside Windows 7,8,8.1. The aim of installing Mac On Windows will be achieved by Virtual Technology. Many users aspire to buy Apple powered Macbook or any other premium Mac OS X running Apple device, but as we know that all can’t afford it, but atleast one can make ends meet by getting Mac OSx experience on Windows with very few steps.
Here is the glimpse of the result that you will see after you install mac on windows 7 on laptop :
Methods to Dual Boot Mac alongside Windows on PC or Laptop
We actually have two methods by which you will be able to use Mac On Windows PC –
- Buy Apple’s Macbook which will cost you three times you buy a new Window powered Laptop.
- Use this tutorial and little tech work which will cost you nothing but will give you a feeling of self-satisfaction that you have installed Mac OS on PC without spending even a penny.
So I would like to go by procedure 2 as that is very easy and hope you will not mind it 😛 So now the basic question that arises is – How to Run Mac On Windows -XP,7,8,8.1,10 – Follow up this easy tutorial to Install or Run OSX on Windows PC without losing important data or compromising with the Speed of your PC.
Requirements to Run Mac On Windows
The Basic Requirements to Run MAC on PC or Laptop or to Install Mac OS X (10.5 and above) on Virtual Machine VMWare. As VMWare is a virtual machine so it runs alongside windows and unlike other Operating System which we run using VMware, we need little more hardware requirements to run Mac on Vmware.
- 8 GB RAM will give you more than enough speed to cope up with the load of Mac OS on Virtual Machine
- Intel Core i3, i5, i7 will work like a charm.
- 128 GB of storage available on the hard disk to make Mac run without errors on PC.
It is not compulsory to have the above requirements. But lower than this will result into slow performance by the VMWare Workstation while loading MAC. But one can always give it a try to Run OSX on Windows with whatever config you have.
Tools Needed to Install Mac On Windows PC or laptop
To run mac on windows VMware one need to have few essentials that will equip you up to Run MAC OS-X alongside windows smoothly.first and the foremost software we require is the VMWare Virtual Machine itself. Download
First and the foremost software we require is the VMWare Virtual Machine itself. Download VMware Workstation from here.
VMWare is not the only one software required to Install MAC on Windows 7,8 or 10; You require an essential Unlocker as well. Download Latest MaC Unlocker required to Install Mac OSX on Windows from link in the Social Locker Below. [Like/+1/Tweet in order to Download latest Mac Unlocker]
Now Download the Essential VMDK Disk image of OSX that you will be using for running mac on windows from here and extract the same with xnohat as password 🙂
How To Run Mac On Windows [Guide]
- Step 1: Install the latest virtual technology powered VMWare Workstation which can be done easily by following on-screen instructions.
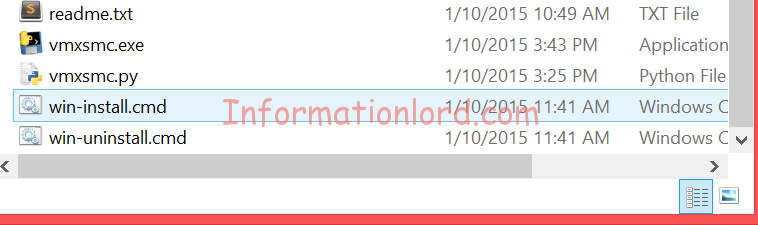
- Step 2: Now the real task starts here- Unzip the Unlocker 2.0.8 which you downloaded from second link and then Run the file named “win-install.cmd“. We would recommend that you run the file as Administrator.
You can hereafter link your CD Drive, Internet connection etc via editing settings of the Virtual Machine! If you are facing any problem to run OS-X on windows or if you want to share your views, do comment here, We will be at your service!
Running Mac OS X on Windows via Dual Boot is not a very hard task as well, but then the procedure mentioned here to Install Mac alongside Windows using VMware is of much use compared to totally formatting the system for Hackintosh. Do let us know if you are looking for Hackintosh tutorials in the comments section. This setup is all for free to get Mac Os X running on your Windows pc with all official udpates.


