- Setting up an Open VPN server on Windows Server 2008/2012
- How it works?
- Installing Open VPN on the server
- Key generation (PKI) of the certification center, server, client; Diffie-Hellman algorithm
- Open VPN server configuration
- Open VPN Client Configuration
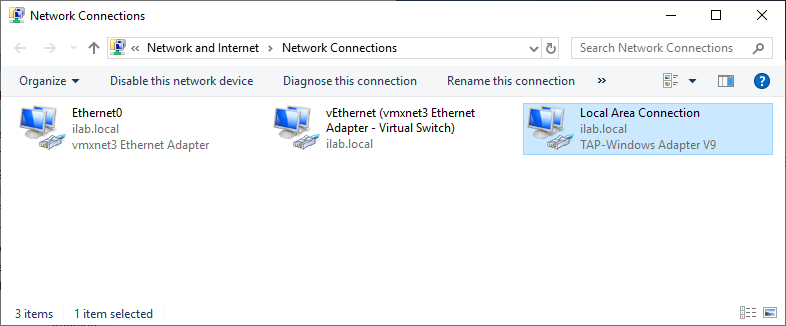
- Verify Windows Firewall Rules
- Check OpenVPN connections
- Установка OpenVPN сервера на Windows
- Установка OpenVPN Server
- Создание ключей и сертификатов
- Настройка OpenVPN сервера
- Настройка OpenVPN клиента
- Отзыв сертификата
Setting up an Open VPN server on Windows Server 2008/2012
This is a step-by-step guide on how to configure an Open VPN server on Windows Server 2008/2012 operating systems and connect clients to the created virtual private network.
Open VPN is an open implementation of VPN technology — the Virtual Private Network, which is designed to create virtual private networks between groups of geographically distant nodes on top of an open data transmission channel (Internet). Open VPN is suitable for tasks such as secure remote network connection to a server without opening Internet access to it, as if you are connecting to a host on your local network. Connection security is achieved by Open SSL encryption.
How it works?
When the Open VPN configuration is completed, the server will be able to accept external SSL-protected network connections to the virtual network adapter created at the start of the VPN service (tun / tap) without affecting the traffic processing rules of other interfaces (external Internet adapter, etc.). You can configure client sharing Open VPN to a specific network adapter from those present on the server. In the second part of the instruction, this tunneling of users’ Internet traffic is considered. With this method of forwarding, the host that handles VPN connections will also perform the function of a proxy server (Proxy) — to unify the rules of network activity of users and to route client Internet traffic on its own behalf.
Installing Open VPN on the server
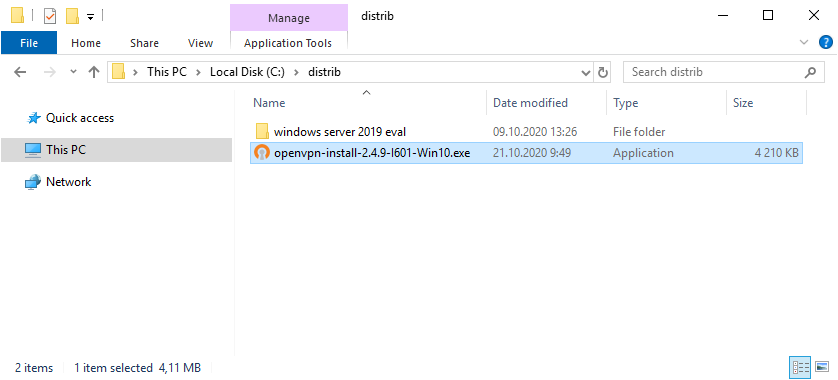
Download and install version of Open VPN that matches your operating system. Run the installer; make sure that all features are selected for installation in the third step of the installation wizard.
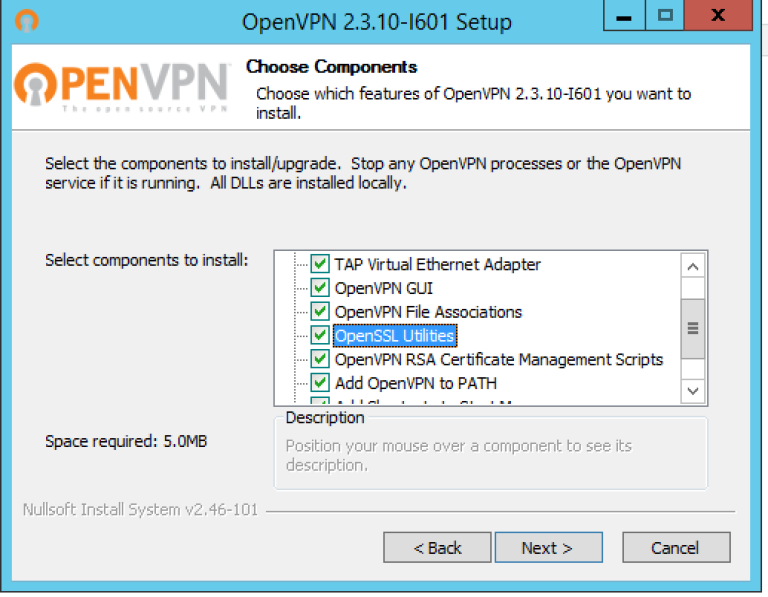
Please note that in this instruction further commands are based on the fact that Open VPN is installed in the default directory «C: \ Program Files \ OpenVPN».
We allow adding a virtual network adapter TAP in response to the corresponding request and wait until the installation is complete (it may take several minutes).
Key generation (PKI) of the certification center, server, client; Diffie-Hellman algorithm
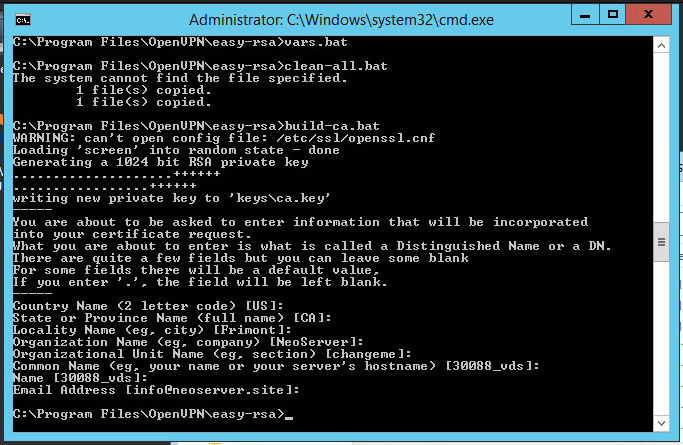
To manage the key / certificate pairs of all nodes of the private network being created, use the easy-rsa utility, which works via the command line, by analogy with the Linux console. To work with it, open, run the command line (Keyboard shortcut Win + R, then type cmd and press Enter)
Configuration files.
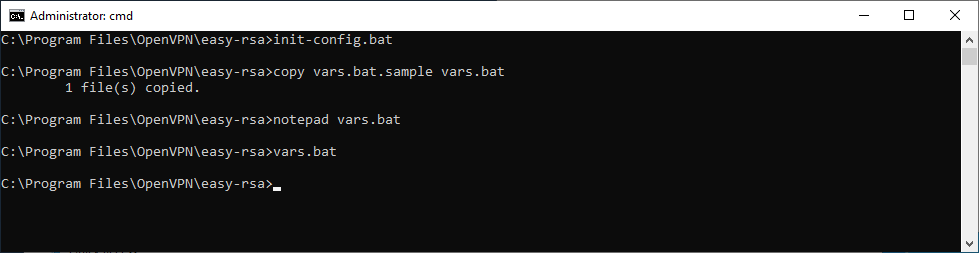
Running init-config.bat script will generate a new vars.bat file in our easy-rsa directory, this file will contain our configuration:
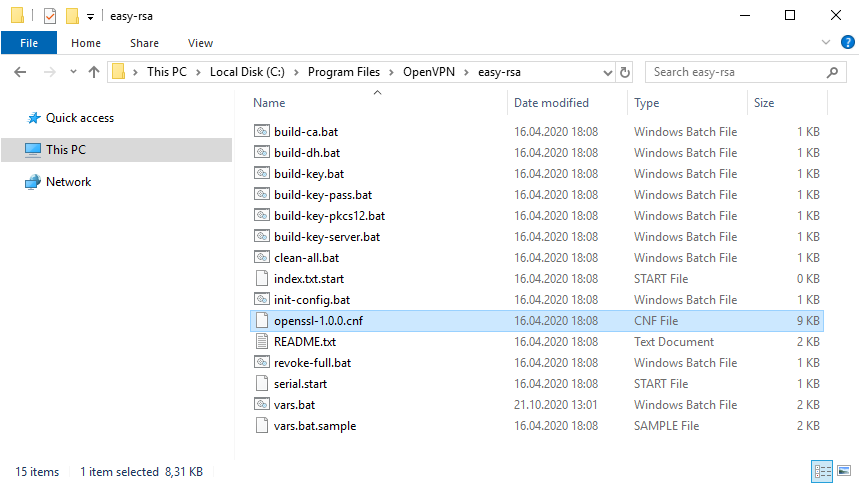
So now we need to open up the following directory using Windows Explorer: C:\Program Files\OpenVPN\easy-rsa
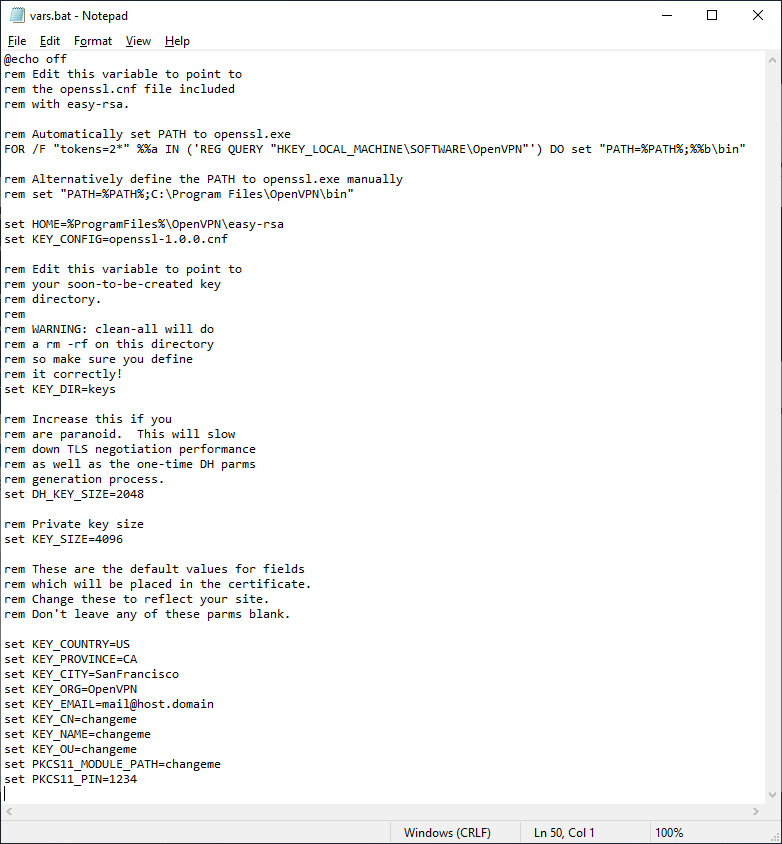
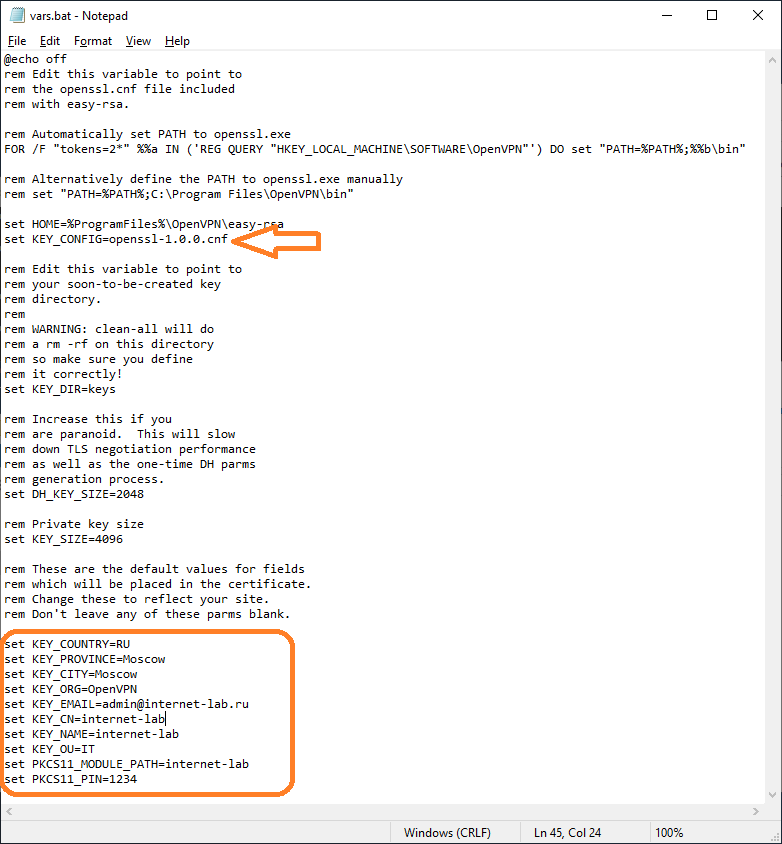
Now, using Notepad (or another text editor) edit the batch file named vars.bat, we need to configure some variables…
Change the following settings (nearer the bottom of the file) to meet your requirements:
Note: if the value of the variable contains a space, enclose it in quotes.
Next you should save the changes to the file and then using Command Prompt, run the following commands:
Certification Center and Server Key Generation
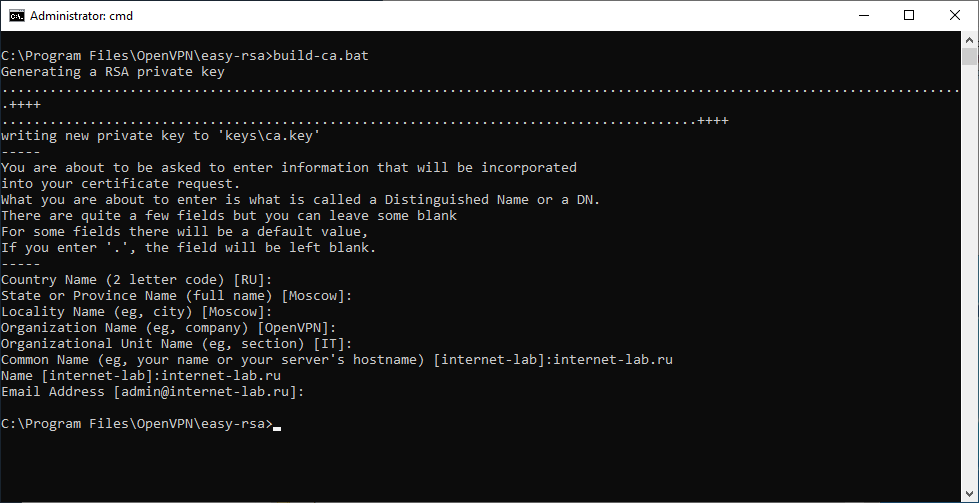
Let’s proceed to the creation of the key / certificate of the certification authority. Run the script:
In response to the prompts that appear, you can simply press Enter. The only exception is the KEY_CN (Common Name) field — be sure to specify a unique name and insert the same name in the Name field:
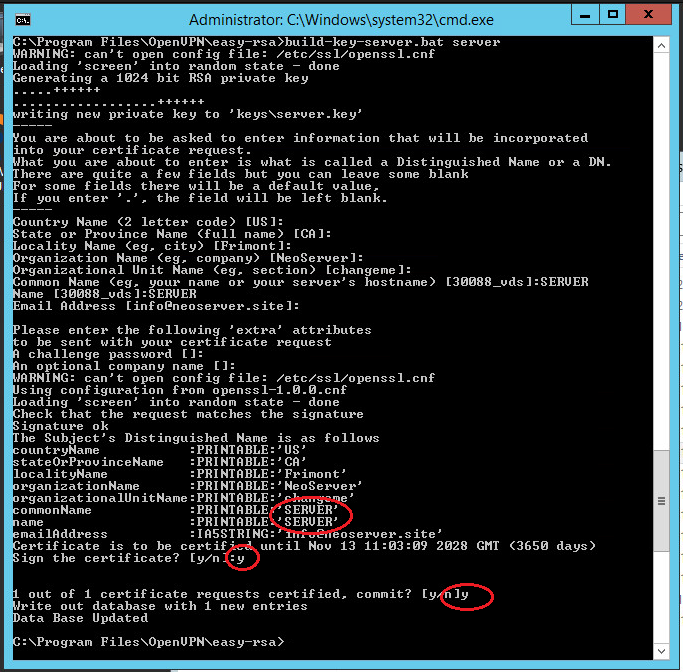
Similarly, we generate a server certificate. Here the value of the Common Name and Name fields is SERVER:
Note: the server argument is the name of the future file.
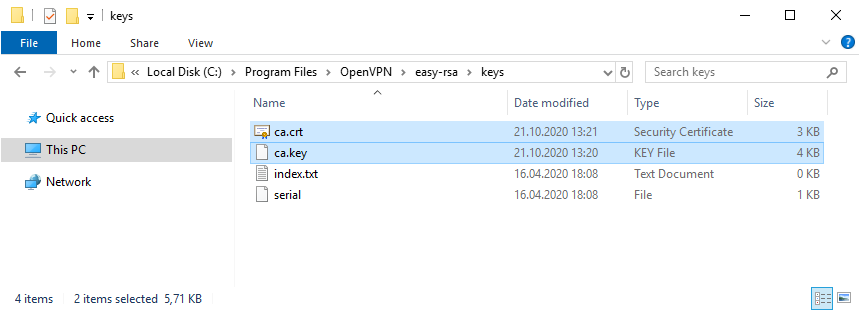
All generated keys will now be asked whether to sign the generated certificate (Sign the certificate) on behalf of the certification authority. Answer y (yes).
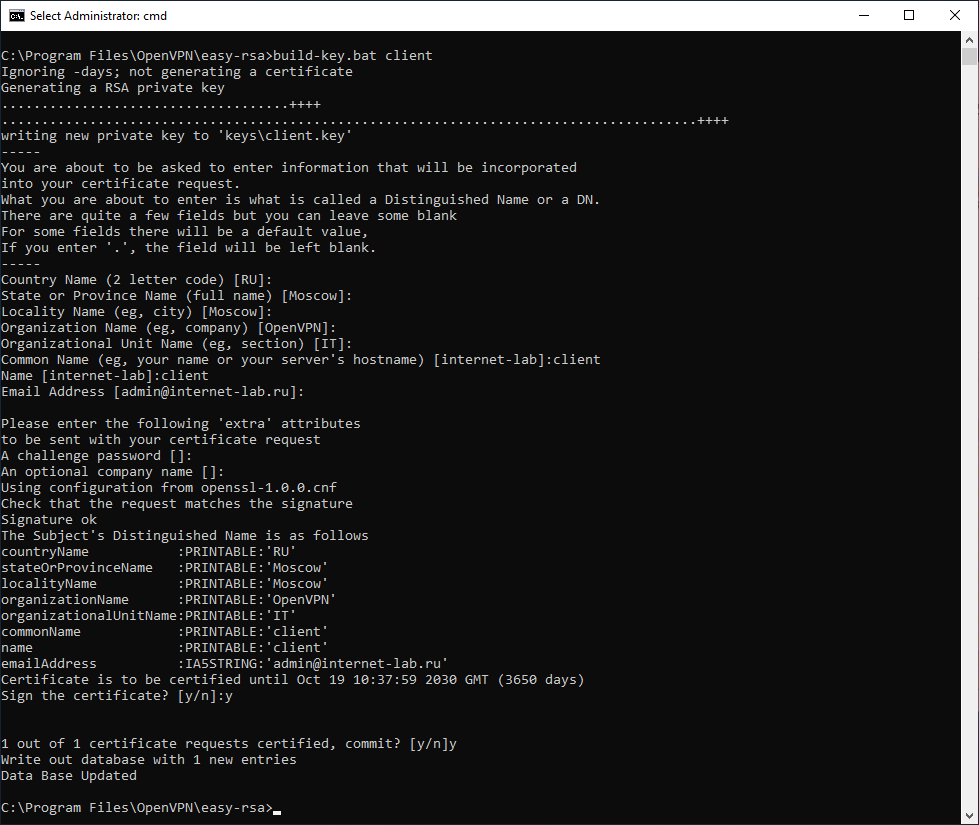
Generating client keys and certificates
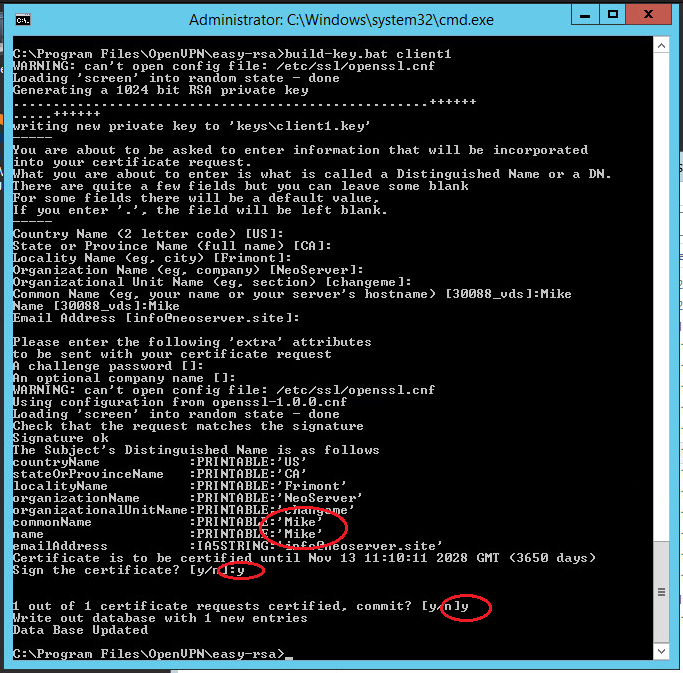
For each VPN client, you need to generate a separate SSL certificate.
There is an option in the Open VPN configuration, by enabling which you can use one certificate for several clients (see the server.ovpn file -> «dublicate-cn» file), but this is not recommended from a security point of view. Certificates can be generated in the future, as new customers connect. Therefore, now we will create only one for client1:
Run the following commands to generate client keys:
Note: client1 argument is the name of the future file.
In the Common Name field, specify the name of the client (in our case client1).
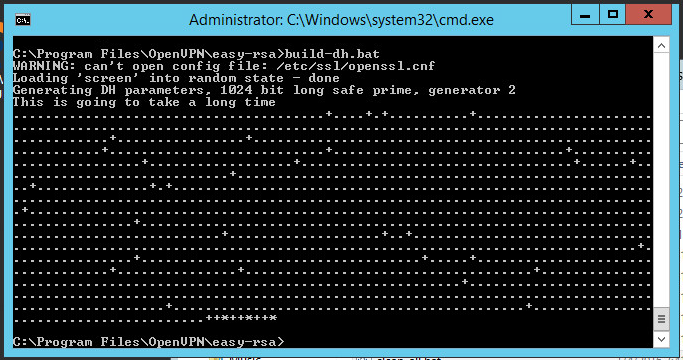
Diffie Hellman Parameters
To complete the encryption setting, you need to run the Diffie-Hellman parameter generation script:
Displaying information about creating parameters looks like this:
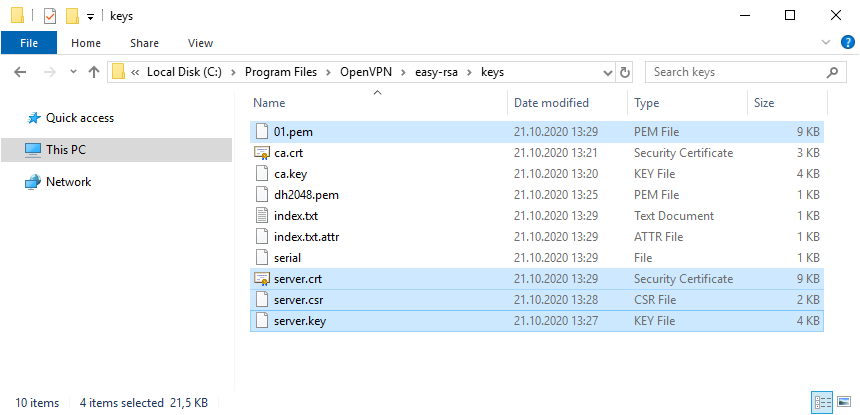
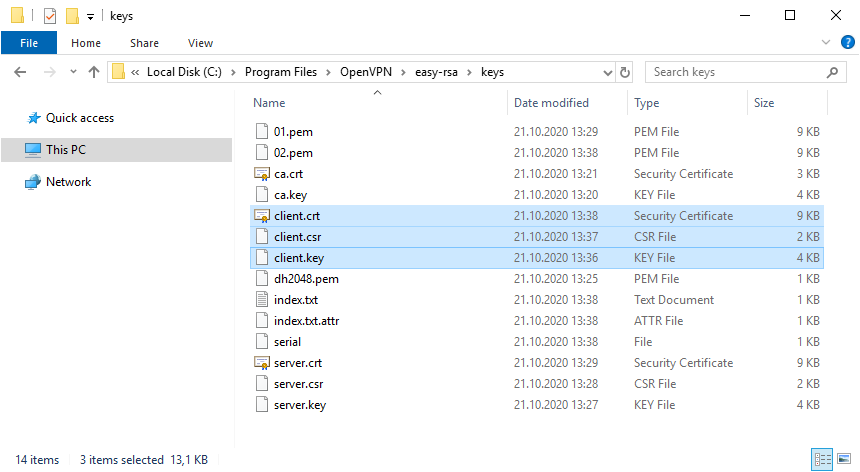
Transferring generated keys / certificates
The generated certificates are located in the C: \ Program Files \ OpenVPN \ easy-rsa \ keys directory. Copy the files listed below to the directory C:\Program Files\OpenVPN\config:
Open VPN server configuration
Let’s proceed to the configuration of the VPN server directly, use our configuration file with the name server.ovpn and place it in the C: \ Program Files \ OpenVPN \ config directory.
Open the file; find the path to the keys (see below). Check the paths to the previously copied certificates ca.crt, dh1024.pem / dh2048.pem, server.key, server.crt and, if necessary, change:
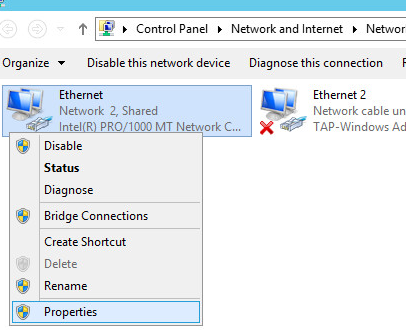
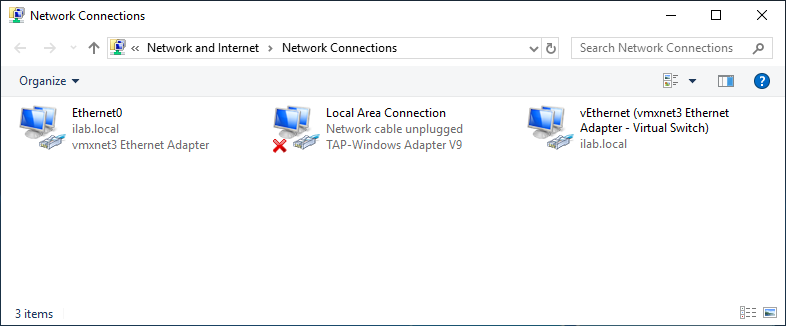
Now you need to allow traffic forwarding between adapters. Follow these steps: Control Panel -> Network and Internet -> Network and Sharing Center -> Change adapter settings. Choose an adapter that looks to the external Internet (TAP-adapter is responsible for the VPN connection). In our example, this is Ethernet 2.
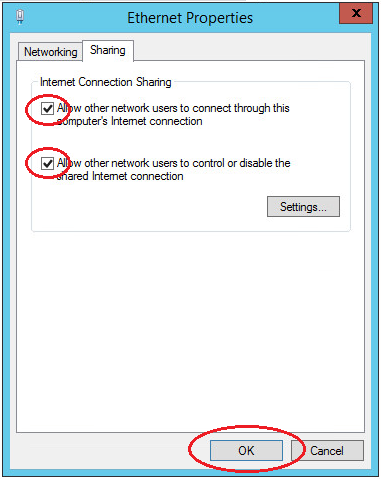
Double-click the adapter Properties and go to the Access tab, tick all the checkboxes. Save the changes.
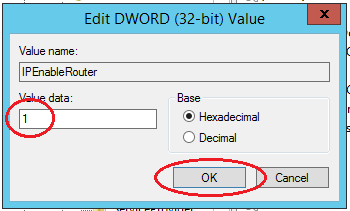
Next you need to enable IP addressing.
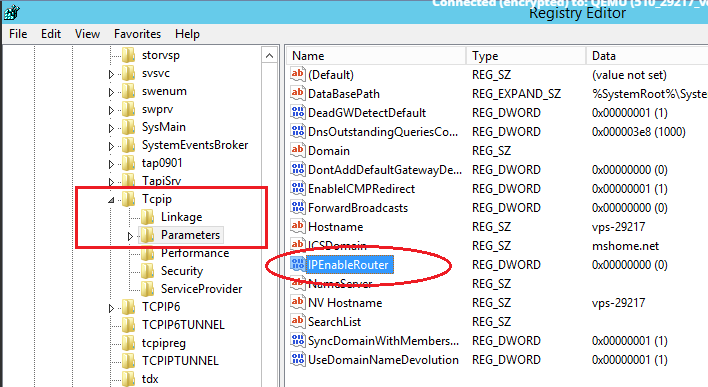
Using Windows Search, locate the REGEDIT.exe application.

In the tree, find the directory HKEY_LOCAL_MACHINE \ SYSTEM \ CurrentControlSet \ Services \ Tcpip \ Parameters. In the right part of the window, find the IPEnableRouter variable, double-click into the value editing window and change it to 1, thereby allowing addressing on the VPS.
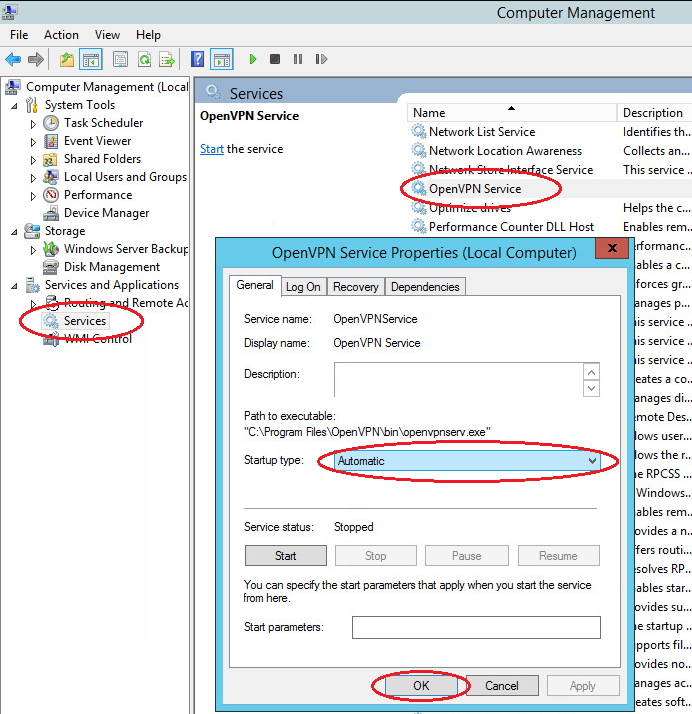
Autorun Open VPN
Immediately configure the Open VPN service to autorun at system startup.
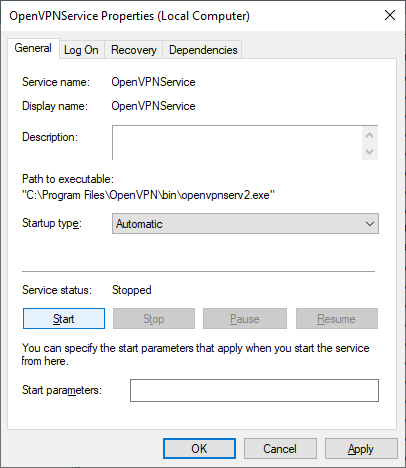
Open the Windows Services. Find in the list Open VPN -> right-click -> Properties -> Start: Automatic
This completes the basic configuration of the virtual private network server. Find the file C: \ Program Files \ OpenVPN \ config \ server.ovpn -> right-click -> «Start OpenVPN on this config» to start the virtual private network server and the configuration file we prepared.
Open VPN Client Configuration
Open VPN client applications are available for all popular operating systems: Windows / Linux / iOS / Android. For MacOS, the Tunnelblick client is used. All of these applications work with the same configuration files. Only some differences of several options are possible. You can learn about them by examining the documentation for your Open VPN client. In this guide, we will look at connecting a Windows client using the same distribution package of the program that we installed on the server. When using applications for other operating systems, the setup logic is similar.
- Install the current version of Open VPN on the client computer.
- Copy to the directory C: \ Program Files \ OpenVPN \ config the client certificate files created earlier on the server (2 certificates with the .crt extension and the key with the .key extension) and use our client.ovpn client configuration file. After copying to the user’s device, the last file is deleted from the server or transferred from the config folder to avoid confusion in the future.
- Open the client.ovpn file. Find the line remote my-server-1 1194 and specify the ip-address or domain name of the vpn-server in it:
Find ways to certificates. Specify in it the paths to the ca.crt, client1.key, client1.crt certificates copied earlier as in the example below:
Verify Windows Firewall Rules
Attention! For the correct operation of the OpenVPN service, it is required that the corresponding ports be opened on the server (by default UDP 1194). Check the relevant rule in your Firewall: Windows Firewall or third-party anti-virus software.
Check OpenVPN connections
Start the Open VPN server, to do this, go to the directory C: \ Program Files \ OpenVPN \ config and select the server configuration file (we have server.ovpn -> right-click -> «Start OpenVPN on this config file»).
Start the client, to do this, go to the directory C: \ Program Files \ OpenVPN \ config and select the client configuration file (we have client.ovpn -> right-click -> «Start Open VPN on this config file»).
The screen displays the connection status window. In a few seconds it will be minimized to tray. The green indicator of the Open VPN shortcut in the notification area indicates a successful connection.

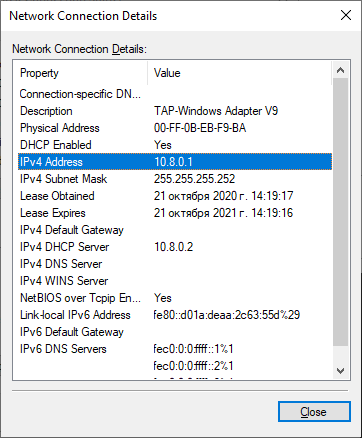
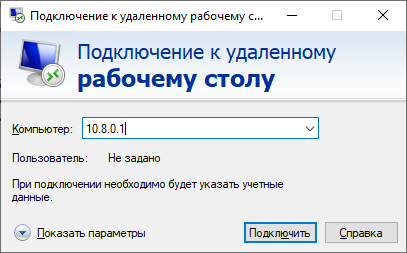
Check the accessibility from the client device of the OpenVPN server using its internal private network address:
- Press the Win + R keys and type cmd in the window that appears to open the command line.
- Execute the ping command to the address of our server in a virtual private network (10.8.0.1):
If the VPN is configured correctly, the packet exchange with the server will start.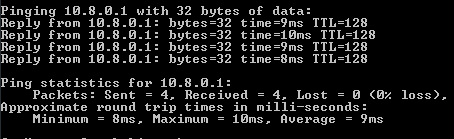
From the result of the utility, we see that the packets are first sent to the VPN server, and only then to the external network.
Now you have a ready-to-work virtual private network that allows you to make secure network connections between its clients and the server using open and geographically distant points of connection to the Internet.
Установка OpenVPN сервера на Windows


Установим и настроим OpenVPN сервер. На сервере используется операционная система Windows Server 2019.
OpenVPN — бесплатная реализация технологии виртуальной частной сети (VPN) для создания зашифрованных каналов связи между компьютерами типа точка-точка или сервер-клиенты за NAT и Firewall.
Установка OpenVPN Server
Скачиваем дистрибутив для установки OpenVPN:
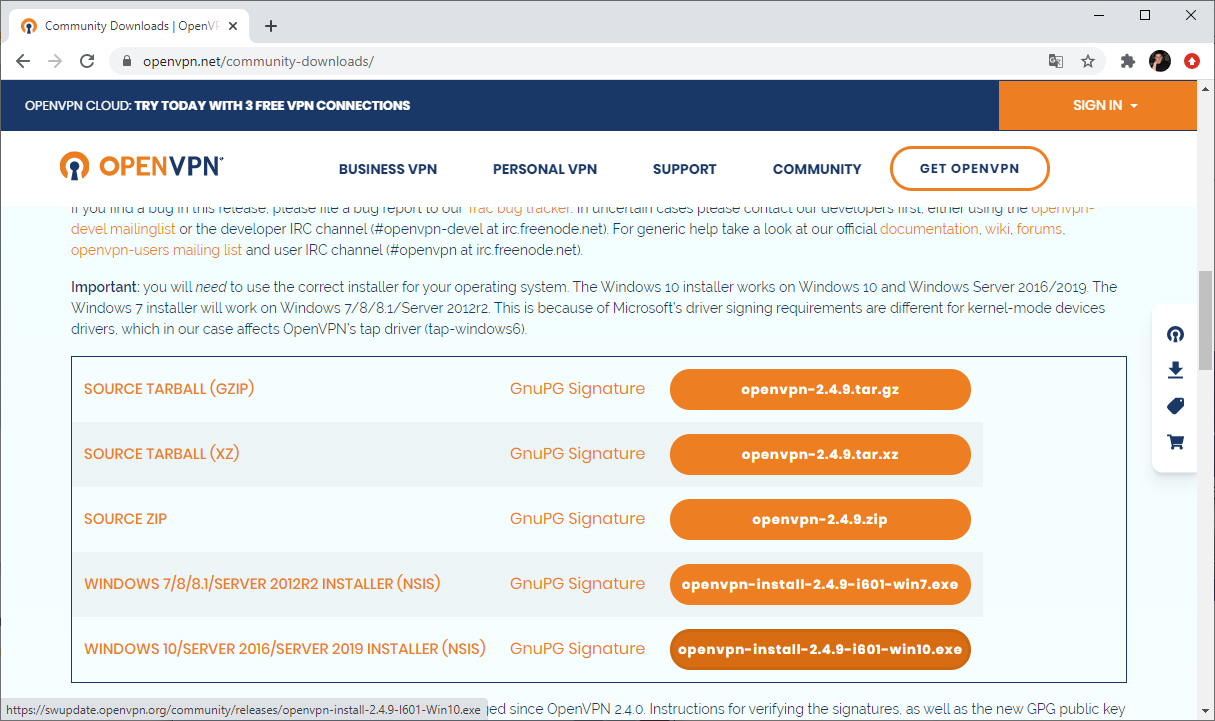
Прокручиваем вниз, выбираем стабильную версию. Я буду использовать версию 2.4.9.
Для операционной системы Windows доступны два пакета:
- WINDOWS 7/8/8.1/SERVER 2012R2 INSTALLER (NSIS)
- WINDOWS 10/SERVER 2016/SERVER 2019 INSTALLER (NSIS)
Для Windows Server 2019 подходит второй вариант, скачиваю.
Запускаем инсталлятор OpenVPN.
Открывается мастер установки. Next.
Принимаем лицензионное соглашение. I Agree.
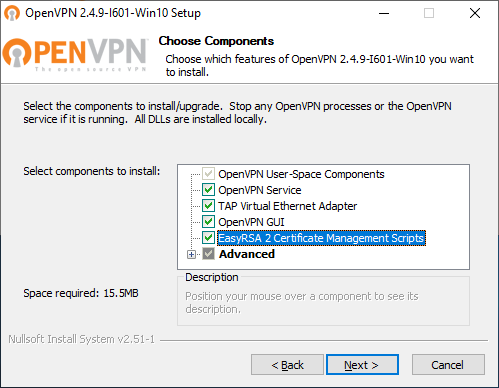
Выбираем компоненты. Выделите EasyRSA 2 Certificate Management Scripts. Для сервера OpenVPN GUI можно не устанавливать, если вы планируете запускать OpenVPN в качестве службы. Next.
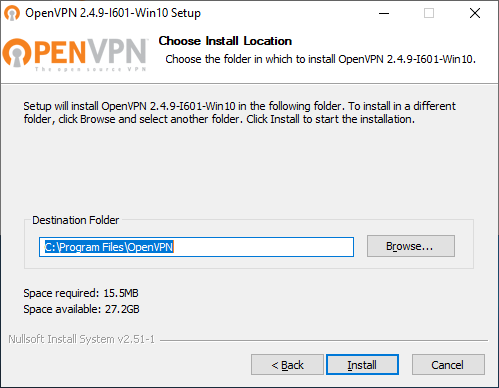
Выбираем путь установки, я оставляю по умолчанию C:\Program Files\OpenVPN. Install.
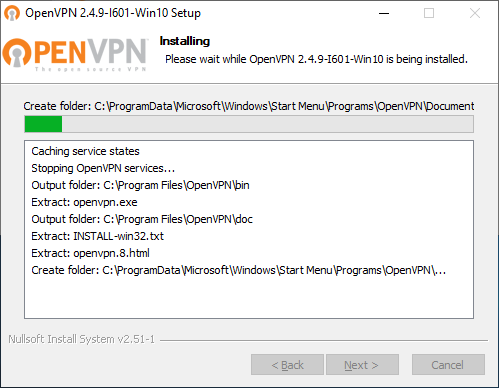
Начинается процесс установки OpenVPN.
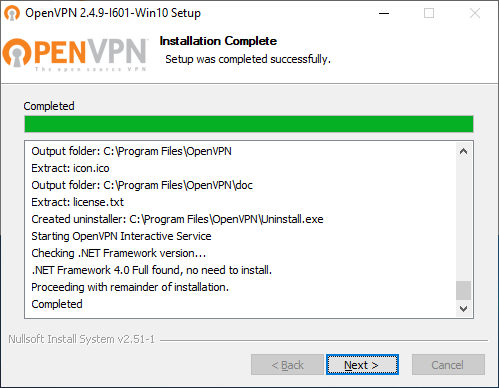
Установка успешно завершена. Next.
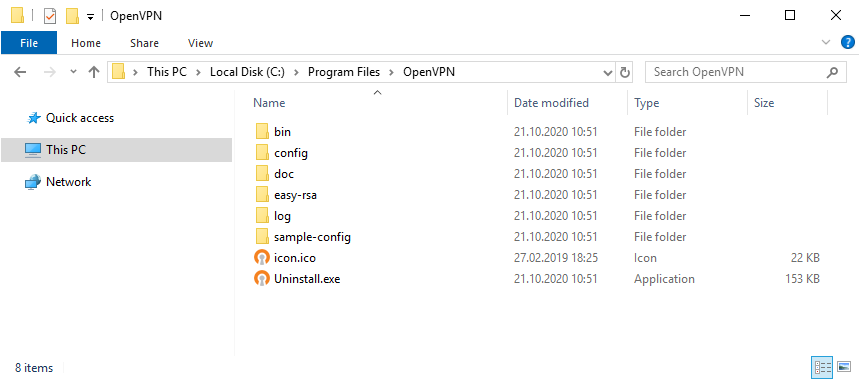
Установка выполнена в директорию C:\Program Files\OpenVPN.

После установки у нас появляется новый сетевой адаптер TAP-Windows Adapter V9.
Адаптер отключён. Если по каким-то причинам нужно добавить несколько таких адаптеров, то загляните в папку C:\Program Files\TAP-Windows\bin.

Здесь есть скрипты для установки адаптера, добавления адаптера и удаления всех адаптеров.
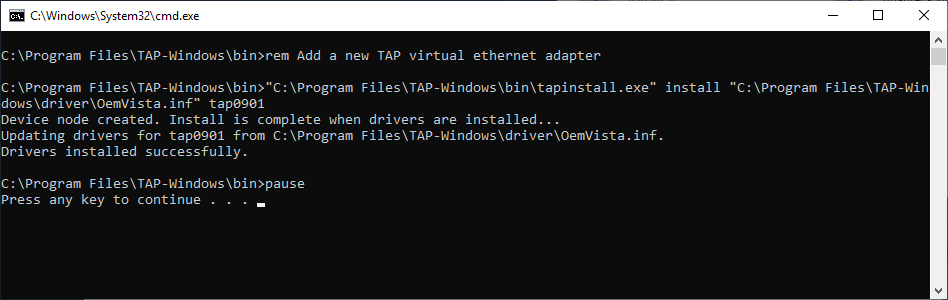
Пример установки адаптера. В командной строке под администратором:
В большинстве случаев дополнительно настраивать сетевой адаптер не требуется.
Создание ключей и сертификатов
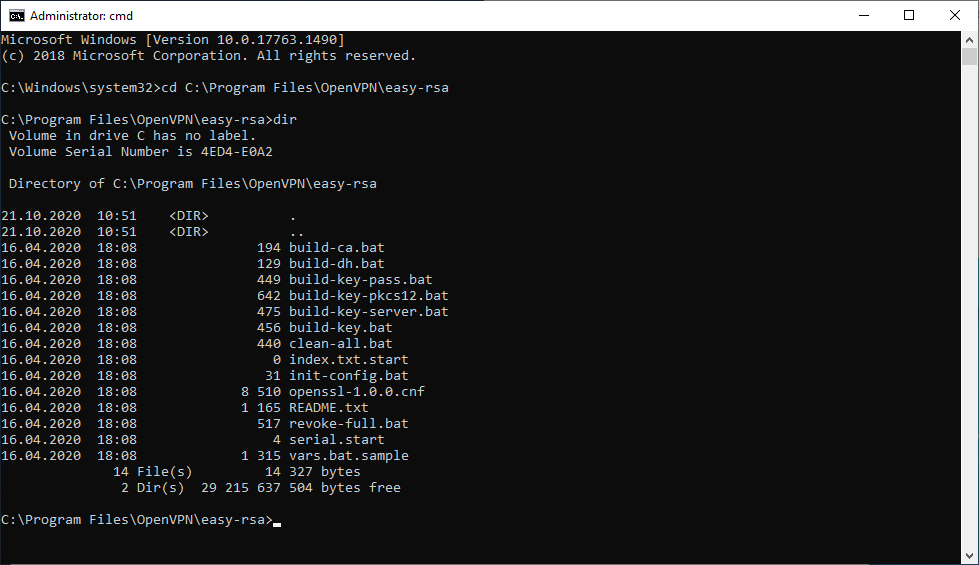
Запускаем командную строку под администратором и переходим в рабочую директорию C:\Program Files\OpenVPN\easy-rsa.
В этой папке есть всё необходимое для генерации сертификатов.
Создаётся файл vars.bat с настройками и примером готовых параметров для создания CSR запроса сертификатов. Заполним его. Открываем vars.bat блокнотом.

Здесь стоит обратить внимание на пути к рабочим директориям. Например, вы можете указать свой путь к openssl.exe, если установили OpenVPN в другую директорию. Здесь же можно изменить длину ключей шифрования.
Заполняем переменные в нижней части файла, указываем:
- KEY_COUNTRY — страна
- KEY_PROVINCE — область
- KEY_CITY — город
- KEY_ORG — организация
- KEY_EMAIL — e-mail
- KEY_CN — (Common Name) имя сервера
- KEY_NAME — (Name) имя сервера
- KEY_OU — (Organization Unit) отдел
- PKCS11_MODULE_PATH — для токенов двухфакторной аутентификации, нам не требуется, укажу имя сервера
- PKC11_PIN — ПИН для токенов двухфакторной аутентификации, нам не требуется, укажу 1234
Для каждого сертификата нужно будет указывать свои NAME и COMMON NAME, можно их не указывать в vars.bat, потому как при генерации все параметры будут запрашивать.
Обращаем внимание на строку:
Это имя конфигурационного файла. Находим его в рабочей директории.

Внутри есть параметр default_days, в котором можно указать срок действия будущих сертификатов. По умолчанию у меня стоит 3650 дней, это 10 лет. Меня устраивает. Вероятно, кому-то при генерации клиентских сертификатов может понадобиться уменьшить этот срок.
Сохраняем все изменения и возвращаемся к командной строке. Подгружаем утверждённые нами переменные:
Очищаем директорию с ключами:

Сертификаты, которые мы будем создавать, появятся в папке C:\Program Files\OpenVPN\easy-rsa\keys. Сейчас эта папка очистилась, в ней два файла: index.txt и serial.

Генерируем ключ и сертификат центра сертификации:
В процессе генерации сертификата нас будут спрашивать все те же параметры, которые мы указали в vars.bat. Если параметр нас устраивает (а он нас устраивает), просто нажимаем ввод и переходим к следующему вопросу. После завершения работы скрипта в папке C:\Program Files\OpenVPN\easy-rsa\keys появляется два файла:
- ca.crt — сертификат центра сертификации
- ca.key — ключ центра сертификации
Ключ секретный, никому не передавайте, он будет храниться на сервере.
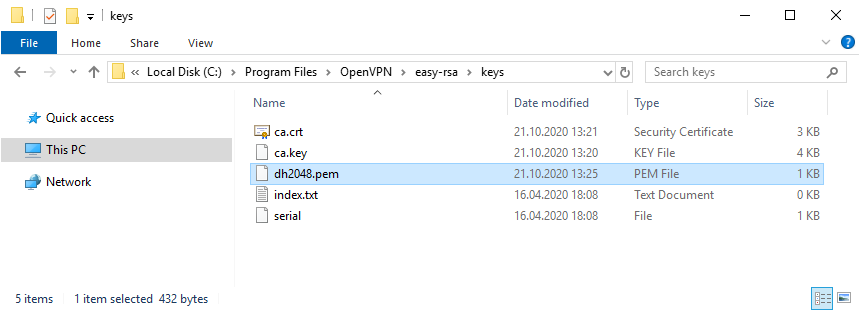
Генерируем ключ Диффи-Хеллмана:
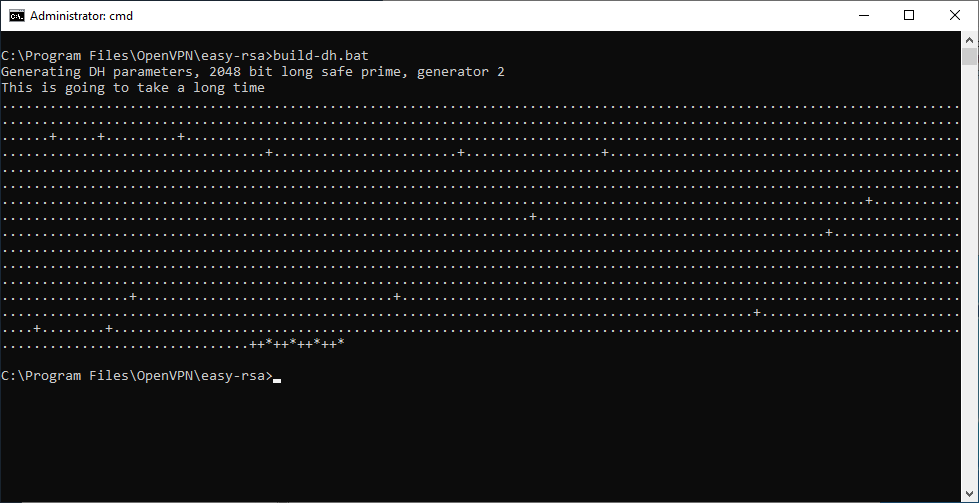
В папке C:\Program Files\OpenVPN\easy-rsa\keys появляется файл:
Генерируем ключ и сертификат сервера, назовём сервер именем «server«:

В процессе генерации серверного сертификата нас будут спрашивать те же параметры, которые мы указали в vars.bat. Если параметр нас устраивает (а он нас снова устраивает), просто нажимаем ввод и переходим к следующему вопросу. На вопрос Sign the certificate отвечаем y. На вопрос 1 out of 1 certificate requests certified, commit отвечаем y.
После завершения работы скрипта в папке C:\Program Files\OpenVPN\easy-rsa\keys появляется четыре файла:
- 01.pem — не понадобится
- server.crt — сертификат сервера
- server.csr — запрос сертификата сервера, не понадобится
- server.key — ключ сервера
Ключ секретный, никому не передавайте, он будет храниться на сервере.
Генерируем ключ и сертификат первого клиента. Для каждого клиента нужно указывать своё имя файла, Name и Common Name. Назовём первого клиента именем «client«:
В процессе генерации клиентского сертификата нас будут спрашивать те же параметры, которые мы указали в vars.bat. Нас устраивают все параметры кроме NAME и COMMON NAME, на них отвечаем client. Помним, что для другого клиента имя должно быть другим. На вопрос Sign the certificate отвечаем y. На вопрос 1 out of 1 certificate requests certified, commit отвечаем y.
После завершения работы скрипта в папке C:\Program Files\OpenVPN\easy-rsa\keys появляется четыре файла:
- 02.pem — не понадобится
- client.crt — сертификат первого клиента
- client.csr — запрос сертификата первого клиента, не понадобится
- client.key — ключ первого клиента
Для каждого нового клиента, который будет подключаться к серверу OpenVPN необходимо сгенерировать свой клиентский сертификат. Но это можно сделать позже, пока добьёмся подключения хотя бы одного клиента.
В настройках сервера можно потом включить настройку duplicate-cn, которая позволяет подключаться всем клиентам по одному общему сертификату, но это небезопасно и не рекомендуется. Используйте только в тестовых целях.
# Uncomment this directive if multiple clients
# might connect with the same certificate/key
# files or common names. This is recommended
# only for testing purposes. For production use,
# each client should have its own certificate/key
# pair.
#
# IF YOU HAVE NOT GENERATED INDIVIDUAL
# CERTIFICATE/KEY PAIRS FOR EACH CLIENT,
# EACH HAVING ITS OWN UNIQUE «COMMON NAME»,
# UNCOMMENT THIS LINE OUT.
;duplicate-cn
Я на сервере собираюсь использовать tls-auth для дополнительной проверки целостности, это обеспечит дополнительный уровень безопасности протокола SSL/TLS при создании соединения:
- Сканирование прослушиваемых VPN-сервером портов
- Инициация SSL/TLS-соединения несанкционированной машиной на раннем этапе
- DoS-атаки и флуд на порты OpenVPN
- Переполнение буфера SSL/TLS
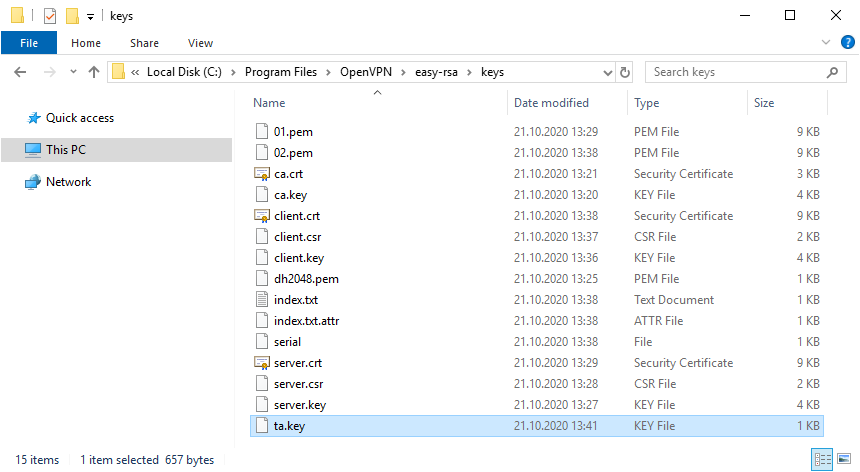
При использовании tls-auth на клиенте не понадобится ключ Диффи-Хеллмана, но пусть будет. Генерируем ключ tls-auth:

В папке C:\Program Files\OpenVPN\easy-rsa\keys появляется файл:
Минимальный набор сертификатов сгенерирован.
Настройка OpenVPN сервера
Чтобы случайно всё не удалить, создадим папку C:\Program Files\OpenVPN\ssl и скопируем в неё сертификаты. Это будет рабочая папка сервера.
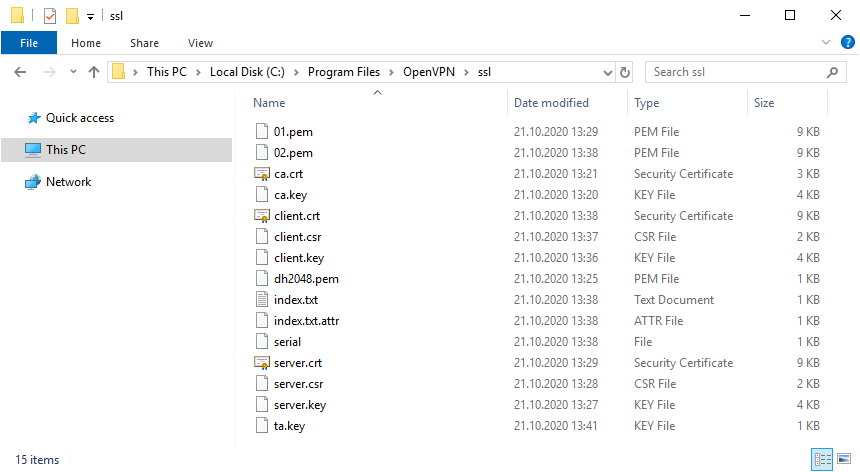
Создадим конфигурационный файл сервера C:\Program Files\OpenVPN\config\server.ovpn:
Открываем блокнотом и редактируем:
Лучше изучить конфигурационный файл, я предлагаю свой вариант конфига:
Указываем параметры сервера, пути к ключам и сертификатам. Здесь же пути к логам. Для тестирования можно использовать tcp протокол:
Переходим к службам:
Находим службу OpenVPNService.
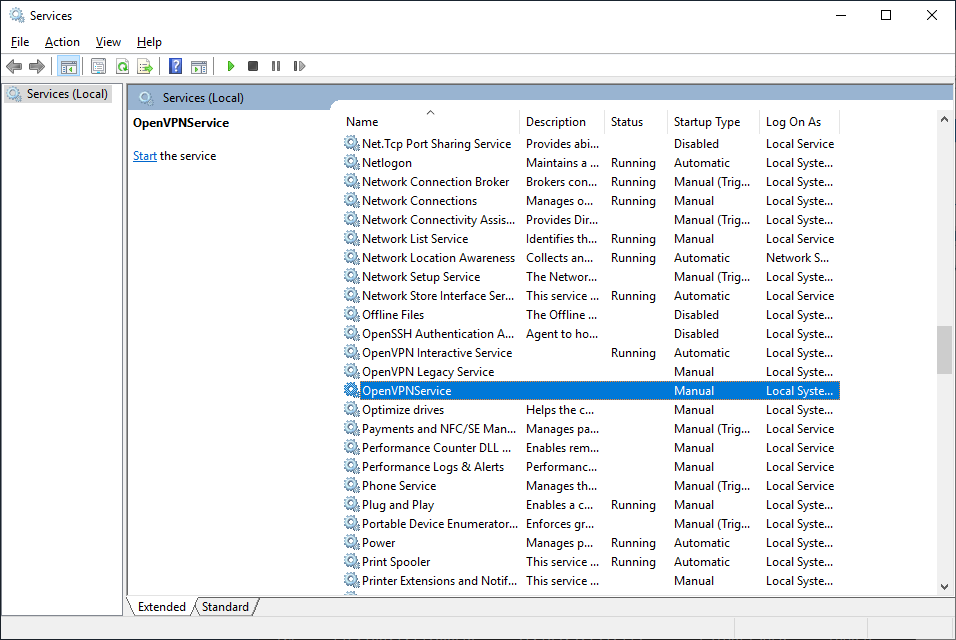
Настраиваем на автоматический запуск при загрузке сервера.

Согласно настройкам сервера в папке C:\Program Files\OpenVPN\log должны появиться логи. Это один из инструментов администратора OpenVPN сервера.

Активировался сетевой адаптер TAP-Windows Adapter V9.
Согласно настройкам сервера IP адрес 10.8.0.1.
Проверяем поднялся ли порт tcp 1194:
Порт должен прослушиваться.

Теперь нужно настроить firewall. Открываем Windows Defender Firewall with Advanced Security.
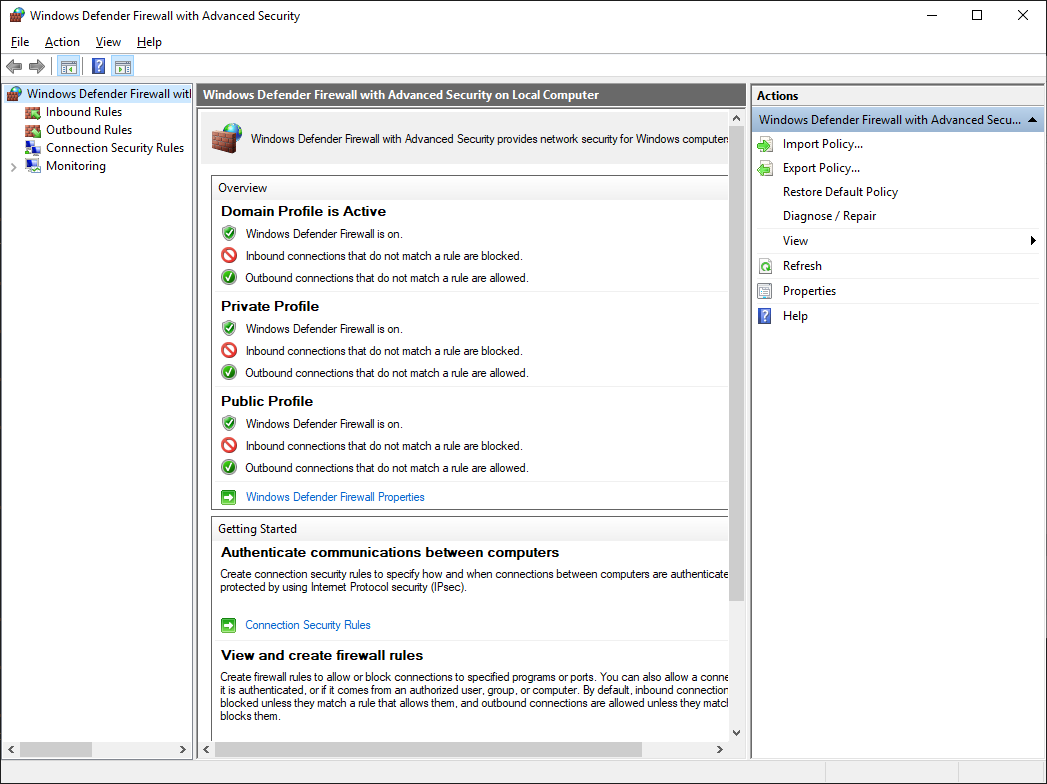
Переходим в Inbound Rules.

Создаём правило — New Rule.
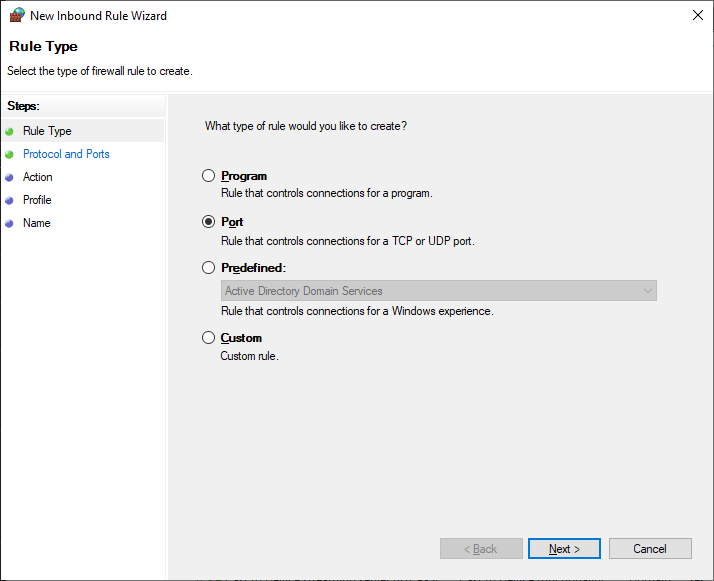
Тип правила — Port. Next.

Протоколы и порты — UDP 1194. Как в настройках сервера. Next.
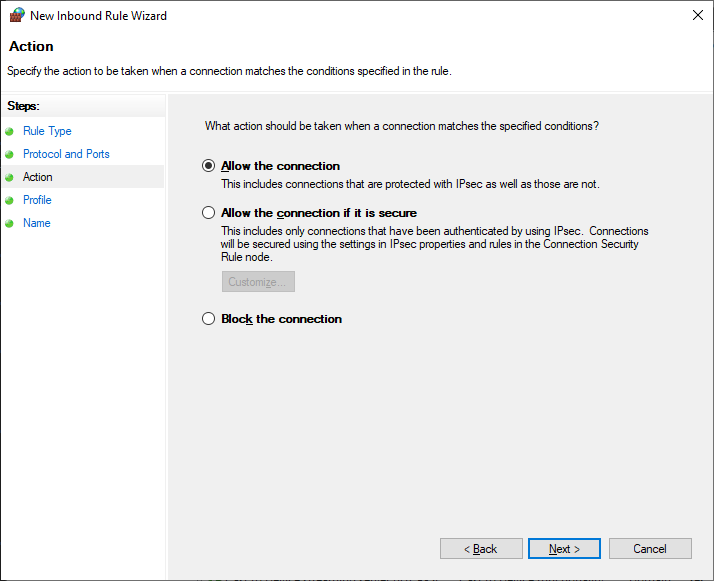
Действия — Allow the connection. Next.
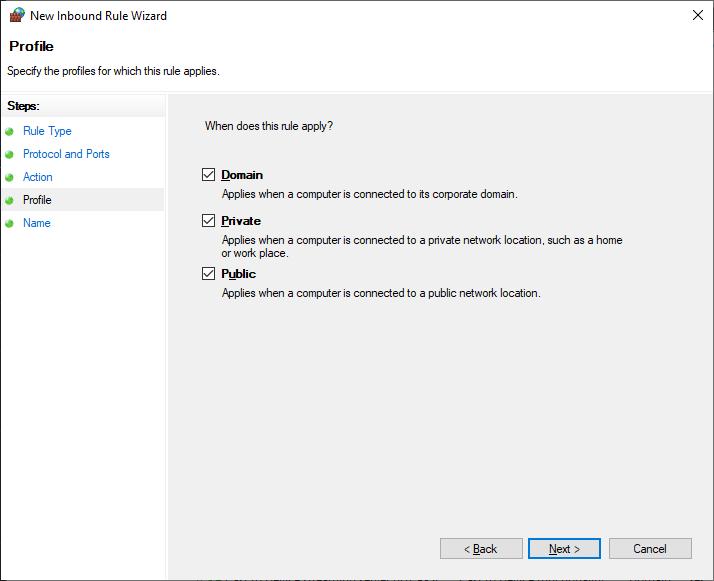
Для всех сетей. Next.

Указываем название правила — OpenVPN. Next.
Правило создано, теперь firewall не блокирует входящие UDP соединения на 1194 порту.
Настройка OpenVPN клиента
На компьютере клиента устанавливаем OpenVPN точно также как на сервер. Галку EasyRSA 2 Certificate Management Scripts не указываем. Галку OpenVPN GUI указываем.
Я устанавливаю OpenVPN на клиенте в папку по умолчанию. C:\Program Files\OpenVPN.
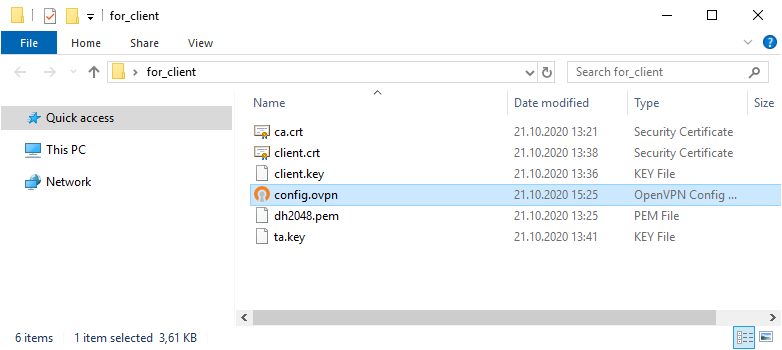
Копируем в отдельную папку for_client (её содержимое отправим потом на компьютер клиента) на сервере файлы для клиента:

Туда же из папки C:\Program Files\OpenVPN\sample-config копируем client.ovpn

Переименовываю client.ovpn в config.ovpn. Можно использовать любое имя, лучше созвучное с названием организации. Вот такой получился набор.
Редактируем файл config.ovpn.
Здесь указываем пути к ключам и сертификатам клиента. Не забываем про адрес и порт сервера, куда подключаться, для примера я указал internet-lab.ru UDP 1194.
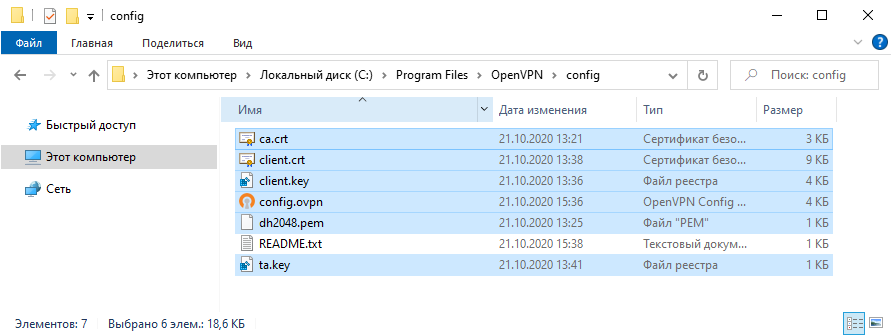
Отправляем подготовленные файлы на компьютер клиента и копируем в C:\Program Files\OpenVPN\config.
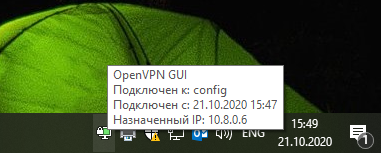
На клиента запускаем OpenVPN GUI.
В трее появляется значок OpenVPN.

Правой кнопкой — подключиться.


Значок позеленел, назначен адрес 10.8.0.6.
Можно подключаться к серверу, если есть доступы.
Для второго и последующего клиента генерируем свой набор клиентских сертификатов.

Отзыв сертификата
Иногда нужно отозвать сертификат, выданный клиенту. Кто-то увольняется, кто-то палит сертификаты.
Где client — это имя клиента.
В папке C:\Program Files\OpenVPN\keys появляется файл:
Копируем его с заменой в рабочую директорию сервера C:\Program Files\OpenVPN\ssl.
Добавляем строчку в конфигурационный файл сервера:
Перезапускаем службу OpenVPN сервера.
Если в конфигурационном файле уже был ранее указан путь к crl.pem, то службу можно не перезапускать, OpenVPN перечитывает CRL один раз в час. Но в течении этого часа клиенты с отозванными сертификатами смогут продолжать подключаться и работать.
Для клиента с отозванным сертификатом процесс подключения будет «зависать». В логе можно увидеть:
Чтобы клиент не стучался постоянно на сервер, у него в конфиге есть опция:
Передать эту опцию при отзыве сертификата нельзя, поэтому указывайте её всем клиентам заранее.


