- How to: Install and uninstall Windows services
- Install using InstallUtil.exe utility
- Uninstall using InstallUtil.exe utility
- Install using PowerShell
- Uninstall using PowerShell
- Creating a Windows Service with C#/.NET5
- Windows Services
- ASP.NET similarities
- Coding, coding, coding!
- Where is the service?
- Service Controller
- Code in Action!
- Event Viewer
- Conclusion
How to: Install and uninstall Windows services
If you’re developing a Windows service with the .NET Framework, you can quickly install your service app by using the InstallUtil.exe command-line utility or PowerShell. Developers who want to release a Windows service that users can install and uninstall can use the free WiX Toolset or commercial tools like Advanced Installer, InstallShield, or others. For more information, see Create an installer package (Windows desktop).
If you want to uninstall a service from your computer, don’t follow the steps in this article. Instead, find out which program or software package installed the service, and then choose Apps in Settings to uninstall that program. Note that many services are integral parts of Windows; if you remove them, you might cause system instability.
To use the steps in this article, you first need to add a service installer to your Windows service. For more information, see Walkthrough: Creating a Windows service app.
You can’t run Windows service projects directly from the Visual Studio development environment by pressing F5. Before you can run the project, you must install the service in the project.
You can use Server Explorer to verify that you’ve installed or uninstalled your service.
Install using InstallUtil.exe utility
From the Start menu, select the Visual Studio directory, then select Developer Command Prompt for VS .
The Developer Command Prompt for Visual Studio appears.
Access the directory where your project’s compiled executable file is located.
Run InstallUtil.exe from the command prompt with your project’s executable as a parameter:
If you’re using the Developer Command Prompt for Visual Studio, InstallUtil.exe should be on the system path. Otherwise, you can add it to the path, or use the fully qualified path to invoke it. This tool is installed with the .NET Framework in %WINDIR%\Microsoft.NET\Framework[64]\ .
- For the 32-bit version of the .NET Framework 4 or 4.5 and later, if your Windows installation directory is C:\Windows, the default path is C:\Windows\Microsoft.NET\Framework\v4.0.30319\InstallUtil.exe.
- For the 64-bit version of the .NET Framework 4 or 4.5 and later, the default path is C:\Windows\Microsoft.NET\Framework64\v4.0.30319\InstallUtil.exe.
Uninstall using InstallUtil.exe utility
From the Start menu, select the Visual Studio directory, then select Developer Command Prompt for VS .
The Developer Command Prompt for Visual Studio appears.
Run InstallUtil.exe from the command prompt with your project’s output as a parameter:
After the executable for a service is deleted, the service might still be present in the registry. If that’s the case, use the command sc delete to remove the entry for the service from the registry.
Install using PowerShell
From the Start menu, select the Windows PowerShell directory, then select Windows PowerShell.
Access the directory where your project’s compiled executable file is located.
Run the New-Service cmdlet with the with your project’s output and a service name as parameters:
Uninstall using PowerShell
From the Start menu, select the Windows PowerShell directory, then select Windows PowerShell.
Run the Remove-Service cmdlet with the name of your service as parameter:
After the executable for a service is deleted, the service might still be present in the registry. If that’s the case, use the command sc delete to remove the entry for the service from the registry.
Creating a Windows Service with C#/.NET5
February 10th, 2021
Windows Services
Windows Services have been a foundation of Windows since Windows NT. They help users, or system admins, manage long-running programs that execute in their own Windows sessions. It is fairly trivial to set them up and start whenever the computer boots, for example. Since they can be completely UI-less, they provide an interesting approach for tasks that don’t require user interaction, such as looking for directory or file updates, pooling a service, or logging data. Windows itself uses services for many common task that an operating system should do, like Windows Defender , and Windows Update .
This blog post will demonstrate how to build a system file watcher as a Windows service that runs in the background, and classifies images using the WinML model we’ve previously set in my previous blog post.
ASP.NET similarities
If you ever created an ASP.NET Core project, you probably noticed that the default templates create a Program.cs file. This file contains the worldly famous Main method. Actually, most templates create this method, aside from class libraries, which don’t necessarily provide a starting point for your code to execute.
In my last blog post we created a small program that parses the arguments passed down to it and processes one image file, using WinML. For a Windows Service, which must not end its execution straight away, we need to halt the termination of our process until the Windows Service manually is terminated, not only after a single image is processed. We don’t want the Start -> Process -> End flow to exist. To achieve this, instead of using the command line argument to inform a single image file path, we will change our software to expect a Directory path, which we will listen for file changes. Then, whenever a new file is created inside this folder we are watching, we will run our WinML code to move the file to a folder named after its category, recognized by our WinML model.
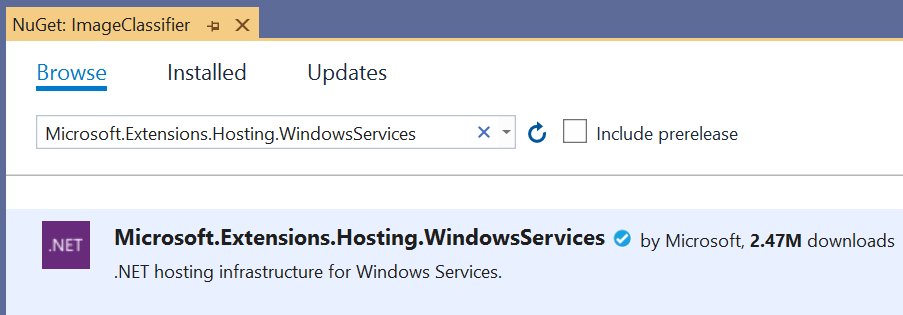
ASP.NET is the most common framework to provide a web service using .NET , but unlike a web service, a Windows Service is not necessarily accessed through the network. It is, still, quite simple to setup a Windows Service that hosts a web service. Since this is a possible scenario, Microsoft provides a NuGet package named Microsoft.Extensions.Hosting.WindowsServices that let us host our .NET process, with or without ASP.NET , as a Windows Service. It automatically provides logging capabilities to the Windows Events, the default output where Windows Services should log information to, as well as automatically logging life-cycle events, such as Started , Stopping and Stopped events. It also provides a helpful method to detect if your process is running as a windows service or not.
Coding, coding, coding!
With this NuGet installed inside our project, we can change our Main method to initialize a Host, which will initialize it as a Windows Service and run it. We’ll move all the WinML related code to a new Worker class, which will act as a hosted service without our host process. The code itself is simpler than it sounds:
As you can see, we are still using the CommandLineParser NuGet package that we’ve used on the last blog post, since we still want to make this software act based on the parameters that we invoked it with. You’ll notice that the CreateHostBuilder method has both the string array parameter, as well as our already parsed and valid CommandLineOptions . We need both, since we want the parsed one and due to the fact that the Host.CreateDefaultBuilder method allows you to pass parameters from the command line to configure it, so we need to pass down the original string array to it.
We start by creating this default builder. We then configure its logging to filter only if the log level is Information or higher, and then we add our hosted service. We also create a singleton with our parsed CommandLineOptions , which allows us to use it inside the ImageClassifierWorker class that is initialized for us by the default builder. We will expect a CommandLineOptions parameter in the constructor of our ImageClassifierWorker which will be automatically injected for us. We are also configuring our EventLogSettings with a LogName and a SourceName . These parameters let us choose where the Events from our logs will be stored. Last, but not least, we are initializing this host as a Windows Service. This last step is as easy as calling the UseWindowsService() method, which configures the host to use the logging properties we just set, as well as setting up automatic logging for the Windows Service lifetime events.
Since this new code will listen to new files in the directory we specify, we need a way to filter the file extensions we want to allow processing. We could hard-code this, but lets simply add a parameter to our CommandLineOptions class, which will easily handle all the parsing for us:
See how easy it is to support our list of extensions? Since these are the most commons ones, we support png , jpg , and jpeg , and all the classes we use to load our image handle these extensions, so we are safe with them. We’ve also updated the HelpText of the Path argument, to better reflect what it actually means.
Now that you understand the structure of our Program.cs , and we’ve updated our arguments, lets look at our new ImageClassifierWorker class, which inherits from BackgroundService :
This is the class that will run our WinML code. The ExecuteAsync method is going to be called automatically for us, so we need a mechanism to keep it from returning, to keep our process from ending. There are many ways to achieve that, specially since we need to return a Task . I’ve chosen a simple one that can be achieved in only 3 lines of code:
This should be at the very end of our ExecuteAsync method. The stoppingToken is passed down to our ExecuteAsync method, and it is an instance of CancellationToken which will be cancelled when our service is requested to stop. See how we are using the _logger object that we stored in our constructor? That is a handy helper that lets us log whatever we want/need. Remember that this code is headless (no user interface at all), so we need a way to know what our code is executing, and that is done through logs.
At the start of our method, we should load our WinML model, pretty much the same way we were doing before:
The interesting code that we are adding here is this:
This creates a FileSystemWatcher instance that will hook up to some Windows events for us, and automatically raise the Created event whenever there is a new file created on the folder we are watching. Notice that we are adding Filters to it, which are mapping to the extension filters coming from our new command line argument.
We are waiting 1000 milliseconds (1 second), before we process the file. The FileSystemWatcher is attached to the Windows events, and is so fast that it will raise the Created event even before the file is closed by whichever process is still creating it. If we didn’t add a Delay, our ProcessFileAsync method would throw an exception:
We could have created a retry logic if we caught this specific exception but, again, this solution is a simplification, and will keep our code simple for this sample.
The ProcessFileAsync method expects a full path to an image file and a confidence float, just like we had before. I’ve just extracted it to its own method. Also, I’ve changed the logic at the end to, instead of just printing the classification to the Console, to move the file to its correct folder:
Notice that the folderName argument passed in our MoveFileToFolder method is the label with highest confidence, returned by our WinML classification model for that one specific image. Therefore, we are moving that file inside a folder with its category name. The whole process is so fast that if you copy and paste an image file into the folder we are watching, it barely stays inside the folder, almost instantaneously being moved to a newly (or existing) folder.
Where is the service?
The next step is to (1) deploy this somewhere, (2) register our Windows Service, and (3) start it!
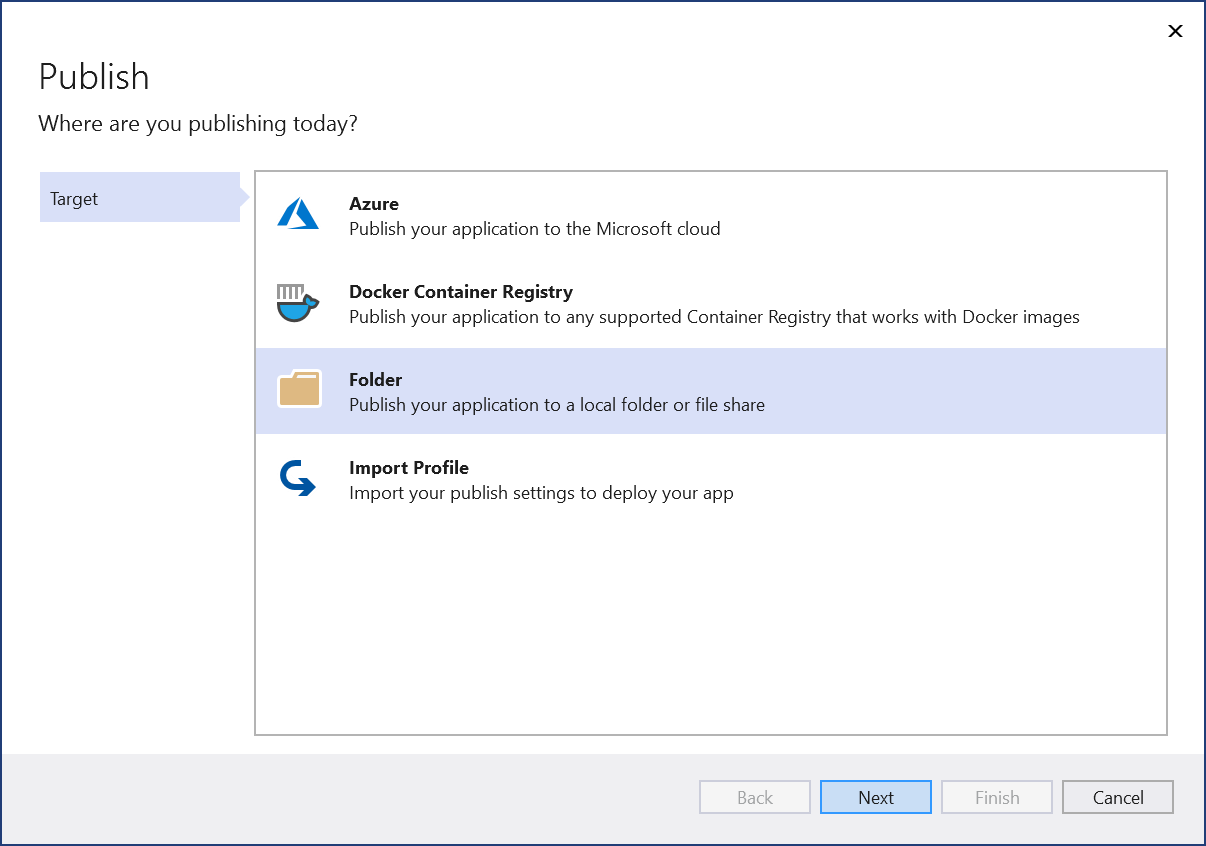
The deployment step is very straight forward. Right-click in our ImageClassifier project, inside Visual Studio, and select Publish . This will let you select where you want to publish it, and since this is a simple .NET5 console application, we can choose between a variety of places. Lets select a simple Folder .
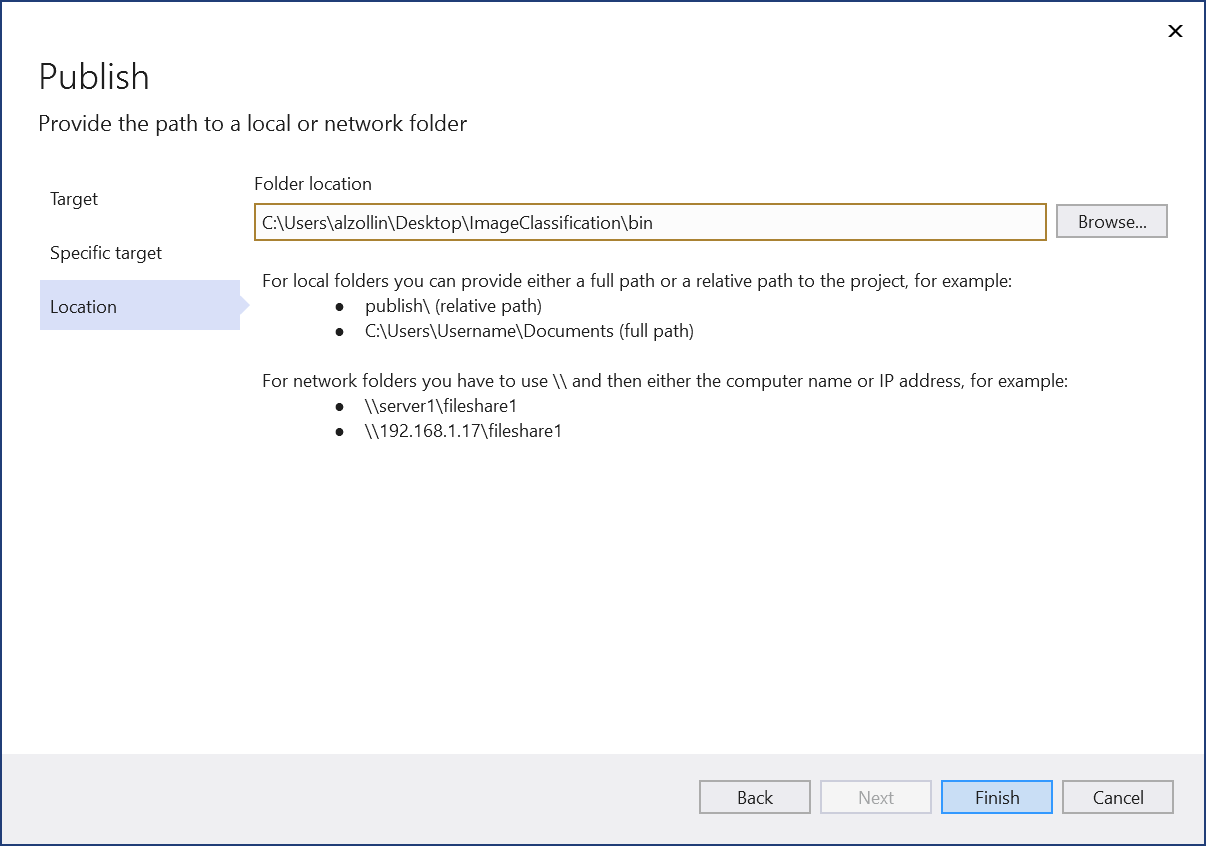
On the next step, just select Folder again and click Next . On the last step, we need to select a path. I’ve chosen a simple folder inside my Desktop, but this could be anywhere you need it to, as long as the user you select to run the service have the proper permissions to execute it.
Click on Finish to create the publish profile, and then on Publish to build our code and deploy it!
You will see that all the files that we need are properly deployed in that folder, so we can now configure our service!
Another way to publish your project is using the dotnet publish command.
Service Controller
Windows Services are managed through a tool called Service Controller, a.k.a. SC . We’ll use one simple command to create a windows service, and we’ll start it manually through the services tab. Remember that you need admin privileges to create a service on Windows, so run an elevated command line to run these commands.
All we need is a name for our service, and which command should be executed (the binary path).
Notice that we are passing the binPath argument in quotes. We are passing our arguments to the executable right after the path, still inside the quotes, which will be handled by our implementation of the CommandLineParser .
Running this command should return a simple message, if successful:
This means our service is created, but not yet running. To run it, lets call the SC command again, but now with different parameters:
This will log some properties on the console, and you will probably read START_PENDING in the STATE , since the SC command will return immediately. The simplest way to check the state of your service is at Windows’s Task Manager . If you never noticed, there is a Services tab:
This means that our service is running! Lets see if it works!
Code in Action!
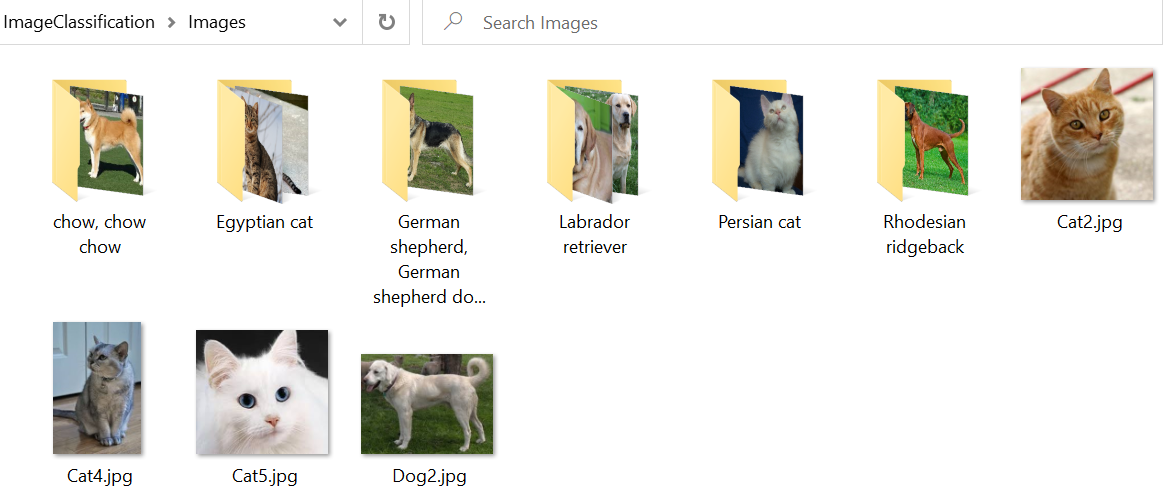
Since I’ve added the C:\Users\alzollin\Desktop\ImageClassification\Images path parameter when I created the service, it will be listening to new files created at that folder. Here is the folder before I do anything:
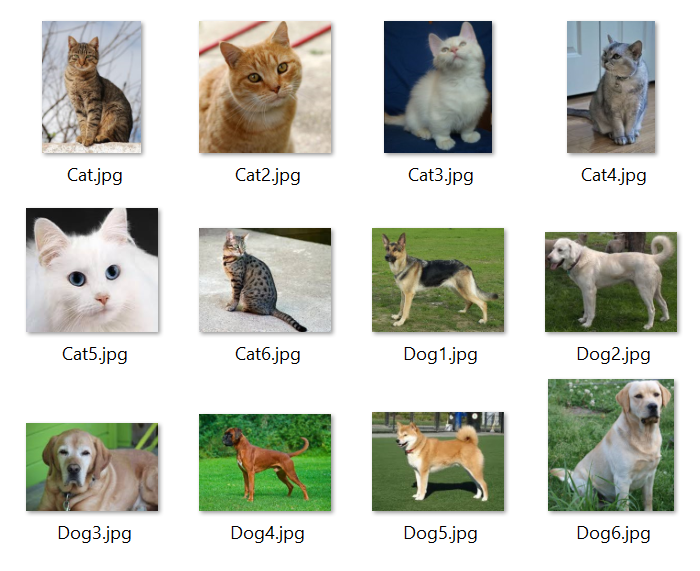
And I’m going to copy all these files at the same time inside this empty folder:
The instant I copy these files over to the Images folder, there will be an intentional one second delay, followed by a refresh of explorer showing all the images already classified:
Notice that some files were not moved, and that is due to our logic that moves them only if the WinML model classified them with a 90% confidence. But how do we know how these files were classified? The answer is the Windows Events.
Event Viewer
The Windows Event Viewer is a tool that helps you read the Windows Logs. Just search on Windows’ start menu for Event Viewer , and the Windows search will show find it. There is also a neat shortcut that I often use: Windows Key + X then V .
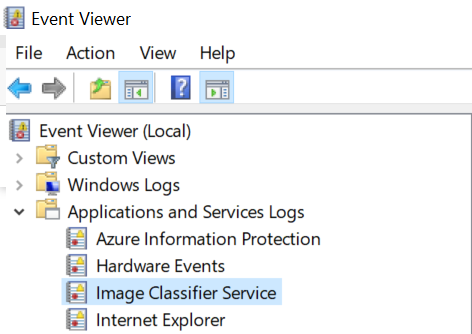
When you open the Event Viewer you will see a tree view on the left side, that categorizes the events. Remember when we configured our LogName , during our process initialization? This is where the log will be, inside the Applications and Services Logs :
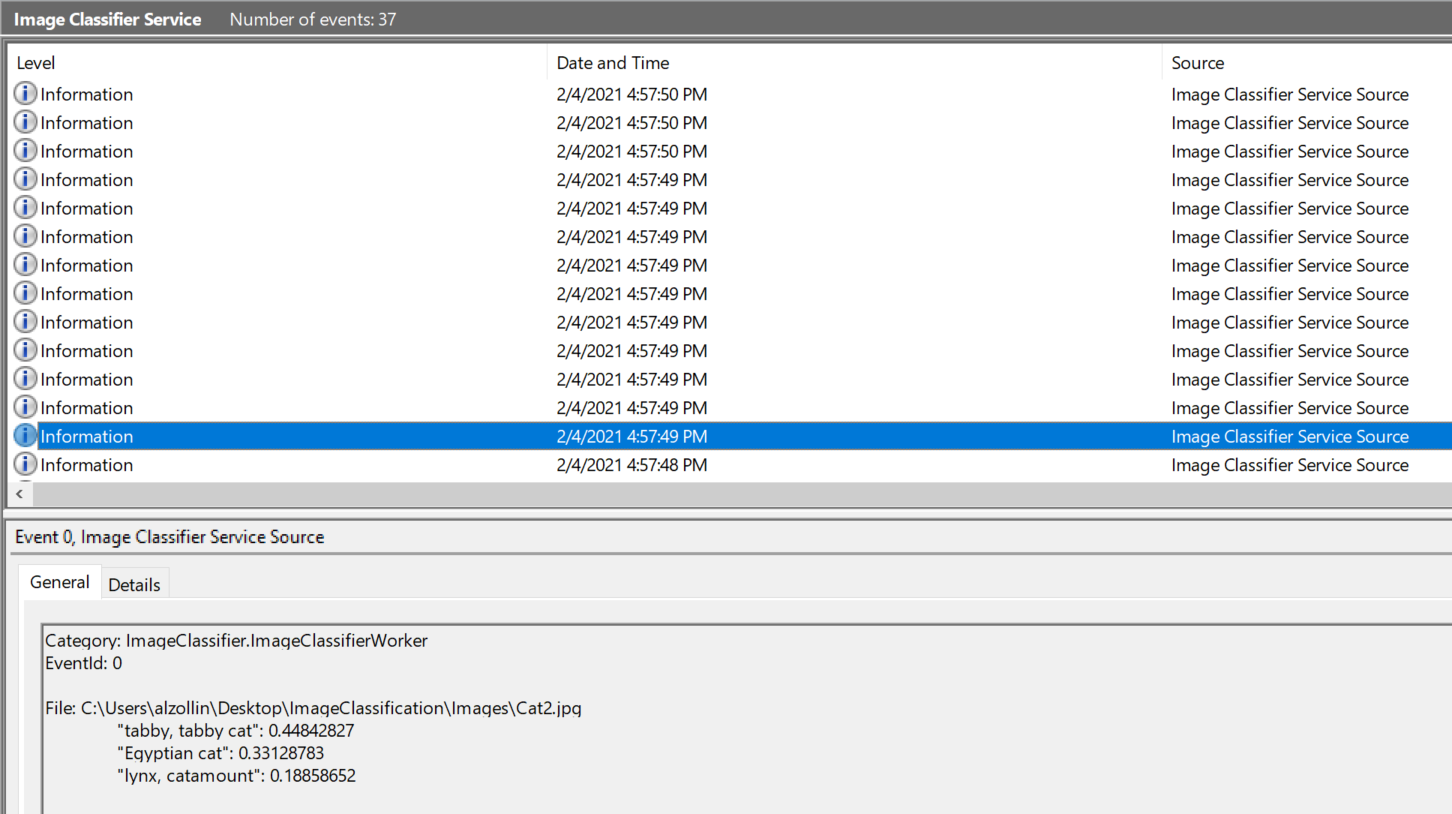
Selecting our Image Classifier Service will show all the events that your service logged under that category, with the Level, Date/Time, and much more:
You can quickly see that the Cat2.jpg file was not moved around since its highest ranked classification was at only about 44% (0.44842827) of confidence, as a “tabby, tabby cat”. Since our default confidence is 90%, the file wasn’t moved. You can easily play around with this service, for example, by dragging images from the browser to that folder to see the logs of how they were classified. Just remember to refresh by pressing F5.
Conclusion
As we were able to show with our fun sample, Windows Services are not extremely complex, if used properly. They allow developers to implement complex scenario with a simple lifecycle management, and C#/.NET5 is a great technology to create them.
Don’t forget to check out the full sample source here.
I hope you enjoyed this 3-part series. You can read the other 2 blog posts here:

